Reminder of where to get help with D2L, Collaborate, and Kaltura at Camosun

Well, it’s a new year, and we are one week into the first term of 2021.  Time for a reminder of where you can get help at Camosun College with all your D2L, Collaborate, Kaltura, and online teaching and learning questions.

First stop, contact eLearning@camosun.ca.  They can help you if you have technical issues with the tools we support.  And they can also forward your questions to an instructional designer in eLearning if your questions require a more detailed meeting.   Note that we will be adding workshops (for Winter and Spring) and drop-in sessions for Winter to our CETL calendar in the next week or two, so stay tuned for more information about these virtual offerings.

Next stop, check out all our eLearning tutorials.  We have a wide range of documents covering D2L, Collaborate, Kaltura, as well as pages dedicated to faculty support for teaching online, and student support for learning online.  Just a reminder, that if you are fairly new to any of our tools, we recommend booking an appointment with and instructional designer to get the basics down (as well as those hidden tips and tricks) and then using the tutorials as refreshers and reminders.

And finally, want to talk more about your course and teaching online?  Contact eLearning@camosun.ca to book an appointment with an instructional designer who will be happy (and thrilled) to talk to you about your course and how best to support your students!

 

Grading Assignments Using Rubrics in D2L

Starting to use Rubrics in D2L?  This tutorial is for faculty who have previous experience using the Assignments tool in D2L, and will walk through attaching a Rubric, grading using a Rubric, and showing you what students see as well. NOTE: Make sure you have created your rubric(s) in the Rubrics tool first!

Steps for Attaching Rubrics to Assignments

  1. Go to the Assignments tool in your course.
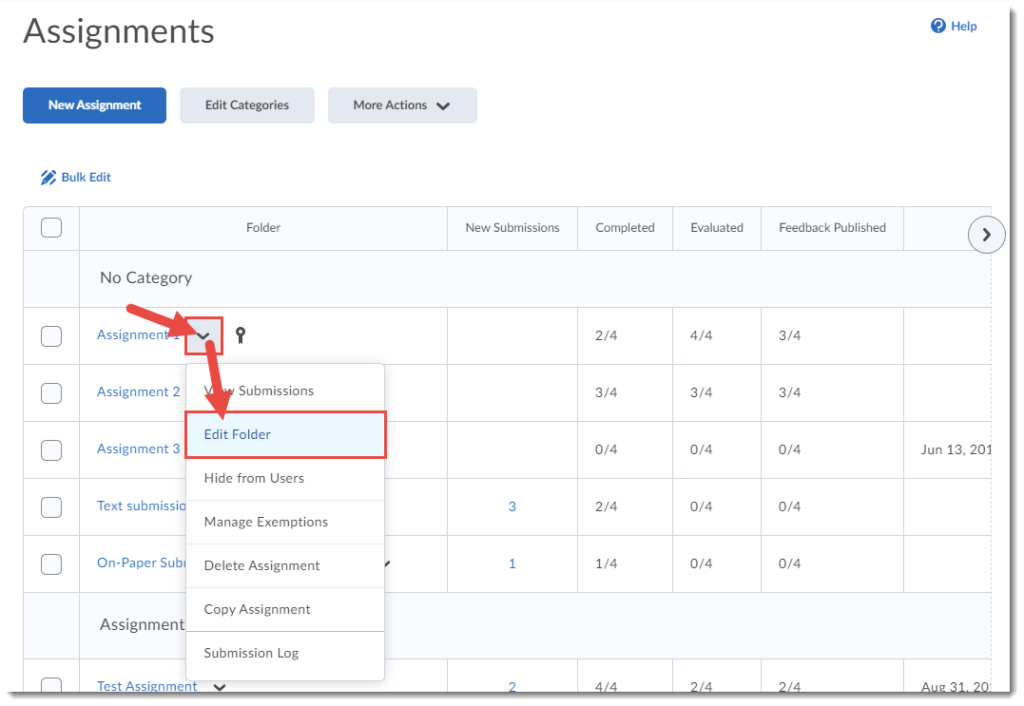
  2. Click the down arrow next to the title of the Assignment you wish attach a Rubric to, and select Edit Folder.Select Edit Folder
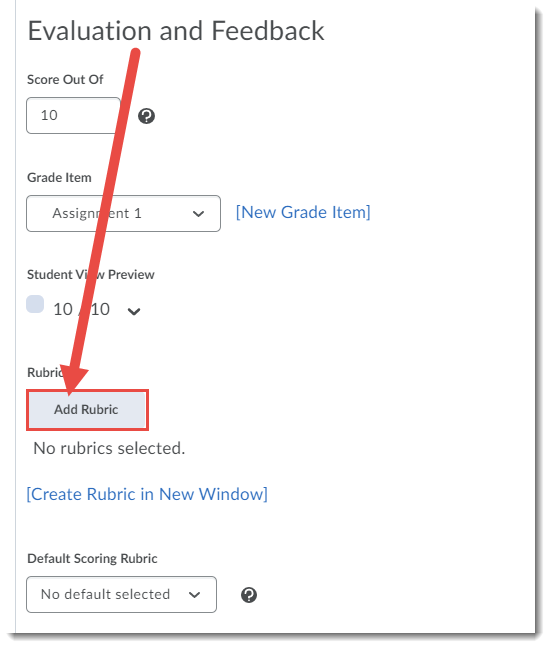
  3. In the Edit Folder area, scroll down to the Evaluation and Feedback area, then click Add Rubric (NOTE: we advise creating your Rubrics in the Rubrics tool first, then attaching them to other tools).Click Add Rubric
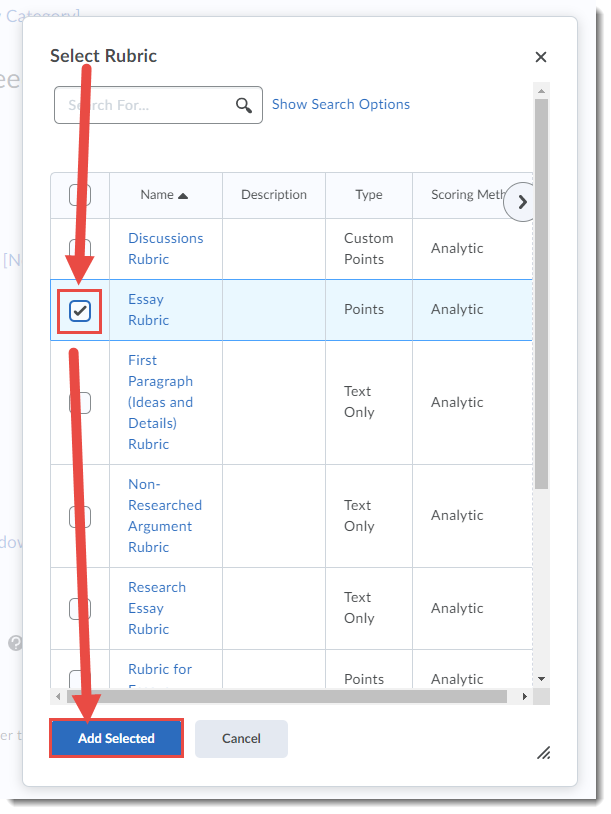
  4. In the Select Rubric pop-up, select the Rubric you wish to attach, and click Add Selected.Select Rubric and click Add Selected
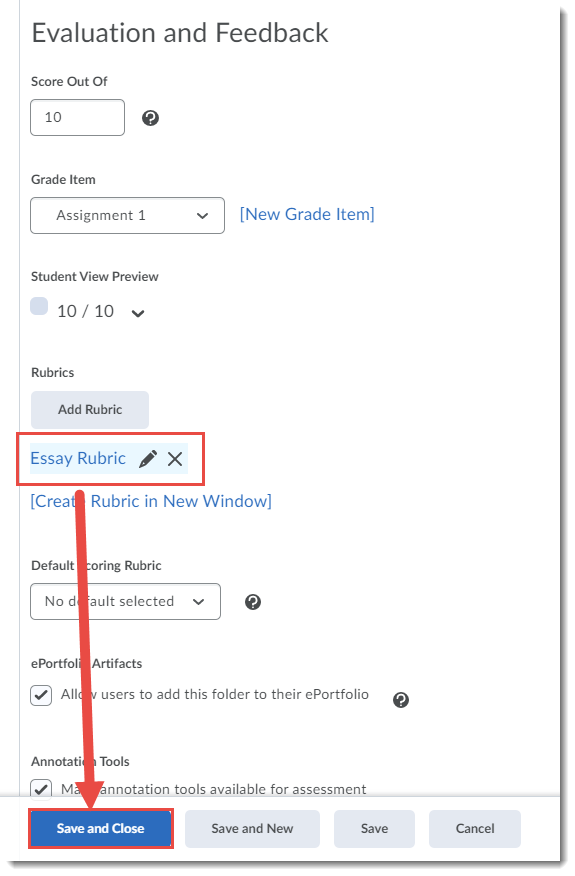
  5. Your Rubric will now appear under the Add Rubric Finish editing your Assignment, and then click Save and Close.Click Save and Close

Steps for Grading Assignments Using Attached Rubrics

  1. Go to the Assignments tool in your course.
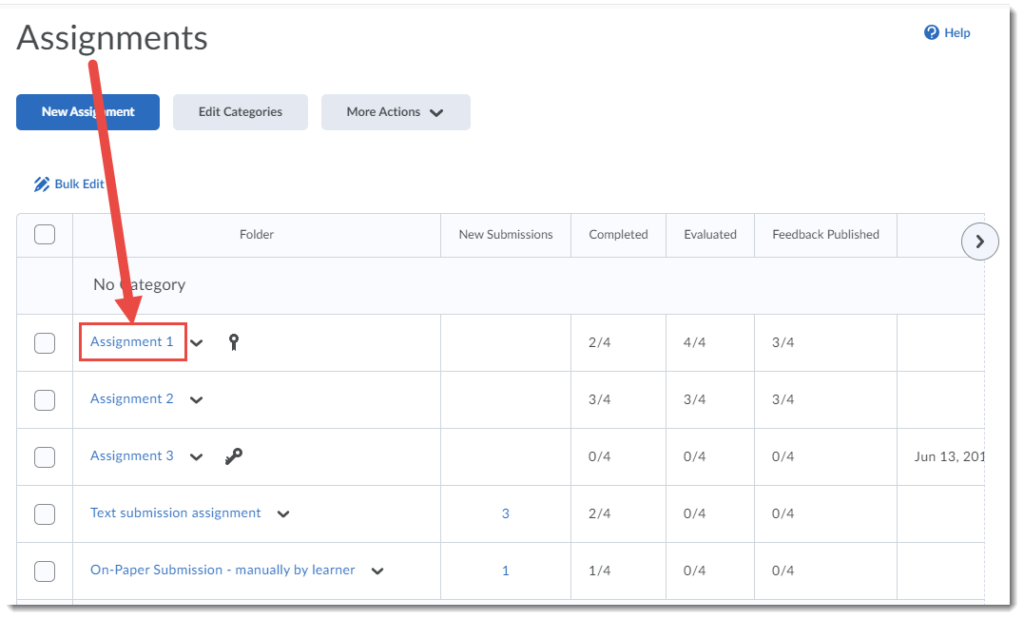
  2. Click on the title of the Assignment you wish to see submissions for.Click the Assignment title
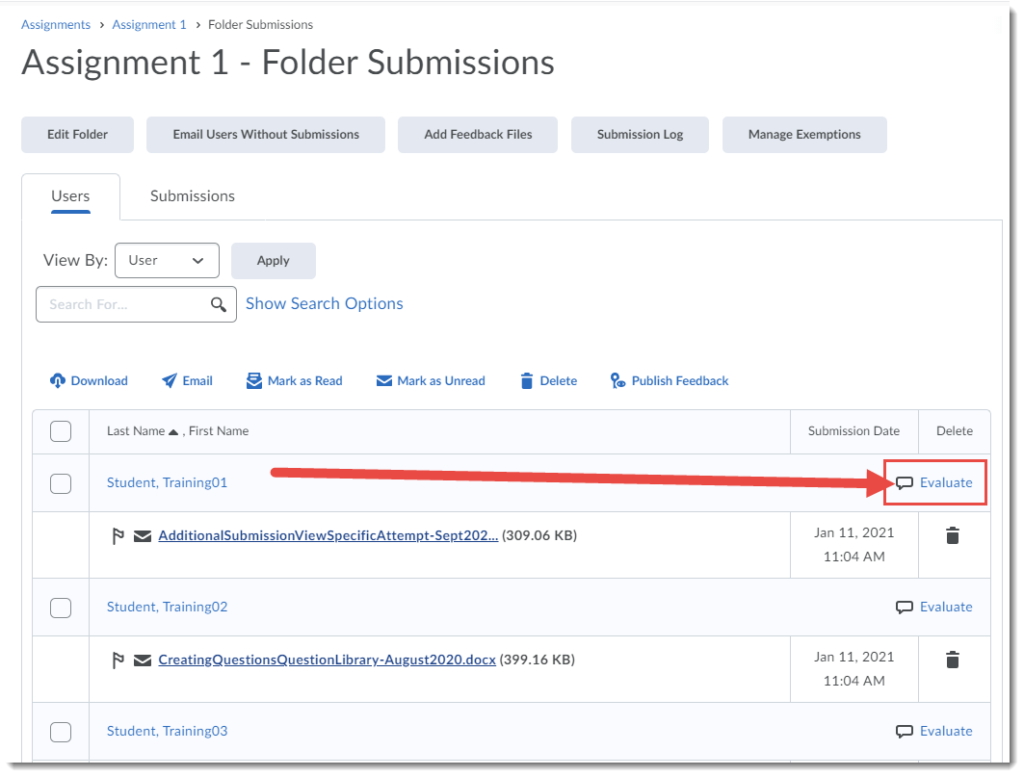
  3. Click the Evaluate link for the student you wish to assess.Click Evaluate
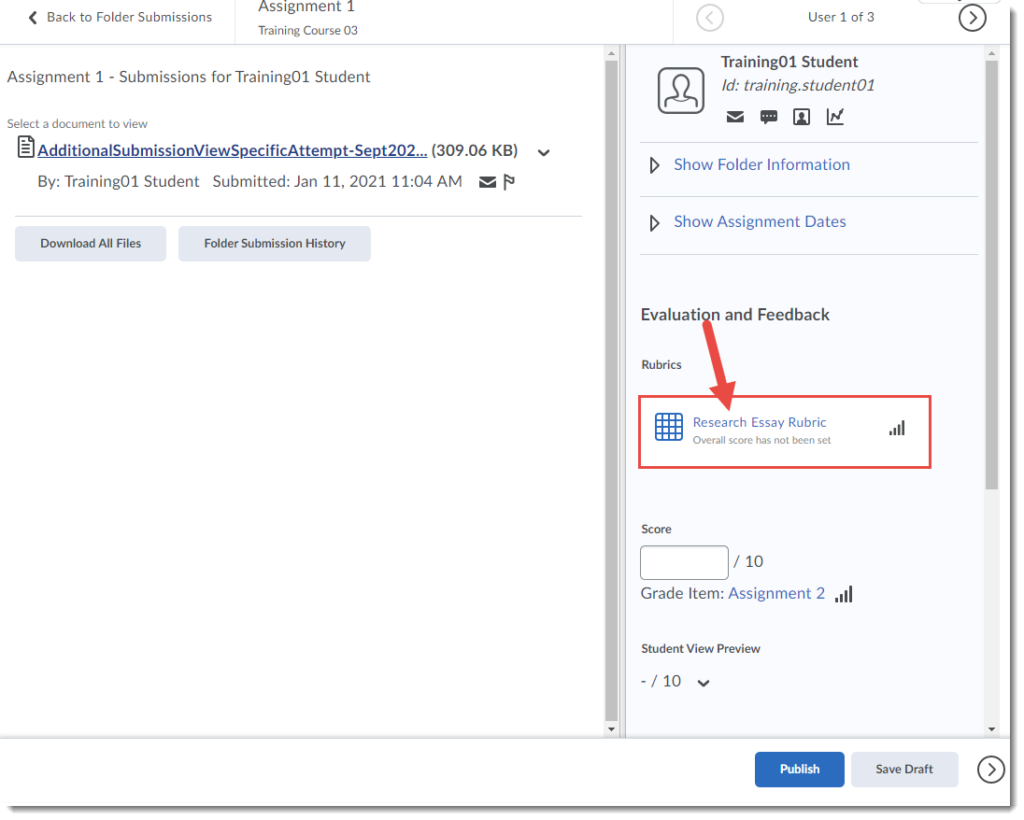
  4. Click the Rubric link under Evaluation and Feedback.Click the Rubric link
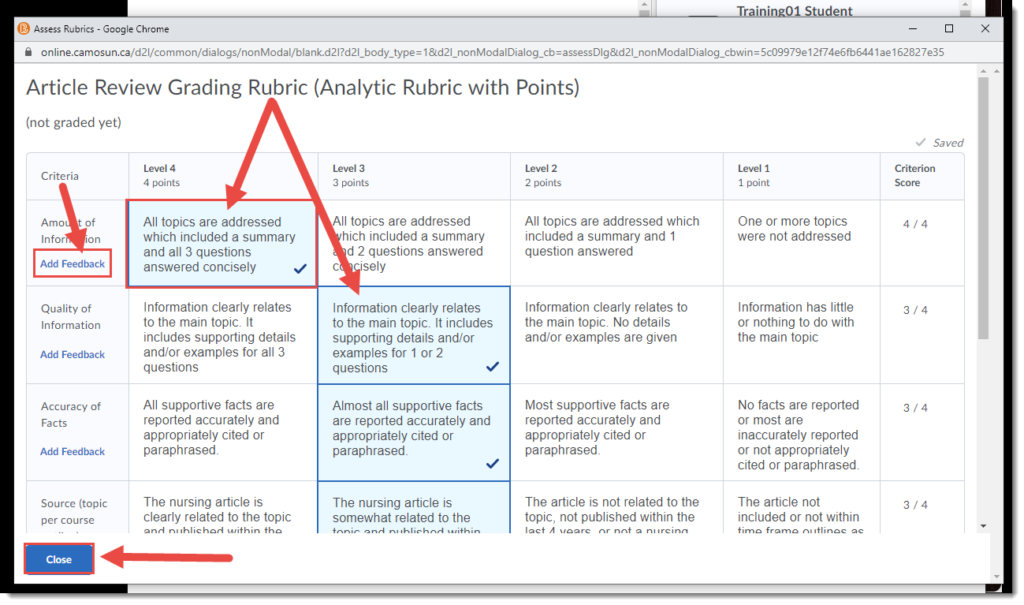
  5. In the Rubric’s pop-up, click the cells for the feedback you wish to leave (checkmarks will appear indicating you have selected those cells), click Add Feedback for any criteria you wish to add custom feedback for, then click Close.Select cells and add feedback, then click Close.
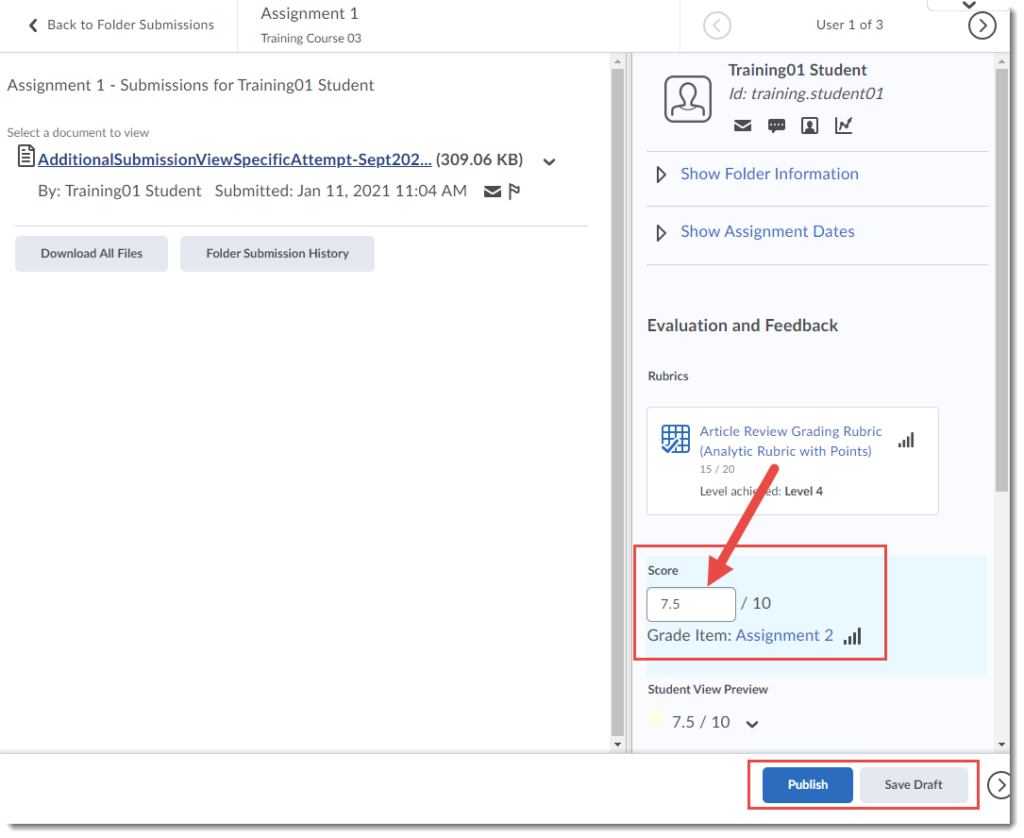
  6. For Points rubrics, the rubric will then automatically generate a grade for the Assignment. Click Publish or Save Draft, and move on to the next student’s assignment.Click Publish or Save Draft

What Students See when Viewing Rubrics in Assignments before Grading

  1. Go to the Assignments tool in your course.
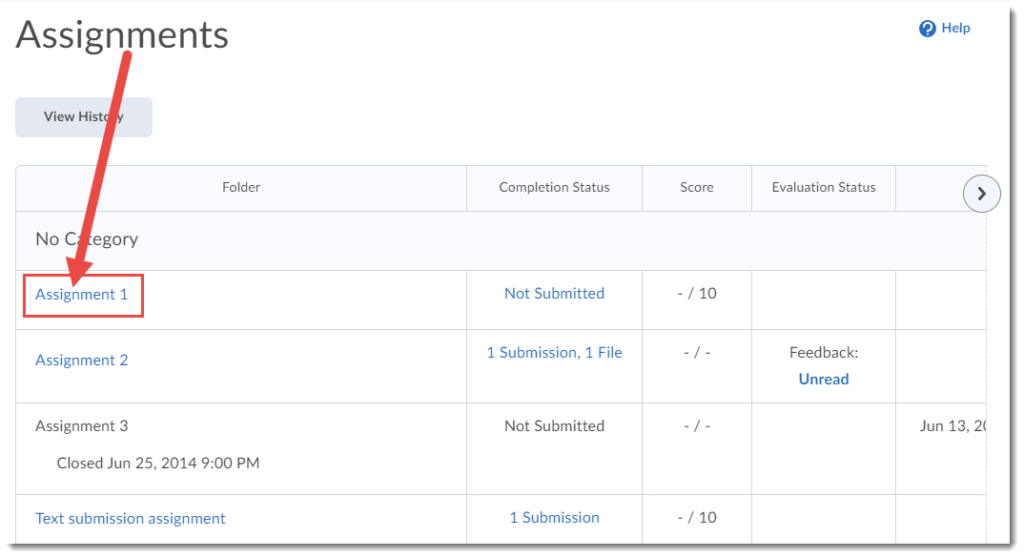
  2. Click on the title of the Assignment.Click the Assignment title
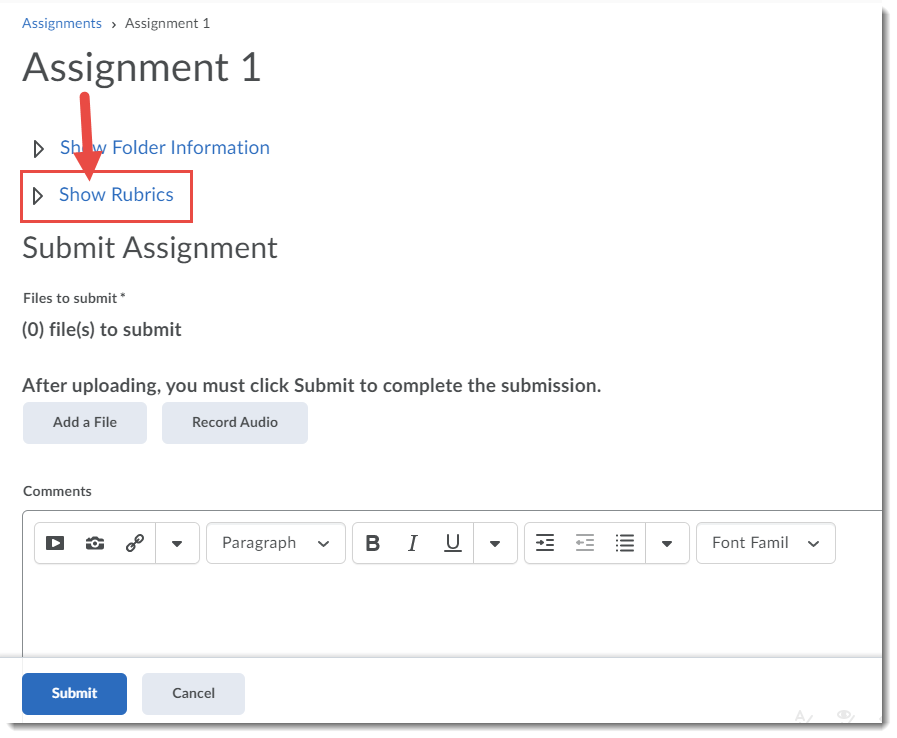
  3. Click Show Rubrics to open the Rubric.Click Show Rubrics
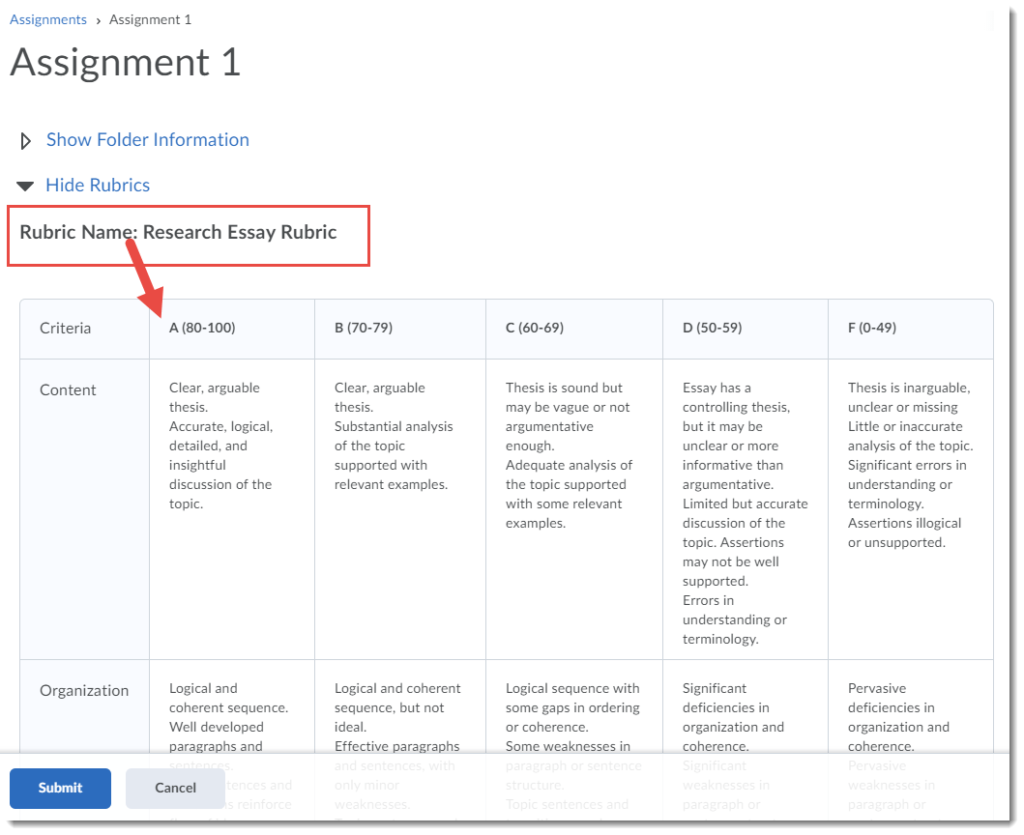
  4. The Rubric will then appear for students to review.Rubric appears for review

What Students See when Viewing Rubrics in Assignments after Grading

  1. Go to the Assignments tool in your course.
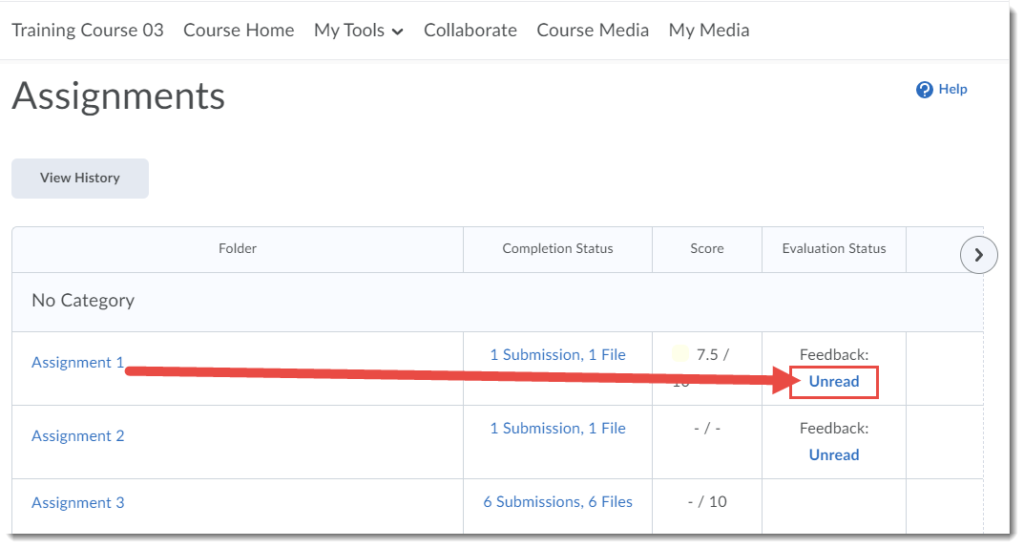
  2. Click link under Feedback in the Evaluation Status column (here the link is Unread).Click the feedback link
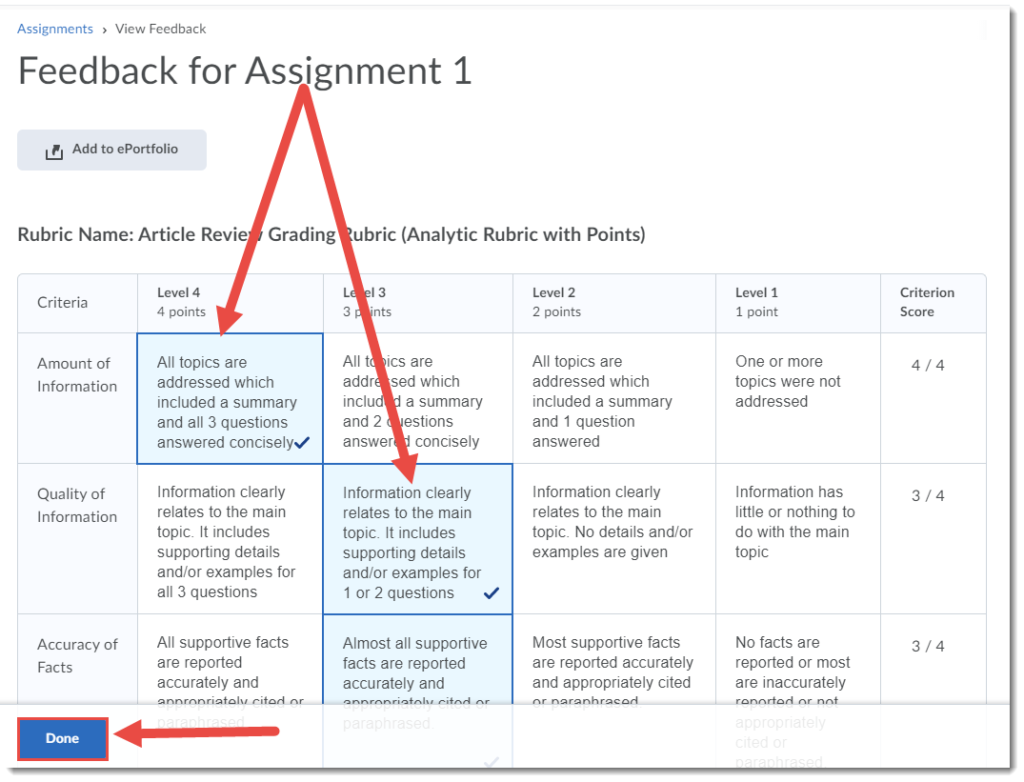
  3. The Rubric will open and students can review their feedback, then click Done.Review feedback and click Done

Things to Remember

Only Points and Percentages rubrics will adjust the score in an Assignment. Text only rubrics will only generate text-based feedback, and you will have to add a score manually in the Submissions area if the Assignment has a grade.

Rubrics in D2L

I wanted to take a moment to update you on where we are at as we begin to create new tutorials for the Rubrics tool in D2L.

Rubrics in D2L can be attached to Assignments, Discussions, or Grades.  When you integrate a Rubric in D2L, the grade you assign on the Rubric automatically becomes the grade for the assessment it is attached to.

There are 2 kinds of Rubrics you can set up in D2L:  Holistic and Analytic.

  • Holistic – Performance is assessed holistically, LEVELS only, with multiple criteria being assessed at once.  For tasks where it is not easy to evaluate performance on one criterion independently of performance on a different criterion. For example, many writing rubrics are holistic because it is not always easy to disentangle clarity from organization or content from presentation.
  • Analytic – Most rubrics are analytic. An analytic rubric breaks performance into multiple criteria. You assess each criterion separately, resulting in an overall assessment score. For example, an analytic rubric for assessing essays could have separate criterion for spelling, grammar, and expression.

Note that once a Rubric has been attached to something (assignment, discussion, grade item) it can NOT be deleted!

So far, we have finished 3 rubric tutorials (which can also be found on our Tutorials site).  Check them out here as well!

Have questions about rubrics, want to know how to add your own rubrics to D2L, or just need some help?  Contact eLearning@camosun.ca to arrange for a consult with an instructional designer.

New feature coming to Quizzes – Import from Question Library into Quiz Section

As some of you may know, the newer Quiz Creation interface has at least one feature that has been driving me personally crazy:   If you create a Section in a Quiz, you can’t import questions from the Question Library directly into that Section. Right now you have to import questions into the root directory (the main page) of the quiz, and then move them into a section. How cumbersome.

Well, no more!

In our next upgrade, happening at the end of this week, you will be able to import questions from the question library into a Quiz Section. Here’s how:

  1. Go to the Quizzes tool in your D2L course, and go to Edit a Quiz.
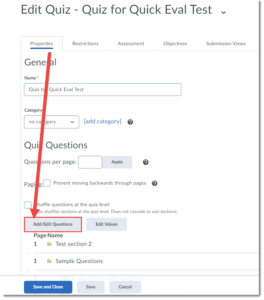
  2. On the Properties tab, click Add/Edit Questions.

    Click Add Edit Questions

  3. Make sure you have added at least one Section (Add a Section).
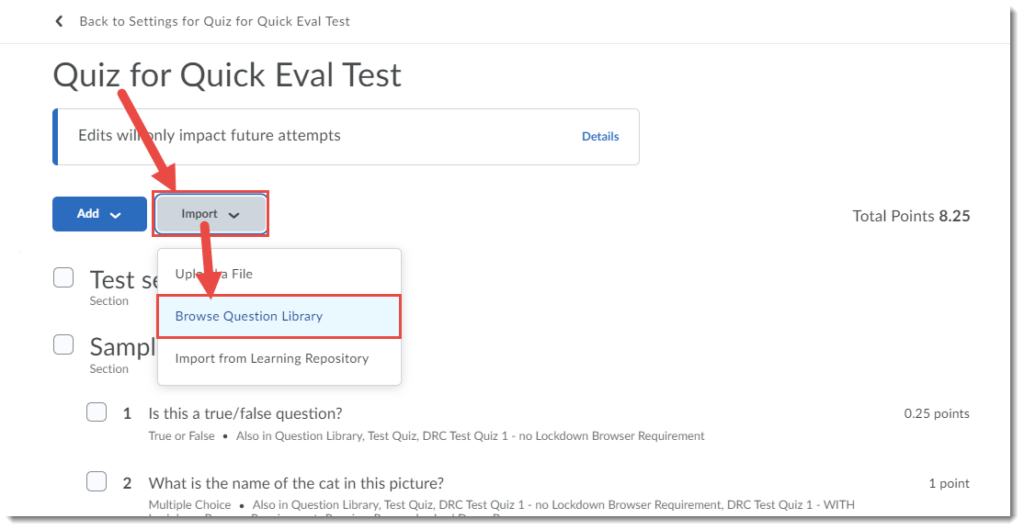
  4. Click Import and select Browse Question Library.

    Browse Question Library

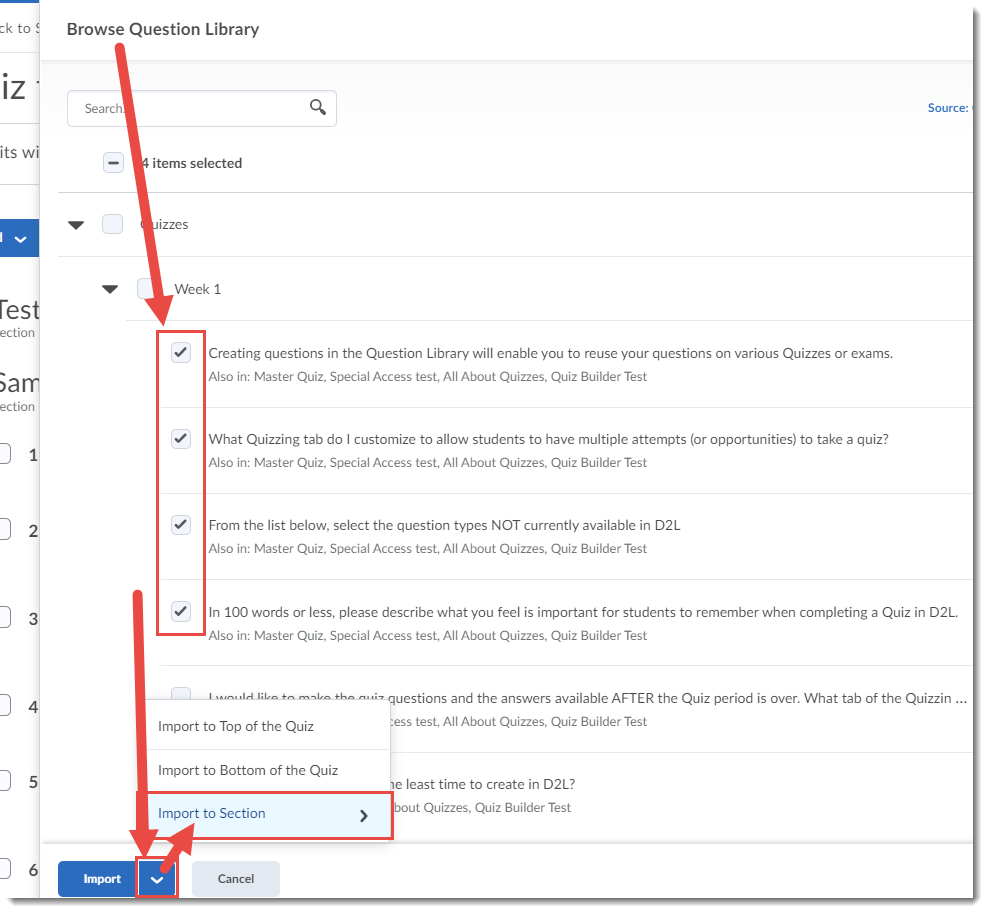
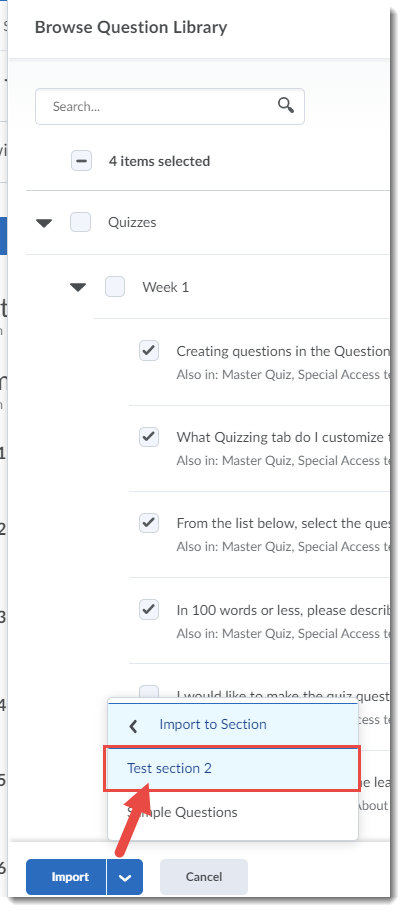
  5. Select the questions you want to import into your Section in the quiz, then click the arrow next to Import and select Import to Section.

    Import to Section

  6. Select the Section you want to import the questions to. They will automatically be imported into that section.

    Select section

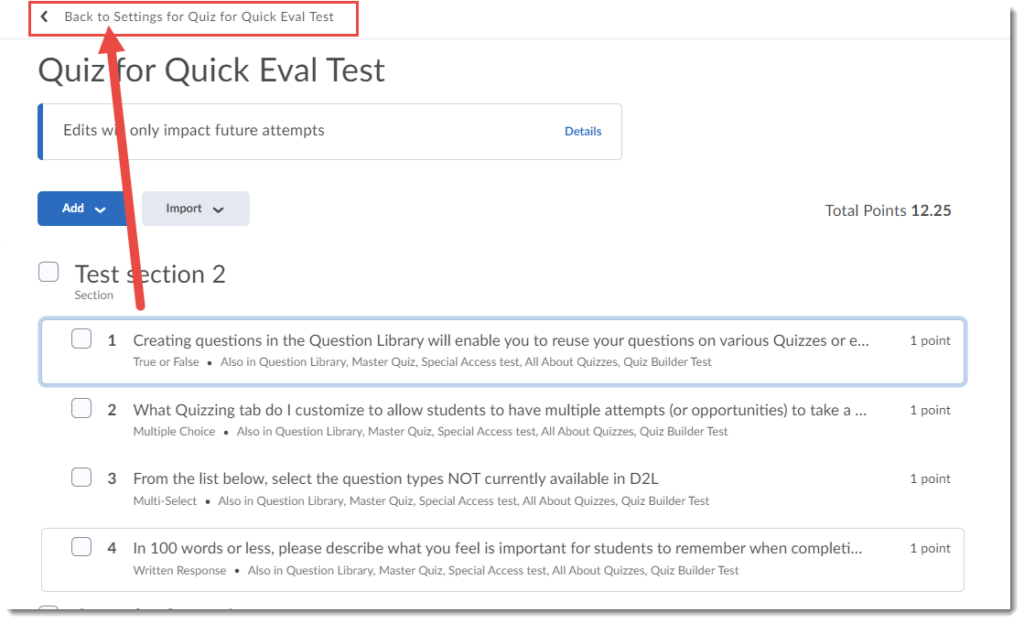
  7. Finish adding questions to your quiz, then click Back to Settings for Quiz …

    Go back to Settings

  8. Finish creating your quiz, and click Save and Close.


eLearning Tutorials – updates and new tutorials being added this month!

This month is “Update eLearning Tutorials and Add New Ones” month for our eLearning Tutorial site (and the On-Demand Training D2L site). We will be updating and adding new tutorials for the next several weeks, so check back on a regular basis.

For example, this week we have been working on a new structure for our D2L tools tutorial pages, and updating/creating new Assignment tutorials. Find out more at eLearning Assignment Tutorials.

And now, I wanted to showcase one of our new tutorials here, which will introduce you to a new Assignment Creation Experience which is available for opt-in in Camosun’s D2L right now. This interface will eventually replace the current interface, so I encourage you to try it out and let us know if you have any comments or problems that we can pass on to D2L.

Using the New Assignment Create/Edit Experience – D2L Tutorial

This tutorial is for faculty who have previous experience using D2L and will cover the basic steps involved when you wish to create an assignment submission folder using the New Assignment Create/Edit Experience interface (opt-in as of August 2020).. For further information, please contact elearning@camosun.ca for assistance.

Steps

  1. Go to the Assignments tool in your course (e.g., through the My Tools drop-down).
  2. Click New Assignment.
  3. You will be given the option to turn on the new Assignment Create/Edit Experience. Click Turn it on to enable it.

    Turn on the new assignment create/edit experience
    If you have previously clicked Leave it off, you can turn it on by clicking the arrow at the top right, and clicking turn it on.

    Click arrow to find the enable settings

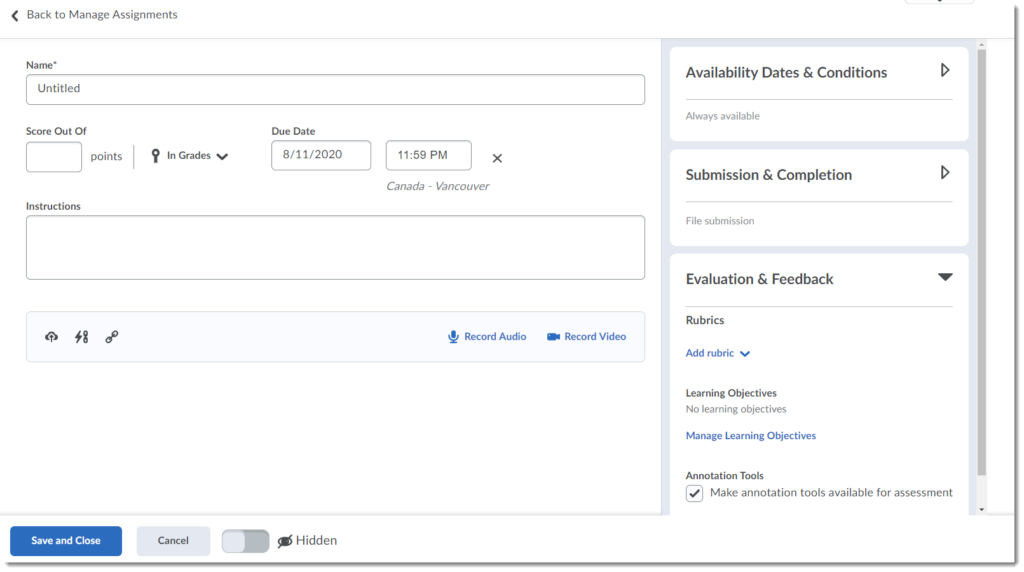
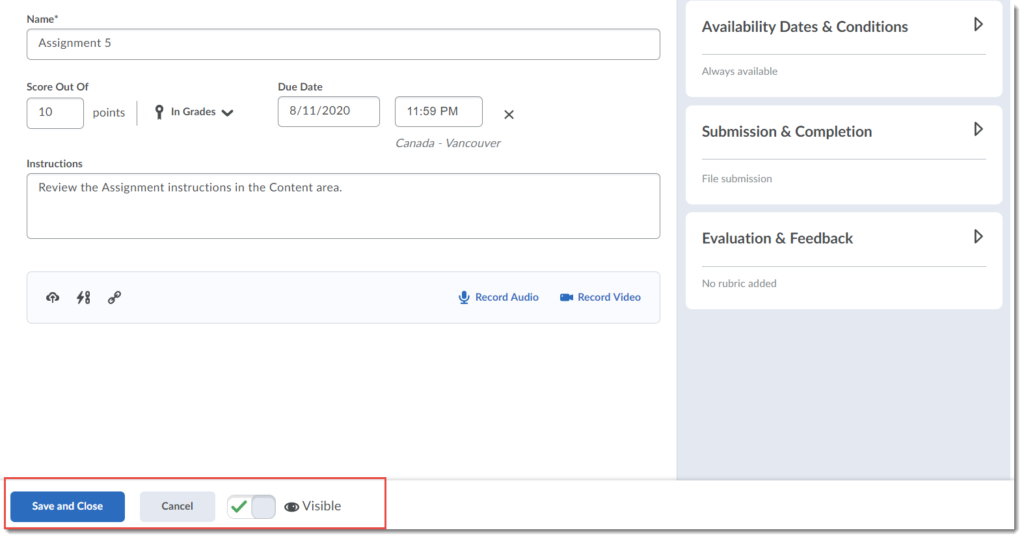
  4. The new creation interface consists of a main area, a side panel, and a bottom set of buttons.  We will look at each area in turn.

    New Creation/Edit interface

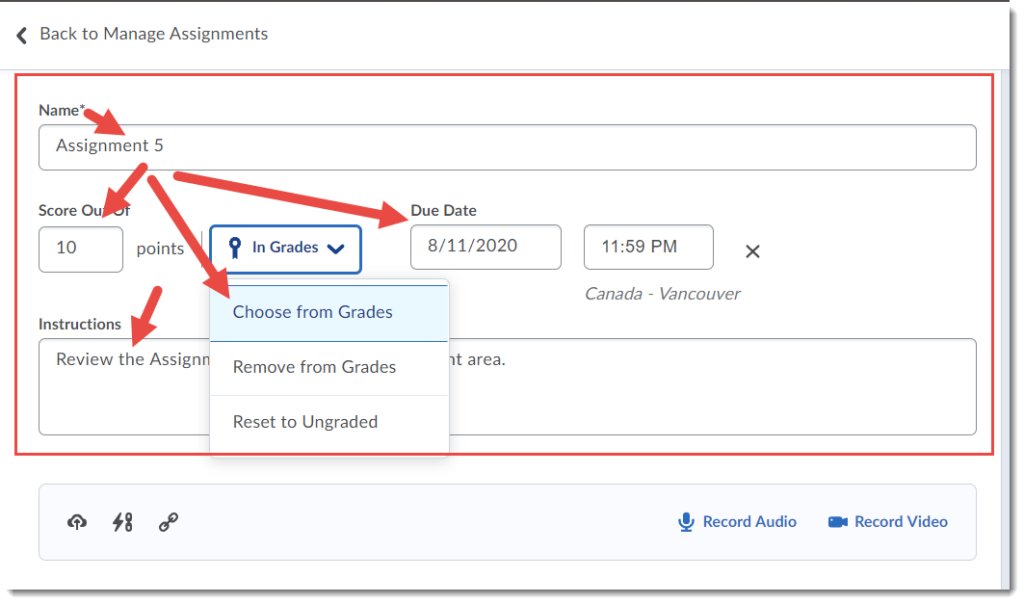
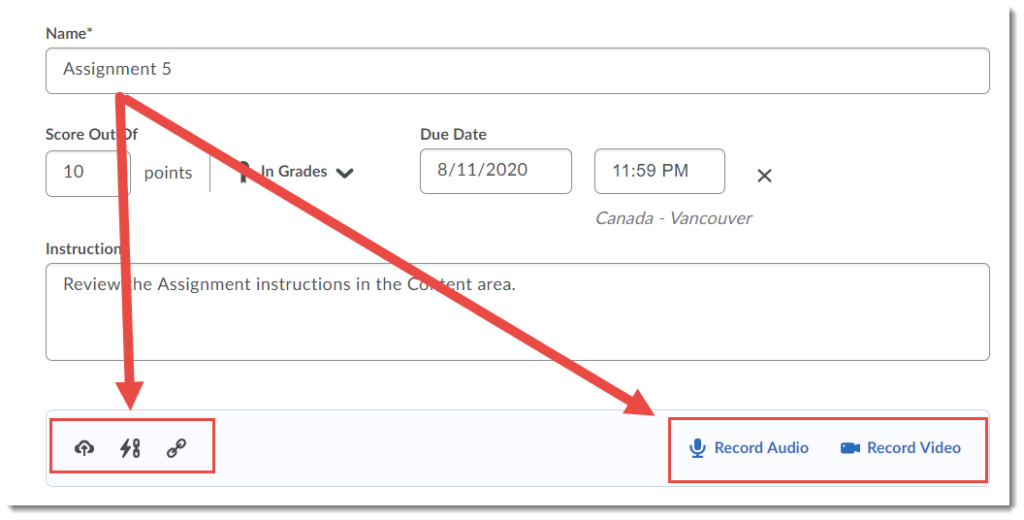
  5. First, the main area. You will need to give your assignment a Name. You can then choose to add a Score Out Of and a Due Date. When you click Score Out Of, you are given the option to connect your Assignment folder to or disconnect it from a Grade Item (Choose from Grades, Remove from Grades, or Reset to Ungraded). You can then add instructions into the Instructions box.

    Add Name, Score, Due Date, Instructions
    Under the Instructions box are options to add additional items such as an instructional document or a template file (File Upload – the first icon), Attach Link to Existing Activity in D2L such as a Content page (the second icon), Attach a Weblink (the third icon) or Record Audio instructions (note that the Record Video option is currently not enabled at Camosun).

    Upload file, attach activity or web link, record audio instructions

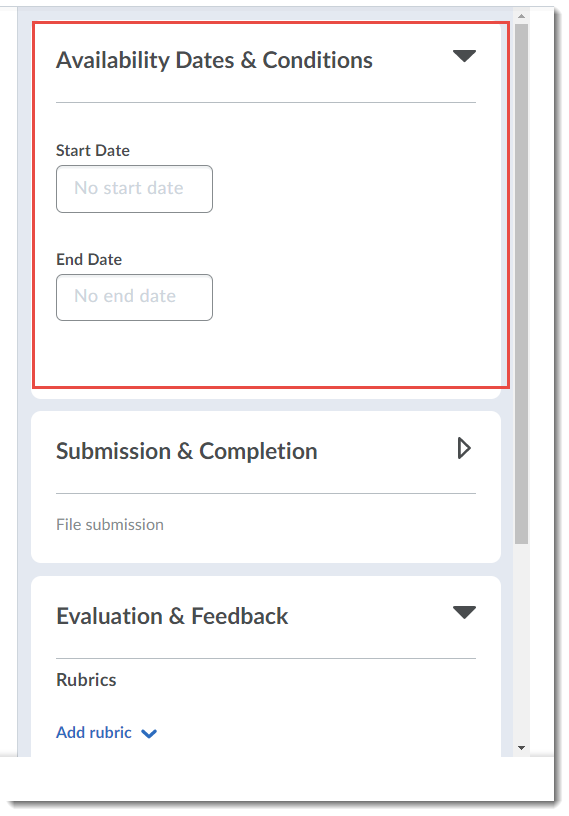
  6. Availability Dates and Conditions allows you to set a Start Date (which opens the Assignment folder) and an End Date (which closes the Assignment folder). As of the August upgrade, you will also be able to attach Release Conditions to the Assignment folder. Special Access is not yet available in the new interface, so if you have students needing special access, you will need to return to the old interface.

    Availability Dates & Conditions

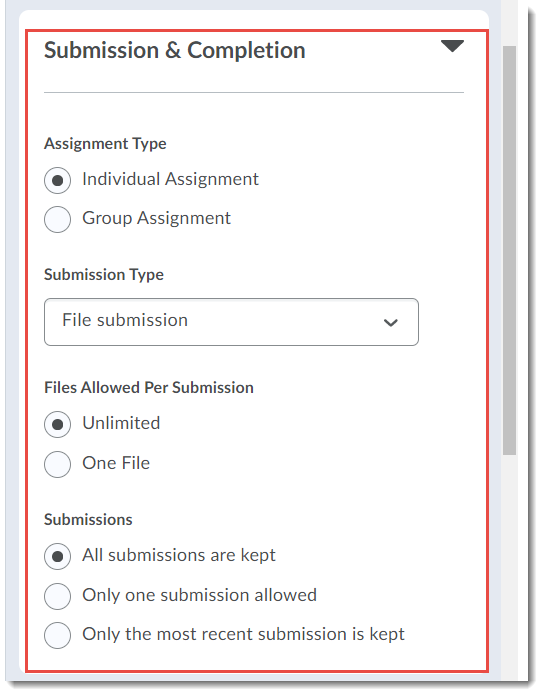
  7. Submission and Completion allows you to set the Assignment folder as an Individual or Group Assignment, and to add your preferred Assignment and Submission Type settings.

    Submission & Completion options

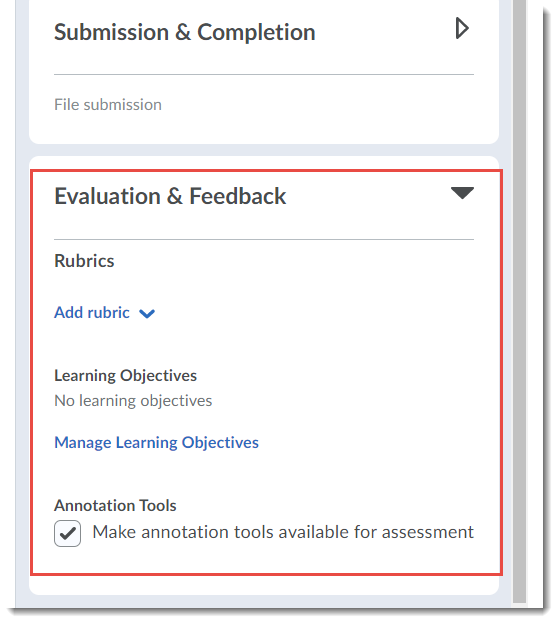
  8. Evaluation and Feedback allows you to attach a Rubric, and select or deselect the Annotation Tools setting.

    Evaluation & Feedback options

  9. Finally, at the bottom you can save your changes, or toggle to make the Assignment folder Visible or Hidden.

    Save, or Hide

Things to Remember

You can turn off and on the New Assignment Create/Edit Experience as needed, but be aware that eventually this new interface will become the default. New features will be added to this interface over the next few months.

Once you have turned on the new experience, any old assignments you have in your Assignments area will open it automatically when you go to edit them.


eLearning Tutorials – Licenced to Share!

Did you know all our eLearning Tutorials were licenced CC-BY? This means that you can take and use, adapt, modify our tutorial documents for any purpose!   So, if you want to take our materials and use or adapt them for your own situation, please feel free! The only thing we ask is that, in addition to attributing us as the original authors, if you make improvements, please send them back to us so we can share those improvements with everyone.

And while I have you here, here are the six Creative Commons (CC) licenses that can be created from the four CC licence elements – note that all six licenses require attribution.

CC BY image  “CC BY” allows people to use the work for any purpose.

CC BY SA image   “BY-SA” allows people to use the work for any purpose, but adaptations must be made available under the same or a compatible license.

CC BY NC image “BY-NC” allows people to use the work for any noncommercial purpose (so, they can’t make a profit from the work or adaptations of it).

CC BY NC SA image  “BY-NC-SA” allows people to use the work for noncommercial purposes, but must be made available under the same or a compatible license.

CC BY ND image  “BY-ND” allows people to use the work for any purpose (even commercially) but NOT to adapt it.

CC BY NC ND image  “BY-NC-ND” allows people to use only the un-adapted work for noncommercial purposes.

For those of you who would like to see an more visual explanation of these elements and licenses, here is a video from censiCLICK (note that this video also explains the relationship between CC licenses and the public domain, which I will talk more about later in this post).

Creative Commons Licenses, Explained