D2L Tool Tip of the Week: Setting Your D2L Email to Forward to an External Email

D2L Tool Tip of the Week: Setting Your D2L Email to Forward to an External Email

This tutorial is designed for faculty who have experience using D2L and will cover the steps involved when you wish have emails coming into the D2L Email tool forwarded to an external email account, for example, to your Camosun email address.  For further information, please contact desupport@camosun.ca for assistance.

Steps

  1. CourseAdmin-ForwardingYourEmail1-700
  2. CourseAdmin-ForwardingYourEmail2-700
  3. CourseAdmin-ForwardingYourEmail3-700

Things to Remember

When you reply to a forwarded email, it will go back to D2L – you don’t have to go into D2L to reply to a forwarded email address.

Note: If you want to have D2L email forwarded to a cloud-based email address (for example, Gmail or Yahoo mail) you will need to inform your student as this is potentially in violation of B.C. Privacy Legislation. For more information, please contact an Instructional Designer at eLearning Development and Support.

D2L Tool Tip of the Week: Customizing your Homepages and Widgets

D2L Tool Tip of the Week: Customizing your Homepages and Widgets

This tutorial is designed for faculty who have experience using D2L and will cover the steps involved when you wish to modify what is on your course’s Homepage and/or create custom widgets for your Homepage. Note that this tutorial presumes you have NOT copied an already modified Homepage from another course. If this is the case, all you will need to do is activate that Homepage.  For further information, please contact desupport@camosun.ca for assistance.

Steps for customizing your Homepage

  1. Edit Course
  2. Click Homepages
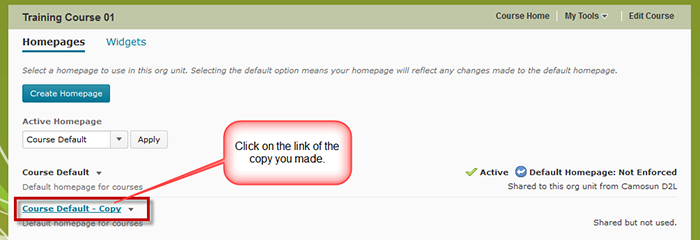
  3. Click the Course Default context menu and select Copy
  4. Click on the title of the copy you made
  5. Edit your Homepage
  6. Activate your Homepage

Steps for creating a custom widget and adding it to your Homepage

Step 1:  Create a custom widget

  1. Click Widgets
  2. Click Create Widget
  3. Enter a Name, then click the Content tab
  4. Add your content and click Save and Close

Step 2:  Add your custom widget to your Homepage

  1. Click Homepages
  2. Click the title of your new Homepage
  3. Click Add Widgets in the location you want your new widget to appear
  4. Find your new widget in the list, select it and click Add
  5. Move the widget if you like, then click Save and Close


D2L Tool Tip of the Week: Customizing your Navigation Bar and My Tools Drop-down Menu

D2L Tool Tip of the Week: Customizing your Navigation Bar and My Tools Drop-down Menu

This tutorial is designed for faculty who have experience using D2L and will cover the steps involved when you wish to modify what is on your course’s Navigation Bar and/or in your My Tools drop-down menu. Note that this tutorial presumes you have NOT copied an already modified navigation bar from another course. If this is the case, all you will need to do is activate that navigation bar. For further information, please contact desupport@camosun.ca for assistance.

Steps

Step 1: Create a Navbar for your course

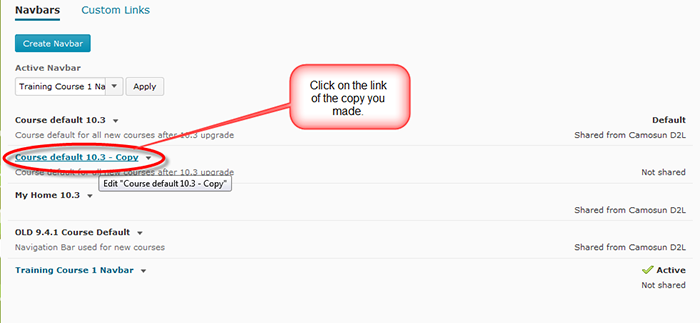
  1. CourseAdmin-CustomizeNavBar1-700
  2. CourseAdmin-CustomizeNavBar2-700
  3. CourseAdmin-CustomizeNavBar3-700
  4. CourseAdmin-CustomizeNavBar4-700
  5. CourseAdmin-CustomizeNavBar5-700

Step 2: Create a custom My Tools drop-down menu for your Navbar

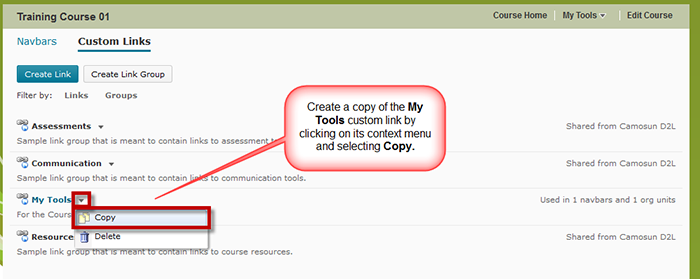
  1. CourseAdmin-CustomizeNavBar6-700
  2. CourseAdmin-CustomizeNavBar7-700
  3. CourseAdmin-CustomizeNavBar8-700
  4. CourseAdmin-CustomizeNavBar9-700

Step 3: Add your custom link to your Navbar

  1. CourseAdmin-CustomizeNavBar10-700
  2. CourseAdmin-CustomizeNavBar11-700
  3. CourseAdmin-CustomizeNavBar12-700
  4. CourseAdmin-CustomizeNavBar13-700
  5. CourseAdmin-CustomizeNavBar14-700
  6. CourseAdmin-CustomizeNavBar15-700

Step 4: Activate your Navbar!

  1. Finally to activate your new Navbar, click on Navbars one more time.
  2. CourseAdmin-CustomizeNavBar16-700

Things to Remember

The edits you make to your Navbar and My Tools drop-down menu will only appear if you have activated your Navbar. Check this first if your NavBar changes do not appear.

Once you have created a new Navbar, you can copy it into other courses. If you do this, the only thing you will have to do is activate it in the new course.


D2L Tool Tip of the Week: Copying Course Components from One Course to Another

D2L Tool Tip of the Week:  Copying Course Components from One Course to Another

This tutorial is designed for faculty who have previously taught using D2L, and who will be teaching in a future term and would like their new D2L course site to be set up with the same structure (content, news items, quizzes, dropbox folders, grade book, etc) as their previous D2L course site. It is also for those faculty who have been working in a development course and are now ready to move their materials and activities into their live course. For further information, please contact desupport@camosun.ca for assistance.

Steps

  1. Go to the Course Home of the course you want to copy INTO.
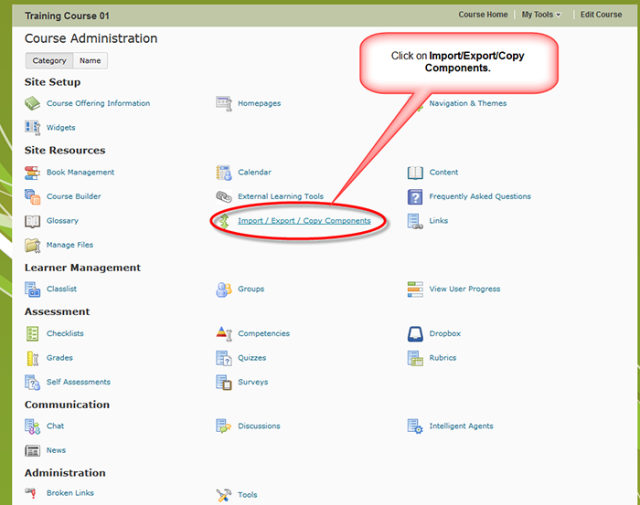
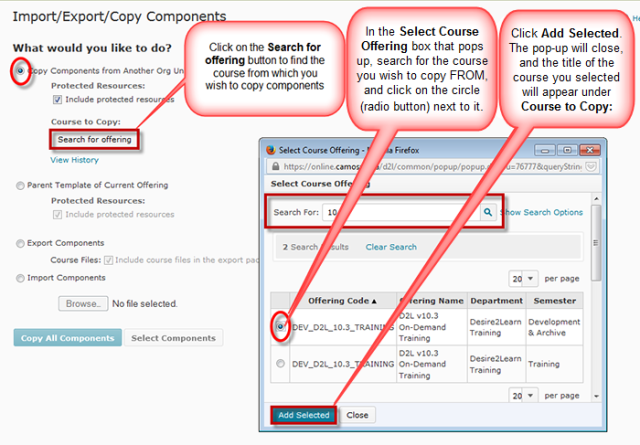
  2. CourseAdmin-CopyCourseComponents1-700
  3. CourseAdmin-CopyCourseComponents2-700
  4. CourseAdmin-CopyCourseComponents3-700
  5. CourseAdmin-CopyCourseComponents4-700
  6. If you Selected Components,

    CourseAdmin-CopyCourseComponents5-700
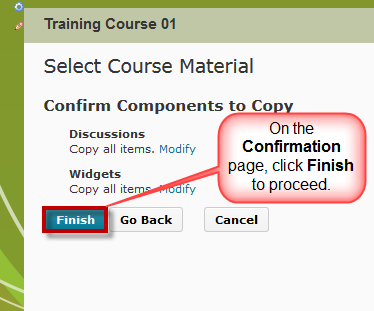
  7. CourseAdmin-CopyCourseComponents6-700
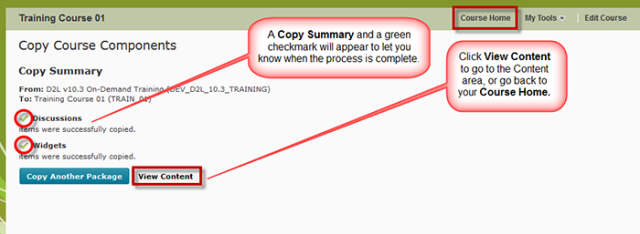
  8. CourseAdmin-CopyCourseComponents7-700