How do I create groups students can self enrol into?

d2l2w
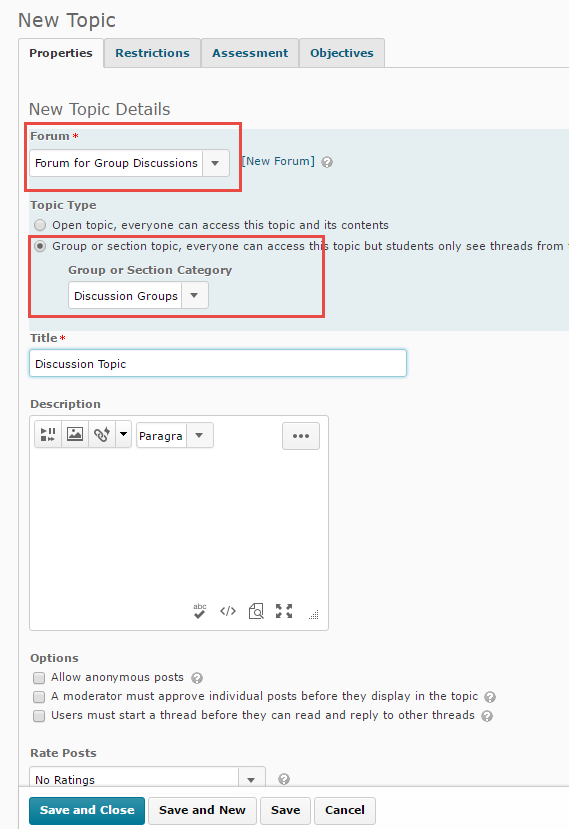
Here’s a topic from the Working with Groups in D2L workshop:  Did you know that you can have students self-select into groups?

Why might you want to do this?

Well, imagine a scenario where you had a variety of possible topics for group discussion and/or group presentation or assignment submission, but you wanted to give students the option of choosing which topic they wanted to contribute to and work with. Use one of the self-enrolment options to create a set of groups, one for each topic, and let students choose which one to enrol in!

The group self-enrolment options you have in D2L are:

  • Groups of # – Self Enrolment
  • # of Groups – Self Enrolment
  • # of Groups, Capacity of # – Self Enrolment

Groups enrolment options

Note that after they self-enrol in a groups, students will have the option of leaving one group and enrolling in another if they change their mind about which group they want to work with.

Also note that in each case, you can set a self-enrolment expiry date and ask D2L to enrol any student who has not self-enrolled into a group into a group automatically (select Set Self Enrollment Expiry Date, and Allocate unenrolled users after Self Enrollment Expiry Date). In addition, once this date has passed, students can no longer leave one group and enrol in another.

Let’s look at each of these in turn.

Groups of # – Self Enrolment

With this option, you would be telling D2L how many students should be in each group. How this works is that students will enrol themselves in the group they want, and when it is full it will no longer be open for enrolment. The number of groups initially created will be the number of students in the course divided by the maximum number of students each group can contain (you can add additional groups later if you like) This is a good option for when you want to control the maximum number of students in each group.

*Note: If students are not enrolled in your course site yet, then only one group is initially created. You can use the Edit Category page to add additional groups. You might want to add additional groups even if students are already enrolled to ensure all students have options when forming groups.

# of Groups – Self Enrolment

With this option, you would be telling D2L how many group you want in this category. How this works is that students will enrol themselves in the group they want. Remember that this option is based on an established number of groups, so you may end up in a situation where more students enrol in one group than in the others.

# of Groups, Capacity of # – Self Enrolment

With this option, you would be telling D2L both how many groups there should be AND how many students should be in each group. How this works is that students will enrol themselves in the group they want, and when it is full it will no longer be open for enrolment. You will need to make sure that you have the right number of groups for the number of students in your class (given the group number limit you have assigned).

Here is what these self-enrolment options look like to students:

Student View of self enrolment options

facsupp_id2

Want to know more? Contact desupport@camosun.ca to book an appointment with an instructional designer!

How do I create a Contact Information Widget for my D2L Homepage?

d2l2wHere’s a topic from the Customizing Your Homepages and Widgets workshop: did you know that you can create a widget on your homepage with your contact information in it?

Need a place to let students know when, how, and where they can contact you with questions? Afraid that they may have lost the information you handed out to them in class? Why not create a Contact Information Widget on the homepage of your D2L course site!

A widget is a box that appears on the Homepage of your D2L course site. It can be a box for a tool, like the News or the Calendar widgets, or a box containing information, like a Contact Information widget.

Creating a Contact Information widget is easy – so let me walk you through the steps here! Note that this is not a complete tutorial, and it presumes you have some familiarity with D2L. If you have any questions about this process, or get lost at any point, contact eLearning (desupport@camosun.ca) to arrange to meet with one of our instructional designers.

The first thing you need to do is click on the Edit Course link on your D2L course Homepage.

Click Edit Course

Then click on Widgets.

Click Widgets

Click Create Widget.

Click Create Widget

You will need to give your new Widget a name, perhaps something like “Contact Information”? Then click on the Content tab. Note that information added to the Description box on this Properties tab will NOT be seen in the Widget. It is the Content tab that contains the information you wish students to see.

Add a Name for your Contact Information Widget

Once you are on the Content tab, you can enter the information you wish students to see in your Contact Information widget. Since you are entering informaiton in the HTML editor, you also have the option of adding a picture, as well as links to another website. When you are finished entering your information, click Save and Close.

Add your information on the Content tab

You will then need to add your widget to your D2L course Homepage so students can see it. To do this, click Homepages.

Click Homepages

Click on the title of your active Homepage. If you can’t click on the title, you will need to copy the default, activate it, and then edit the copy. You can find out how, but reading this blog post: D2L Tool Tip of the Week: Customizing your Homepages and Widgets.

Once you are on the editing page for your active Homepage, you can add your widget to one of the widget areas (see below) click Save and Close.

Add your Widget to your homepage

When you go back to your Course Homepage, you will see your Contact Information widget.

To edit it, click on the down arrow and select Edit this Widget.

Click Edit this Widget to edit your widget

To move it to another location on your Homepage, go back to Edit Course –> Homepages and edit your active Homepage.

An there you have it – a Contact Information widget that you can copy to any course you have access to, and change as you need!facsupp_id2

More questions about D2L and customizing your homepages and widgets? Contact eLearning (desupport@camosun.ca) to arrange a meeting with an instructional designer at Interurban or Lansdowne!

UDL SLAM 2016 Stories | SLAM Story #3: School of Nursing

In October 2016, the eLearning unit in CETL hosted Camosun’s first “UDL Slam.” Faculty and staff were invited to share stories about practical applications of UDL (Universal Design for Learning) Principles they have implemented in their courses or programs. The “Slam” format required that these stories include the following details and be told in 5 minutes or less:

  1. The specific barrier to learning;
  2. The solution applied to address this barrier;
  3. Some assessment of the solution to date.

Darlaine Jantzen

Joan Humphries Karen FoxallIn this third in a special series of posts, we give you a resourceful example of UDL in practice at a program level. This initiative out of the School of Nursing was spear-headed by Darlaine Jantzen (Program Chair), implemented with the assistance of Karen Foxall (Program Assistant), and was presented at UDL Slam 2016 by Joan Humphries (Associate Program Chair).

At the bottom of this post, we have included our own mini-analysis of which UDL Principles & Guidelines underpin the School of Nursing’s solution to a barrier that presented risks to accessing applied learning opportunities throughout the program.

Barrier: Intuitive, Consistent & Sustainable Orientation for New Students

Each fall, the BSN Program welcomes around 160 new students, all of whom need to become immediately oriented to not only the program itself but also to some fundamental expectations of professional Nursing practice. Those expectations include 13 different documents (certifications, credentials, etc.) that each student is required to complete and submit in order to be eligible for the practicum placements that are the cornerstone of the program; students who do not provide the required documentation cannot work in practicum locations.

In the past, the faculty teaching first-term courses were made the point-people for collecting the hundreds of pieces of required documentation from their students and tracking outstanding pieces – while also managing responsibilities inherent to delivering first-term curriculum. The communication about these requirements also largely fell to the 1st-term teaching-faculty to manage, so attendant issues included inconsistencies between each faculty member’s approach to messaging and managing the process. Finally, the previous process did not allow students to access and submit all documentation electronically, creating additional challenges for the tracking of these required documents and presenting constant concerns about lost forms and repercussions for student learning opportunities.

In sum: the previous process made it difficult for students to get consistent information about fundamental program requirements, lacked a central point of contact for them to get clarification and support, was entirely paper-based, and added an enormous administrative workload on top of the teaching responsibilities of 1st-term faculty.

Solution

In an effort to minimize student confusion about expectations and goals, avoid losing essential documents, and relieve 1st-term faculty of administrative responsibilities on top of their existing teaching load, the BSN Program decided to centralize the program orientation (now known as the “BSN Primer”) into a dedicated module in all first-term course D2L sites. Program Assistant, Karen Foxall, was made the primary point-person for the BSN Primer; she became the consistent point of contact for questions students had about the orientation and also took over tracking their successful completion of the BSN Primer requirements.

By integrating the BSN Primer into D2L course sites, new students have the additional benefit of becoming familiar on Day 1 with common D2L functions that they will encounter throughout the program (e.g. Dropboxes, Quizzes, Content, etc.)

And finally: the old paper-based process that was both clunky and risky, was replaced by a fully digital process. All forms were converted into electronic format and students now submit their materials online via task-specific Dropboxes in D2L. This allows the Program Assistant to easily retrieve all completed documents and confirm student completion at a glance.

Example Sections from the New BSN Primer

The BSN Primer is organized around 4 primary themes that orient students to both the expectations of the program and their professional practice:

  1. Presenting & Preparing Yourself for Classes
  2. Preparing Yourself for Registered Nursing Practices
  3. Consent Forms
  4. Confidentiality: Yours and Others.

Below are screen-shots of two of these sections. These sections include: instructions for students, electronic copies of required forms, Dropboxes for form submissions, and short “quizzes” or checklists used to confirm that students have completed all of the requirements for that section.

BSN Primer Example 1: Preparing Yourself for Registered Nursing Practice

BSN Primer Example 2: Confidentiality: Yours and Others

Benefits

Primary benefits:

  1. Consistent messaging and support; accountability. With Program Assistant, Karen, as the central manager of this process and with all of the forms being submitted online and in a centralized location, the process of tracking outstanding documentation is much easier and follow-up is timelier. Students who have not completed all of the required documentation or whose documentation includes errors are less likely to fall into an administrative gap and find themselves ineligible for practicum placements.
  2. Intuitive and user-friendly. The BSN Primer introduces students to program goals, expectations and schedules on Day 1 of their program. By Karen’s estimation, in the Fall 2016 trial run of the BSN Primer, approximately 75% of the new student intake had no difficulty completing the requirements and/or read all of the instructions and completed all of their requirements by the deadlines.
  3. Orientation to LMS (D2L) prior to formal course work. By integrating the BSN Primer orientation into the same LMS used to deliver course curriculum, students are given immediate familiarity to D2L functions and navigation.
  4. Timeliness. Based on the program’s experience in previous years, the digitization and centralization of the orientation moved the typical schedule for collecting students’ documentation up by about 10 weeks.

Additional benefits:

  1. More sustainable practice for Faculty. Instructors who teach the first-term courses expressed appreciation for having the administrative responsibility for collecting and tracking all of the required forms taken out of their hands.
  2. More environmentally sustainable too! By moving this orientation online into D2L, the sheer volume of paper used collected by the program has gone down tremendously.

UDL Breakdown & Analysis

We think this story positively illustrates the practical application of two UDL Principles:

First:

UDL Principle #1: Provide Multiple Methods of Representation

By digitizing the documentation component of the Nursing Orientation and incorporating the same LMS (D2L) students will use throughout their program, the BSN Primer supports at least two of Principle #1’s guidelines (“Perception” and “Comprehension”). Through the BSN Primer, the program is:

  1. Offering learners ways to customize their display of information: the BSN Primer provides digital formats of all the required documentation that give students options for accessing and viewing materials.
  2. Providing background knowledge. The BSN Primer centralizes essential program and professional expectations of the students that they need to know and practice throughout the program; students access the BSN Primer on Day 1 of their program.
  3. Supporting transfer of learning across the program; the BSN Primer incorporates explicit opportunities for students to review program expectations and requirements & practice navigating through D2L functions

There isn’t one means of representation that will be optimal for ALL learners; providing options for representation is essential

And second:

UDL Principle #2: Provide Multiple Methods of Action & Expressions

By providing new students with an essential orientation to program and professional expectations with consistent and centralized support, the School of Nursing’s BSN Primer illustrates Principle #2’s Guideline 6: Executive Functions*.

*“Executive functions” allow us to set long-term goals and plan effective strategies for reaching those goals. CAST

The BSN Primer underpins this guideline as it:

  1. Guides appropriate goal-setting by posting goals, objectives & schedules in an obvious place, and providing cues to help learners identify resources required – including time.
  2. Supports planning and strategy development by providing checklists and setting up prioritization and sequences of tasks for students;
  3. Facilitates managing information and resources by providing templates for data collection & organizing information;

Learners differ in the ways that they navigate a learning environment and express what they know. There isn’t one means of action and expression that will be optimal for ALL learners; providing options is essential.


Do you know when you and your students have access to D2L courses at Camosun?

d2l2wThis term I thought I would begin writing a series of posts based on our eLearning workshops – both for those of you who can’t attend, as well as to remind those who did of some of the amazing things you learned at the workshops!

Today, from the workshop Getting Started with D2L, I am answering the question: “Do you know when you and your students have access to D2L courses at Camosun?”

D2L at Camosun is connected to our registration system (Colleague). That means that faculty and students are automatically added to live D2L course sites through that connection.

What this means for faculty, is that if your course is “flagged” for D2L in the registration system, you will see a blank shell for that course appear in your D2L course listing approximately 30 days before the course start date. Then, 7 days before the course start date, you will see your students appear in the D2L course Classlist. This is also the point at which your students will have access to D2L in general – but NOT to your course site.  Your student will not have access to your course site until the day it starts (the official start date in Colleague). Note that this is all controlled through Colleague – we in eLearning cannot give your students access to your D2L course materials earlier than the official start date.

You may also be wondering how long students have access to your D2L course site after the course ends. Well, they will have access to the course site for 20 days past the end date as it appears in Colleague.

Sometimes faculty want to work on a course D2L site before their live course appears in their course list (for example, when planning/developing a September course in May/June for Scheduled Development). If this is the case, you can ask eLearning to create a DEV site for your course. This is a static D2L course site (meaning that it is not dependent on start and end dates) containing NO students (meaning you can use it to create, experiment, etc. without worrying that students may see what you’re doing). If you would like a DEV site for a course (and I recommend having one), contact desupport@camosun.ca.

facsupp_id2More questions about D2L and getting started? Contact eLearning (desupport@camosun.ca) to arrange a meeting with an instructional designer at Interurban or Lansdowne!

D2L Monthly Upgrades – What’s new in January 2017!

Welcome to our monthly Camosun D2L Upgrade Report.

It’s the first upgrade of the new year, and there is a nice new feature for you to explore in the Discussions tool when using Groups.

Remember, if you have questions about the basics around using the Groups or Discussions tools in D2L, you can arrange to meet with an instructional designer by contacting desupport@camosun.ca

Discussions – Improvements to Group Discussions

While you can still create Group Topics (meaning that the Topic as a whole is restricted to a specific group of students, so if you have 5 groups, you would have to create a Topic for each group), you can now also create one Topic which contains a set of threads – one Thread for each group!

To do this, first create your Groups in D2L using the Groups tool.  Then go to the Discussions tool and create a New Forum into which to place your Topic.

Next:

  • In the New menu, select New Topic.Under New, Select New Topic
  • In the Properties Tab for the New Topic, Select the Forum you want the Topic in, then select the Group or section topic… radio button and select the Group you wish to connect the Topic to.Select Group or section topic...and select the group
  • When you’ve finished creating your Topic settings, click Save and Close.

When you go into your new Topic to post a message, click Start a New Thread, and then select which Group you wish to post to, type your message, and click Post.

When posting to the thread, select the Group you want to post to

Note that students will only have access to the Thread(s) belonging to THEIR group, while you will be able to view and post to all the Threads in the group Topic.

This is a quick and easy way to set up Group discussion areas in the Discussions tool.