3 CETL workshops you don’t want to miss!!

Well, you don’t want to miss any of our workshops, so in addition to the ones I will tell you about below, you can find out more about other exciting Camosun eLearning workshops, and register too, at: https://decamosun.wordpress.com/2018/02/02/elearning-spring-2018-workshops-open-for-registration/.

But there are three in particular I want to mention today.

First, Ethical Dimensions of Educational Technology

Many of us are integrating educational technology into our teaching, but how many of us are discussing the ethical issues that come along with those technologies? This blended workshop (first part online, second part face-to-face) will support conversations around institutional policy, privacy, social justice, accessibility, and personal risk, when it comes to educational technology, and help you develop strategies for being creative and innovative while keeping these issues in mind.

  • Who: Brian Lamb, Thomson Rivers University and Emily Schudel, Camosun College
  • When: Mon., May 14, 1:00-4:00 pm
  • Where: Lansdowne, Library and Learning Commons, Room 151
  • Register at: https://www.surveymonkey.ca/r/DYZ3KFS

Second, Creating Community in the Online Classroom

What does it mean to create an online community for your students? What considerations do you need to keep in mind when developing online activities to support that online community? This blended workshop will give you the opportunity to engage in online community building, and to work with your peers face-to-face to develop strategies for integrating online community-building activities into your course. NOTE: the online component will run first, taking 1-2 hours to complete over a week, and will be followed by a 1½ hour face to face session.

  • Who: Emily Schudel and Martha McAlister, CETL
  • When: Online: Wed., May 16-May 23;  Face-to-Face: May Wed., May 23, 11:30am-1:00pm
  • Where: Lansdowne, Library and Learning Commons, Room 151
  • Register at: https://www.surveymonkey.ca/r/D2LFHQ2

And finally, Flipping Out over the Flipped Classroom

Wonder what all the hype is around the “flipped” classroom? Come experience one way to flip a classroom in our 2-hour workshop. In this flip, the first hour will be online in D2L and will start on Friday, May 5 and run until May 12, and the second hour will be in the “classroom” on May 12. In this workshop, you will:  Learn about what it means to flip a classroom; Discuss your own ideas for flipped classroom activities with Camosun colleagues; Learn about the pros and cons of flipping the classroom

  • Who: Martha McAlister and Emily Schudel, CETL
  • When:  Online: Wed., May 9-May 16;  Face-to-Face: May Wed., May 16, 11:00am-12:30pm
  • Where: Lansdowne, Library and Learning Commons, Room 151
  • Register at: https://www.surveymonkey.ca/r/D2LP2XF

Have questions?  Want to know more?  Email Emily Schudel at schudele@camosun.ca.

Introduction to Daylight, Post 3: The Grades Tool

As we move closer to our upgrade of D2L to what is called The Daylight Experience, I have begun to publish a series of posts showing you what the various tools will look like come May.  My last post gave you a glimpse of the new Daylight Content tool design.  Today we will look at the Grades tool.

Similar to the changes in the Content tool, the changes to the Grades tool from our current D2L to Daylight, are about the visual: the white background, the larger font size, more space between items in tables, etc.

So, without further ado, let’s have a look at the changes.

Here is what the Manage Grades area looks like now.

Pre-Daylight Manage Grades area

And here is Manage Grades in Daylight. Notice the change in spacing in the table. This gradebook is identical to the one presented above, but you will not be able to see all the items on one page – you will have to scroll to see the whole thing. Otherwise, the Manage Grades area in Daylight functions the same as it does in the current version.

Daylight Manage Grades area

Now, let’s look at the Enter Grades area. Here it is in the current version.

Pre-Daylight Enter Grades area

Now, here it is in Daylight. Notice again the larger table size which will lead to more scrolling, the more students there are in the list. Notice also that, in addition to the scroll bar at the bottom of the page (which you also see in the current version), there is a scroll arrow at the top of the table.

Daylight Enter Grades area

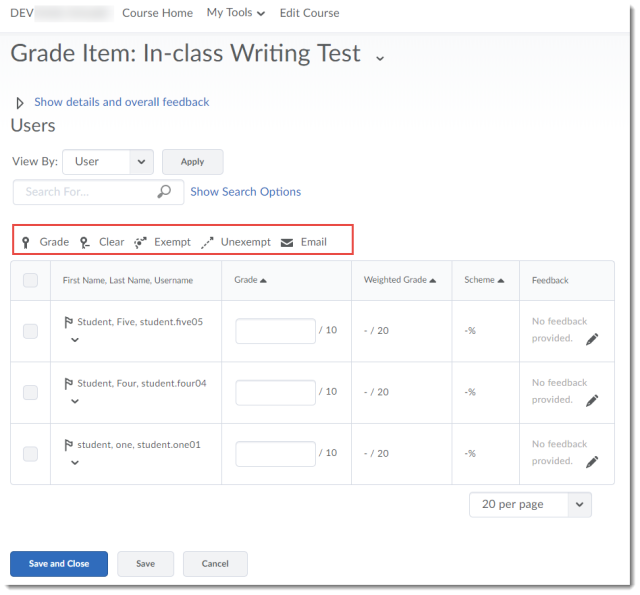
When grading an item, choosing Grade All in the drop-down menu for a grade item (here, for In-class Writing Test), here is the current interface:

Pre-Daylight Grade All Item area

And here is the Daylight interface. Notice that the tool icons (Grade, Clear, Exempt, Unexempt, and Email) only appear at the top of the table (and that the icons have been updates, and are in black and white).

Daylight Grade All Item area

Finally, we will look at previewing a student’s gradebook. First, clicking on a student’s name, then selecting Preview from that student’s drop-down menu (the grading interface for an individual student has not changed). If you are not sure how to preview a student’s gradebook, see the Previewing a Student’s Gradebook pdf.

Here is what this looks like in the current version:

Pre-Darylight Preview Student Gradebook

And here is what it looks like in Daylight. Same gradebook, taking up much more space! And no, the name of the student still does NOT appear at the top of the pop-up window with their gradebook preview…sigh…

Daylight Preview Student Gradebook

To wrap this up, I’ll note that both the Schemes and Settings area have not changes, except visually. You can expect all the same functionality in the Grades tool (for good or bad) in Daylight that you have in the current version of D2L.

Next time, we will have a look at Dropbox in Daylight!

Introduction to Daylight, Post 2: The Content Tool

As we move closer to our upgrade of D2L to what is called The Daylight Experience, I have begun to publish a series of posts showing you what the various tools will look like come May.  My last post gave you a glimpse of the new Daylight homepage design.

And now that you have seen what the new Daylight course homepage will look like, it’s time to take a brief look at some of the other tools in D2L and what they will look like in Daylight. Today we will look at the Content tool.

In general, the changes to the Content tool, as with most of the tools, are visual: the white background, the larger font size, all those things that lend themselves to the responsiveness of the design for mobile devices.

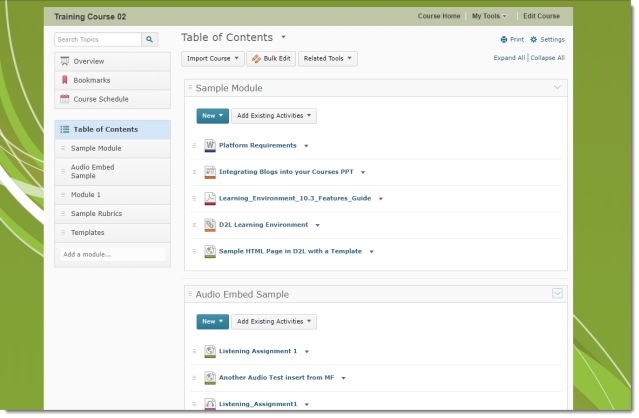
Here is what the Content tool looks like now. Note the placement of the content tool in the course page set against the green background.

Pre-Daylight Content area

And here is what it will look like in Daylight. Note that the Content tool takes up the whole page space, there is no colour background, and how you can see less of the content on the main page without scrolling than you can in the current version.

Daylight Content area

Now, let’s take a side-by-side look at the content in one of the modules.

Pre Daylight sample module with content Daylight Sample Module with content

Not too many changes here, but there are a couple of things to notice. First, in the Table of Contents box, note that the open module is much easier to see in the current version than in Daylight. You really need to look at the main page to see which module is open. Also, in Daylight, the icons have been redesigned, and there is text indicating whether the content is a PDF document, a Link, a Web Page, etc. Here’s a closer look at the Daylight icons here:

Daylight sample module with content closeup to show file icons

One final change is with the Upload File interface.

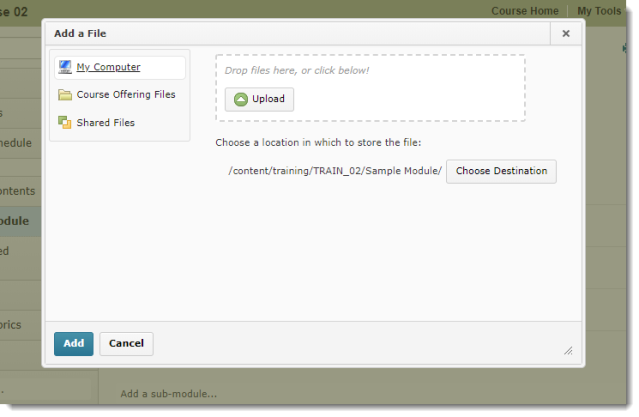
In the current version, if you click New and Upload File, the upload box gives you options of where to upload files from, AND the Upload interface:

Pre Daylight file upload box

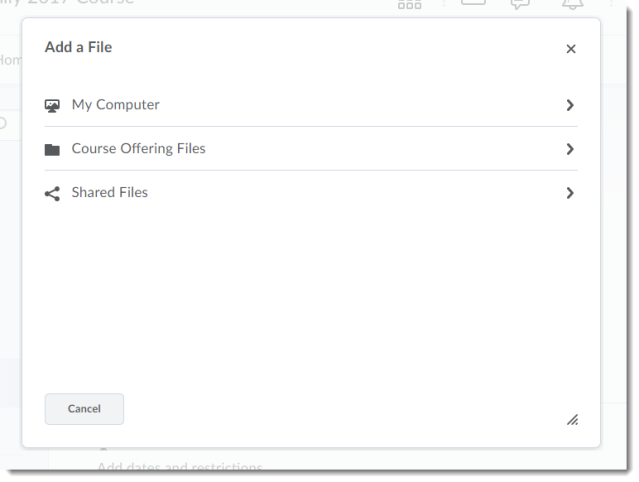
However, in Daylight, the initial upload box you will see gives you the option of selecting files from My Computer, Course Offering Files, or Shared Files.

Daylight File initial file upload box

In this box, you need to select where the file will be uploaded from before you can select a file, so if you click on My Computer, you will then be able to upload a file from your computer.

Daylight file upload box if My computer selected

Aside from these design changes, the Content tool looks and functions the same as it does in the current version, and rest assured that all your content will still be in your courses after the upgrade!

Next time we will have a look at the Grades tool!