D2L Design Considerations for Mobile Devices

Last May, Bob Preston (one of our amazing eLearning Support crew) and I ran a workshop for faculty that I called “D2L Design Considerations for Mobile Devices”. In this post, I am going to give you a bit of a synopsis of this workshop, and let you know what you might want to think about when setting up your D2L course site to ensure it is viewable on mobile devices, such as iPhones and iPads.

My conversations with faculty over the years, and surveys and interactions with students, tell us that more and more students are using mobile devices (phones and tablets) to work in their D2L course sites. But faculty don’t often know what their sites actually look like on smaller devices. So, for this workshop, while it was held in a computer lab, I asked faculty to bring their tablets and phones so they could try out some design techniques to make sure their students can get the most out of D2L course sites on their own devices.

The outcomes of the workshop were for participants to be able to:

  • Know better how students are viewing their D2L sites on mobile devices
  • Integrate mobile accessibility considerations when designing and adding materials
  • Consider how they will discuss D2L on mobile devices with students

First, we looked at the homepage of D2L on a phone. I should first note that you don’t need to download an app to use D2L on a mobile device anymore.   It has been redesigned to work on browsers. The first image shows what the main Camosun D2L page looks like on a phone – note the “hamburger” menu pointed out on the top left – and the second image shows what it looks like when you click on the “hamburger” menu:

Camosun D2L homepage on a phone

Hamburger menu opened

And here is a sample course homepage. Note that if you move your News widget to another location on your homepage, it will NOT be the first thing student see if they are working on their phones.

Course homepage on a phone

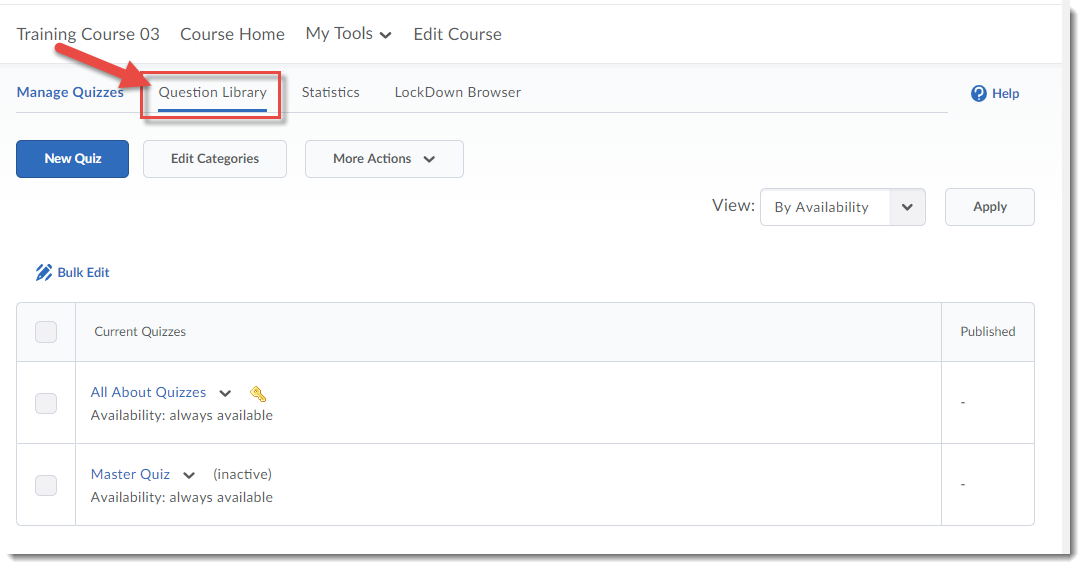
Next we took a look at the Content tool to check to see what students see for various content pieces. When we open a piece of content on a phone, we see the larger context of the Content tool can be lost (or seemingly lost) on a small device, so it becomes easier for students to “not see” things like the Print or Download buttons (they have to scroll down), and the pages themselves can become so small as to be illegible. The key is organization AND showing (and reminding) students of how D2L is being used for the course.

Content page on a phone

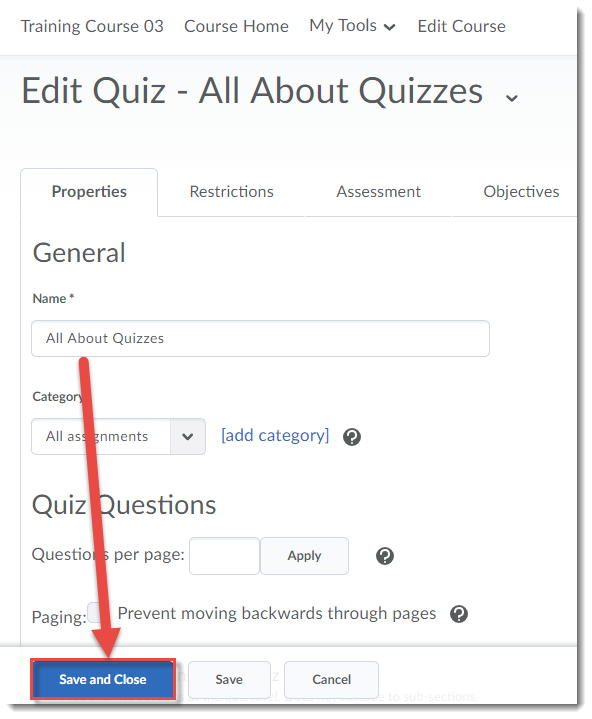
Using the Quizzes tool on a mobile device works relatively well, although we recommend you Preview your quizzes on a phone to check for image size etc. With regards to Dropbox, you may need to advise students on how to upload files from a mobile device (especially if it is an Apple device) and caution them that viewing rubrics might be challenging on a smaller device as students will need to scroll (using the arrows as seen below) to see the full rubric table. This will be the same for students viewing their gradebooks on a phone.

Dropbox Feedback on a phone

To conclude, based on our experience with common support issues, and questions raised by participants in this workshop, we in eLearning will be looking at developing some tutorials for students using D2L on mobile devices, and additionally will continue to encourage faculty to look at their sites and content on smaller devices, such as phones, and to advocate for accessible course design (Universal Design for Learning) as it relates to both D2L in general, and mobile devices. So, stay tuned as we begin our work!

Some New EdTech Tools Coming to eLearning!

Some of you may have heard rumours that some new edtech tools are coming to Camosun via eLearning this term.  It is indeed true!  We are currently piloting our streaming media platform, Kaltura, and setting up our new instance of WordPress and our updated Blackboard Collaborate Ultra (our synchronous class delivery platform).

Want to know more?  Come to one of our information sessions this term!  Descriptions are below, and you can register at https://www.surveymonkey.ca/r/GDWH7WY

Introduction to Kaltura (Streaming Media at Camosun): Information Session

Monday, March 4th, 3:00-4:00 pm LLC151 (Lansdowne)

Kaltura is a streaming media tool that is coming to Camosun. This means faculty and students will now have a place to create, edit, and house their course-related videos. Kaltura also integrates with D2L. Come find out more about what Kaltura is, what it can do, and how you can use it for your courses, as well as when it will be available at this information session!

Introduction to Blackboard Collaborate Ultra: Information Session

Monday, March 11th, 3:00-4:00 pm LLC151  (Lansdowne)

Blackboard Collaborate Ultra is a synchronous classroom tool that is coming to Camosun. This means that faculty now have an online tool with audio, video, chat, and whiteboard/desktop sharing capabilities to support their teaching in real-time. Come find out more about Blackboard Collaborate and how it can be used, as well as when it will be available, at this information session.

Using WordPress for Student Blogs: Information Session

Thursday, March 14th, 3:00-4:00 pm LLC151  (Lansdowne)

WordPress is a blogging and website creation tool which is now available in the Canadian cloud, meaning that if you would like your students to build blogs and websites as part of their learning, we can now offer a solution which will be in compliance with the BC Freedom of Information and Protection of Privacy Act. Come find out more about how to set up a site for yourself, and what you need to know to get your students started.


Adding Text or Images to Appear above a Set of Questions: A D2L Tutorial

This tutorial is for faculty who have previous experience using the Quizzes tool in D2L. For further information, please contact desupport@camosun.ca for assistance.

Scenario

This tutorial will cover the steps involved with making some of your quiz questions bonus questions (counting above the total grade for the quiz).

Steps

  1. Go to the Quizzes tool in your course.
  2. Click Question Library.Click question library
  3. Select a Section to add your Text or Image information to, or create a new section (for the purposes of this tutorial, we want to create a Case Study text that accompanies a set of questions in the Week 1 Quiz, so we will click the Week 1 section to open it).Adding Text or Images to Appear above a Set of Questions – D2L Tutorial
  4. Click New and select Section.Click New and select Section.
  5. Give your Section a Title and click Hide Section Title from students if you like (we will keep it unselected to show you want it looks like in a quiz). Add your text or image to the Section Text box. This is where your case study text would go, for example. If you would like all the questions in this section shuffled (so that each student sees the questions relating to the case study in a different order), click Shuffle questions in this section. Then click Save.Give your Section a Title and click Hide Section Title from students if you like. Add your text or image to the Section Text box. If you like, click Shuffle questions in this section. Then click Save.
  6. Click on the title of the Section you just created, and using the options under the New button, add your questions to it. Click Done Editing Questions when you have finished.Click on the title of the Section you just created, and using the options under the New button, add your questions to it. Click Done Editing Questions when you have finished.
  7. Now, you can add your Section (along with your questions) to a Quiz. Click on the title of the quiz you want to add your Section to (or create a new Quiz).Click on the title of the quiz you want to add your Section to (or create a new Quiz).
  8. If you need to, give your Quiz a Name, then click Add/Edit Questions.If you need to, give your Quiz a Name, then click Add/Edit Questions
  9. Click Import, and select Browse Question Library.Click Import, and select Browse Question Library.
  10. Find your Section – you may need to scroll down in the Browse Question Library window and click the down arrows next to Section titles to open them to find it. Click the select box next to your Section, and click Add.Find your Section. Click the select box next to your Section, and click Add
  11. Click Done Editing Questions.Click Done Editing Questions.
  12. Finish setting up your Quiz, then click Save and Close. Make sure to Preview your Quiz to check that your Section text or image appears above the questions you placed in it.Finish setting up your Quiz, then click Save and Close.

Things to Remember

NOTE: If you have old quizzes in your course site (for example, if you have copied them from Master or Dev or old course sites), you may have old versions of Text or Image information “question types” that have been converted into Sections called “Untitled [converted from a Text/Image Information Item]”. You will want to check your quizzes to make sure these sections work the way you want them to in the context of your quiz, and may even want to take the time to give them an appropriate title and move the questions the original “question type” was associated with so that they are inside the section.

Continuous Upgrade Post – Catch up from September through December

I have been sadly remiss in posting information about all the changes that have been happening in D2L with our monthly upgrades. So, what has been happening in D2L since September that you might want to know about? Here are some of the highlights:

September Updates

  • Students can now print or download content added to the Overview area in the Content tool.click Overview, then Print or download
  • You can now attach a Group to existing discussion topic while creating the group. You’ve always been able to create a Discussion Topic while creating a group, but now you can also select an existing Topic to attach a group to. You will find this option when you click Set up discussion areas, when creating a New Group. Select Attach to existing topic, and choose the Topic you want to attach your group to.

 Click Set up discussion areas, then Attach to existing topic, then choose your topic!

 October Updates

  • There are some new assignment types you can choose from in Dropbox, which means that students don’t have to necessarily upload a file for Dropbox to work properly. This will open all kinds of options for accepting embedded videos or audios (rather than students having to upload them and you having to download them – you will be able to play them right in D2L!), or setting up a Dropbox for assignments students hand in in class. I will post about this change separately so I can give you a closer look at how these new changes work! Stay tuned…
  • You may have noticed (or your students may have noticed, and may or may not have pointed out to you) that quiz questions now auto save. This means that students no longer have to click Save for each question (the Save button is in fact gone) – but their answers will be saved automatically once they answer the questions. Student do still need to Submit the quiz when they have finished it though!!Auto Save in a Quiz

December

  • In the new Question Creation Interface for Written Response questions, the option to add Initial Text for students has been added back!  See below for how this will now work:Click Options, then Add Intial TextAdd your initial text to the Intial Text box
  • All graded rubrics, whether they are in Dropbox or Discussions, now will appear in a student’s Gradebook (if the Dropbox/Discussion is linked to a Grade Item). Below is a Preview of a student’s gradebook – the View Graded Rubric links are links to the rubrics as graded in Dropbox!Students can click View Graded Rubric in their Gradebooks

Next week I’ll let you know what is coming later this month for the first updates of 2019!

A very brief introduction to Open Educational Resources (OER)

One of the big topics in education these days, especially when talking about elearning or online educational resources, is Open Educational Resources (OER) (and generally, Open-ness). I thought I would take a moment today to very briefly give you some idea of what people mean when they talk about OER, and give you some resources you can explore to find out more.

Open Educational Resources

The Camosun Library Open Resources Guide is a great place for you to go to find out more about OER and where to find them. The guide provides a nice definition of OER as well, which I will repeat here for you: “Open Education Resources (OER) include textbooks, course readings and other teaching and learning content available online at little or no cost. These resources are produced by libraries, universities, government agencies, archival organizations and individuals, and can be used, reused and modified depending on how they have been licensed by the creator of the content.” OERs are especially important in today’s high-cost educational market. Open Textbooks in BC have

According to http://opencontent.org/definition/, “The terms “open content” and “open educational resources” describe any copyrightable work (traditionally excluding software, which is described by other terms like “open source”) that is either (1) in the public domain or (2) licensed in a manner that provides users with free and perpetual permission to engage in the 5R activities”, which are as follows:

  • Retain – the right to make, own, and control copies of the content (e.g., download, duplicate, store, and manage)
  • Reuse – the right to use the content in a wide range of ways (e.g., in a class, in a study group, on a website, in a video)
  • Revise – the right to adapt, adjust, modify, or alter the content itself (e.g., translate the content into another language)
  • Remix – the right to combine the original or revised content with other material to create something new (e.g., incorporate the content into a mashup)
  • Redistribute – the right to share copies of the original content, your revisions, or your remixes with others (e.g., give a copy of the content to a friend)

Creative Commons

One of the hallmarks of OERs is that they are licenced as Creative Commons (https://creativecommons.org/). Creative Commons “are flexible copyright licenses that allow copyright holders to decide for themselves who can share, reuse and build upon their creative works.” (http://camosun.ca.libguides.com/open/OpenCulture)

Other kinds of “open” in education

In addition to Open in OER, you may hear Open being used in other contexts as well, some of these include:

  • Open source (software that is available at little or no monetary cost, but often costs a lot to set up and maintain in terms of people resources)
  • Open access (resources – articles, books, etc. – that are available freely on the Internet)
  • Open culture (the concept that knowledge should be shared openly and collaboratively, free of copyright restrictions)
  • Open pedagogy (a little more complex, but defined briefly at https://opencontent.org/blog/archives/2975 as “that set of teaching and learning practices only possible in the context of the free access and [5]R permissions characteristic of open educational resources.” – you can explore its complexities further at http://openpedagogy.org/open-pedagogy/)

A few resources

Now that you know a bit more about what OERs are, here are some great resources for you to explore so you can find out more to help you decide how to integrate OERs into your own teaching!

Introducing D2L to your Students

Last May, I ran a workshop for faculty called Introducing D2L to Your Students which asked “Using D2L, but not sure how comfortable your students are with it? Come and find out what other faculty at Camosun are doing to introduce D2L to their students.” The workshop outcomes invited participants to:

  • Decide how best to talk about D2L with your students
  • Rethink the assumptions we make about what students do or don’t know about D2L and accessing online resources
  • Integrate strategies for introducing D2L and referring to it throughout the term

During the workshop, participants discussed how they introduce, or might introduce, D2L to their students.  Expanding on their discussions, I shared what I have learned what faculty across the college are doing to introduce students to D2L, which ranges from nothing (typically assuming students will be able to figure it out for themselves), all the way to full scavenger hunts, and regular sessions in the lab using D2L.

So, here in this post, I now share with you the strategies which have been shared with me.  Faculty at Camosun who are introducing D2L to their students in some way are:

  • Providing students with information about D2L prior to the first class, typically via email (and in some cases via a physical letter). I have seen this being done at a Program level, as well as by individual instructors.
  • Creating handouts (or using the ones created by eLearning) to support students in their use of D2L.
  • Giving students a tour of D2L and the D2L course site on day one, for example,
    • Showing them how to log in;
    • Showing them how to set email forwarding and/or notifications;
    • Showing them all the tools that will be used during the course (or introduce tools throughout the term when they need to be used);
    • Showing them what specifically will be in the tools (content pages, dropboxes, etc.);
    • Showing them how they will see things like quizzes, dropboxes, and grades (using Preview or View as Student options); and
    • Explaining how the various tools, and D2L in general, will be used (what can they expect – for example, how often will News items be posted, or Email checked, or how long it will take to grade a Dropbox assignment).
  • Having students complete a D2L scavenger hunt either in a lab, using laptop carts in a classroom, or asking them to use mobile devices (for example, having them complete one activity (i.e., discussion or dropbox) or multiple activities in your D2L course site).
  • Pulling up D2L for your students at different points throughout the term to remind them to access D2L, or refresh their memory of how a tool works (for example, show them where to find feedback for their assignments, quizzes, in grades, etc.)
  • Giving students a quick survey asking “how’s D2L going” after 4 weeks or so.

After talking to faculty and surveying students, I was surprised that some faculty and students don’t know where they can get help with D2L. Because students don’t always know that there is help available, they often either ask other students or don’t ask anyone at all, which can lead to frustration, and to students giving up on using D2L. Here are some of the places students can (and do) get help with D2L – please make sure to let your students know them!

  • The D2L Student Guide (screen cap) which is available as a link on the main D2L homepage
  • eLearning Support (desupport@camosun.ca), available 8:30-4:30, Monday-Friday.

Finally at the end of the workshop, participants shared what they were going to try with their own courses, either to enhance what they already do, or as a first step. Consider trying some of these, or some of the strategies mentioned above, yourself and let me know how it goes!

  • Including News items around where to get help, or tips on how to use different tools, how to login, using email, etc. (and creating ongoing News posts to help remind students that they need to go to the Dropbox to submit an assignment, or go to Content to view a video).
  • Providing students with a Checklist in the Content area. A checklist can provide students with more clarity around what tools they are supposed to be accessing, what needs to be completed, and by when.
  • Staggering the D2L intro so students don’t have to learn everything at once. This can help students learn how to use the various tools WHEN they need to, so they don’t forget everything after Day 1.

In the end, I can’t stress enough how important it is for instructors using D2L to take the time to show students D2L on a regular basis. If students are continually reminded (visually!) that they need to go to D2L to read content, complete quizzes, submit to the Dropbox etc., they will be assured that using D2L is an important component of their learning and of your teaching. It only takes a few minutes at the beginning of class to call up D2L and give a quick reminder/refresher, so please take the time!

eLearning Drop-ins and Getting Support with D2L (and more!)

Happy 2019 from eLearning at Camosun!

We wanted to remind you that if you need any help setting up your D2L course sites, or have any questions now or during the term about D2L or how to use (or why you might want to use) any of its tools, we are here for you!

Our eLearning Support team is available from 8:30-4:30, Monday-Friday by phone (250-370-3488) or by email (desupport@camosun.ca) or even by in-person in the Centre for Excellence in Teaching and Learning (CETL) offices in the Lansdowne Library. And they are available for your students to, so be sure to direct them to eLearning Support if they have technical issues with D2L (like logging in!)

We also have 6 instructional designers who are available to help you by appointment, or during our eLearning drop-ins. Our Lansdowne drop-ins are on Tuesdays 12:30-1:30pm in the CETL offices in the Lansdowne Library, and out Interurban drop-ins are on Fridays from 11:30am-12:30pm in our CETL offices in the Liz Ashton Campus Centre, room 235.

If you would like to contact an instructional designer to schedule a consult regarding a specific question you are having around using D2L, or for information on how to use a specific D2L tool, or with any questions you may have about using other educational technologies to support your teaching (or even if you have a pedagogical challenge and are wondering what educational technology might help you with your challenge), contact eLearning support (desupport@camosun.ca) and we can set you up!

You can also find out more about who is available to help you with your eLearning needs by visiting the Contact Us section of the main CETL website and email an instructional designer directly.

We look forward to hearing from you – and good luck with your term!