Here’s something that just came up last week for us!
Looking for ways to individualize a student’s gradebook, for example, if they missed the midterm and you want to move 25% of that grade to Assignments, 25% of that grade to Quizzes, and 50% of that grade to the Final Exam? We have a solution for you: Conditional Release.
You can’t use Exempt for a situation like this. Exempting a student from a grade item means that item’s weight will be equally distributed across the other items in the gradebook (or in a Category if that item is part of a Category). You can, however, put that student in a Group by herself, and create new items just for them, weighted the way you want them to be. You just need to Conditionally Release all items to the appropriate Groups.
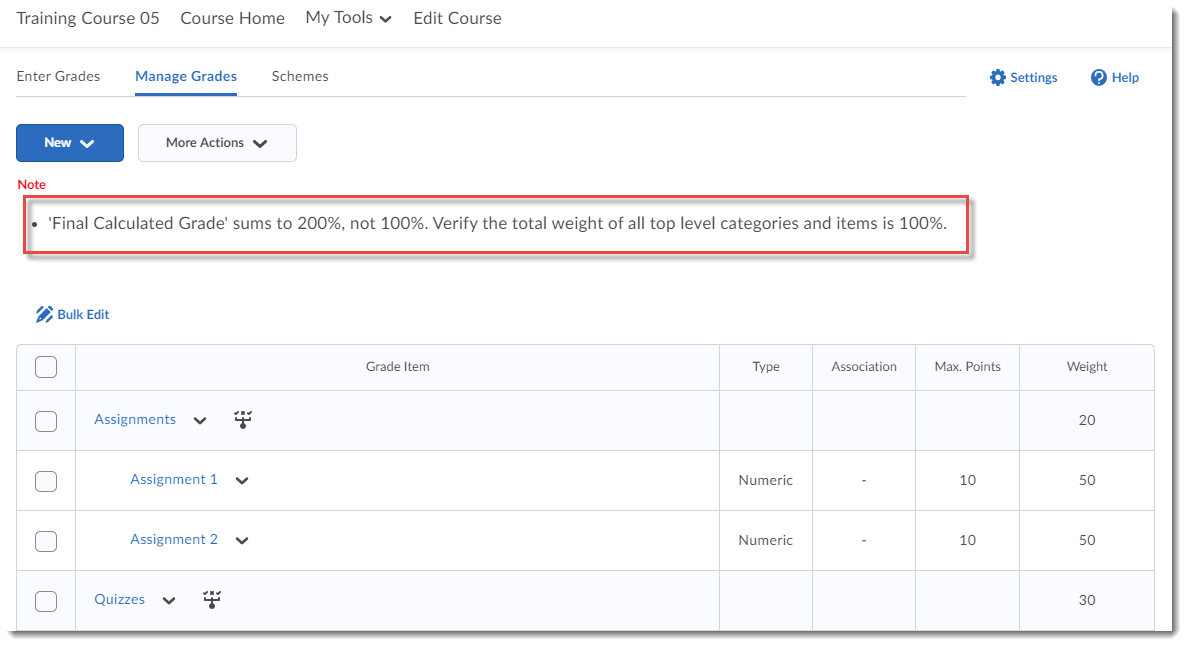
Of course, this will also mean your gradebook will calculate to MORE than 100%, because you will, in effect, have two gradebooks, but your students will only see the grade items they are attached to.
This takes a few steps, and if you are not very comfortable with creating grade items and/or using conditional release options, we recommend you contact desupport@camosun.ca and arrange to meet with an instructional designer to go over the steps with you.
So, let’s begin!
For this scenario, we will be creating Groups, creating new Grade Items/Categories (duplicating most of what is already there), and applying Conditional Release restrictions to each item.
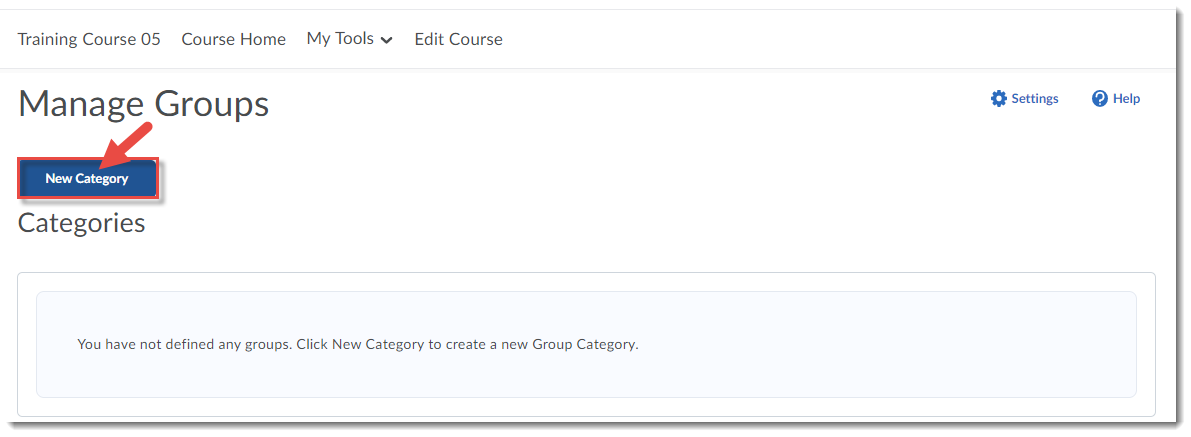
Create Groups
- Go to the Groups tool, and click New Category.
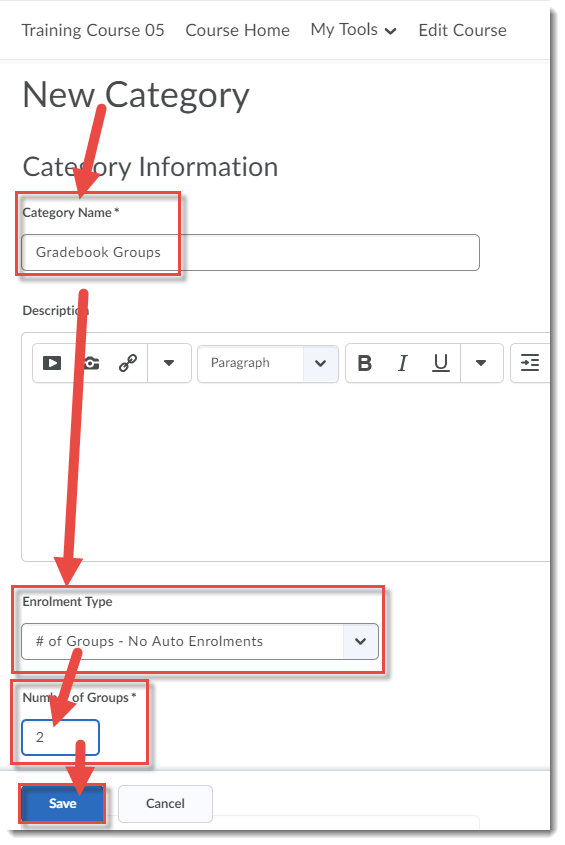
- Give your Category a name (we will call it Gradebook Groups). Select the Enrolment Type # of Groups – No Auto Enrolments, and add the number 2 into the Number of Groups box (we will create one group with one student, and the other group with the rest of the students). Click Save.
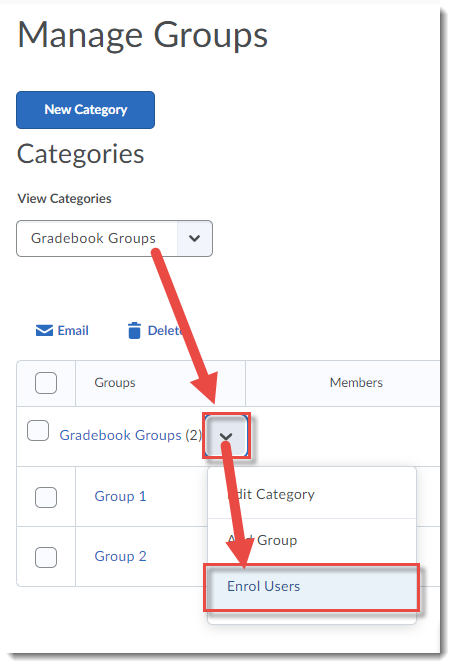
- Click the down arrow next to Gradebook Groups and select Enrol Users.
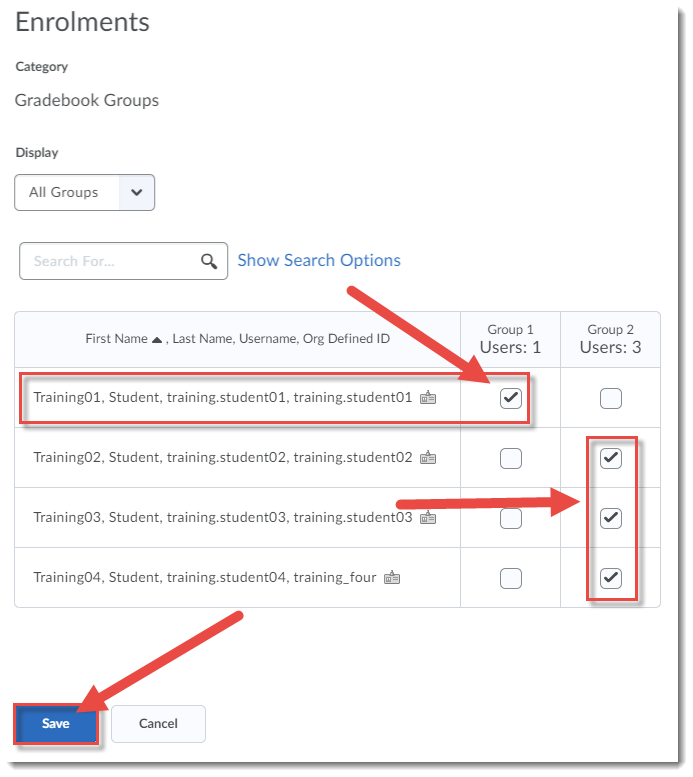
- Use the select boxes to place each student into a group – the student you wish to exclude from the Midterm should be in a group on her own. For our scenario, Student 1 needs to be excluded, so we will put her in Group 1, and the others in Group 2. Note: You can rename the Groups by clicking on the Group name. Otherwise you will need to remember which Group contains which students. Click Save.


Create and Conditionally Release Grade Items
- Go to Grades.
- For our scenario, we will create a new Category/Grade Items for each of Assignments, Quizzes, and Final Exam. We will add the word “Conditional” after each. As we create the Categories for Assignments and Quizzes, and the item Final Exam, we will add Conditional Release to them. I will show this for Assignments, then you can do the rest yourself.
- Click New and select Category.
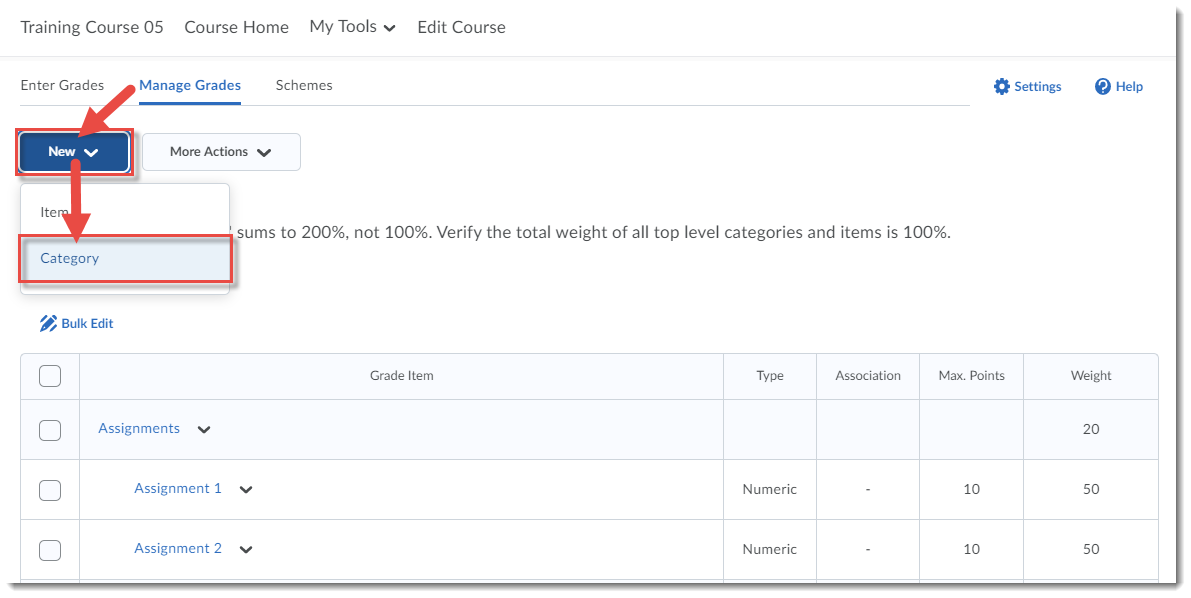
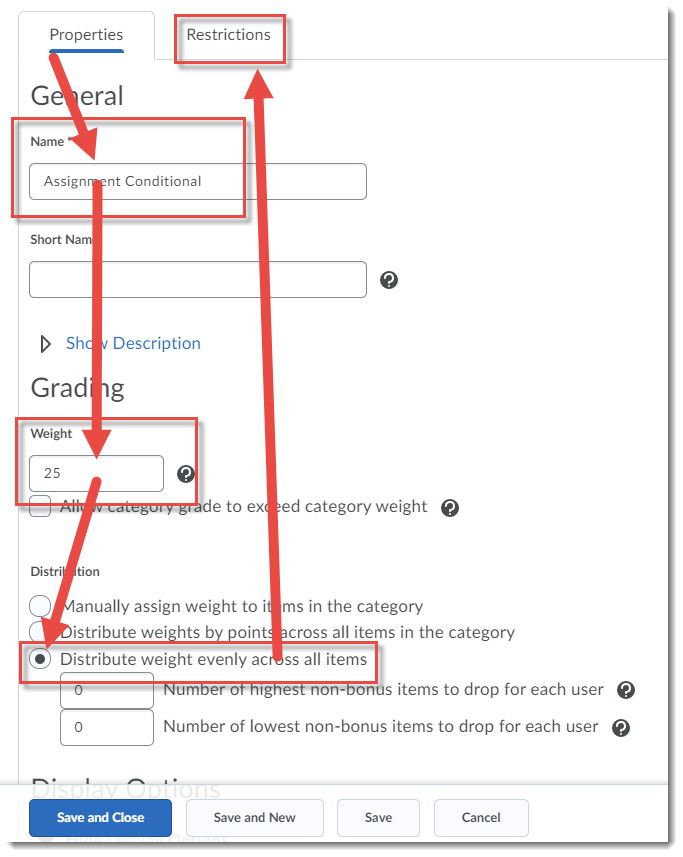
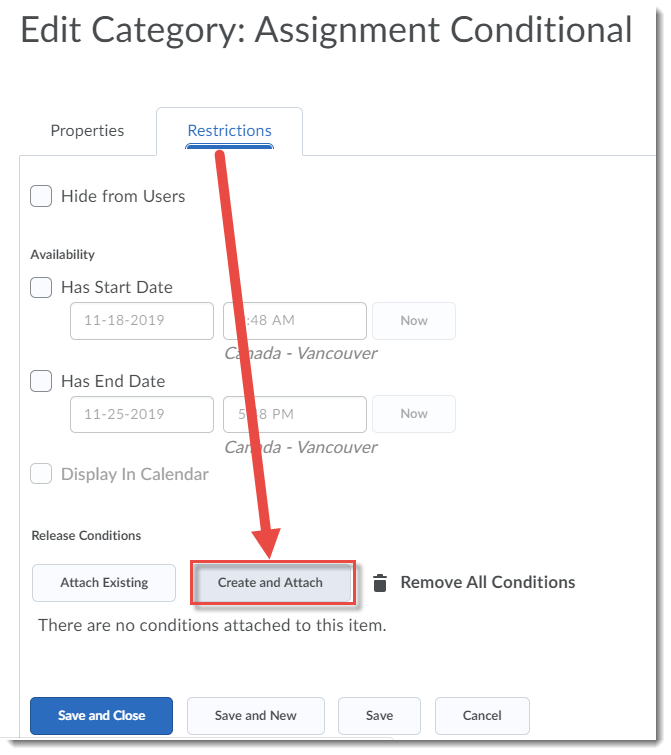
- Add a Name (here Assignments Conditional). The weight will now be 20% + 25% of the 20% Midterm, so add 5% to the Assignments = 25%. For this scenario, select Distribute weight evenly across all items. Then click Restrictions.

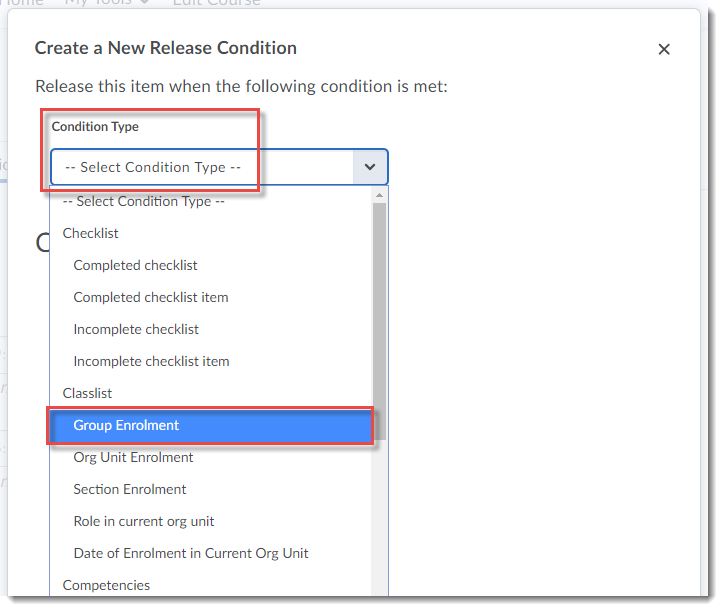
- Click Create and Attach.

- Under Condition Type, select Group Enrolment.
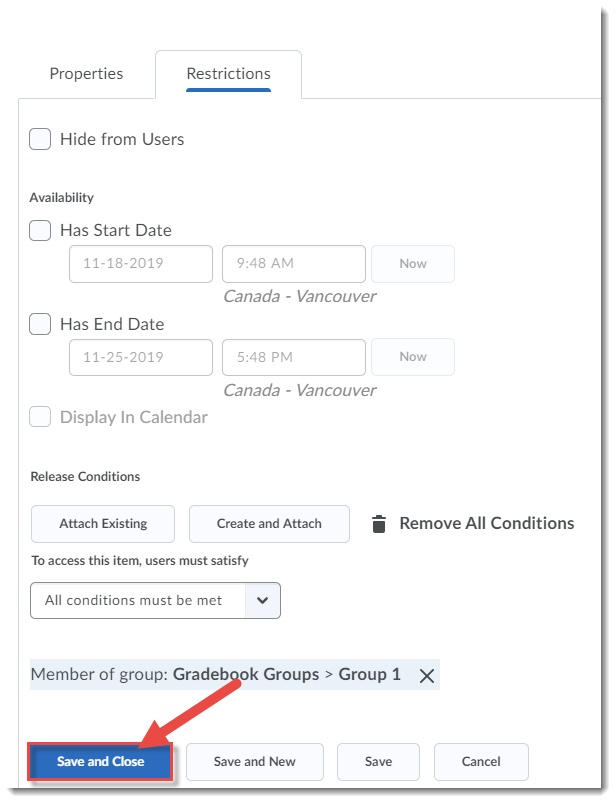
- Under Group, select Group 1 (the group your single student was in), and click Create.

- Click Save and Close. The Assignments in this category will now ONLY be seen by the student in Group 1.
- Repeat steps 4 – 9 for a Quizzes Conditional Category (also add 5%) and a Final Exam Conditional grade item (add 10%). Then make sure to add new Assignment items to the Assignments Conditional category and new Quizzes to the Quizzes Conditional category.
- You will now need to edit all your OLD categories and items and conditionally release them to Group 2 so your other students only see those items in their gradebooks. When you are done, your gradebook should total to 200%.

- You should now be ready to re-enter the grades for this student. If you have already entered grades for this student, you will need to MOVE those grades to the NEW grade items so they do not get double the marks (go to Enter Grades, delete the grades from the old items and add them to the new items you just created).


As I mentioned earlier, this may seem complicated – but we are here to help! If you want to go over these steps with an instructional designer, or just ask them to check to make sure your gradebook is setup correctly for your situation, contact desupport@camosun.ca.
![]()
This content is licensed under a Creative Commons Attribution 4.0 International Licence.Icons by the Noun Project.