4 Great People to Follow on Twitter

When integrating educational technology into our teaching, we often find ourselves faced with a myriad of challenges and ethical issues to consider beyond the simple question of how the tool supports our learning outcomes. If you are wondering where to turn, here are four experts I follow on Twitter whose work has helped me work through some of the struggles I have faced when assessing a new tool. And yes, these are only four – if you have a go-to expert on your list, let me know in the comments!

Jesse Stommel: https://twitter.com/Jessifer

According to his website, “Jesse Stommel is Executive Director of the Division of Teaching and Learning Technologies at University of Mary Washington. He is also Co-founder of Digital Pedagogy Lab and Hybrid Pedagogy: an open-access journal of learning, teaching, and technology. He has a PhD from University of Colorado Boulder.”

Exploring digital pedagogy from a critical lens, with the student forefront in his mind, he says about his own practice, “My scholarly work is about the sometimes wondrous, sometimes horrifying relationship between bodies and technology. My particular expertise is in digital pedagogy, digital humanities, and open education. I believe all learning is necessarily hybrid. In on-ground pedagogy, it is important to engage students’ digital selves. And, with digital and online pedagogy, our challenge is not merely to replace (or offer substitutes for) face-to-face education, but to find new and innovative ways to engage students in the practice of learning.”

Rajiv Jhangiani: https://twitter.com/thatpsychprof

A champion of and innovator in the Open Pedagogy movement, Jhangiani says on his website: “I am the Special Advisor to the Provost on Open Education and a faculty member in the Department of Psychology at Kwantlen Polytechnic University. I currently serve as an Associate Editor of Psychology Learning and Teaching and an Ambassador for the Center for Open Science. Together with Robin DeRosa, I am co-founder of the Open Pedagogy Notebook. I also serve as an Advisory Buddy with Virtually Connecting and on the board of KDocs, KPU’s Official Documentary Film Festival.”

I highly recommend exploring the Open Pedagogy Notebook site which contains concrete examples of open pedagogy in action, and encourages you to collaborate and engage with open pedagogy practitioners from around the world.

Julia Hengstler: https://twitter.com/jhengstler

An advocate for and specialist in privacy as it applies to our world of educational technology, The White Hatter tells us that “Julia Hengstler is a Professor, Educational Technologist, and Chair of the Centre for Education & CyberHumanity (Faculty of Education, Vancouver Island University, Nanaimo, British Columbia, Canada) 
 Her doctoral research specializes in privacy and the use of educational technology in BC public schools
 With over more than 25 years as an educator in BC’s public-school system, Julia has taught a wide variety of subject areas and grade levels ranging from K-12 to post-graduate. Julia blogs about education and technology at “ED Tech Thoughts”.”

Much of Hengstler’s work revolves around understanding and managing your digital footprint, and the impact of using social media in education.

Jess Mitchell: https://twitter.com/jesshmitchell

Jess Mitchell is the Senior Manager of the Inclusive Design Research Centre  at OCAD University in Toronto, Ontario which “was created as Canada’s first research hub focused on digital inclusion. It is adding new approaches to learning that are championing cross-disciplinary practice, collaboration, and the integration of emerging technologies.” (https://casestudies.etgroup.ca/ocad/)

An advocate for inclusive design, as you may have guessed, Mitchell “manages large-scale international projects and initiatives focusing on fostering innovation within diverse communities while achieving outcomes that benefit everyone”, which is inclusive design in a nutshell: inclusive design benefits all, and practicing inclusive design makes something more accessible overall. When I started reading more about inclusive design, I realized that there is a difference between inclusive design and universal design, as well as between inclusive design and accessibility. The essay “The Number 1 Thing You’re Getting Wrong about inclusive Design” is a good place to start when beginning to puzzle through the distinctions. Following Jess Mitchell will help clarify them.

Printing Content in D2L – a Student Tutorial

Scenario

This tutorial will cover the steps involved with printing PDFs, WORD documents, and PowerPoint course materials from within the Content tool.  For further information, please contact desupport@camosun.ca for assistance.

Steps

  1. Go to your course in D2L.
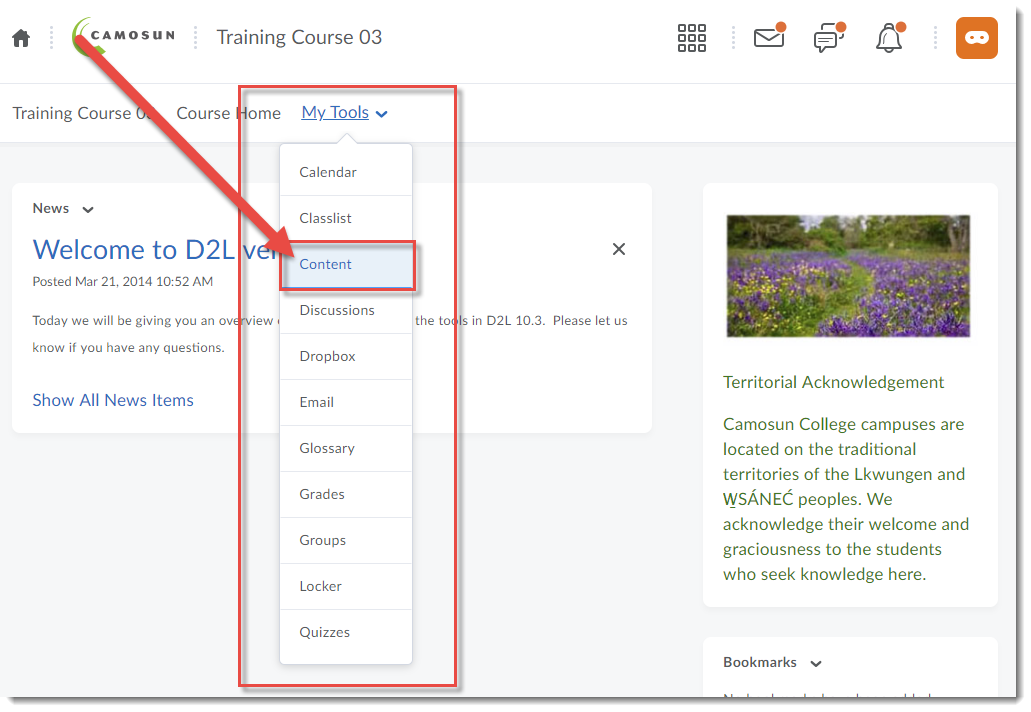
  2. Go to the Content tool (through the Tools drop-down menu in the navigation bar).Go to Content

To print documents (WORD, PDF, PPT)

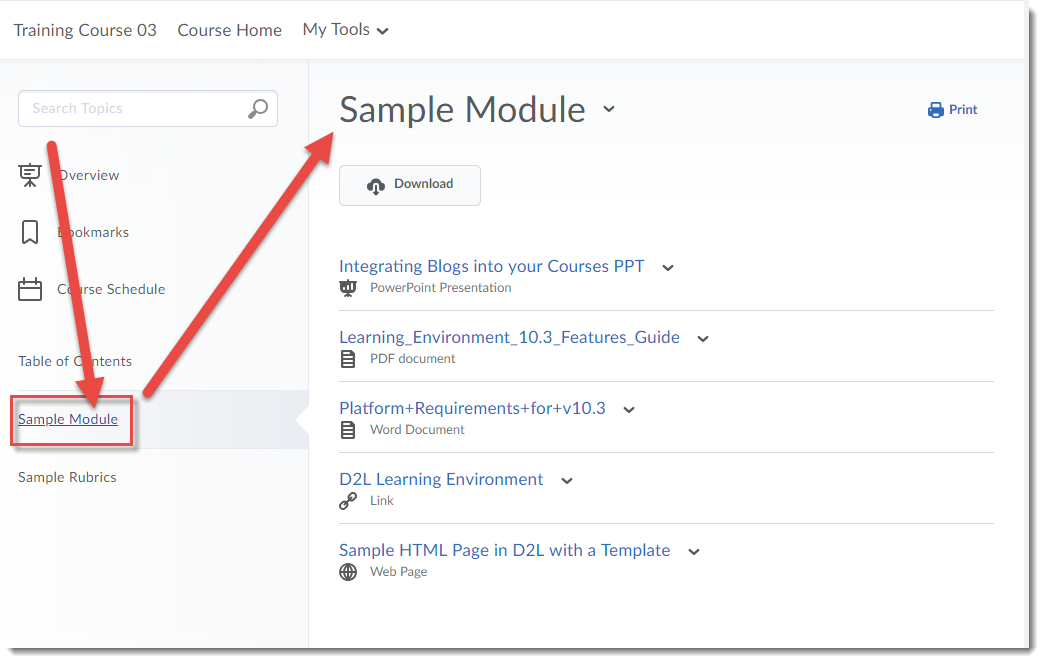
  1. In the Table of Contents box, click on the title of the Module containing the files/pages you want to print.Open the Module you want to print from
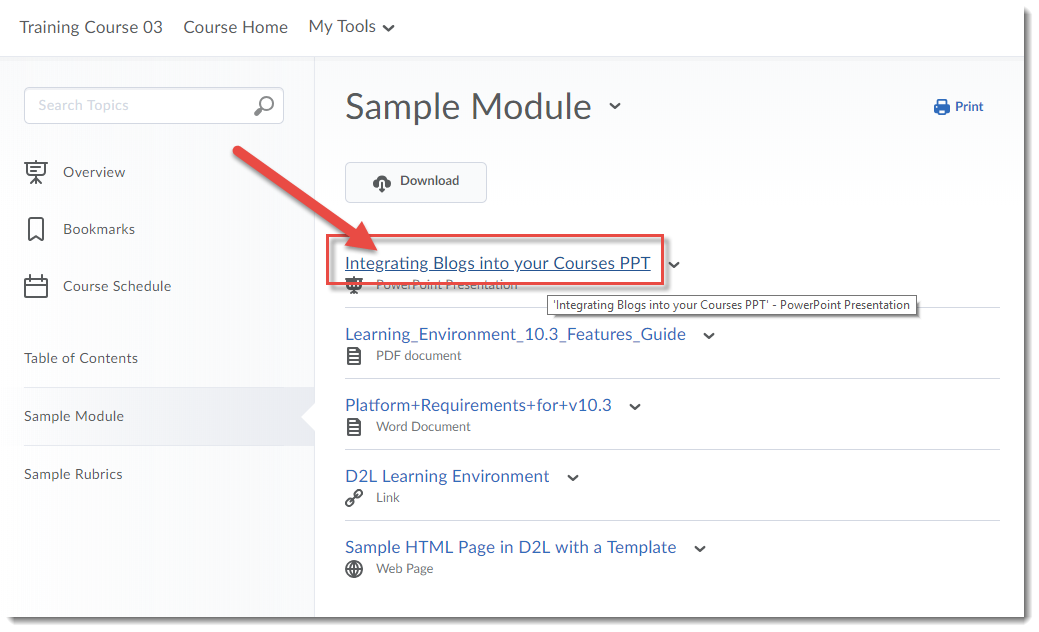
  2. Click on the title of the content page you want to print.Open the page you want to print
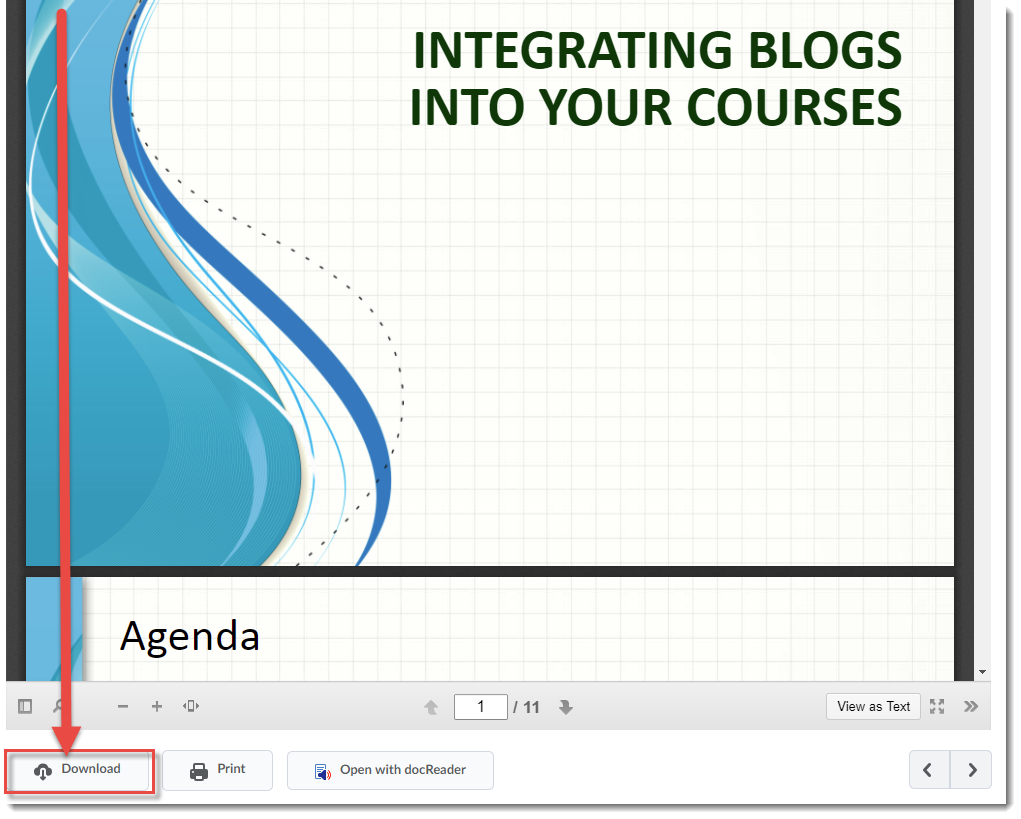
  3. Scroll down to the bottom of the content page and click the Download button to save the file to your computer, then open it in the appropriate program (for example, WORD or PowerPoint) and print the document from there.Click Download

To print multiple pages of Content

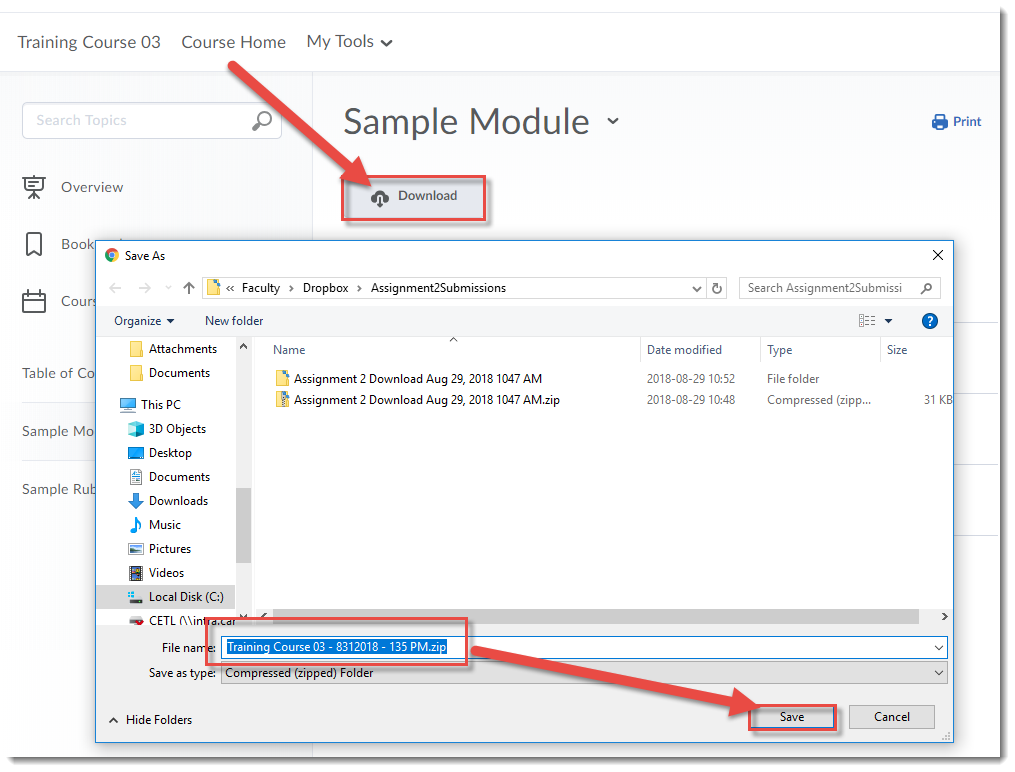
  1. In the Table of Contents box, click on the title of the Module you want to work with.Open the Module you want to print from
  2. Click the Download button at the top of the page. The files in the Module will be “compressed” into a zip file, which you can save onto your computer, and then unzip into separate files which you can then print.Click Download

Keeping Final Grades Updated in D2L

As the term winds down, you may find yourself looking at your course Gradebooks in D2L to see how students are doing. One easy way to do this is to set your Final Calculated Grades to be continuously updated as grades are added – you can see it, but students won’t unless you release the Final Calculated Grades column!

Scenario

This tutorial will cover the steps involved when you want to keep the Final Calculated Grade column updated (in the Enter Grades area) as you add marks to grade items.

Steps

  1. Go to the Grades tool in your course.
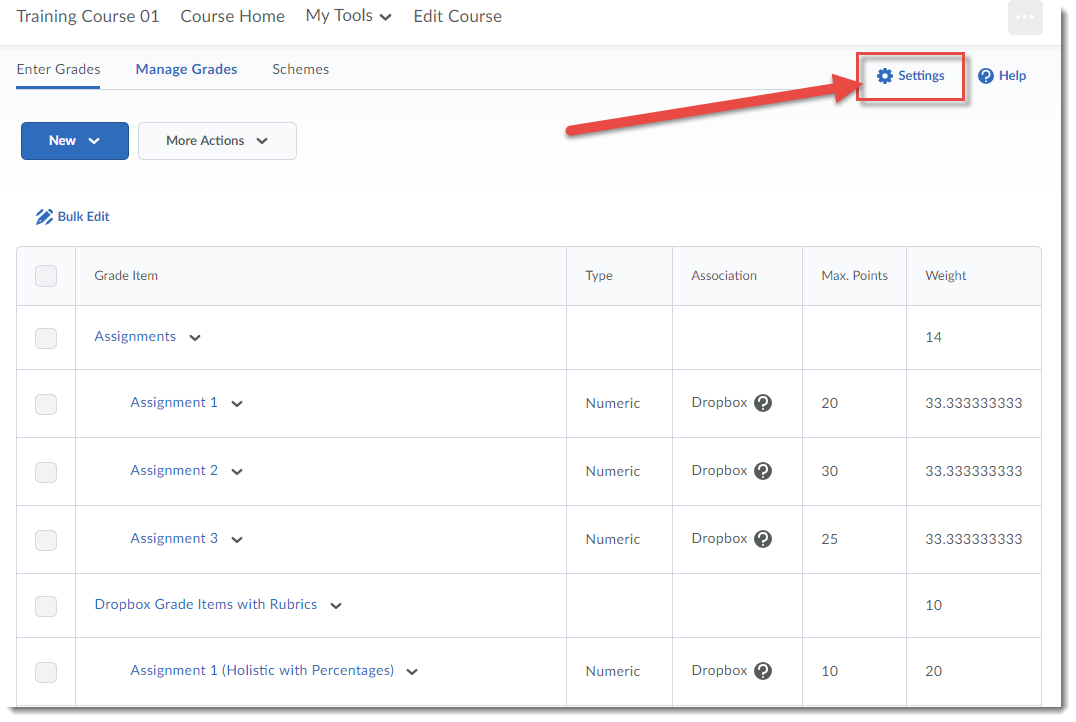
  2. From either Enter Grades or Manage Grades, click Settings.Click Settings
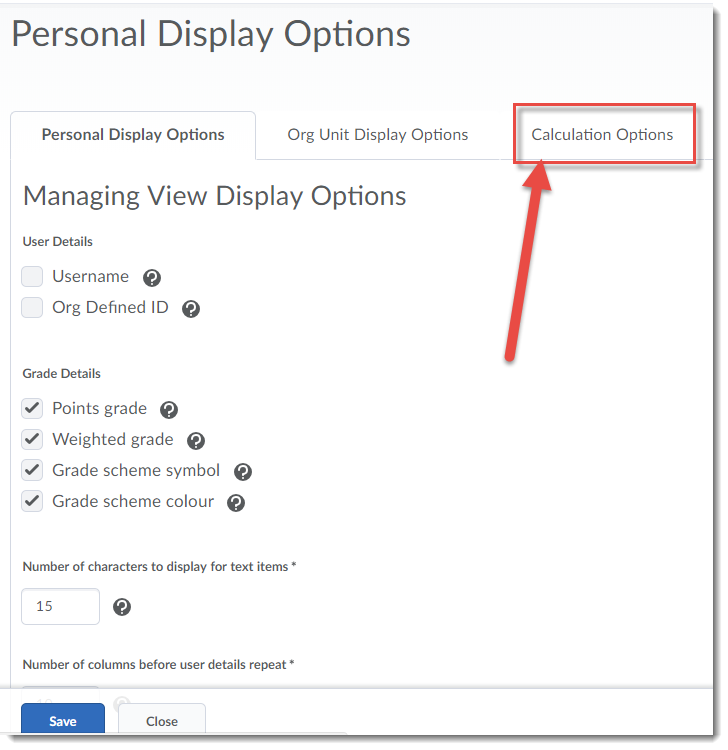
  3. Click on the Calculations Options tab.Click Calculation Options
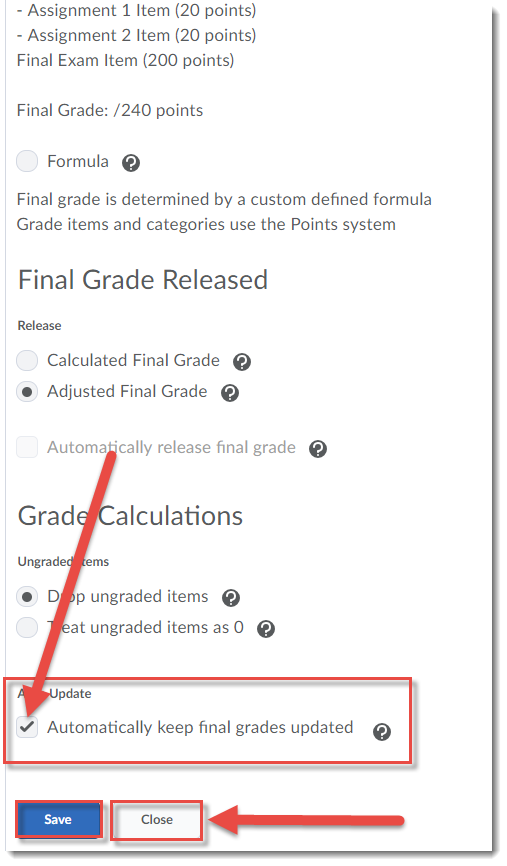
  4. Under Auto Update (at the bottom of the page), select Automatically keep final grades updated. Click Save. Then click Close. When you go to the Enter Grades area, you will now see that the Final Calculated Grades column is updated each time you add new marks to grade items.Select Automatically keep final grades updated, click Save, then Close.

Things to Remember

Note that students will NOT be able to see these ongoing Final Calculated Grade column updates unless you release the Final Calculated Grade item.


Reminder: eLearning Drop-ins, or book a consult!

As we head into the final weeks of the Winter 2019 term, you may be starting to think about how to set up your Final Grade in the D2L Gradebook, or about setting up your courses for the Spring term, and we here in eLearning wanted to remind you that we are here to help!

If you need any help setting up your D2L course sites, or have any questions now or during the term about D2L or how to use (or why you might want to use) any of its tools, we are here for you!

Our eLearning Support team is available from 8:30-4:30, Monday-Friday by phone (250-370-3488) or by email (desupport@camosun.ca) or even by in-person in the Centre for Excellence in Teaching and Learning (CETL) offices in the Lansdowne Library. And they are available for your students to, so be sure to direct them to eLearning Support if they have technical issues with D2L (like logging in!)

We also have 6 instructional designers who are available to help you by appointment, or during our eLearning drop-ins. Our Lansdowne drop-ins are on Tuesdays 12:30-1:30pm in the CETL offices in the Lansdowne Library, and out Interurban drop-ins are on Fridays from 11:30am-12:30pm in our CETL offices in the Liz Ashton Campus Centre, room 235.

If you would like to contact an instructional designer to schedule a consult regarding a specific question you are having around using D2L, or for information on how to use a specific D2L tool, or with any questions you may have about using other educational technologies to support your teaching (or even if you have a pedagogical challenge and are wondering what educational technology might help you with your challenge), contact eLearning support (desupport@camosun.ca) and we can set you up!

You can also find out more about who is available to help you with your eLearning needs by visiting the Contact Us section of the main CETL website and email an instructional designer directly.

We look forward to hearing from you!

Attaching Feedback to a Grade Item in D2L

This tutorial is designed for faculty who have previous experience using the Grades tool and HTML editor in D2L. For further information, please contact desupport@camosun.ca for assistance.

Scenario

This tutorial will cover the steps involved when you want to add feedback or attach feedback files for students in the Grades tool.

Steps

  1. Go to the Grades tool in your course, and make sure you are in the Enter Grades area.
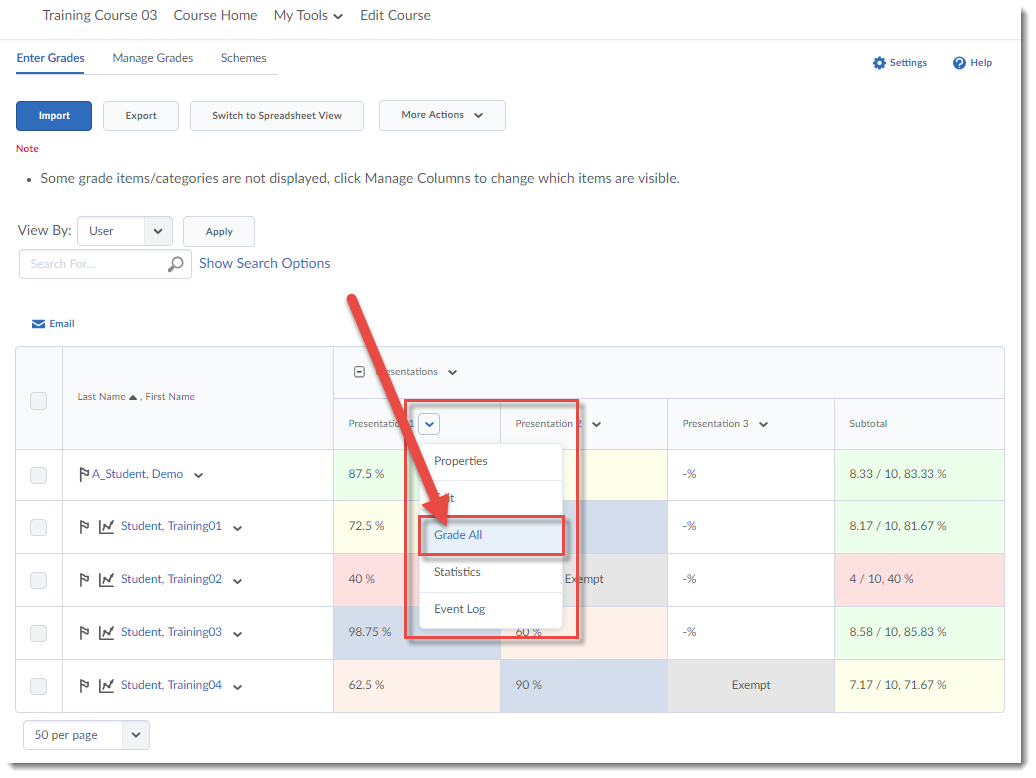
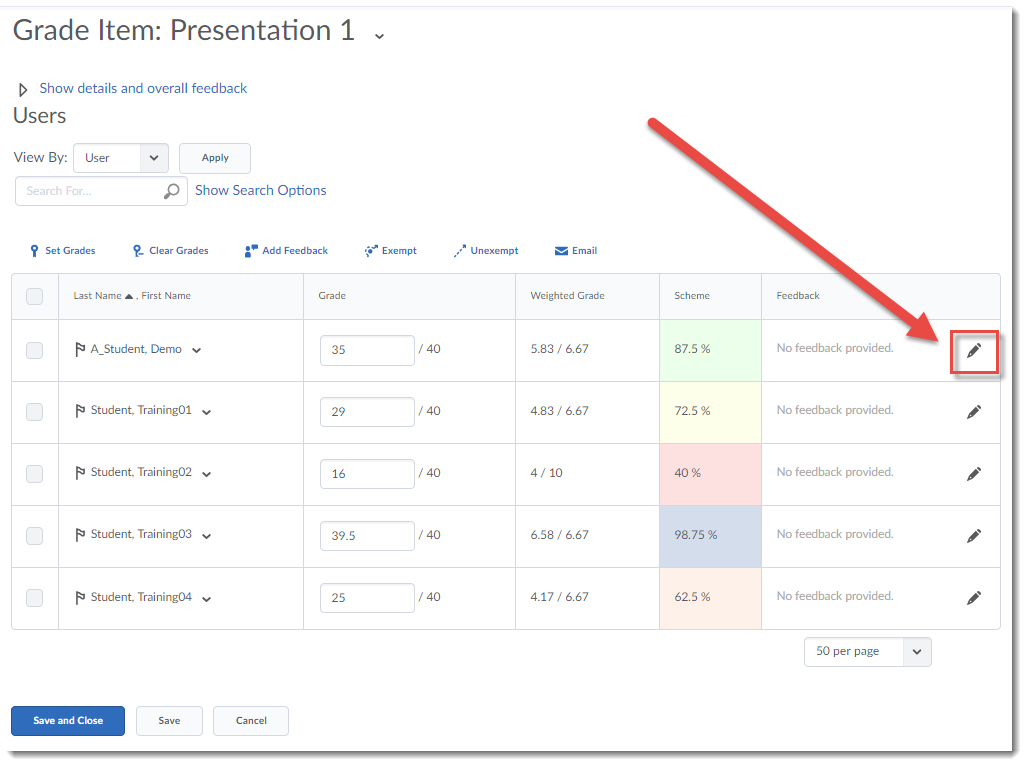
  2. Click the down arrow next to the grade item you want to add feedback to, and select Grade All.Click the down arrow next to grade item and select Grade All
  3. Click the Feedback (pencil) icon for whichever student you want to provide feedback.Click the Feedback icon
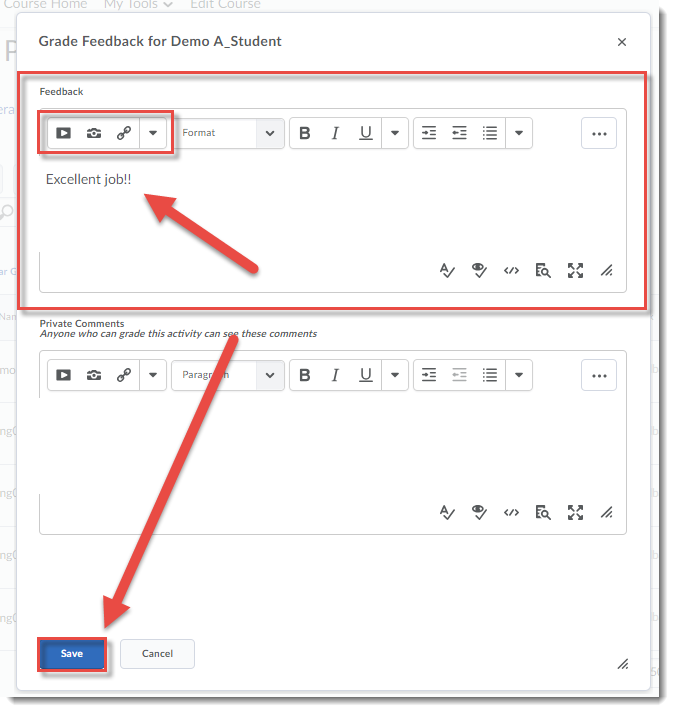
  4. In the Grade Feedback pop-up box, type or copy/paste your feedback into the Feedback box (the HTML editor). You can also use the Insert Stuff or Quicklink options (the icons on the top, left) to upload feedback files for your students (they will be stored in Manage Files). Click Save. Then click Save again once you have finished adding all your grades and feedback for this grade item.Note that the Private Comments box is used to leave comments/information for people in the course who have grading permissions (for example, another instructor, a TA, etc.)

    Add feedback and click Save

Things to Remember

If you are linking grade items to other activities in D2L, for example Dropbox, we recommend that you add feedback, or upload feedback files, to those tools rather than adding them in the Grades tool.

Viewing Assignment Feedback – a Student D2L Tutorial

Scenario

This tutorial will cover how to view assignment feedback that your instructor has left for you in the Dropbox in D2L (if your course is using the Dropbox tool for assignments!)

Steps

  1. Go to your course in D2L.
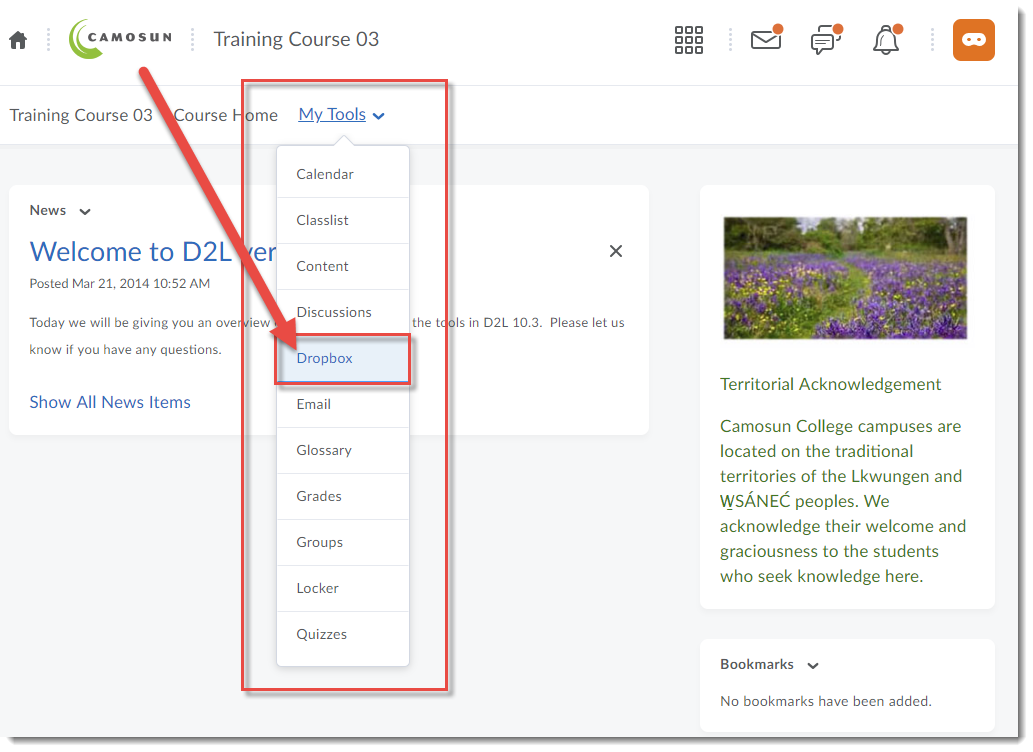
  2. Go to the Dropbox tool (through the Tools drop-down menu in the navigation bar). Note that you have to go to Dropbox to view your feedback, as you won’t receive notifications for feedback (only for grades).Go to the Dropbox tool.
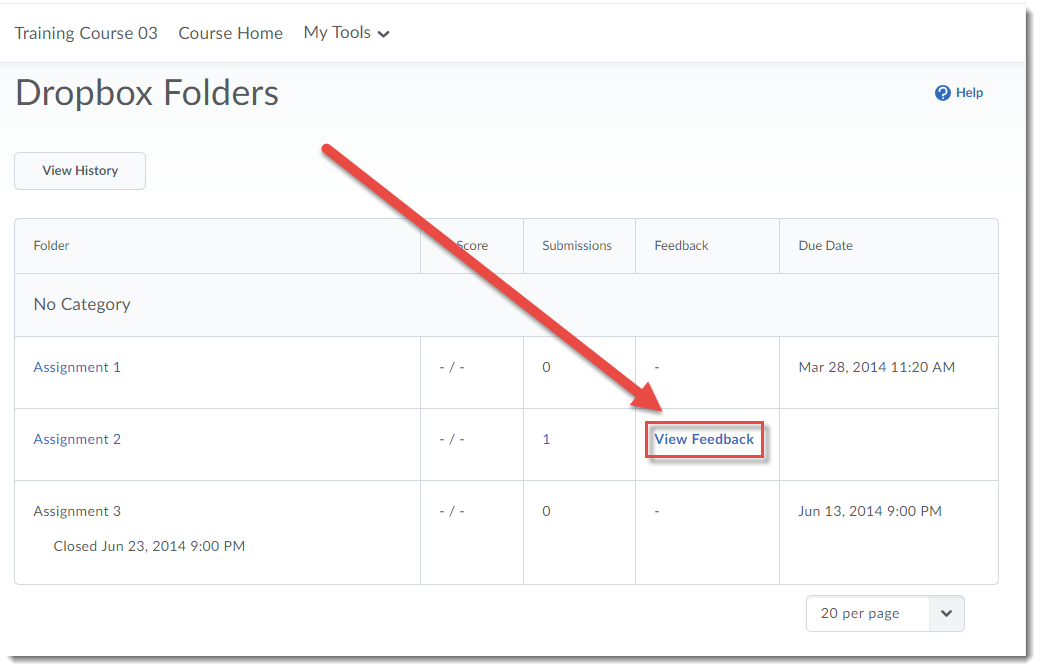
  3. Click the View Feedback link next to the assignment you wish to review feedback for.Click the View Feedback link next to the assignment you wish to review feedback for.
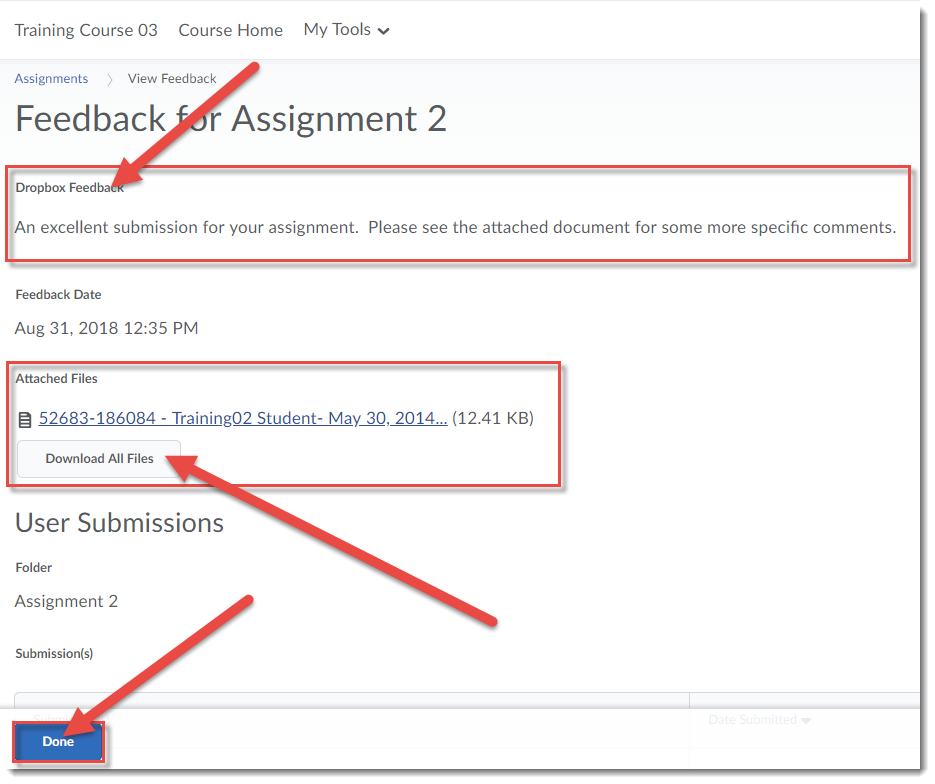
  4. Review the Dropbox Feedback, and/or download the Attached Files (which may contain track changes, comments, etc. from your instructor). Click Done when you have finished reviewing the feedback.Review the Dropbox Feedback or download Attached Files. Click Done when finished.

Things to Remember

NOTE that you will only be able to view Dropbox feedback after your instructor has released it! For further information, please contact desupport@camosun.ca for assistance.

Ethical Dimensions of Educational Technology – Workshop Synopsis, Part 1

Part 1: an introduction to the workshop, and overall impressions

Last May, Brian Lamb, Director of Innovation Open Learning at Thomson Rivers University and I ran a workshop to explore the following question: “Many of us are integrating educational technology into our teaching, but how many of us are discussing the ethical issues that come along with those technologies?”

In this post, I am going to introduce you to how this blended workshop (first part online, second part face-to-face) was constructed: engaging participants in conversations around institutional policy, privacy, social justice, accessibility, and personal risk, when it comes to educational technology, and also helping them being to develop strategies for being creative and innovative while keeping those issues in mind. In later posts, I will explore the specifics of the content presented, and the outcomes of the various discussions.

The learning outcomes for the full workshop stated that by the end of the online and face-to-face sessions, participants will be able to:

  • Identify the main ethical issues facing educational institutions, as well as faculty and students, regarding use of educational technology for teaching and learning.
  • Identify institutional policies covering use of educational technology at Camosun, and what gaps there may be in said policies.
  • Implement at least one strategy for addressing an ethical issue related to educational technology in your own situation (teaching or otherwise).

The online component (lasting one week) both asked participants to review some basic information and reflect on it, and enabled us to maximize collaboration and discussion in the face-to-face session. The online activities, which you can go through yourself at https://ethicaldimensions.opened.ca/online/, were as follows:

1. Reflect on the following three questions, and come prepared to discuss your answers with your fellow participants:

  • What one thing stood out for you from the readings and media pieces you will be reviewing?
  • What one question do you have regarding ethical issues for your own use of educational technology?
  • What do you know about Camosun’s policies around the use of online technology to support teaching and learning?

2. Read the following two online articles

3. Watch/listen to the three media pieces listed here:

The face-to-face session was designed to maximize discussion of the issues raised from the online session, and to move them into thinking about how to consider ethical issues when integrating educational technology into their teaching. The face-to-face session unfolded as follows:

We started with an Impromptu Networking activity around the three questions posed in the online session (see above).

This was followed by a presentation and discussion of six ethical issues we as educators face when integrating educational technology into our teaching.

To get participants up and moving, as well as thinking about how we as an institution can address these ethical issues, we engaged in a 25/10 Crowd-sourcing activity, asking: What is the one critical thing you would like to see Camosun do around supporting or guiding faculty and staff regarding the issues of ethics and educational technology? I will talk more about what the participants came up with in another post.

We then asked participants to take one of the big 10 ideas generated in the 25/10 activity, and to hone it to something practical and personal/useful in their own working situations through Troika Consulting .

To give participants a breather from all the active learning, Brian and I then shared with the group some information about what others (people, institutions) are doing to address ethical issues associated with integrating educational technology in teaching, share strategies we might be able to adapt here. In addition, we talked a little bit about what we at Camosun might consider doing, including:

  • Creation and enforcement of Policy (with the caveat that while we may not be able to control Camosun policy, we can work on what we do at the classroom level).
  • The question of how we can encourage innovation while keeping ethical issues at the forefront of all educational technology adoptions.
  • The provision of Education for faculty and students around ethical issues, as well as who provides this training, who follows-up with it, and who keeps people informed on an on-going basis.
  • The issue of Consistency: of message (institutional), of education, or application of policy.
  • The question of how we support faculty and students to make informed decisions, knowing the potential Risks, and how we, as faculty and an institution, define and evaluate those risk.
  • The integration of Open Educational Resources, Open pedagogy, etc. as a way to mitigate risk and give our students more flexibility in their own learning.

To wrap-up the day, we engaged in a 15% Solutions activity, asking participants to identify what they can do now with the resources they have available to them, and where they may need help to support them in working to address ethical issues with the educational technology they are using in their teaching.

In the next post about this workshop, I will discuss the six specific ethical issues Brian and I introduced at the session.

Blackboard Collaborate Ultra: Video/Audio Class Conferencing Online

If you have been paying attention to the workshop announcements for May/June, you may have noticed the following:

BlackBoard Collaborate Ultra: Information sessions

  • Lansdowne: Wednesday, June 5, 10:00-11:00am, LLC151
  • Interurban: Friday, May 17, 10:30-11:30am, LACC235

Blackboard Collaborate Ultra is a synchronous classroom tool that is coming to Camosun. This means that faculty now have an online tool with audio, video, chat, polling, and whiteboard/desktop sharing capabilities to support their teaching in real-time. Kaltura can be used as a stand-alone teaching tool, or can be integrated into a D2L course, and it works on computers and mobile devices (yes, even phones!)

Blackboard Collaborate Ultra rooms include a collaborative whiteboard tool that allows you to interact with students in real time, breakout rooms for smaller group discussions, and the ability to display desktop applications and web resources such as multimedia. In addition, an interactive recording can be created for each session allowing students the opportunity to review material at a later date.

Some specific activities which work well in Blackboard Collaborate Ultra are:

  • Facilitating live, online discussions around specific topics using video and audio, which can then be recorded so students can go back and review at any time
  • Showing students how to use different kinds of technologies through desktop sharing, and presenting polls at intervals to check comprehension
  • Breaking your class into smaller groups for discussions, then bringing them back to the main room for a debrief
  • Giving students space to do online class presentations using PowerPoint or a virtual whiteboard
  • Providing online office hours, or online space for student group work

More information about how you will be able to access Blackboard Collaborate Ultra will be coming in late April, and hands-on sessions will be offered in the spring. Go to https://decamosun.wordpress.com/2019/01/28/elearning-spring-workshops-open-for-registration/ to find out more.

If you have any questions about how and when you can have access to Blackboard Collaborate Ultra, or if you would like a demo or to talk to someone about how you might use Blackboard Collaborate Ultra, contact desupport@camosun.ca to arrange for a meeting with Bob Preston, or one of our instructional designers.

What’s this Kaltura I keep hearing about?

Kaltura is a streaming media tool that is coming to Camosun. This means faculty and students will now have a place to upload, create, and edit their course-related videos. Kaltura also integrates with D2L, meaning that you can upload, create and edit videos through D2L, and those files can then be viewed on a course page or in your course’s media gallery. It is this integration which we are launching first this spring.

Kaltura can be used to:

  • Upload images, video, and audio files to your course that you can then embed in the HTML editor (wherever it appears in D2L), or as a Topic link in the Content tool.
  • Do some basic editing of your video files right in D2L (note that we do recommend that more complex editing be done in video editing software, as the tools in Kaltura are limited in scope)
  • Create webcam and screen capture recordings (for example, create a voiceover PowerPoint presentation with picture in picture, or capture how to use a piece of software with audio)
  • Create interactive video quizzes (which can then be connected to your gradebook)
  • Collect video and audio assignments from your students
  • Add YouTube videos into your Kaltura media list – this means when you embed these videos, they will play without advertising or providing “helpful” suggestions for additional videos to watch.

In addition, you will be able to

  • Share videos with other instructors
  • Create playlists of videos for your course
  • Use closed-captioning to ensure your videos are accessible
  • Add tags so that your videos can be searched for
  • View analytics on who has watched a video, how long they spent on it, etc.
  • Add Creative Commons licencing to your videos

More information about how you will be able to access Kaltura through D2L will be coming in late April. And a series of hands-on sessions will be offered the first week of June. Go to https://decamosun.wordpress.com/2019/01/28/elearning-spring-workshops-open-for-registration/ to find out more.

If you have any questions about how and when you can have access to Kaltura, or would like a demo or to talk to someone about how you might use Kaltura, contact desupport@camosun.ca to arrange for a meeting with Bob Preston, or one of our instructional designers.

Characters to avoid in Document Filenames – a Student D2L Tutorial

So, today I thought I would post a short tutorial that is targeted more for students who are saving documents for uploading into D2L’s Assignment Dropbox.  However, the information in this post is good to keep in mind whenever you are saving files, whoever you are.

Scenario

This tutorial will cover what characters to avoid in filenames when saving your Word documents (or other assignment documents) for uploading into D2L. (NOTE: a file name is what you are asked to give your document when you save it, for example “BenAssigment1.doc”).

Because your files will be viewed by instructors who use many different operating systems (Mac, PC, etc.) and devices (desktops, tablets, smartphones, etc.), it is important to use characters in your document filenames that may will be compatible as across the board as possible.

So, DO NOT use the following characters and symbols in your filenames!

  • # (pound sign)
  • % (percent sign)
  • & (ampersand)
  • * (asterisk)
  • $ (dollar sign)
  • @ (“at” sign)
  • ? (question mark)
  • ! (exclamation point)
  • ‘ or “ (single or double quotes)
  • : or ; (colon or semicolon)
  • { or } (left or right bracket)
  • < or > (left or right angle bracket)
  • / or \ (back or forward slash)
  • Blank spaces

Also, keep these rules in mind:

  • Don’t start or end your filename with a space, period, hyphen, or underline.
  • Keep your filenames to a reasonable length, and make sure they are under 31 characters.
  • Always use lowercase (as most operating systems are case sensitive).
  • Avoid using spaces and underscores – use a hyphen instead.

For further information, please contact desupport@camosun.ca for assistance.