Introduction to Kaltura Express Capture in D2L – Kaltura Tutorial 

This tutorial is designed for faculty who have previous experience using Kaltura in D2L, as well as the Assignments tool. For further information or assistance, go to our Team Dynamix Support portal and click the appropriate Category to submit a ticket. 

This tutorial will cover the steps involved when you wish to create a simple video right within D2L.  Kaltura Express Capture allows you to created videos using your webcam and audio within various assessment tools in D2L (such as Assignments) as well as in your My Media area. Kaltura Capture Express recordings are saved in your My Media space in D2L. 

Scenario 1: Adding a Kaltura Capture Express recording to My Media 

  1. Go to your course in D2L. 
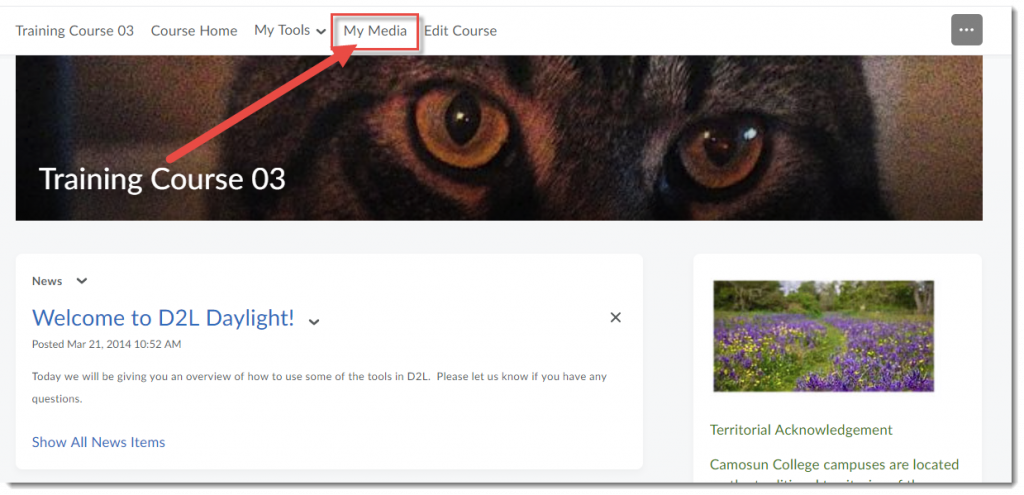
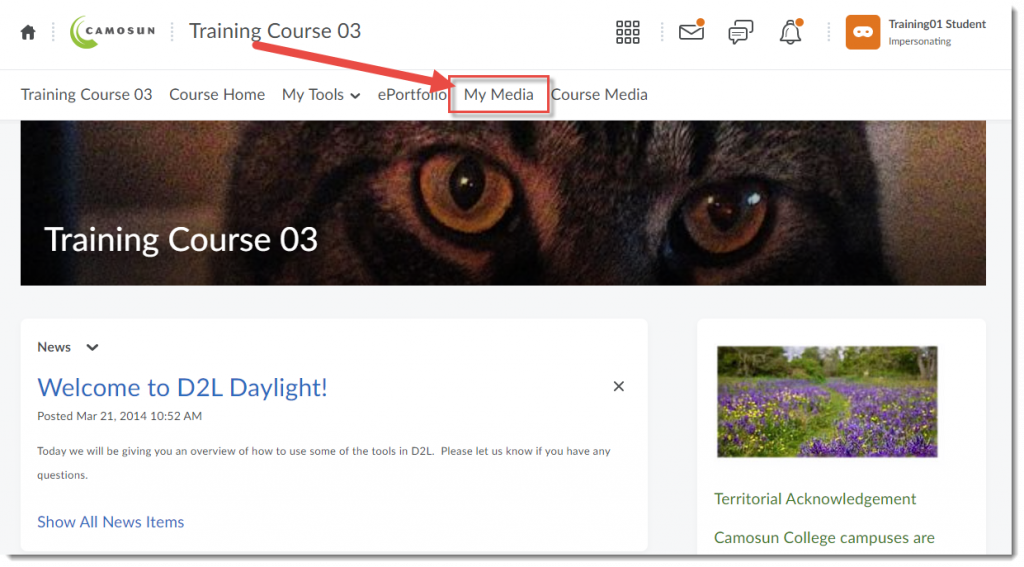
  2. Go to My Media.Click My Media


  3. Click Add New and select Express Capture.Click Add New and select Express Capture


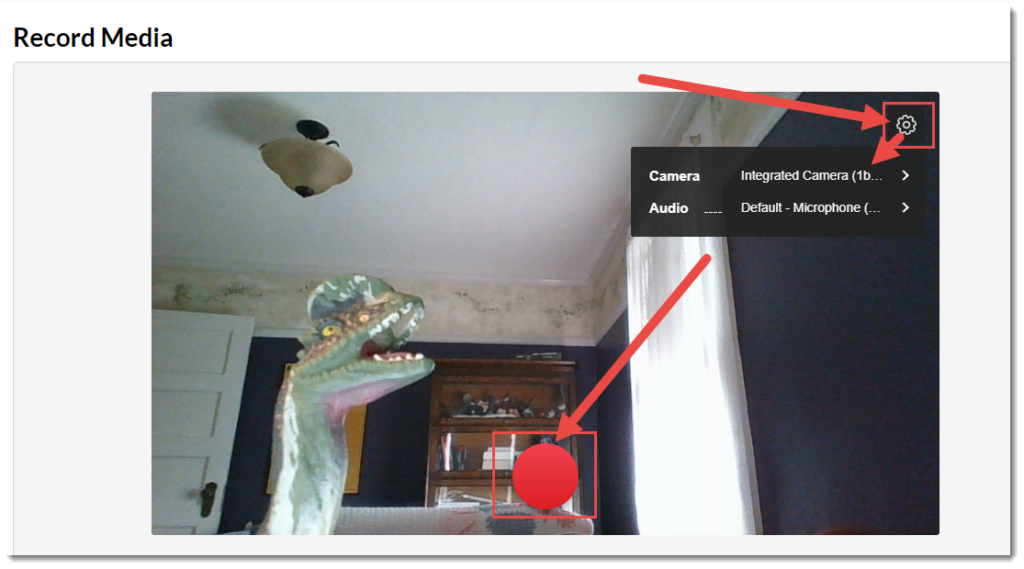
  4. You will see your webcam video appear with a red round record button at the bottom centre. Click the Settings icon at the top right of the video to change your camera and/or microphone settings.  Click the record button to begin recording your video.Click Record


  5. After the countdown (from 3) ends, start talking (note that it’s good to have a script or very clear idea of what you want to say to avoid having to re-take or edit your video(s) later.  Click the Stop button to end the recording.Click Stop


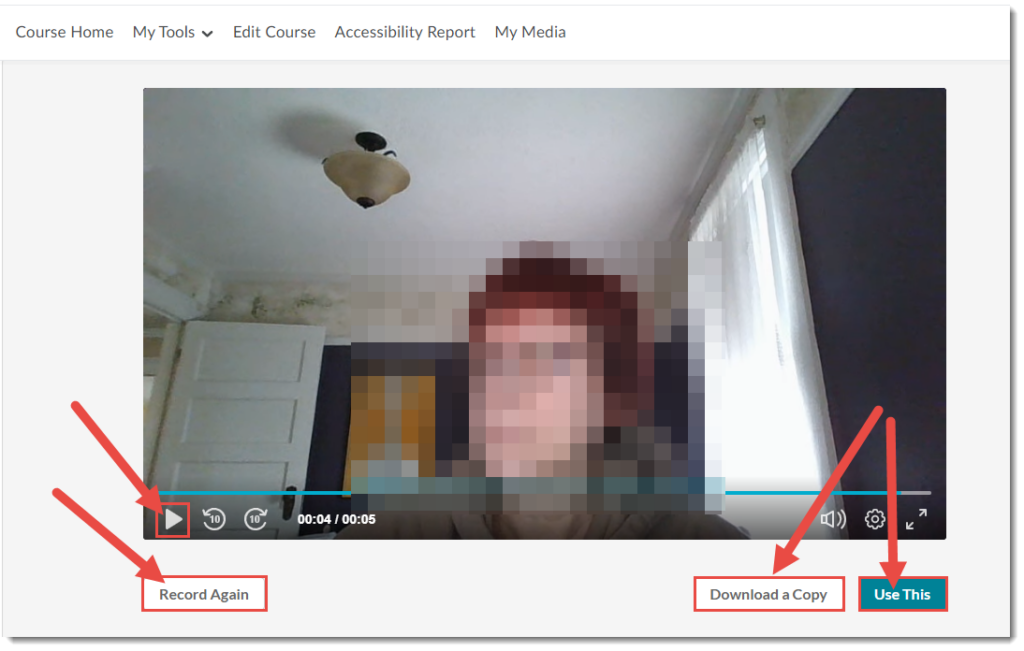
  6. Click the Play icon to play the video.  Click Record Again to re-record your video.  Click Download a Copy to download the video to your device.  Click Use This to save the video to My Media.Click Use This


  7. Once the video is saved to My Media you can change the Name, add a Description, etc. See the Tutorial Uploading Media to My Media (page 4) for more information.

Scenario 2: Adding a Kaltura Capture Express recording as feedback to an Assignment submission 

  1. Go to your course in D2L.  Go to Assignments (through the link on your Navbar, or in your My Tools drop-down menu, or in a draft Topic in the Content tool).
  2. Go to the Submissions area for an assignment and go to a specific assignment submission. 
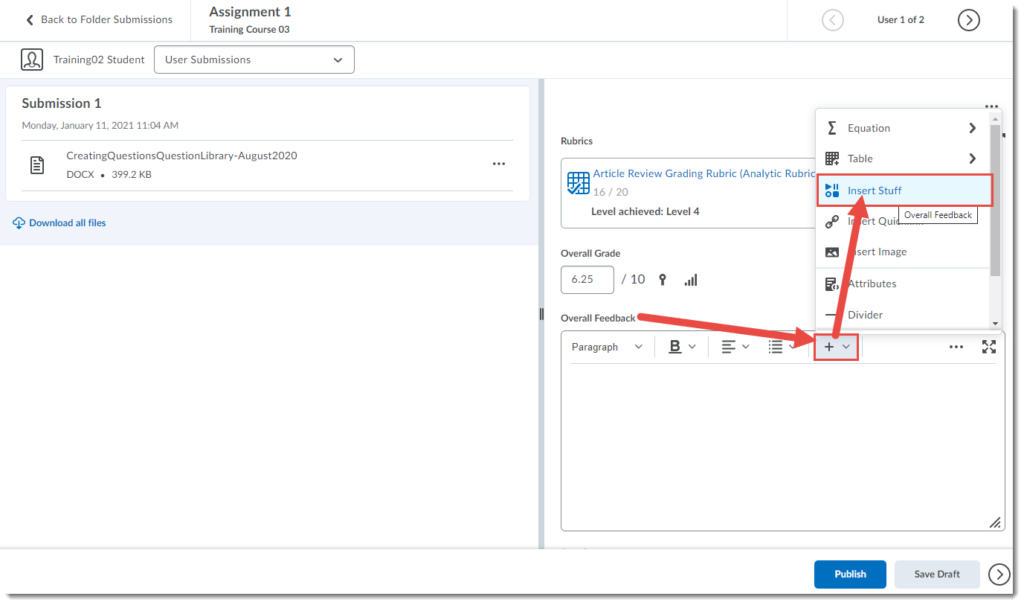
  3. In the Overall Feedback box, click the Plus drop-down menu and select Insert Stuff.

    Click Insert Stuff

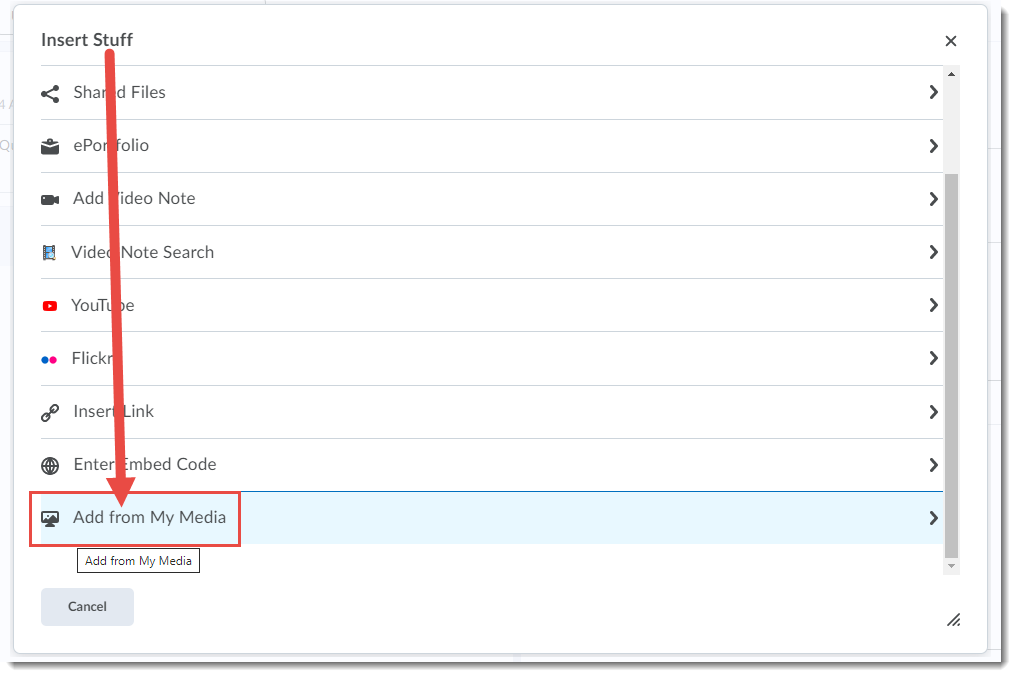
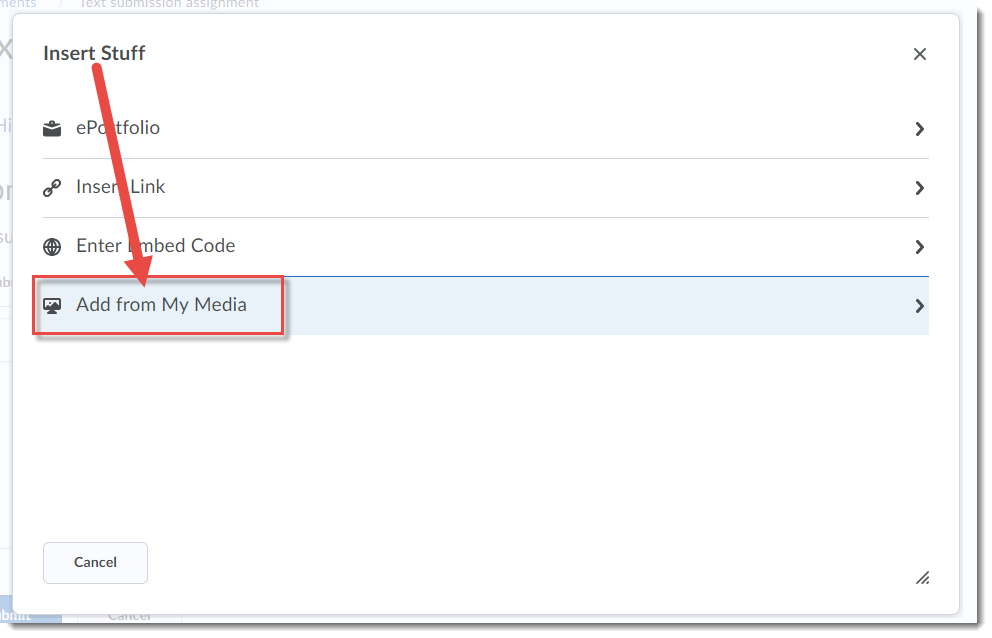
  4. In the Insert Stuff pop-up box, click Add from My Media.

    Click Add from My Media

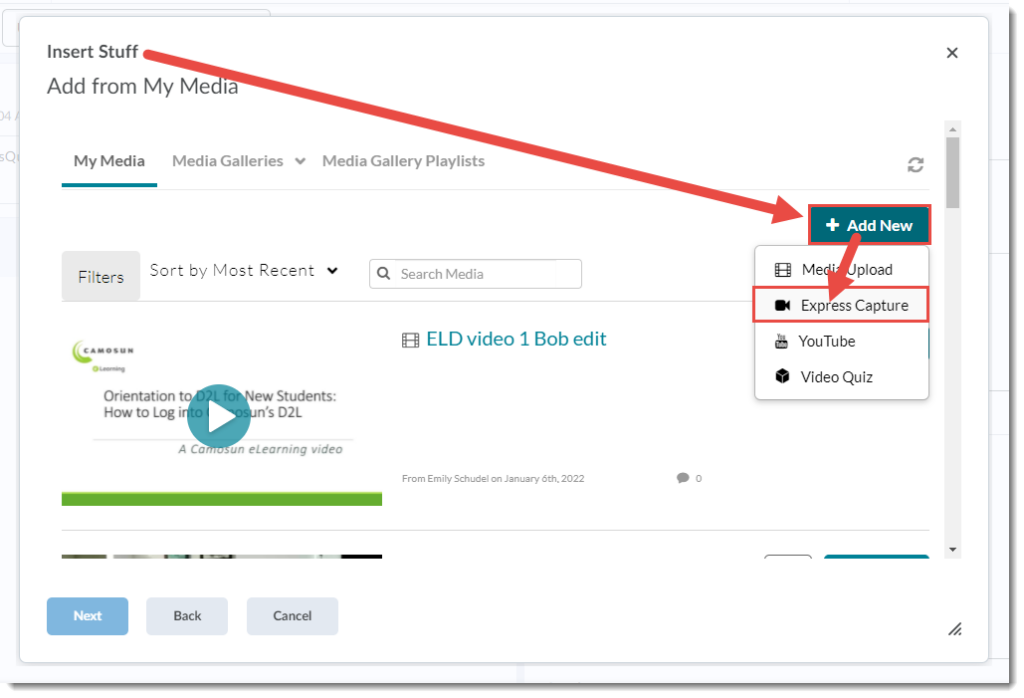
  5. Click Add New and select Express Capture.
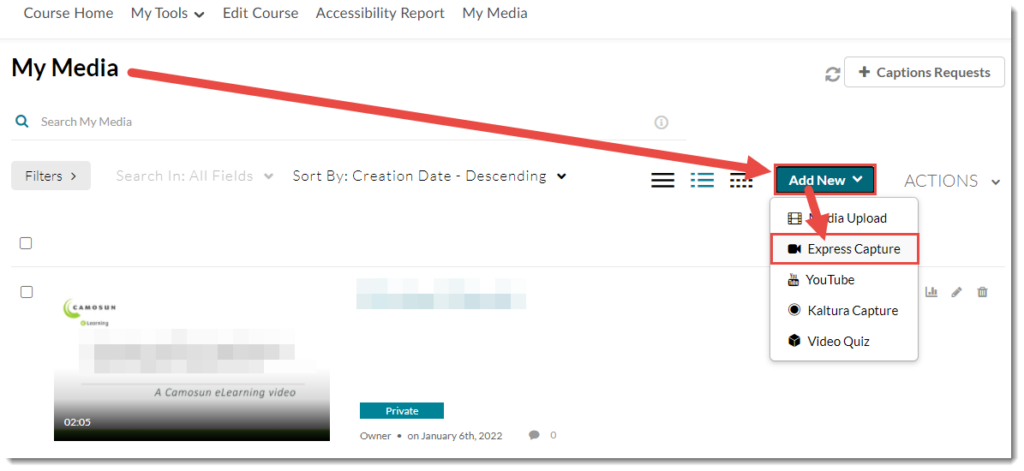
    Click Add New and select Express Capture

  6. As per step 4 in the previous scenario, you will see your webcam video appear with a record button at the bottom centre. Click the Settings icon at the top right of the video to change your camera and/or microphone settings.  Click the Record button.
  7. As per step 5 in the previous scenario, after the countdown (from 3) ends, start talking (note that it’s good to have a script or very clear idea of what you want to say to avoid having to re-take or edit your video(s) later.  Click the Stop button to end the recording. 
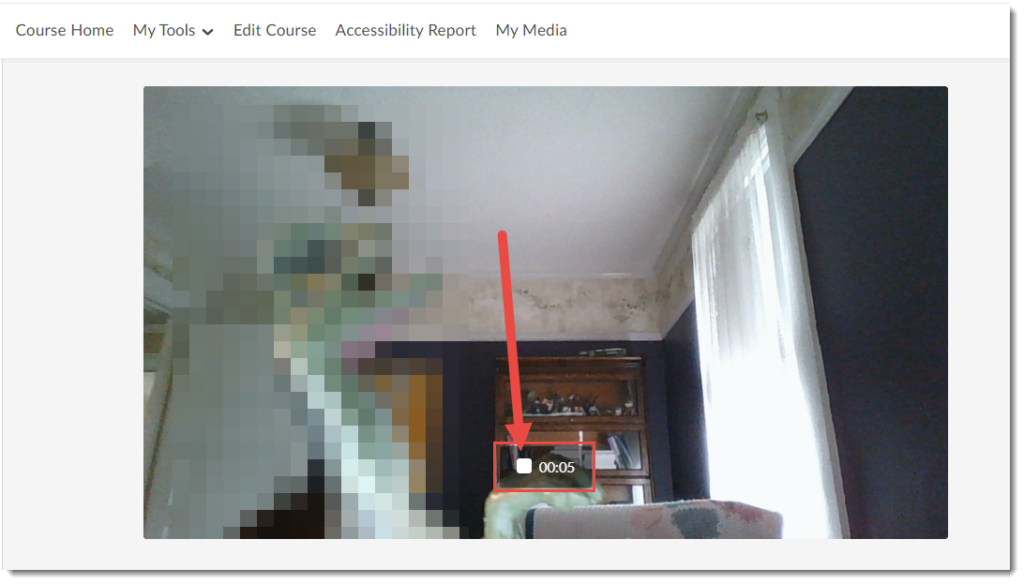
  8. Click the Start Over icon in the centre of the video to play the video.  Click Record Again to re-record your video.  Click Download a Copy to download the video to your device.  Click Use This to save the video to My Media. 
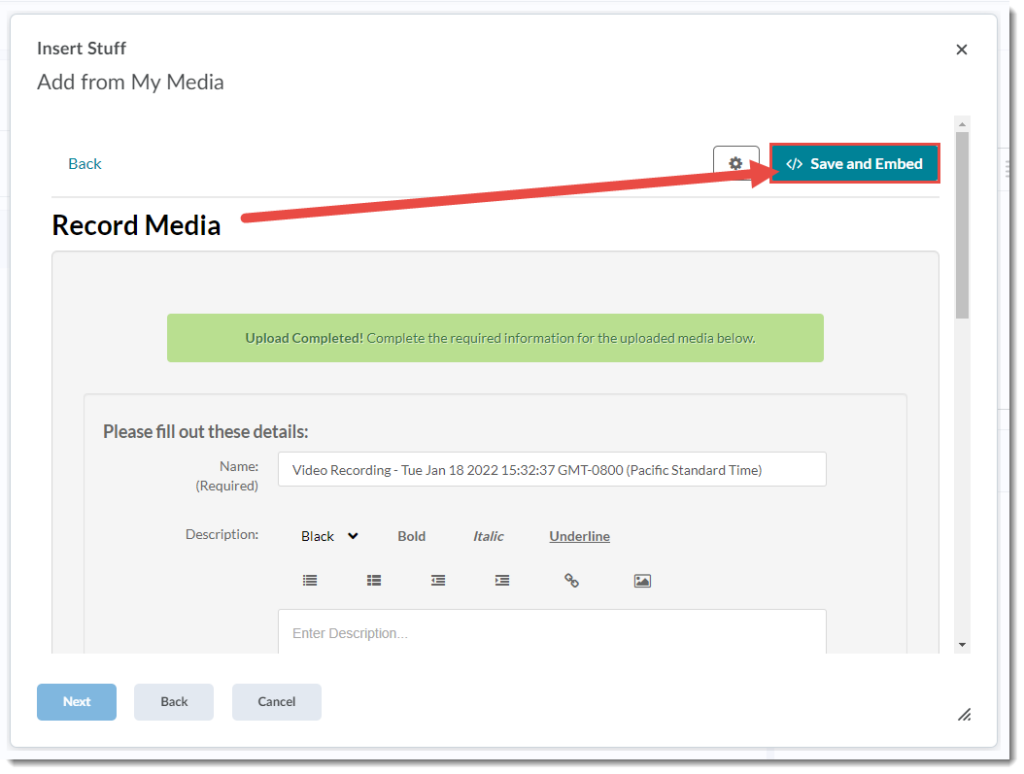
  9. Click Save and Embed.

    Click Save and Embed

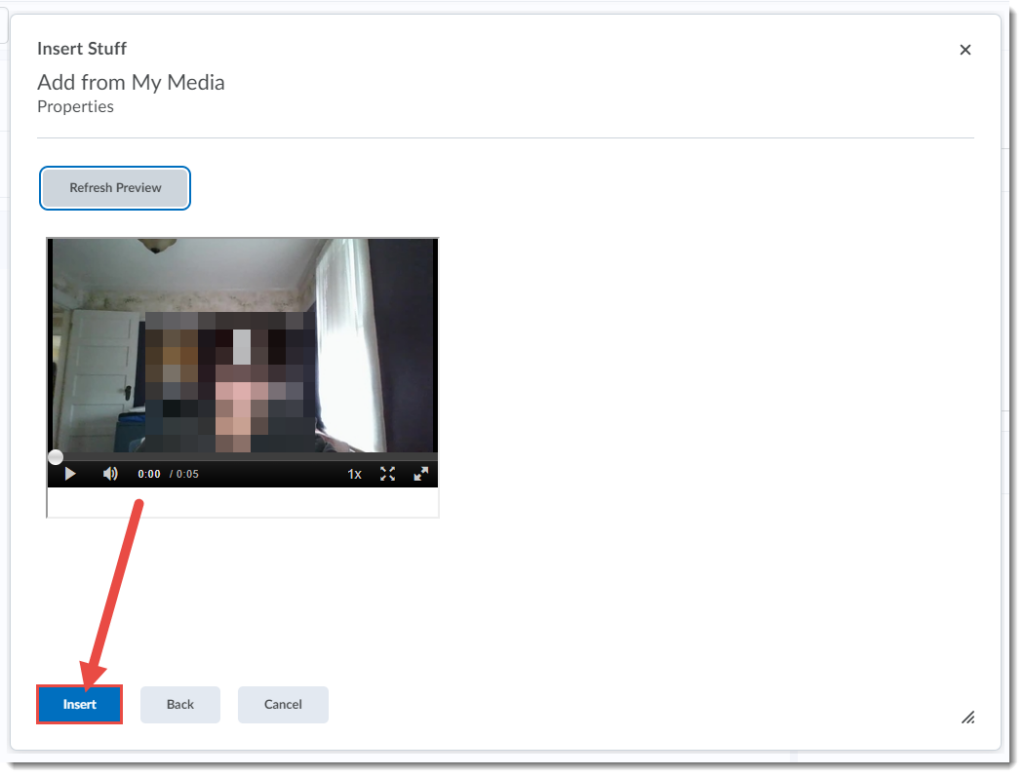
  10. Click Insert.

    Click Insert

  11. Publish or save your feedback as Draft and continue to the next submission. 

Things to Remember 

You can add a Kaltura Express Capture video into the HTML editor wherever it appears in D2L.  For example, you could add a quick video into a News post or a Discussion post.  But we recommend if you are creating videos you want to use for more than one iteration of a course (a video for more than just in the moment feedback), use the regular Kaltura Capture on your device.  See the tutorial Introduction to Kaltura Capture for more information. 

All videos you create using Kaltura Express Capture will be saved in your My Media area no matter where you create them, so you should delete them from the My Media area periodically (e.g., a year after a course has ended) so you don’t end up with hundreds of feedback videos in your My Media space.   

Reminder of where to get help with D2L, Collaborate, and Kaltura

As we gear up for the new school year, I wanted to remind you of some important information related to D2L, and for online teaching/learning, both for faculty and students.

For Students:

For Faculty:

Wondering where to get help?  You can get help from eLearning Support, or book an appointment with an instructional designer, by emailing elearning@camosun.ca.   Check out our list of workshops and the Events Calendar on the CETL website.

eLearning: Spring Cleaning – Tips for Pruning Your Media Collections

With limited server space and the need to better manage our carbon footprint, we cannot accumulate volumes of media. As end of term approaches, it is time to start pruning your Collaborate and Kaltura media collections.

Collaborate:

  • At end of term, delete Collaborate recordings from your courses.
  • If there are specific recordings you want to keep, you can download them and upload them to Kaltura MyMedia for future re-use.
  • Revisit courses from past terms and delete those historical recordings.

Kaltura

  • Go through your MyMedia account and delete copied or duplicate videos that you have created or uploaded but don’t need.
  • Delete any single use videos that you do not plan to use again.
  • Encourage your students to delete any videos created for the course that they won’t need in the future.

Camosun is working on a more formal data retention plan to help manage the growing volume of media. In the meantime, it is good practice to get in the habit of cleaning out your media at end of term or making it part of your annual SD plans.  Questions?  Email elearning@camosun.ca.


Kaltura Post-Upgrade Training Sessions

As you may or may not know, we (Camosun College, but really anyone who has their Kaltura hosted at UBC) are having a Kaltura upgrade this weekend (Kaltura will be unavailable from Saturday, August 22 at 4:00 am until Sunday, August 23 at midnight). Things should be up and running, and new improved on Monday (August 24th).

BCNet is offering some training on the upgrades for our faculty and staff who use Kaltura, so please register using the Registration links below.  The sessions will also be recorded in case you are unable to attend.  Please feel free to forward this invitation to anyone else you think would be interested in attending.

A couple things to note:

  • Sessions will be executed in a Moodle environment given the popularity of this LMS amongst members.
  • Sessions will be hosted using Zoom webinar. As such we have a 500 attendee limit to each session.
  • Sessions will be recorded for anyone who cannot attend and for use as an additional training tool after the fact.

Kaltura Capture and Media Management

  • When: August 27, 2020 from 10:00 – 11:00am PT
  • Where: Online via Zoom
  • Description: This session will focus on the Kaltura Capture feature including everything from install, to access, to usage. Also included, will be a review of best practices on effective media management.
  • Registration

Kaltura Analytics and Student Engagement

  • When: September 1, 2020 from 10:00 – 11:00am PT
  • Where: Online via Zoom
  • Description: This session will provide an overview of the new KAVA analytics tool and how to interpret the analytics you receive. With a focus on student engagement, this session will also cover the use of video quizzing and captioning.
  • Registration

Let us know if you have any questions about Kaltura in general, or about the upgrade by emailing elearning@camosun.ca.


Setting Videos to Allow for Downloads through My Media in D2L

This tutorial is designed for faculty who have previous experience using D2L and who have uploaded media to My Media in D2L.  It will cover the steps involved when you wish to allow students to download a video. There are two parts to this tutorial: setting a video to allow downloading, and adding it to the Course Media gallery so students can download it.  For further information, please contact desupport@camosun.ca for assistance.

Steps

  1. Go to your course in D2L.
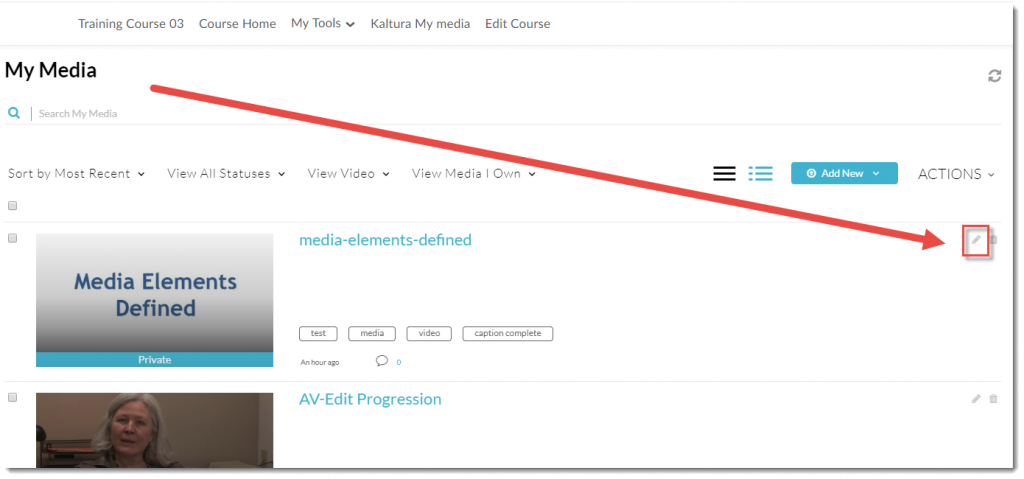
  2. Go to My Media.Click My Media
  3. Click the Edit icon (the pencil) to the right of the video you wish to allow downloads for.

    Click the Edit icon

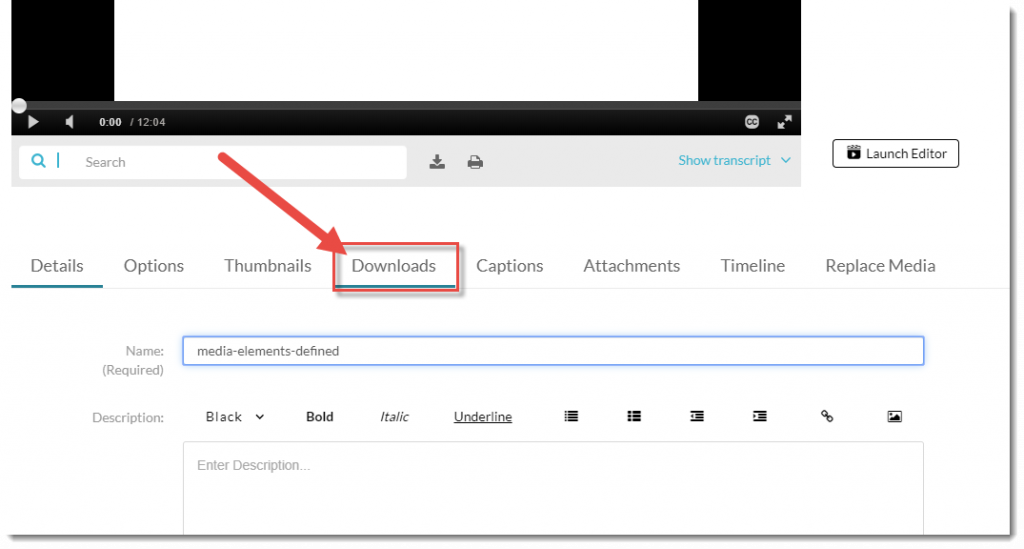
  4. Click Downloads.

    Click Downloads.

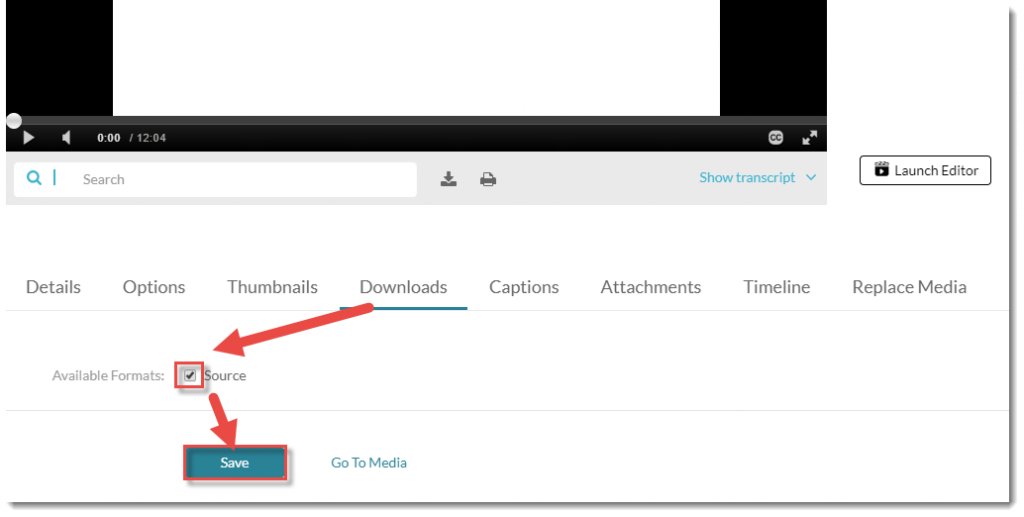
  5. Click the Source select box, and click Save.

    Click the select box and click Save.

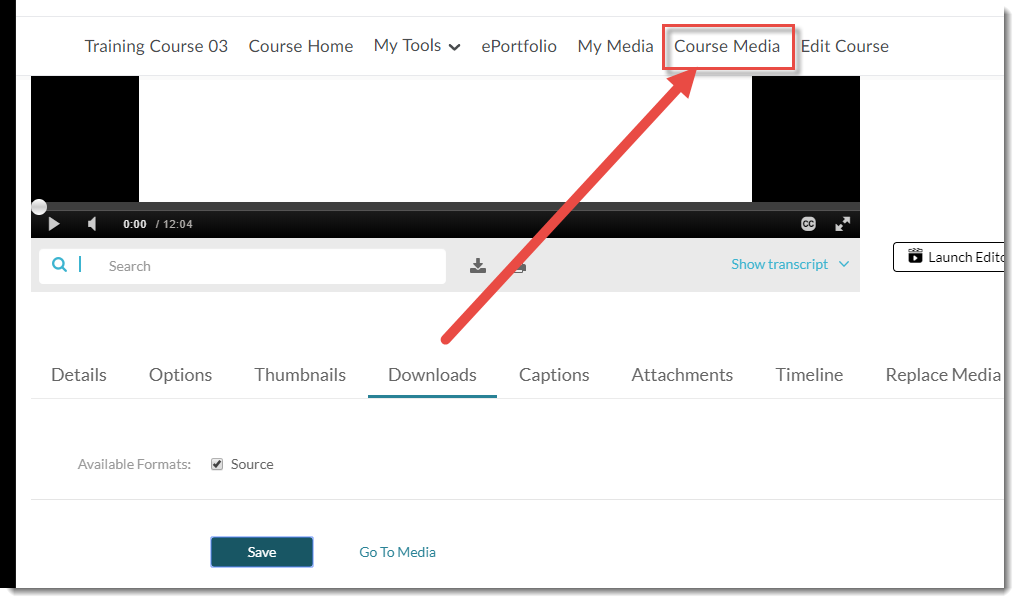
  6. Click the Course Media link on your Navbar (if it is not there, you will need to add it).

    Click Course Media.

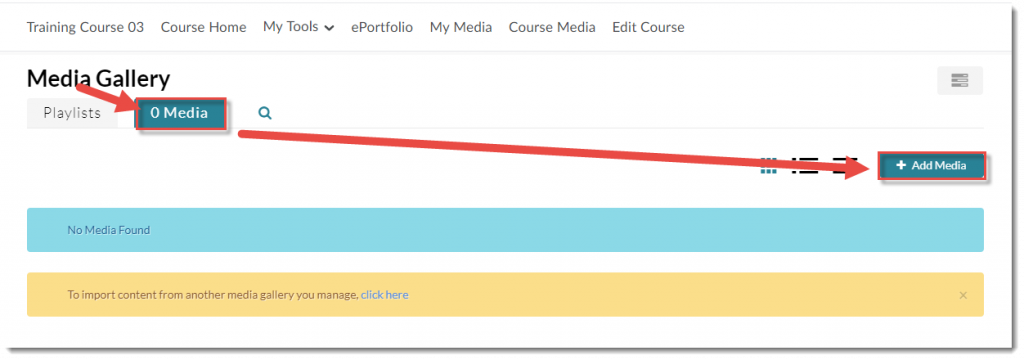
  7. In the Course Media area, click the Media tab, then click +Add Media.

    Click the Media tab, then click Add Media.

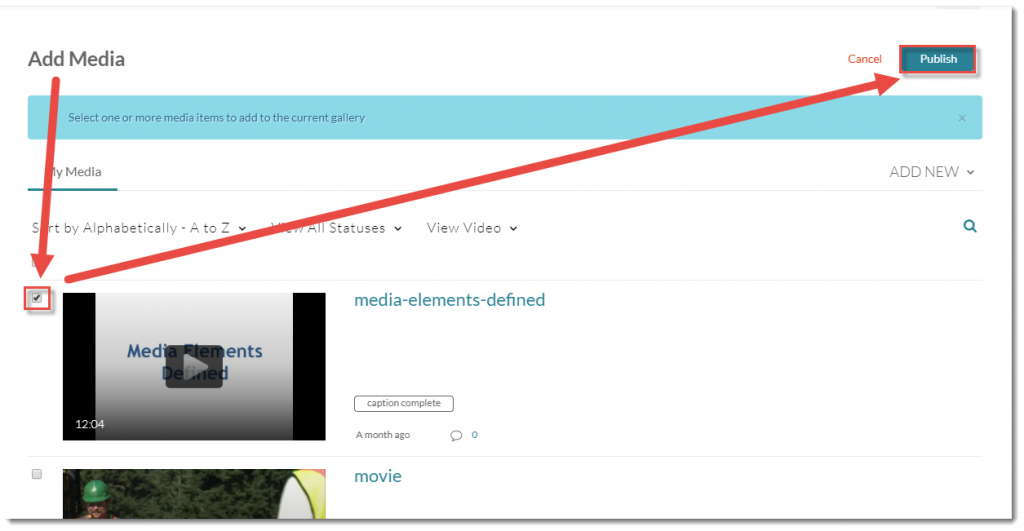
  8. Select the video you wish students to download, and click Publish. This will add the video into the Course Media gallery.

    Select the video and click Publish.

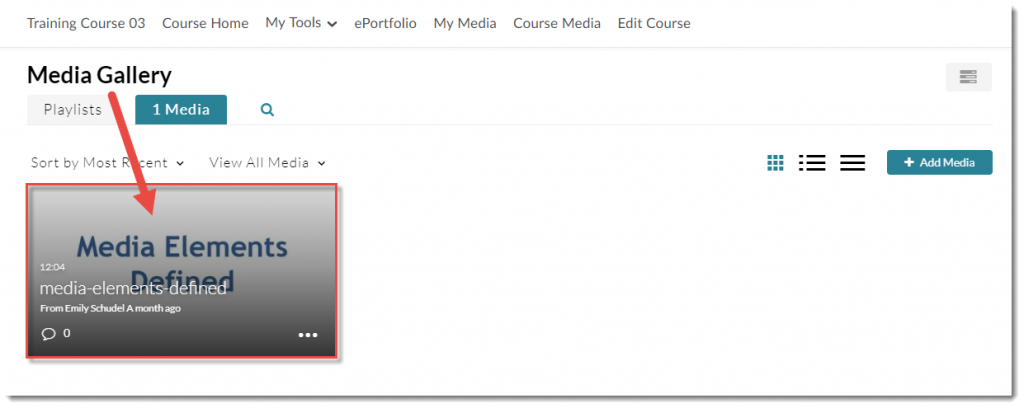
  9. You and your students can then click on the video to open it up in the Course Media viewing area.

    Click on the video.

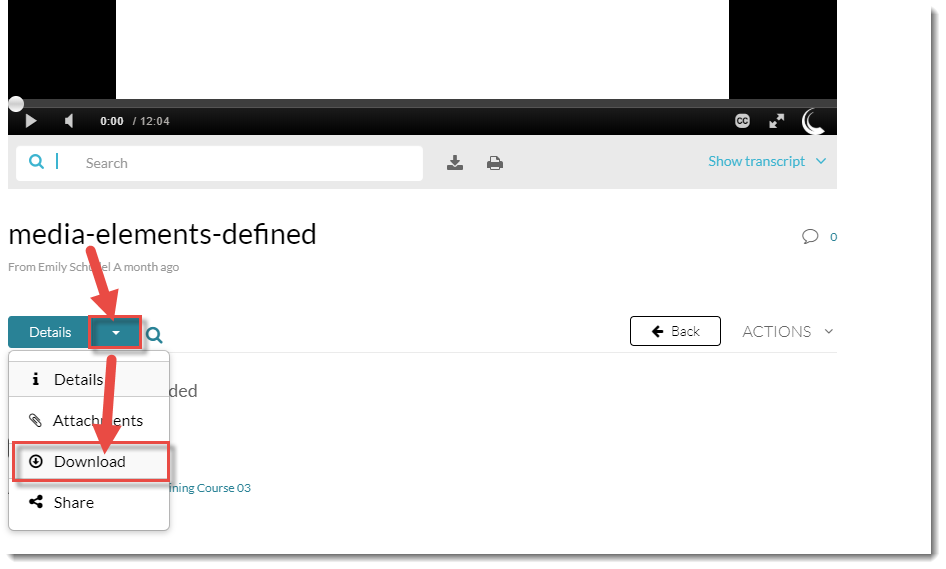
  10. And then click the down arrow next to Details and select Download.

    Click the down arrow next to Details, and select Download.

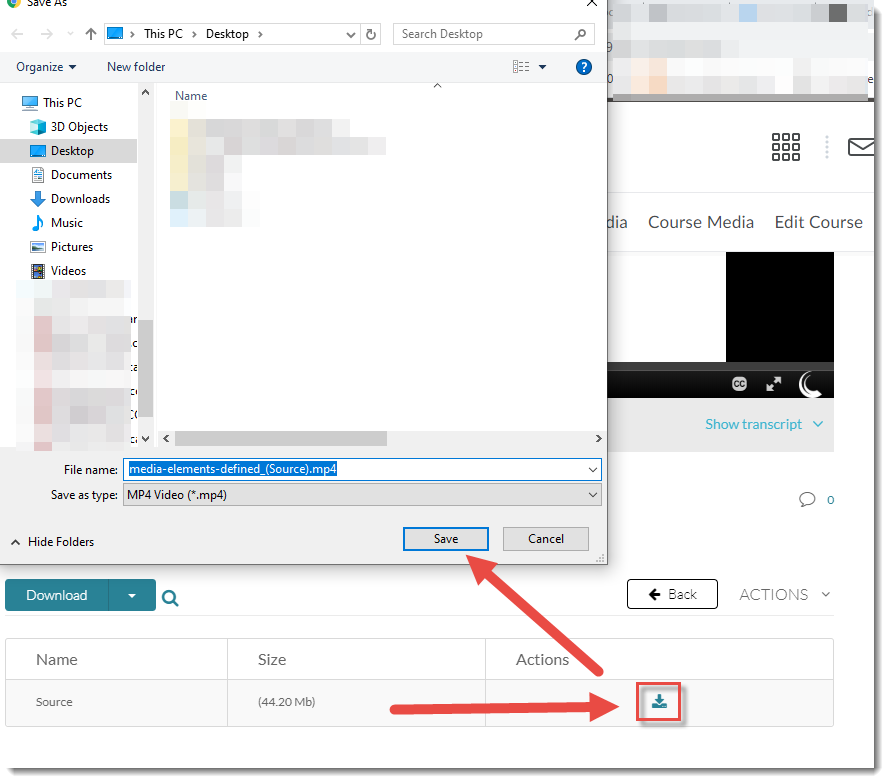
  11. Finally, click the download icon to save the video to your device.

    Click the download icon and save the video to your device.

Things to Remember

Students will NOT be able to download your video if you have only embedded it in an HTML editor page (for example, a Content page). They can only download videos from the Course Media gallery.

CC-BY SAThis content is licensed under a Creative Commons Attribution 4.0 International Licence.Icons by the Noun Project.

Creating PowerPoint Presentations with Voiceover in Kaltura Capture in D2L

This tutorial is designed for faculty who have previous experience using Kaltura in D2L, who have already downloaded Kaltura Capture, and will cover the steps involved when you wish to record a PowerPoint presentation with voiceover using Kaltura Capture through D2L. For further information, please contact desupport@camosun.ca for assistance.

Steps

  1. Go to your course in D2L.
  2. Go to My media (through the link on your Navbar, or in your My Tools drop-down menu, or in a draft Topic in the Content tool).
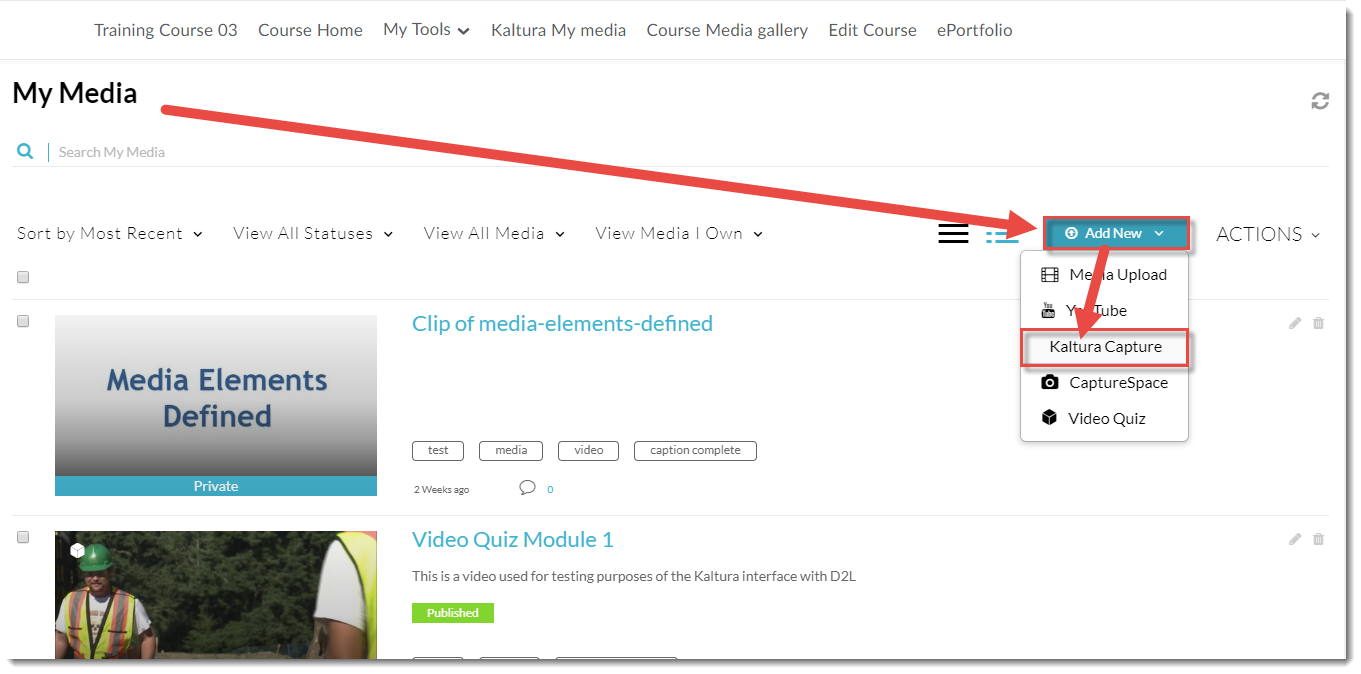
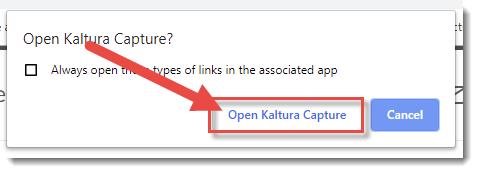
  3. Click Add New and select Kaltura Capture, then click Open Kaltura Capture.

    Click Add New and select Kaltura Capture
    Click Open Kaltura Capture

  4. First, open your PowerPoint presentation so you are ready to play the presentation once you start recording.
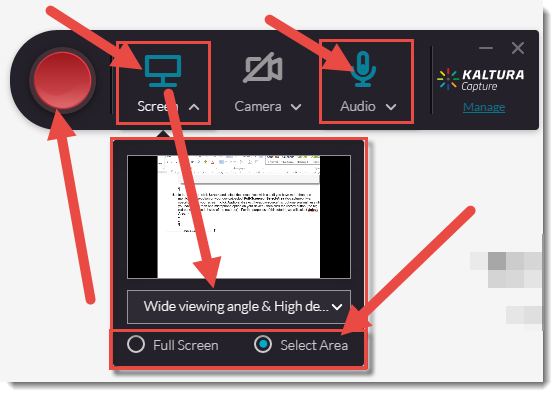
  5. In order to record a PowerPoint presentation with voiceover, you need to record your Screen and Audio, so in the recorder, click on Camera to turn that feature off (the icon will appear with a line through it).

    Click Camera to turn that feature off.

  6. In the recorder, click Screen and select the screen you wish use (if you have more than one monitor source option on your device), select Full Screen or Select Area (to capture only a specific part of your screen), click Audio and select the audio source/microphone you wish use (if you have more than one microphone option on your device), then click the record button (the big red button on the left side of the recorder). For the purposes of this tutorial, we will select Full Screen.

    Select your screen and audio sources and click record

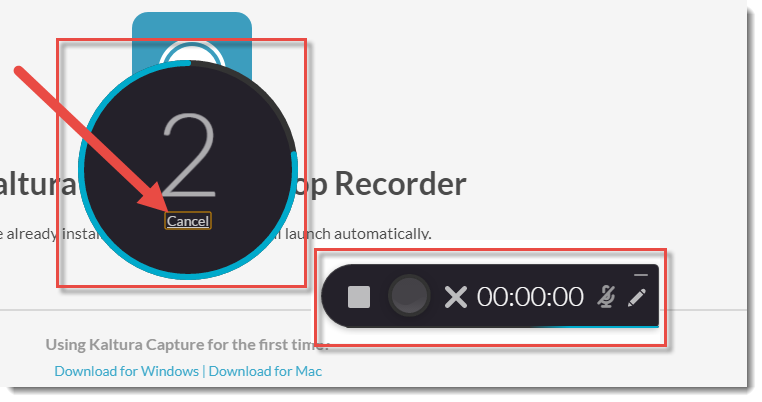
  7. Click the record button. There will be a 3-second countdown before the recording started (you can click Cancel at any time).

    Countdown clock

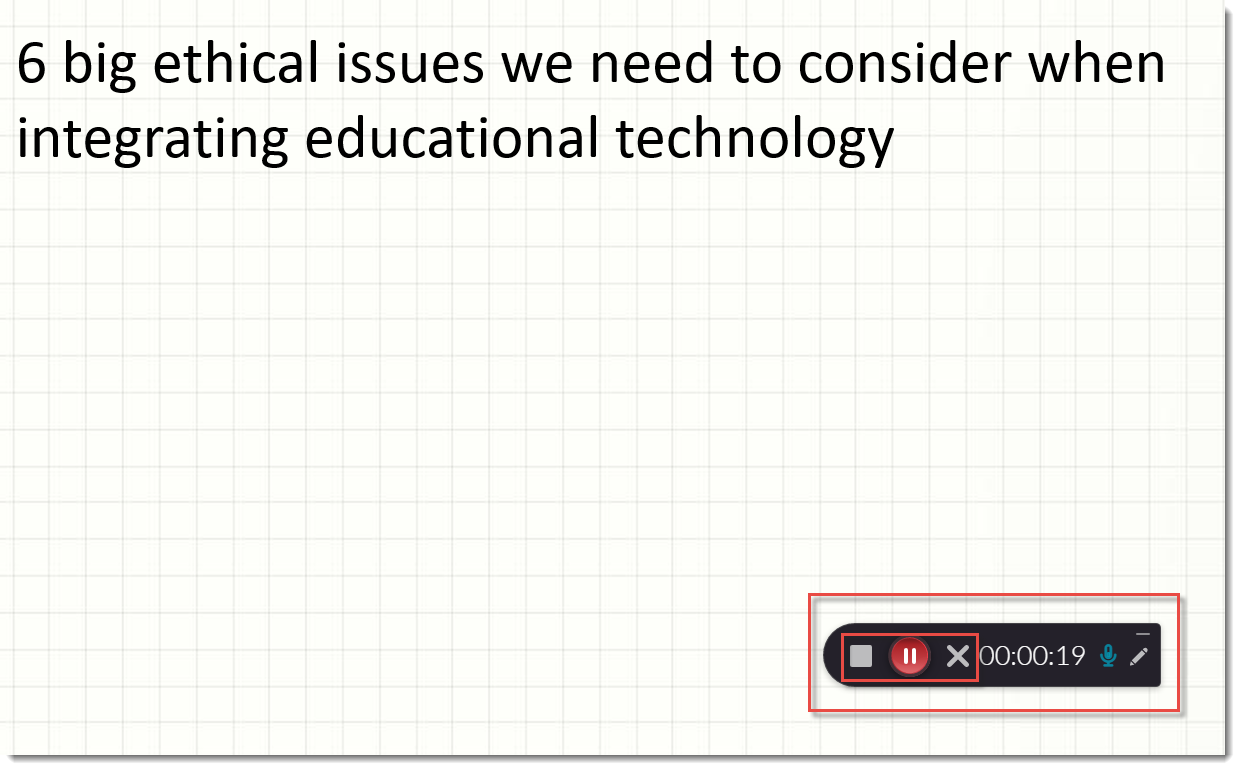
  8. When the recording begins, start your PowerPoint presentation, and begin clicking through it while talking about the slides. Click the Stop button when you are finished and want to save your recording, the Pause button to pause the recording, and the X to cancel the recording (this will NOT save it).

    Stop, Pause, Cancel

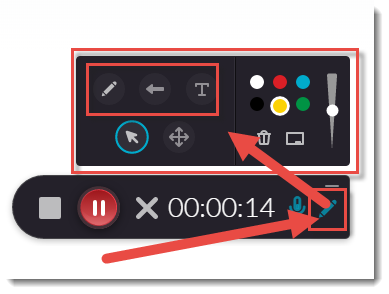
  9. You can also click the Pencil icon to open the drawing tools options. You can circle, point, add text, and change the colour and size of any of these options.

    Click the Pencil to open the drawing options.

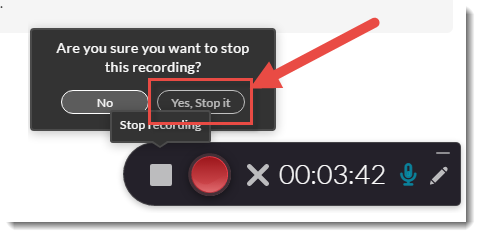
  10. When you click the Stop button, click Yes, Stop it to stop and save the recording.

    Click Yes, Stop it

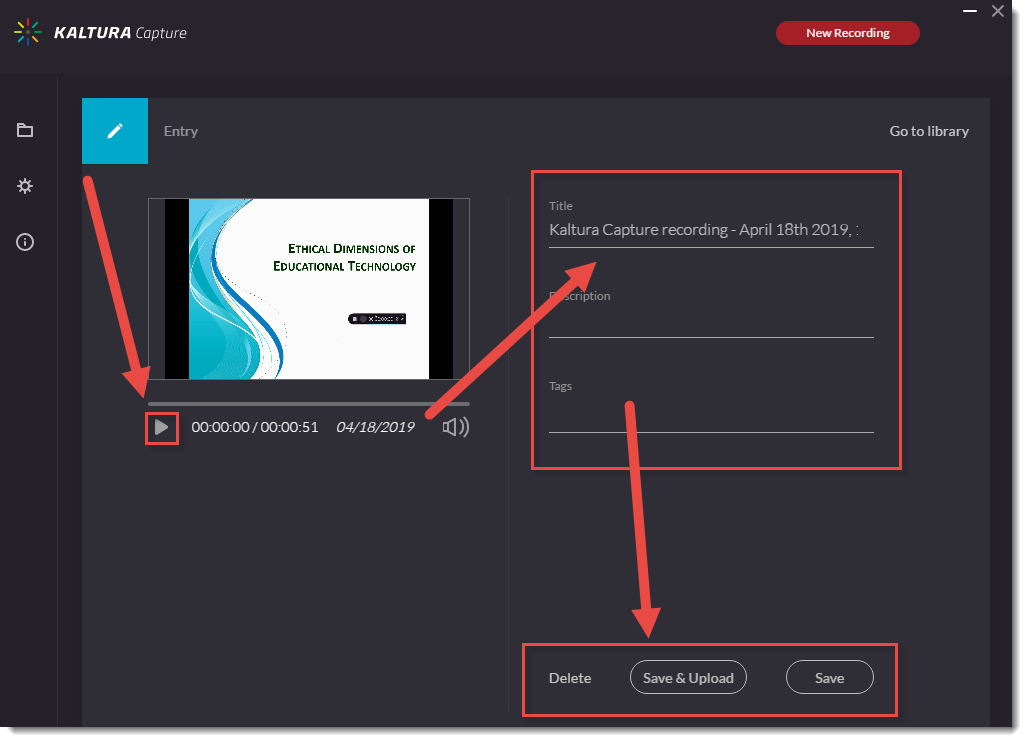
  11. The recording preview will then appear. You can play the recording, edit the Title, and add a Description and Tags. Click Save to save your changes, Save and Upload to save the recording and upload it to your My Media space, or Delete to delete the recording.

    Recording preview

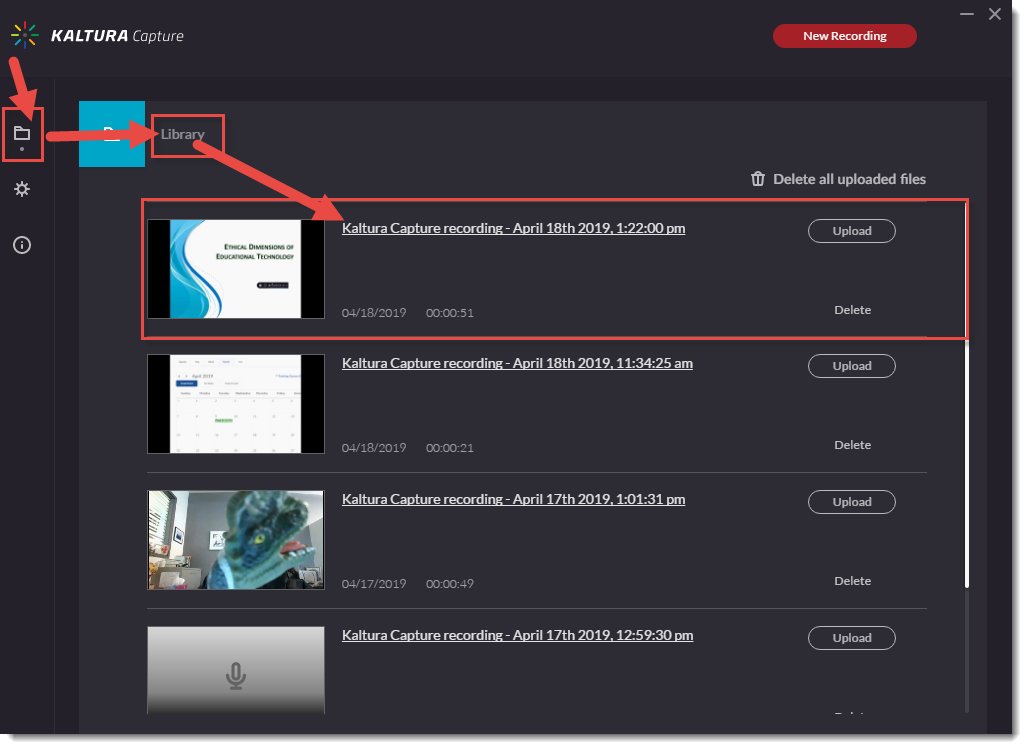
  12. The video recording will now appear in your Kaltura Capture Library.

    The recording is now in the Kaltura Capture Library

Things to Remember

Before starting your recording, make sure to write down what you want to say, and what you will be doing in your presentation – where will you click, what and when will you circle things, what order are the steps, etc.? This is your script, and it will come in handy to keep you on track while you record, and to upload as an attachment with your recording for students who like to read along while they listen.

CC-BYThis content is licensed under a Creative Commons Attribution 4.0 International Licence.Icons by the Noun Project.

Using Kaltura with your students – Discussions

Want students to post videos they have created and discuss them as a small or large group? Have them post their videos in the Discussions tool.

You will first need to create a Discussion Forum and Topic for the conversations, and students need to upload their video(s) to their My Media space in Kaltura. Tutorials for these activities can be found for faculty in the On-Demand Training site, and for students, in the D2L Student Guide, both in Camosun’s D2L.

Once you have a Discussion Forum and Topic created, students should go to the Discussions tool, and follow these steps:

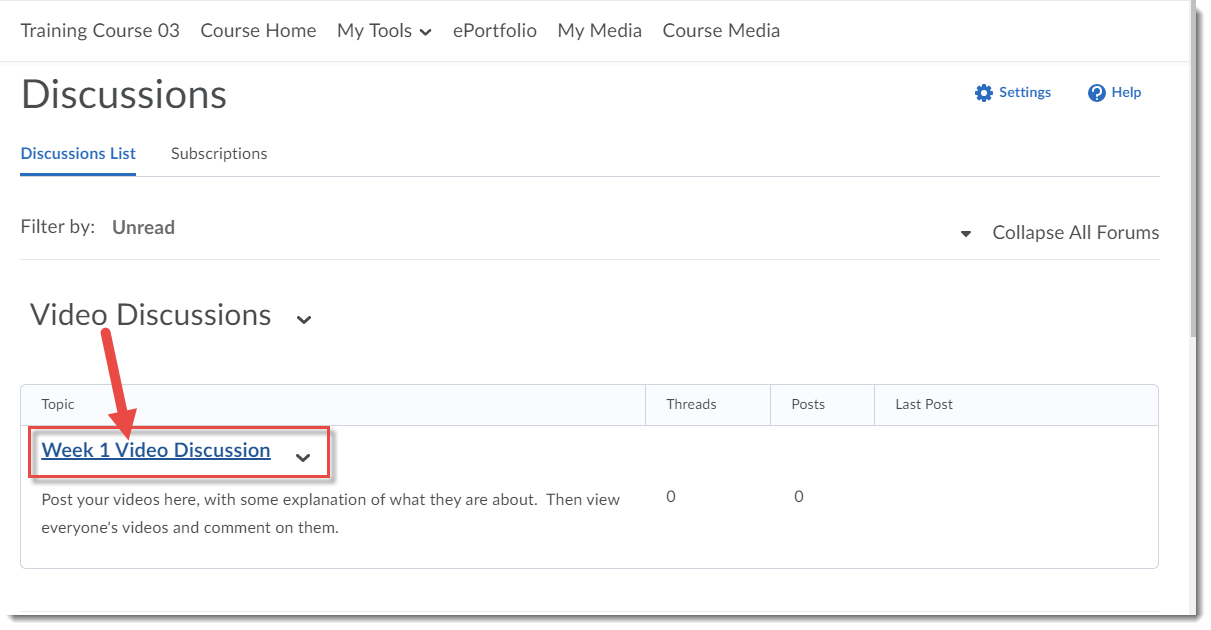
  1. Click on the title of the Topic they will be posting to.

    Click the Topic

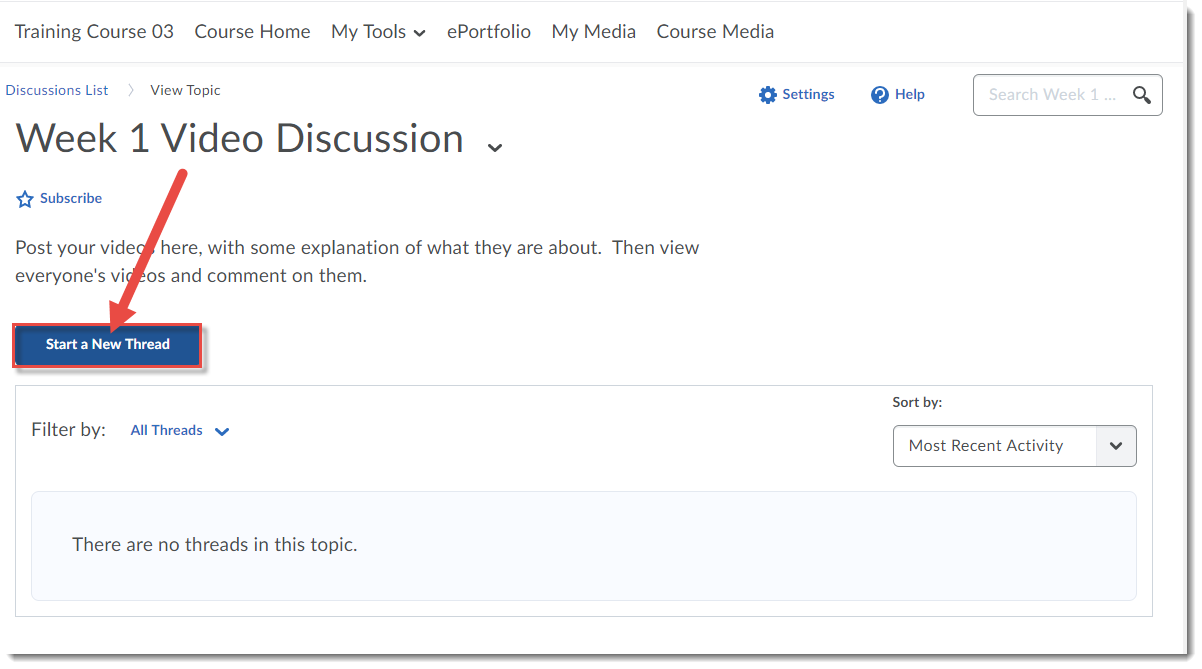
  2. Click Start a new Thread.

    Click Start a New Thread

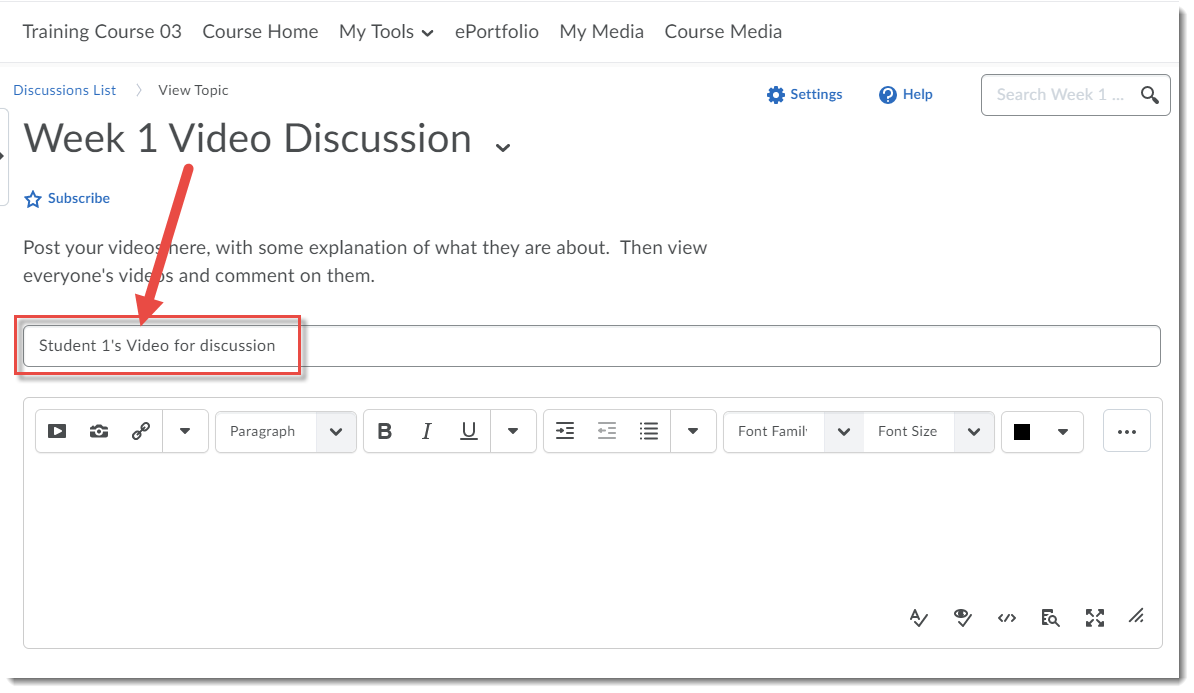
  3. Add a Subject for the Thread. Note that it is good practice to have your name in the subject so everyone knows who is posting.

    Add a subject

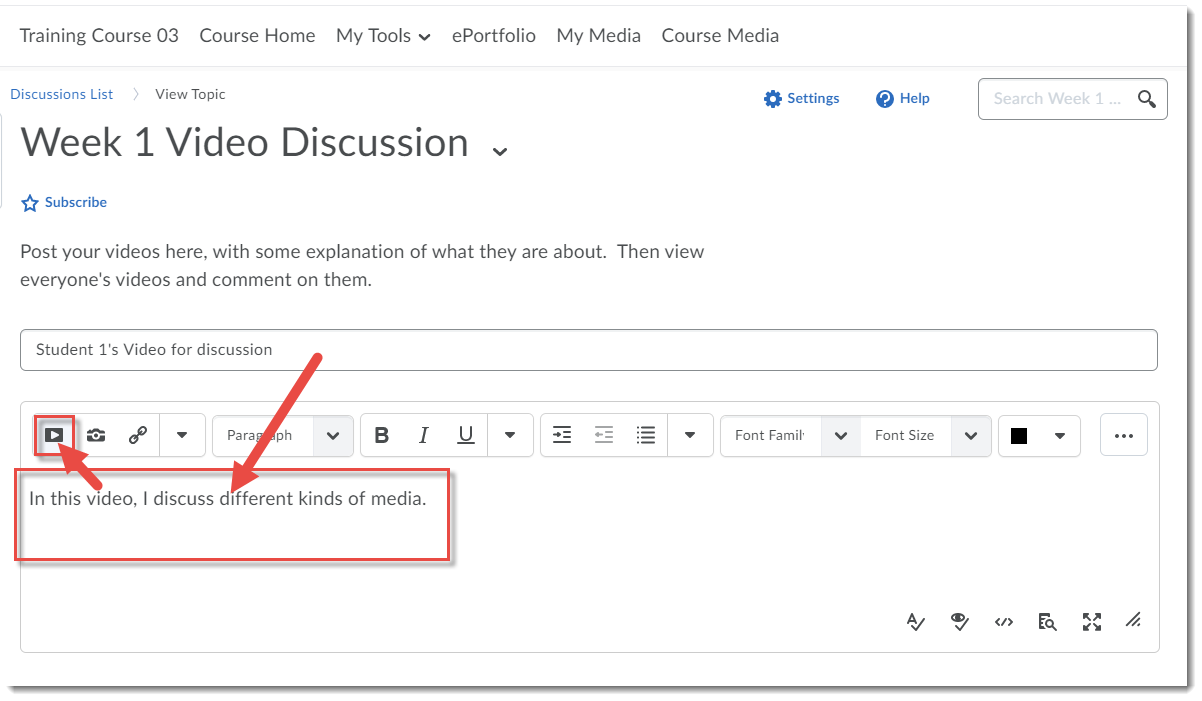
  4. Type some explanatory text into the message box, and then hit Enter. Then click the Insert Stuff icon at the top, left of the message box.

    Add text, then click Insert Stuff

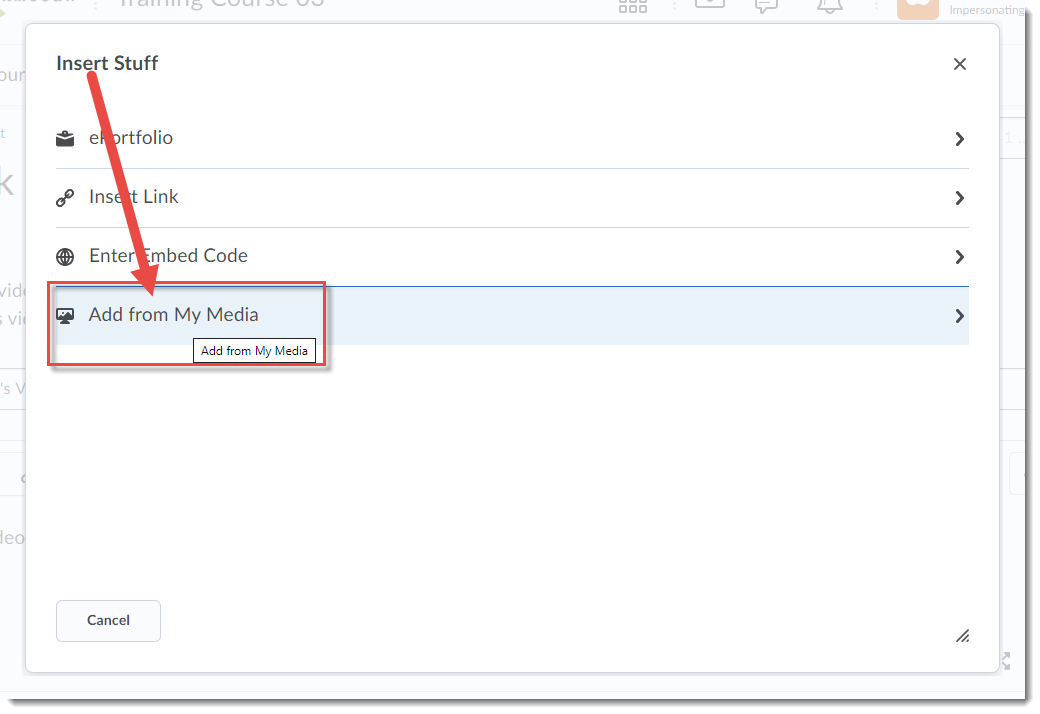
  5. In the Insert Stuff box, click Add from My Media.

    Click Add from My Media

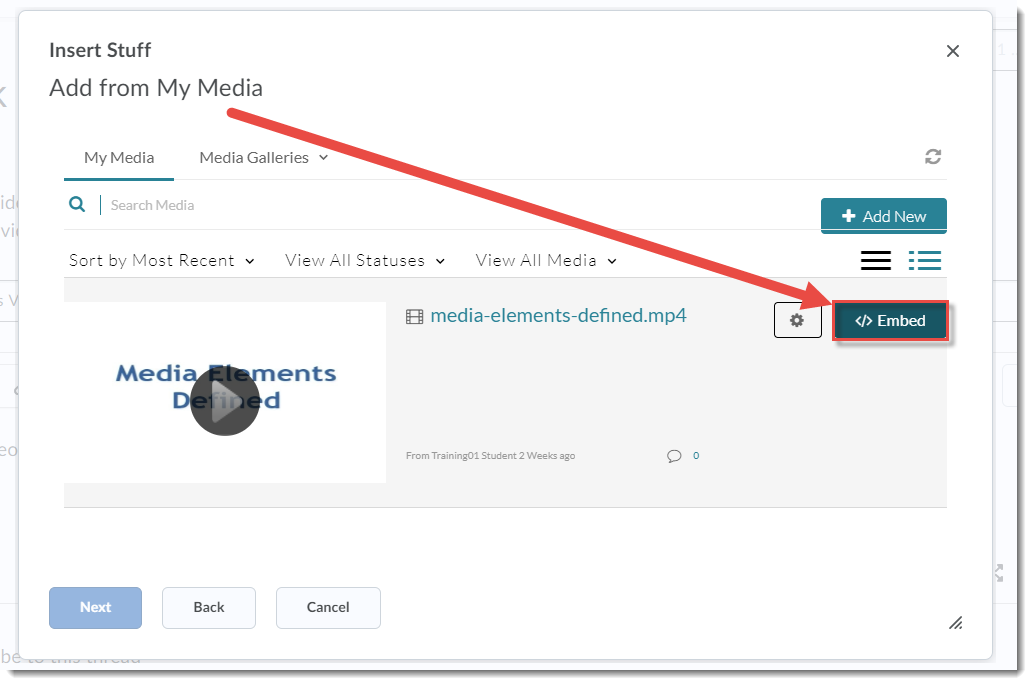
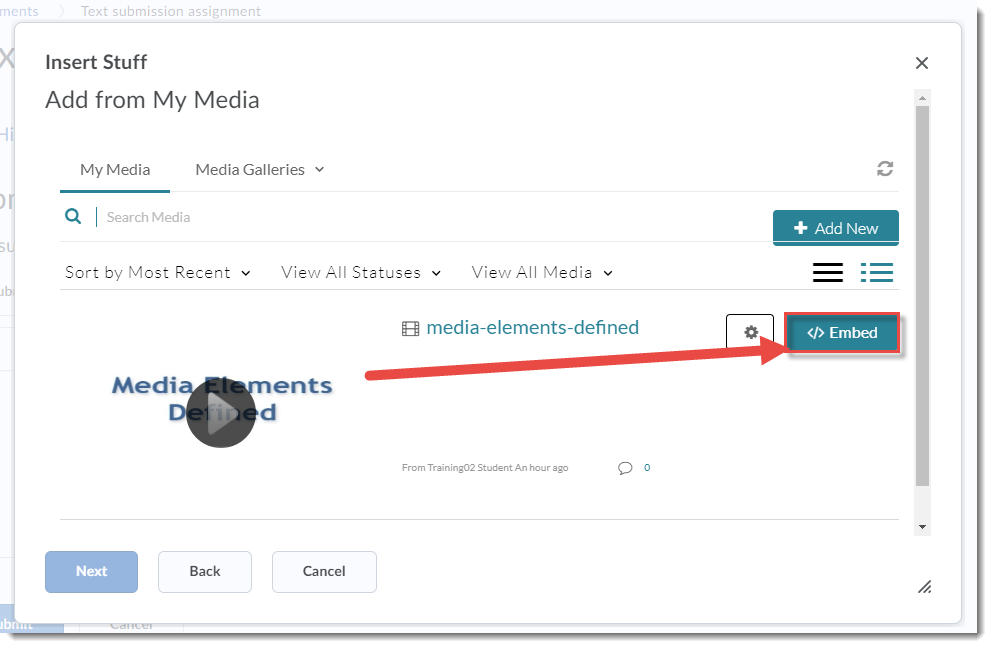
  6. In the Add from My Media box, click Embed next to the video you want to embed into the Text submission box.

    Click Embed

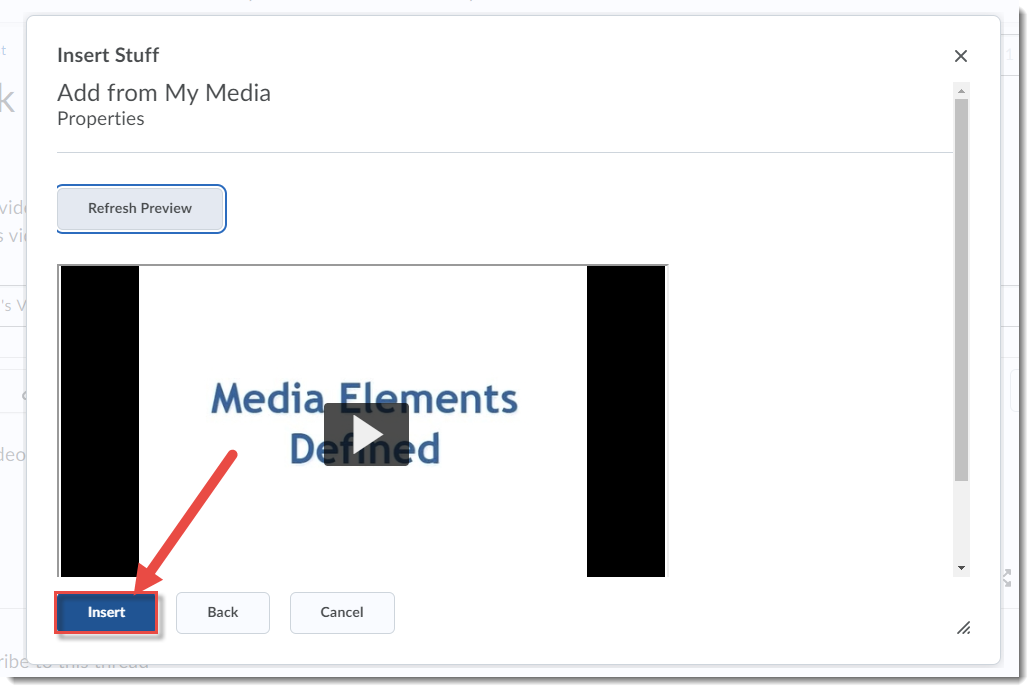
  7. Click the preview to make sure it’s the right video, then click Insert.

    Click Insert

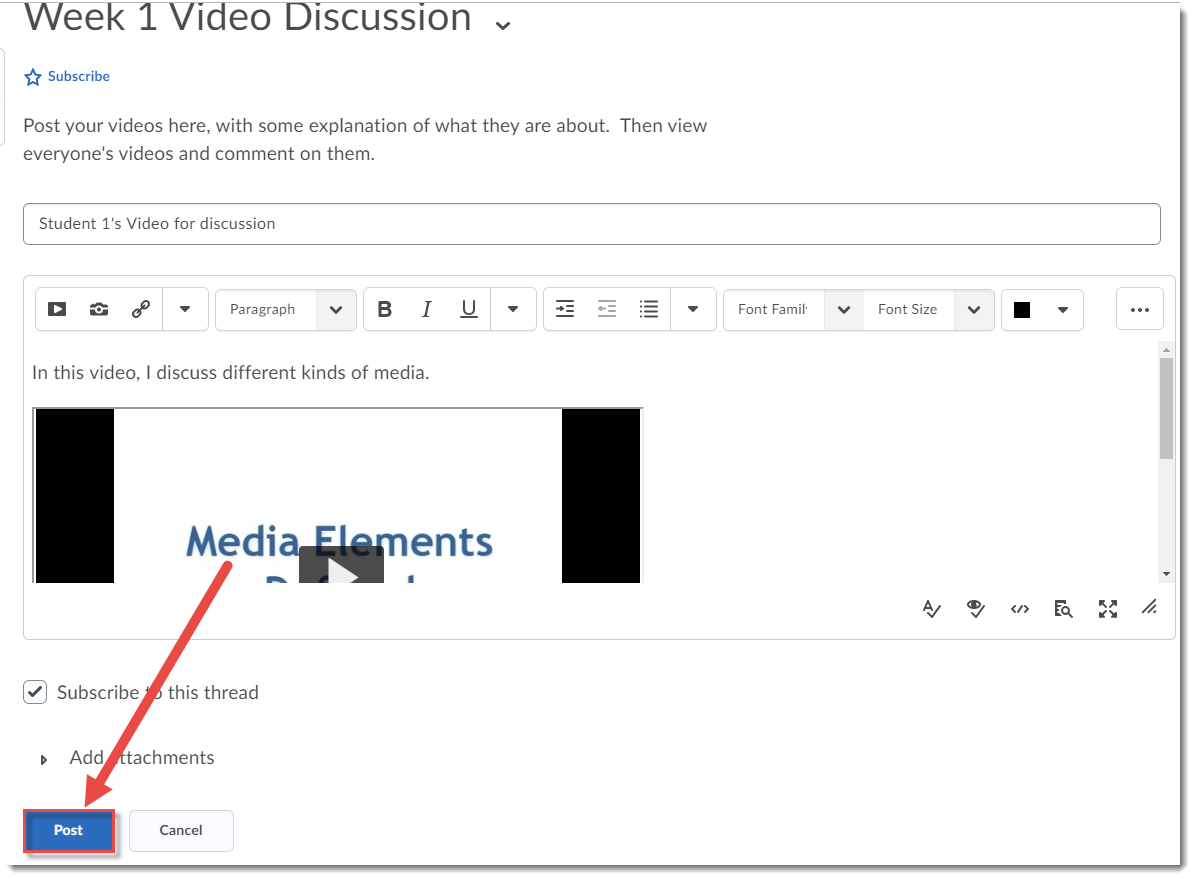
  8. The video will be embedded in the message box. Click Post to post the Discussion Thread.

    Click Post

As students post their embedded videos, they will be able to see each others’ videos and comment on and discuss them in the Discussion Topic area.

If you have any questions about this, or want to talk to someone in eLearning about this, email desupport@camosun.ca.

This content is licensed under a Creative Commons Attribution 4.0 International Licence.Icons by the Noun Project.

How to get started with Kaltura in D2L – a Student Tutorial

Kaltura is a new streaming media tool recently adopted by Camosun. Integrated into D2L, and supported by eLearning, Kaltura gives faculty and students a place to upload, create, and edit their course-related videos, audio files, and images.

This tutorial will cover the steps involved when you wish to upload a video (or audio file) from your device into Kaltura’s My Media area in D2L so that you can then embed it into an Assignment folder, or into a Discussion post (covered in separate tutorials).  If you need additional help, contact desupport@camosun.ca.

Steps

  1. Go to your course in D2L.
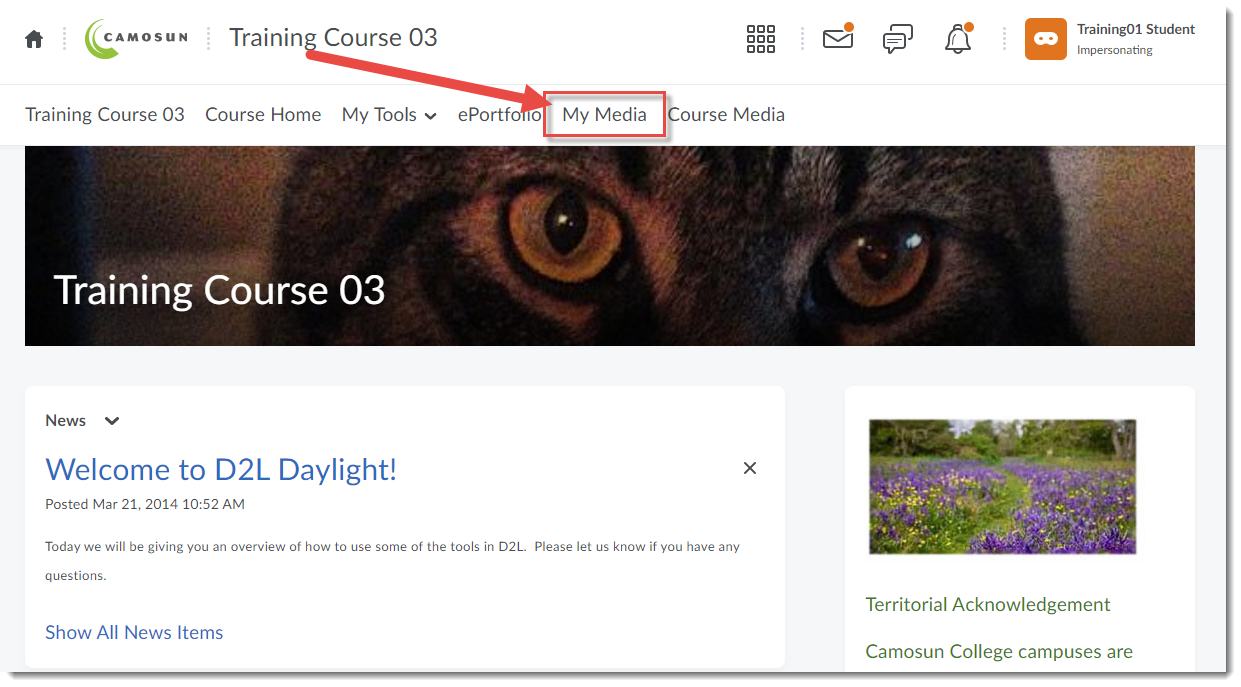
  2. Go to My Media (it may be a link on the NavBar or in the My Tools drop-down menu) to open your personal Kaltura space. If you do not see a My Media link, talk to your instructor as they will have to add a link for you.
    Click My Media

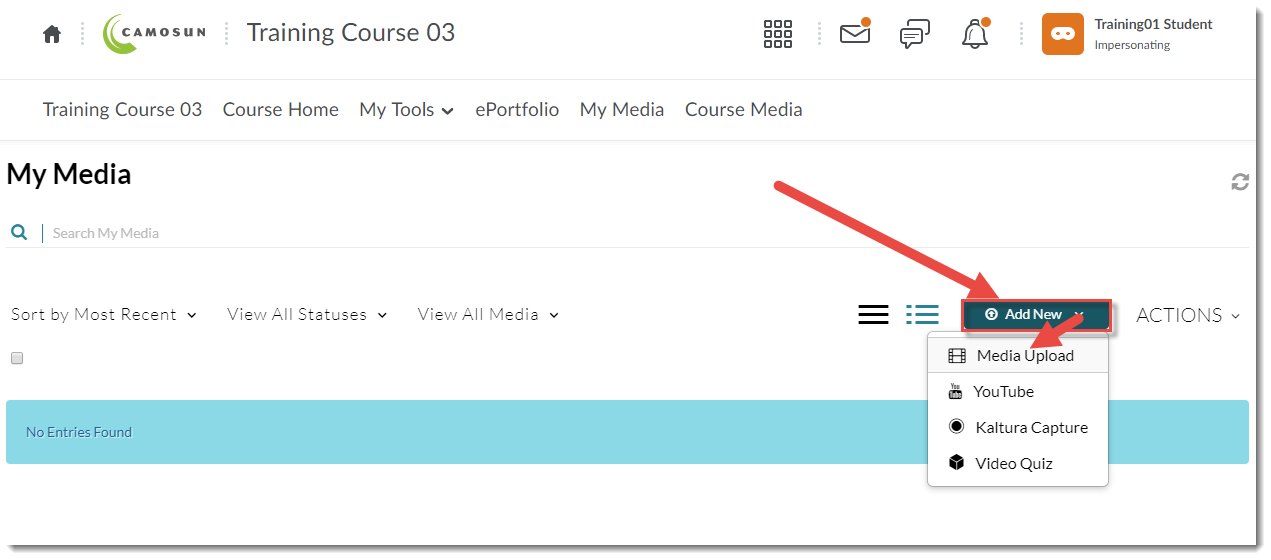
  3. Click Add New, and select Media Upload.

    Click Add New and select Media Upload

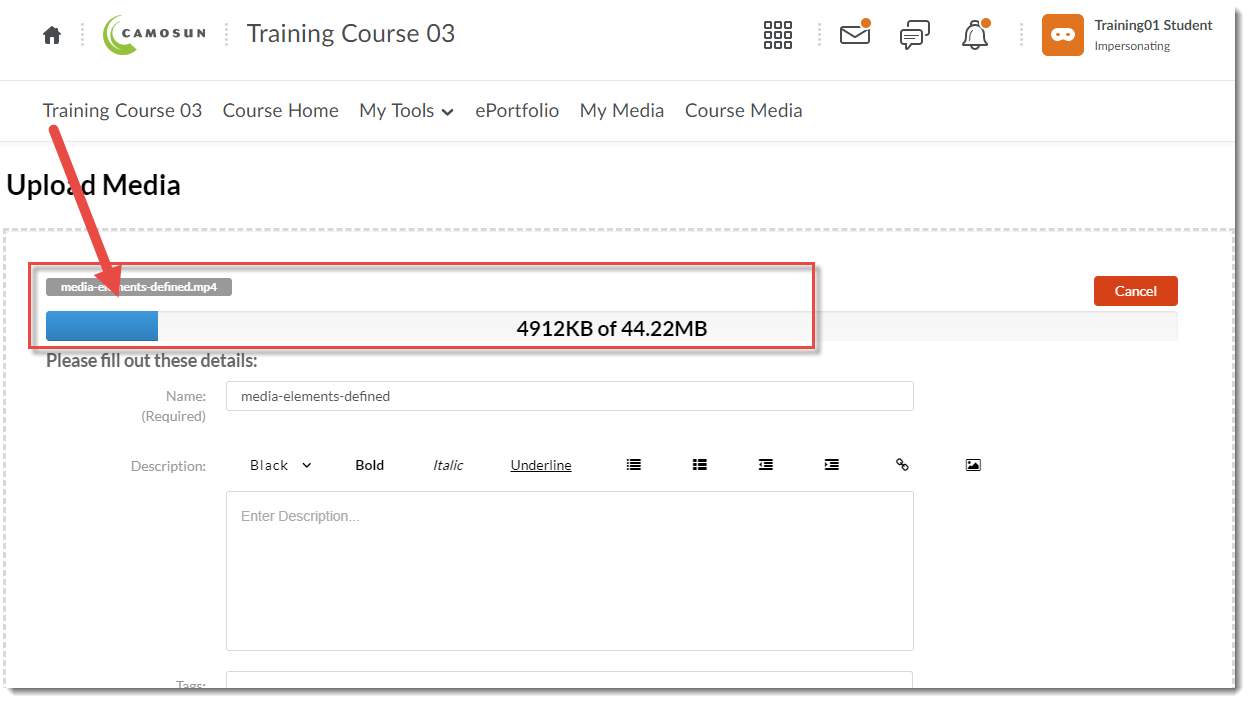
  4. Click Choose a file to upload, find the video file you want to upload from your device, and click Open. All common video, audio and images formats are accepted. Only one file can be uploaded at a time.
    Upload your file

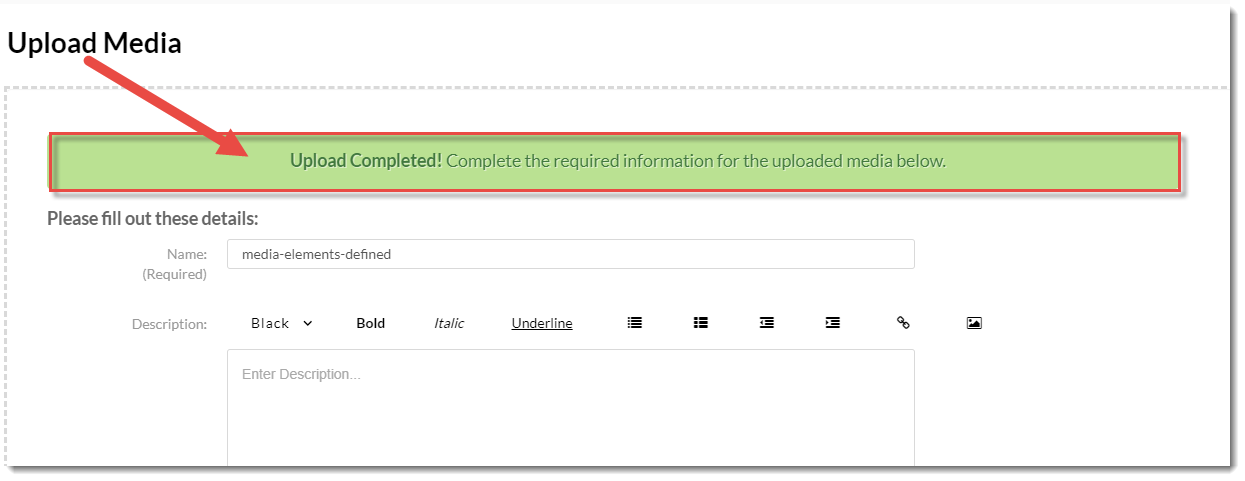
  5. It may take a bit of time for the video file to upload – the bar at the top of the screen will track the upload, and let you know when the upload is complete (as shown in the second image).
    Wait for file to finish uploading

    Upload complete

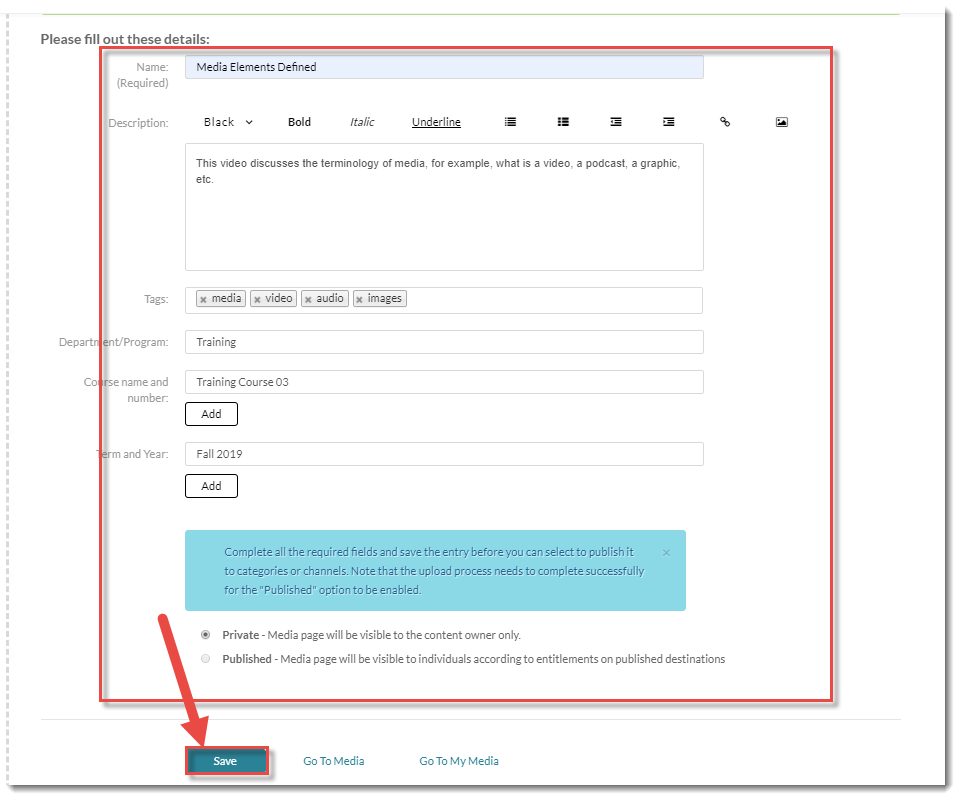
  6. Fill in the Details as listed. You will be required to give your video file a Name, and we highly recommend adding information to the Description, Tags, and the additional fields to help you filter/sort your media files as you build your collection, and to help you search for specific media files in the future.

    Tags are words that can be used to search for specific media files, so think of terms that would most likely be used by you to search for your video.

    Keep your video Private – you do NOT need to Publish your video for you to embed it into Assignments or Discussions. Click Save when you have filled in all the details (you can edit this information later if needed). Your media file has now been saved to My Media, meaning that it is available for you to use in any of your D2L courses.

    Add details and click Save

Things to Remember

There are additional features you may want to set up before using your video in a course. This will be covered in a tutorial entitled Adding Features to Your Kaltura Media.

How to use Kaltura with your students: Part 1 – Assignments

This post will show you how your students can submit videos (or audio files) that have been uploaded to Kaltura, as assignments using the Assignments tool.

If you have the My Media link to Kaltura added to your course Navbar, students can access their own personal media space and upload or create a video or audio file. If the video/audio is stored in Kaltura, then it is easy for students to embed them as assignment submissions. Here’s how:

First, you need to set up your Assignment folder as a Text submission assignment – see the tutorial Submission Options in Assignments for further information.

Once your students have added their assignment media to Kaltura (see the tutorial Uploading Media to My Media in D2L for information you can give to your students), they would

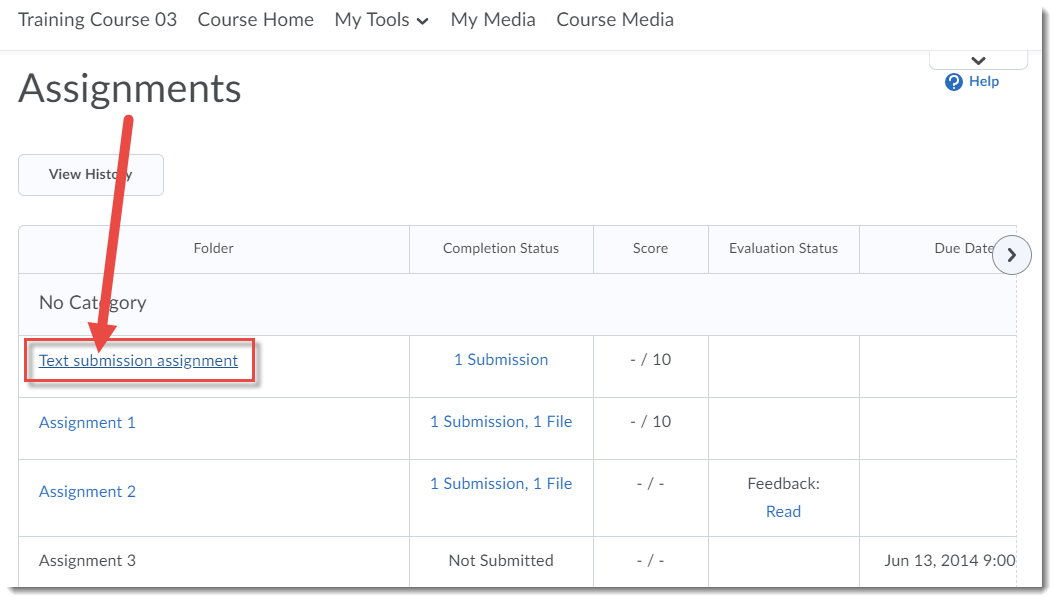
  1. Go to the Assignments tool in your course.
  2. Click on the title of the assignment they wish to submit to.

    Click the assignment you want to submit to

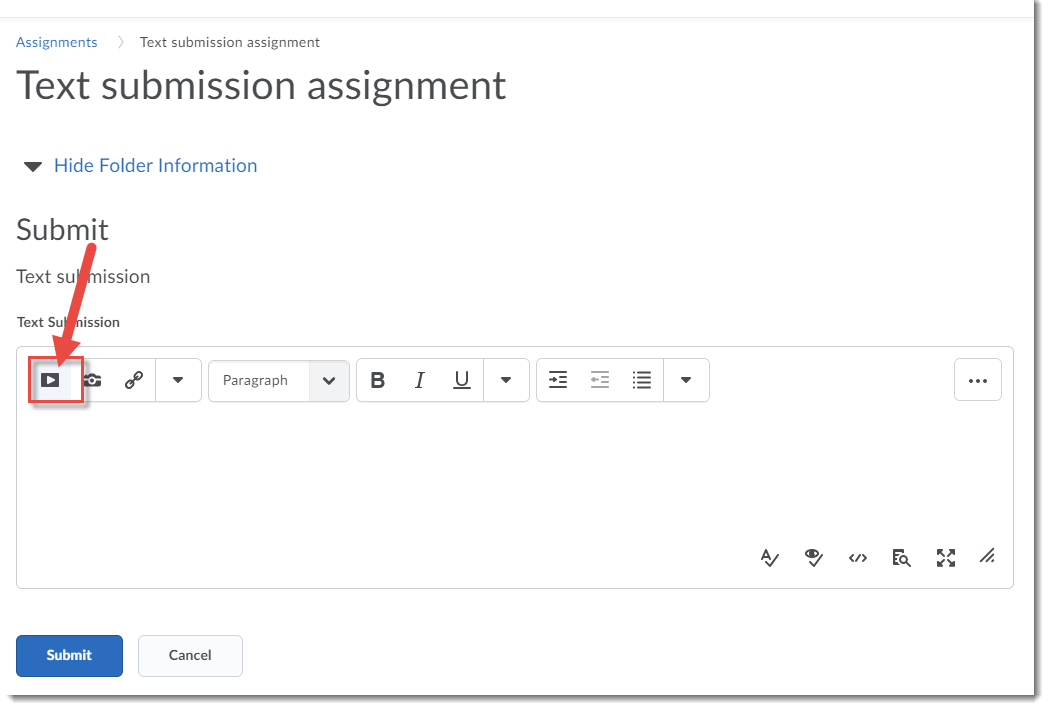
  3. Click the Insert Stuff icon at the top, left of the Text Submission box.

    Click Insert Stuff

  4. Click Add from My Media.

    Click Add from My Media

  5. In the Add from My Media box, click Embed next to the media (video or audio) you want to embed into the Text Submission box.

    Click Embed

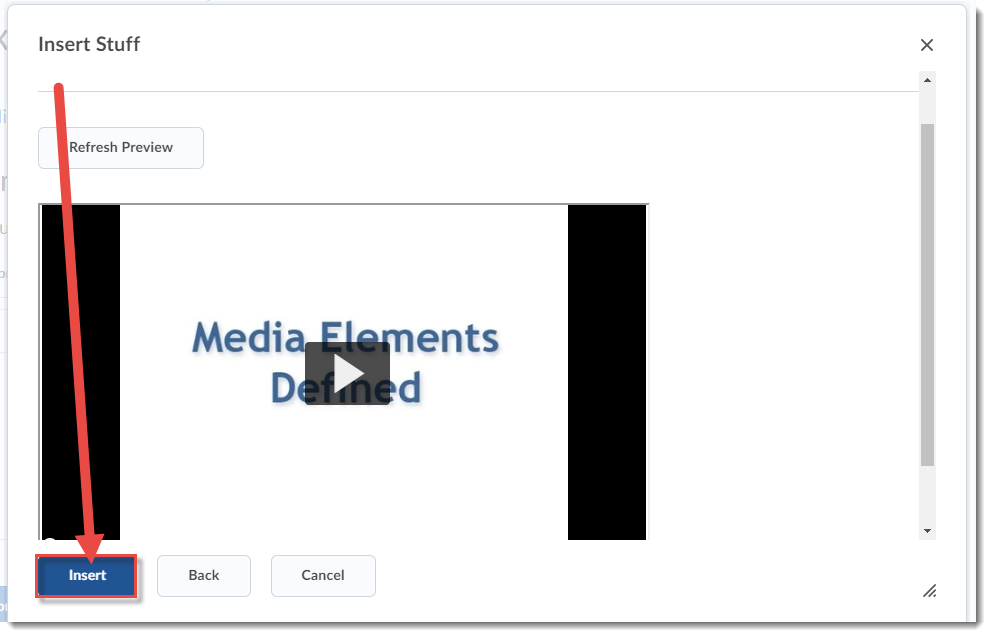
  6. Check the preview to make sure it’s the right video, then click Insert.

    Click Insert

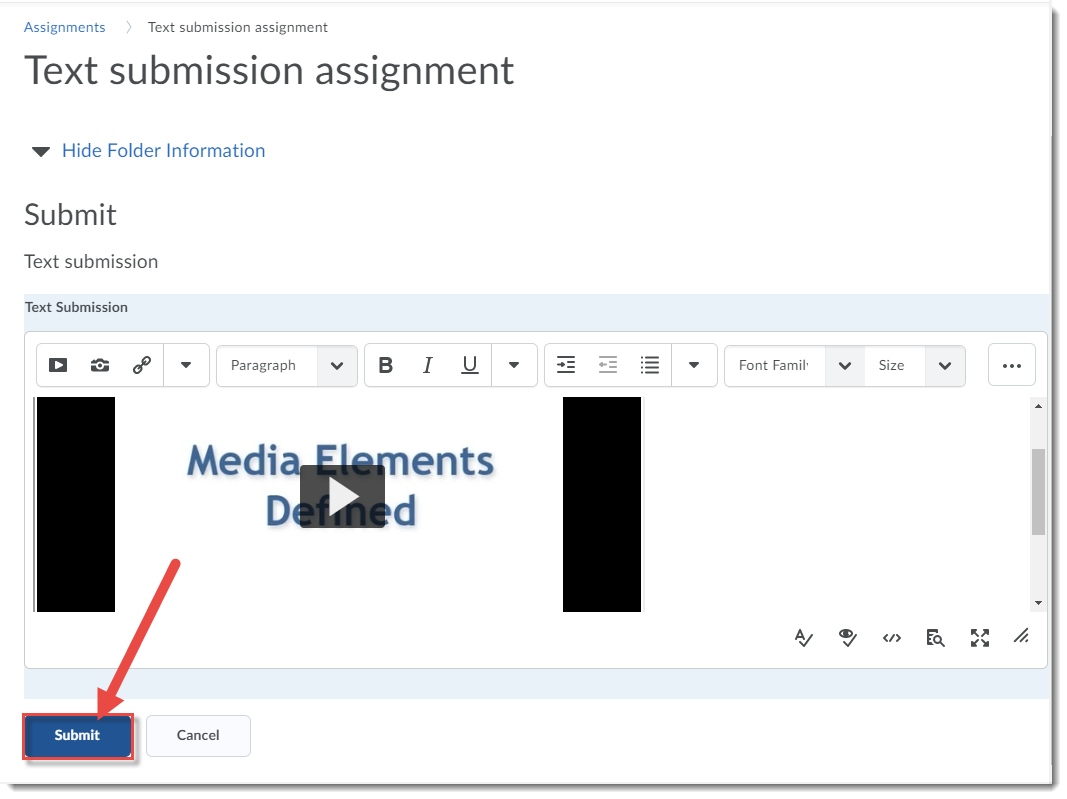
  7. The video/audio will be embedded in the Text Submission box. Click Submit to submit your assignment.

    Click Submit

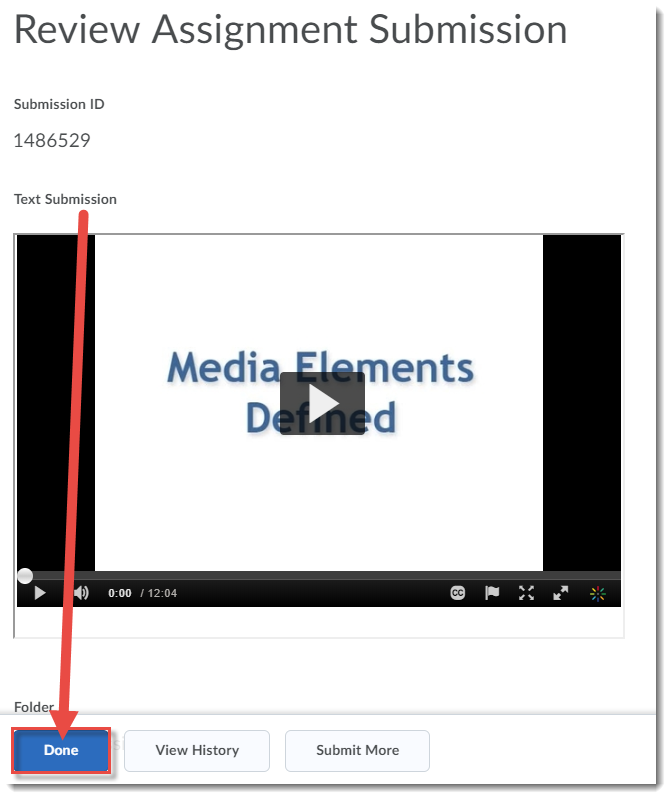
  8. Click Done.

    Click Done

Once your students have submitted their video/audio assignments, you can go to the Assignments tool and view/listen to them right in the Assignments Submissions area. Add your feedback into the Feedback box, or attach your own media piece as feedback to your students.

If you have any questions about this, or want to talk to someone in eLearning about this, email desupport@camosun.ca.

Media tagging advice and best practices: A Kaltura tutorial

The goal of this post (written by Alexandra Flynn, one of our Camosun librarians) is to encourage thoughtful collaboration regarding Kaltura media tagging. This will lead to the creation of a tagging system that makes sense to your department and for the users most likely to be accessing your media content on Kaltura.

Definitions

For the purposes of this post:

  • Private content means media that is limited to student use in D2L, for internal college or department use only, and requires a login to view; Public content is general promotional or information sharing/ instruction that does not require a Kaltura login.
  • Tags: are alternate search terms or keywords that you create which help people discover or retrieve your videos and help you and your colleagues organize them [1].
  • Taxonomy: “A hierarchical classification scheme made up of categories and subcategories of information plus a controlled vocabulary of terms, usually used to describe a specific area of knowledge [2].”
  • Folksonomy: “The mental model, or classification system, of a taxonomy of content or concepts in the minds of content consumers. Includes vocabulary, organization, relationships, and interactions [2].”

General advice

Imagine only be able to search for TV shows by episode number, or using a music app that organized all songs by release date rather than musician or band name! Such frustration should be avoided; having a logical tagging system helps!

  1. Avoid repetition; do not re-use information that you entered as part of the upload process.  Example: no need to have a ‘CHEM’ or ‘COOK’ as a tag because the Kaltura Upload interface requires you to add a Course Code.
  2. Avoid tags that are too generic like “Assignment 1” – or “Unit 1”
  3. Do use specific terms that provide immediate clarity: ”Thermodynamics”
  4. Do meet with your department/program group to decide which tags to use or to choose a guiding theme or taxonomy your group will follow 

Possible strategies to guide tag creation

Recommendation 1: Pair the category tag (in bold) with course or assignment specific tag

Examples:

  • Keyword tags pulled from assignments, for exampleEssay-Research | Essay-argumentative | Essay-persuasive
  • Learning outcomes/objectives, for exampleatomic mass factual, meat cutting procedure, etc [3]
  • Cognitive process (create, evaluate), for example analyse author bias [3]
  • Media content/purpose, for example demonstration, promotional, problem-solve etc.
  • Audience for example prospective students, Camosun employees, Community Partners

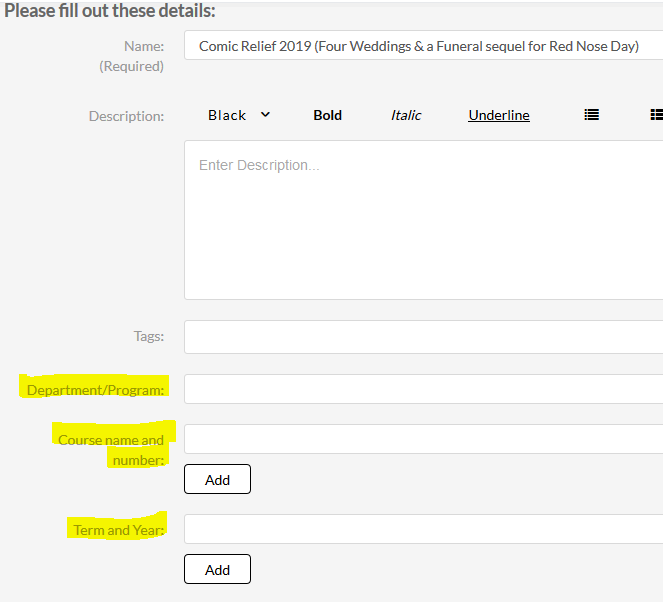
Recommendation 2: Add additional information as per the Upload interface (see image)

  • Department/Program
  • Course name and number
  • Term and Year

Your media content can then still be easily discoverable without the use of tags.

Fields for organization

Recommendation 3: Additional considerations

  • For private / Instructional content, your department/program group may decide you do not need tags.
  • For public or promotional material, you may intentionally use tags that overlap with other departments, programs, or student events.
  • Do you want a hierarchy of granularity or specificity? Three levels of required information (highlighted in image) may mean you decide to limit tags to three levels. [4]
  • Do you want students to be able to add tags? Social-tagging/folksonomies are often ambiguous, unrelated to content or create unwanted overlap with other media [1].

Sample Tagging Practice

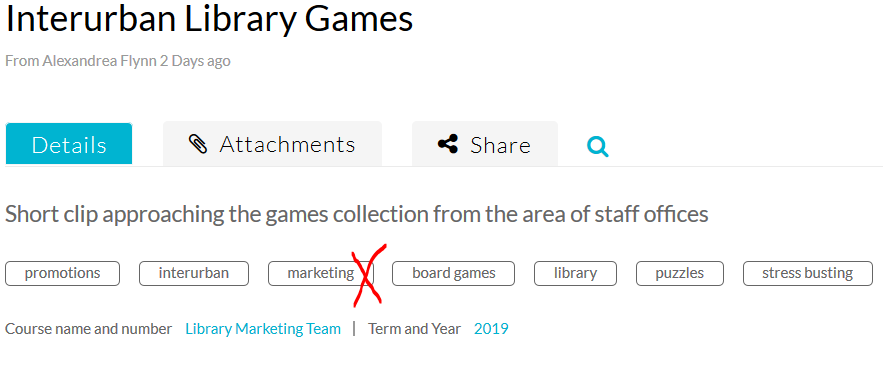
The image below shows the tags that were added to a short video of the games and puzzles in the Interurban library (the tags include promotions, interurban, marketing, board games, library, puzzles, and stress busting.)

In the image, the Marketing tag is marked with a red X because it is too vague; it could indicate a Marketing Course, or the college Marketing Department, or part of an event. That tag should be removed. Additionally, Promotions could be changed to Library marketing and Interurban could be replaced with Interurban Library, etc.

Tag examples

Best Practices for you & your department/program group

  1. Have a meeting or create a shared document to decide what tagging strategies you will use.
  2. Create a list of agreed-upon tags and distribute to all Kaltura users in your department.
  3. Make sure this information is shared with new Kaltura users and eLearning (the Kaltura administrators).
  4. Create tag guidelines for students who will be uploading media that they have created.
  5. Anticipate how terminology in your disciple overlaps with other disciplines and use language that is more precise. Example “CREST Scan” instead of “Environmental scan” to tag a Business course video.

References

[1] J. Ignacio Vazquez, J, Abaitua, and D. LĂłpez de Ipiña. Feb. 2006. [Online]. “The Ubiquitous Web as a model to lead our environments to their full potential” W3. Available: https://www.w3.org/2006/02/Deusto_Position_Paper_v1.0.pdf [Accessed: Mar. 26, 2019]

[2] “Taxonomy – the secret ingredient of great content – and how it is linked to business strategy” The Verditer. Jan. 16, 2019. [Online]. Available: https://www.theverditer.com/blog/2019/1/15/taxonomy- the-secret-ingredient-of-great-content-and-how-it-is-linked-to-business-strategy   [Accessed: Mar. 25, 2019]

[3] “Ensuring Technological Plurality through effective Learning Design” SlideShare. Jan. 26, 2017. [Online]. Available: https://www.slideshare.net/Simon_Atkinson/ensuring-technological-plurality-through-effective-learning-design [Accessed: Mar. 25, 2019]

[4] “Digital Commons Three-Tiered List of Academic Disciplines” bepress. Jan. 2017. [Online]. Available: https://www.bepress.com/wp-content/uploads/2016/12/Digital-Commons-Disciplines-taxonomy-2017-01.pdf [Accessed: Mar. 25, 2019]