Introduction to Daylight, Post 1: The Course Homepage

As we move closer to our upgrade of D2L to what is called The Daylight Experience, I wanted to publish a series of posts showing you what the various tools will look like come May.

Today, we will be looking at the D2L default course homepage. If you have a customized homepage, you may see more widgets, more columns, etc. on your own homepage than you will see here, but be aware that there are some design features associated with our current version of D2L that you won’t be able to customize in Daylight. Let’s have a look.

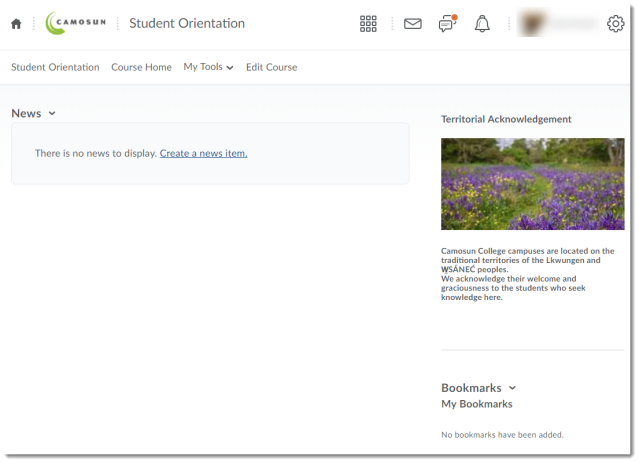
When a new course shell is created in Daylight, this is what you will see:

Daylight Homepage

Compare this to the current version:

Current D2L Default homepage

To detail some of the changes you can see above:

  • As you can see in the images below, the “minibar” at the top of the Daylight page (which is a black bar at the top of the current version of D2L) has changed the My Home link to an icon that looks like a house, and changed the Select a course drop-down menu to a checkerboard-like icon (next to the email notification icon). The minibar will still appear on the Camosun D2L homepage, as well as on every page of your own course sites.

    Current version:
    Current D2L Minibar
    Daylight – note the change of My Home and the Select a course menu to icons:
    Daylight Minibar

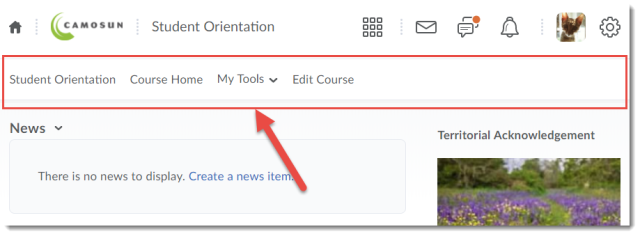
  • As you can see below, the default placement of links on the course NavBar has moved to the left-hand side. In Daylight, you cannot move the links to the right-hand side, but you can still add or delete items from the NavBar.

    Current version – links on the right side:
    Current D2L Navbar
    Daylight – links on the left side:
    Daylight Navbar

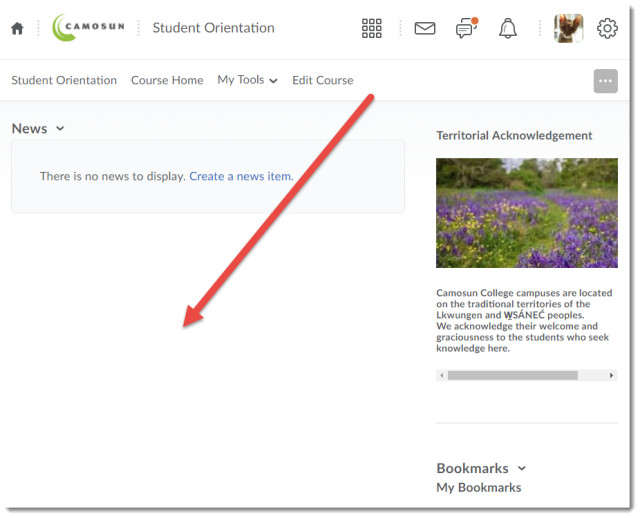
  • Due to the responsive re-design of D2L (meaning that the Daylight interface will adjust to any size device now), there is no longer an option to customize the colour scheme on the homepage (in other words, no coloured swoosh in the background).

    Current version – beautiful swoosh that can be colour-customized:
    Current D2L homepage background
    Daylight – white background only:
    Daylight background

  • Similarly, there is no longer an option to customize the design of the widgets (e.g., you can’t change the title bar of the widgets, or add a border to them).

    Current version, showing possible design options for widgets on the homepage:
    Current D2L Widget design option

    Daylight – no options for customizing the widget design:
    Daylight Widget design (no options)

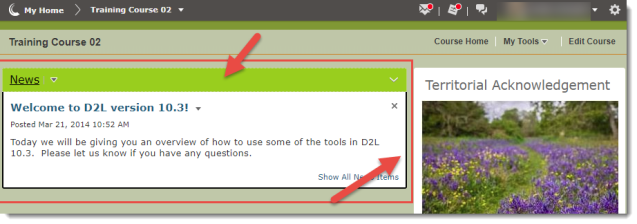
  • On the good news side of things, you no longer have to worry about accidentally collapsing the News widget! In the current version, if you click on the widget title bar, the widget collapses (closes), which makes it easy for students to collapse it without realizing they have done so. But now you have to work harder to collapse those widget by clicking on the drop-down menu to collapse widgets.

    Current version – as you can see it’s easy to close that widget and not notice:
    Current D2L collapsing a widget

    Daylight – you definitely have to work harder now!
    Daylight collapsing a widget

In my next post, I will give you a tour of what the main tools in D2L will look like in Daylight.

D2L/Daylight Upgrade Information Sessions

In anticipation of Camosun’s D2L upgrade to Daylight at the end of April, eLearning is offering information sessions at both campuses in March and April.

Come get a sneak peek at the new D2L, find out about some of the new features it will offer you, and ask your questions.  Sign-up at D2L Upgrade Information Sessions.

And don’t forget to visit our website at http://camosun.ca/about/teaching-learning/events/#alpha to register for our spring workshops on everything from the new D2L to Social Media, Online Learning Skills, and Flipping the Classroom!

Here are the dates, times, and locations of the upcoming D2L Upgrade Information Sessions:

Lansdowne (Library and Learning Commons 156)

  • Monday, March 5, 3:30-4:30pm
  • Thursday, March 15, 11:30am-12:30pm
  • Monday, March 19, 3:30-4:30pm
  • Thursday, March 29, 11:30am-12:30pm
  • Tuesday, April 3, 3:30-4:30pm
  • Thursday, April 12, 12:30-1:30pm
  • Monday, April 16, 3:30-4:30pm
  • Friday, April 27, 1:00-2:00pm

Interurban (Liz Ashton Campus Centre 235)

  • Friday, March 9, 2:00-3:00pm
  • Wednesday, March 14, 3:00-4:00pm
  • Friday, March 23, 2:00-3:00pm
  • Wednesday, March 28, 3:00-4:00pm
  • Friday, April 6, 2:00-3:00pm
  • Wednesday, April 11, 3:00-4:00pm
  • Friday, April 20, 2:00-3:00pm
  • Wednesday, April 25, 3:00-4:00pm 

Advance Notice: Camosun D2L is Upgrading!

Yes, Camosun’s D2L will be upgrading to the latest version, called the Daylight Experience!

When are we upgrading?

We will be upgrading D2L at the end of April 2018.  So, on May 1st, you will login as usual, but see a new bright and shiny D2L.

Why are we upgrading?

Well, the main reason is that the Daylight Experience version of D2L will be the only version available by the end of August, 2018.  But, we are also excited to be upgrading as Daylight Experience has been designed with mobile devices in mind!  So we are looking forward to a better experience for students who access D2L using their phones or tablets.

How different is this new D2L?

Do not fear! Many of you may remember the upgrade of almost 4 years ago when D2L changed significantly, but this upgrade will not be like that.  While D2L will look different, all the tools will continue to function as you are used to.  And everything you had on your course site on April 30th will still all be there for you on May 1st.
What’s it going to look like?

Here is a screen shot of what a default course homepage will look like (note that this may change a bit, depending on what additional changes are made before the upgrade):

How do I find out more?

During the 2018 Winter term (in March and April), we here in eLearning will be running information sessions at both campuses on the new version to prepare you for the change.  If you would like to talk to us about what impact the new version might have on your course, you can arrange to meet with one of our instructional designers – we will be happy to walk you through the changes.

Questions?  Contact me, Emily Schudel, at schudele@camosun.ca.

Do your students know how to access Desire2Learn (D2L)?

Setting up your D2L course sites for next term? Are you wondering if your students know how to access D2L?

If you have a D2L course site at Camosun College, your students will not have access to that site until the first day of classes, although they can login to D2L one week earlier (note that wait-listed students won’t have access to D2L until they are officially enrolled).

One way some of our faculty members let students know about D2L is by emailing them before classes begin, both to let them know what to expect on Day 1, and to let them know that they will have a D2L site associated with their course. This is a great way to both connect with your students before you see them for the first time, and alleviate some of the anxiety they may have about that first day of class.

While the specific content of that email will depend how you use D2L for your course, one thing you could include is a handout showing your students how to login to D2L from the Camosun home page. If you would like to download and use a copy of the eLearning tutorial Logging into D2L – a Student Tutorial, you will find the most recent (PDF) version at https://sites.camosun.ca/elearning/wp-content/uploads/sites/2/2017/11/LoggingIntoD2L-August2017.pdf.

If you have any questions about this handout, or want any other tutorials on D2L, let me (Emily Schudel) know: schudele@camosun.ca. I will be glad to help you out!

D2L Monthly Upgrades – What’s new in August 2017!

This month you will see a change in the Dropbox tool.  You can now hide a Dropbox folder without changing its start and end dates!

Note that at the time of this posting, if you create a New Dropbox folder in your course, it will be hidden by default and you will have to turn the new setting off.  There are two ways of doing this:

First, you can change this setting when you are first setting up your Dropbox folder.  To do this:

  • Click New Folder.
    Click New Folder
  • Give your folder a Name, and set up your Properties as you like.  Then click the Restrictions tab.
    Add a Name then click Restrictions
  • Deselect the Hidden from users checkbox, then click Save and Close.
    Deselec the Hidden from users checkbox, then click Save and Close

If you did not deselect the Hidden from users checkbox, you can also “un-hide” the dropbox using the drop-down menu next to the title of the Dropbox folder.  To do this:

  • Click the down arrow next to the title of your hidden Dropbox folder (you will see a closed eye icon next to the title of any hidden Dropboxes in your list).  Select Make Visible to Users.  The closed eye will disappear.
    Click the dropbox's down arrow and select Make Visible to Users

If you decide later that you want to hide a Dropbox:

  • Click the down arrow next to the title of the Dropbox folder you wish to hide.  Select Hide from users.  You will now see the closed eye next to your Dropbox folder title.
    Click the dropbox's dropdown menu and select Hide from Users

Note that if you have linked to a hidden Dropbox in the Content area, it will also be hidden from students there as well.  When you select Make Visible to Users, the Dropbox will then be Published (made visible) in the Content area.

D2L Monthly Upgrades – What’s new in July 2017!

We have some exciting changes for you this month!

Shuffle Questions in the Quiz

This new option in the Quizzes tool allows you to shuffle the order of questions in your Quiz, either ALL the questions, or specific groups/sections of questions.  This means that the order of questions will change each time the Quiz is opened.

So, first, to shuffle ALL questions in a Quiz:

  • Go to the Quizzes tool in your course and create a New Quiz, or edit an existing one.
  • After adding your questions to the Quiz, click on the Shuffle order of questions at the quiz level select box.  Click Save to enable the shuffling option and continue editing your Quiz.

Second, create a Section in your quiz containing questions you want to shuffle, so that other questions in the Quiz will NOT be shuffled.  You can also use this option if you want to include a Text item (like a Case Study description) followed by a set of questions, where the Text item remains at the top, but the questions are shuffled.

  • Go to the Quizzes tool in your course and create a New Quiz, or edit an existing one.  Then click Add/Edit Questions.

  • Click New and select Section.
  • Give your section a Section Name, and then scroll down to Display Options, where you will select Shuffle order of questions in this section.  Click Save.

  • Click on the title of the Section to open it, and then click Import.

  • Find and add the questions you want to shuffle in the Quiz into the Section.  then click Save.

  • Click Done Editing Questions to return to the Quiz editor.
  • You will see that the questions in your Section have the Shuffled icon next to them.  You can then add more questions to your quiz which will NOT be shuffled.  Click Save and Close when you have finished editing your Quiz.

Copy and Paste from Word – no formatting pop-up anymore!

For the last several months, when copying content from WORD into the HTML editor, you may have seen this pop-up:

But now?  DE Support now has the option to turn off this pop-up, so it will no longer appear when you copy and paste content into the HTML editor wherever it appears in D2L!!

Warning to save HTML editor content if you accidentally forget to save before navigating to somewhere else.

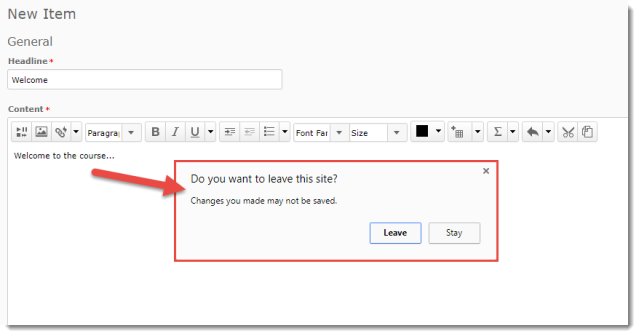
If you are working in the HTML editor in D2L (in the News tool, Content, etc.), and you forget to save before navigating to another website, or shutting down your browser, you will now get a warning prompting you to continue editing (or Save) or discard your changes.

For example, when working in the D2L HTML editor while using Chrome, if you don’t save your HTML page and try to navigate away, you will see this message:

If you choose to Stay, you can continue editing your HTML page and save it.

Announcement: New Interface for Respondus LockDown Browser in D2L

For all faculty at Camosun College who require that students use Respondus LockDown Browser to take their D2L quizzes and exams:  the Respondus LockDown Browser interface in D2L’s Quizzes tool has changed!!  (Please note that any quizzes already set up with Respondus LockDown Browser will maintain their existing settings.)

Instead of setting up Respondus LockDown Browser in individual quizzes, you will be able to set it up in all your quizzes from one dashboard location.  Here is a quick picture of what to expect:

Respondus LockDown Browser Dashboard

To download (and print) complete instructions (in PDF format) on how the new LockDown Browser interface works, go to Respondus LockDown Browser in D2L New Interface.

If you have any questions, please contact desupport@camosun.ca.

D2L Monthly Upgrades – What’s new in April and May 2017!

Welcome to our Camosun D2L Upgrade Report.

From April

Accessibility Checker in the HTML Editor

For those of you looking for a quick way to see if your pages and posts created using the HTML editor in D2L are compliant with WCAG Accessibility standards, your wish has been answered.  The HTML editor in D2L now has a Check Accessibility option that you can click to check for:

  • Use of paragraphs as headings
  • Sequential headings
  • Adjacent links
  • Ordered list structure
  • Unordered list structure
  • Contrast ratio of text to background colors
  • Image ALT text
  • ALT text filename
  • Table Caption
  • Complex table summary
  • Table caption and summary
  • Table heading scope, markup, and headers

“The [accessibility] checker indicates if there are no issues, or offers suggestions to fix identified accessibility issues.”  But note that it only available for those pages you create in D2L using the HTML editor.

Quizzes – “Long Answer Question” renamed “Written Response”

So, don’t be surprised when getting ready to create your quiz questions!

From May

Discussions – Allow instructors to post to All Groups at once in a Group Topic

Back in January, I told you about the new Discussions feature allowing you to create a Topic containing a set of group-restricted threads.  Now, we have a bit of an improvement to this as you can now post to All Groups within the Topic, instead of having to post to each group thread individually.

And there you have it.  Stay tuned for June updates next month!

How do I see all my students in the Dropbox Submissions area?

Here’s a topic from the D2L’s Assignment Dropbox in all its Glory! workshop:  Seeing all students listed in the Submissions area, even if they haven’t submitted an assignment yet.

Are you wondering why you don’t see all your students in your submissions area for your Dropbox?  Well, that’s because the default is to only list the students who have actually submitted assignments!  But, there is a way to view a complete list of students – but there’s a trick to it, so let’s explore that now!

  1. Go to the Dropbox tool in your course.
  2. Click on the title of the Dropbox activity you want to view submissions for.2.Click on the title of the Dropbox activity you want to view submissions for
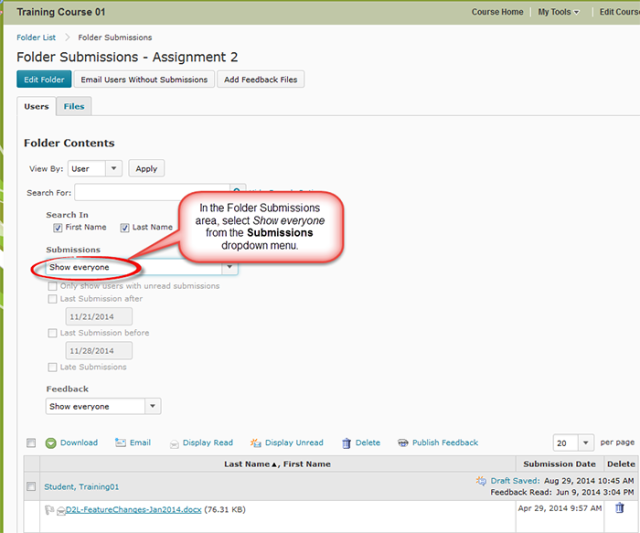
  3. In the folder Submissions area, select Show everyone from the Submissions drop-down menu.3.In the folder Submissions area, select Show everyone from the Submissions drop-down menu
  4. This is the trick:  Click on the magnifying glass next to the Search For box (above the Submissions drop-down menu).Click on the magnifying glass next to the Search For box
  5. Now you will be able to see a list of ALL your students in the Folder Submissions area!

Note that when you return to the Folder Submissions area, the Submissions drop-down menu will be set back again to its default view: Users with submissions.

Want to know more? Contact desupport@camosun.ca to book an appointment with an instructional designer!

D2L Tool Tip of the Week: Creating Forums and Topics in the Discussion Tool in D2L

This tutorial is designed for faculty who have previous experience using D2L and will cover the steps involved when you wish to create forums and topics in the Discussion tool in D2L. The Discussion tool allows for asynchronous discussions of topics, and sharing of information, between students and groups of students. But first, you need to know the difference between Forums, Topics, and Threads/Replies.

  • A Forum is a container for Topics.
  • A Topic contains the discussion itself.
  • A Thread contains an individual student’s post to the Topic, along with others’ replies to that post.

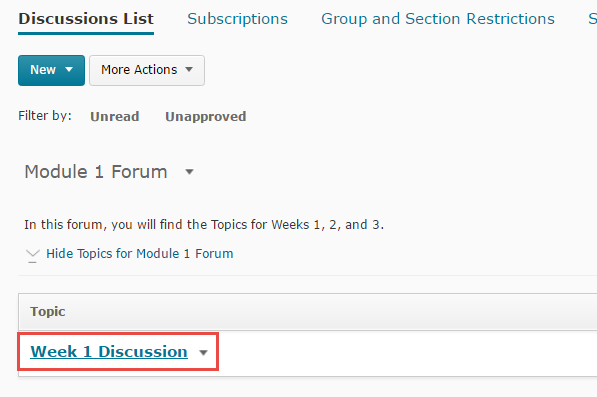
So, a Topic contains multiple Threads, and a Forum contains (often) multiple Topics. You could, for example, have a Forum called “Module 1 Discussions”, and within that Forum, have a series of Topics called “Week 1 Discussion”, “Week 2 Discussion”, “Module 1 Group Discussions”, etc.

For further information, please contact desupport@camosun.ca for assistance.

Steps

  1. Go to the Discussions tool in your course.

To create a Forum

  1. Click on the New button, and select New Forum. Note that you need to create a Forum before you can create a Topic, even if there is only going to be one Topic in that Forum.Select New Forum
  2. Give your Forum a Title. You can also give your forum a Description if you like. This description will appear under the Forum’s title in the main Discussion area.Add a title and optionally, a description
  3. The Options you select for the Forum will apply to any Topics within it. These options include:
    • Allow anonymous posts (this means students can choose to post anonymously)
    • A moderator must approve individual posts before they display in the forum (this means that YOU need to approve posts before students can see them)
    • Users must start a thread before they can read and reply to other threads in each topic (this means that a student has to post to a topic BEFORE they can see other student’s posts)
    • Display forum description in topics (this will repeat the forum description under the title of all the topics within it)Select your options
  4. Visibility controls whether or not (and when) students can see the Forum.Select Visibility options
  5. Locking Options allow students to SEE the Forum, but control whether or not (and when) they can POST to it. Click Save and Close when you are done.Select Locking Options, and click Save and Close

To create a Topic

  1. Click on the New button and select New Topic.Select New Topic
  2. From the Forum drop-down menu, select the Forum you want the Topic to be part of. Note that this is mandatory – every Topic must belong to a Forum.Select the Forum you want the Topic to be part of
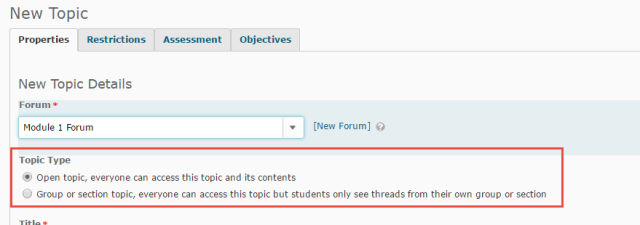
  3. Under Topic Type, choose:
    • Open topic (meaning that all students can see the topic and post to any and all threads posted to it).
    • Group of section topic (meaning that all students can see the topic, but they will only see threads created by other students in their group –that this means that you need to have Groups set up in D2L in order to use this Topic Type).Select the Topic Type (Open or Group)
  4. Give your Topic a title, and the rest of the options are similar to those of the Forum (as described above). Click Save and Close.Give your Topic a title, description, select other options and click Save and Close

 To create a Thread to start the discussion

  1. Click on the title of the Topic you wish to post to.Click the title of the topic you want to post to
  2. Click Start a New Thread.Click Start a New Thread
  3. Give your post a Subject and add the body of your post. You can add attachments if you like. You can also change the Topic you are posting to (in case you have gone into the wrong Topic). Click Post.Give your post a Subject, type the body of your post, click Post

To Reply to a Thread

  1. Click on the title of the Topic you wish to post to.
  2. Click on the title of the Thread you wish to reply to.Click the title of the Thread you with to Reply to
  3. Click Reply to Thread.Click Reply to Thread
  4. Add your reply to the HTML editor, and click Post.Add your reply and click Post

Things to Remember

You cannot create a Topic without putting it into a Forum – every Topic must belong to a Forum!

You and your students CANNOT post to a Forum. You need to have a Topic in order to post threads and replies.

One Forum can contain multiple Topics. You don’t need to have a separate Forum for each discussion, only separate Topics or Threads.

If you have Locking Options set up for a Forum or Topic, and you copy your discussion Forums and Topics from one course to another, remember to revise these settings for the next course, otherwise the original settings will control whether students can post to that Forum or Topic. So, for example, if you locked your Week 1 Discussion Topic on October 31, 2016, that date will copy along with all the other Discussion settings!