A New Final Grade Scheme in D2L

There is a “new” Grade Scheme available for you to apply to your Final Grades in D2L.

Well, “new” in that it was there before, but no one knew what it was. It’s now called Camosun Standard Grading Scheme, and you will have to apply it to your Final Calculated Grade in order to activate it. Camosun Standard Grading Scheme rounds up your final calculated grade percentages and applies a letter grade to them according to Camosun’s grading matrix.

Here’s how to apply this scheme to your Final Calculated Grade.

  1. Go to the Grades tool in your D2L course.
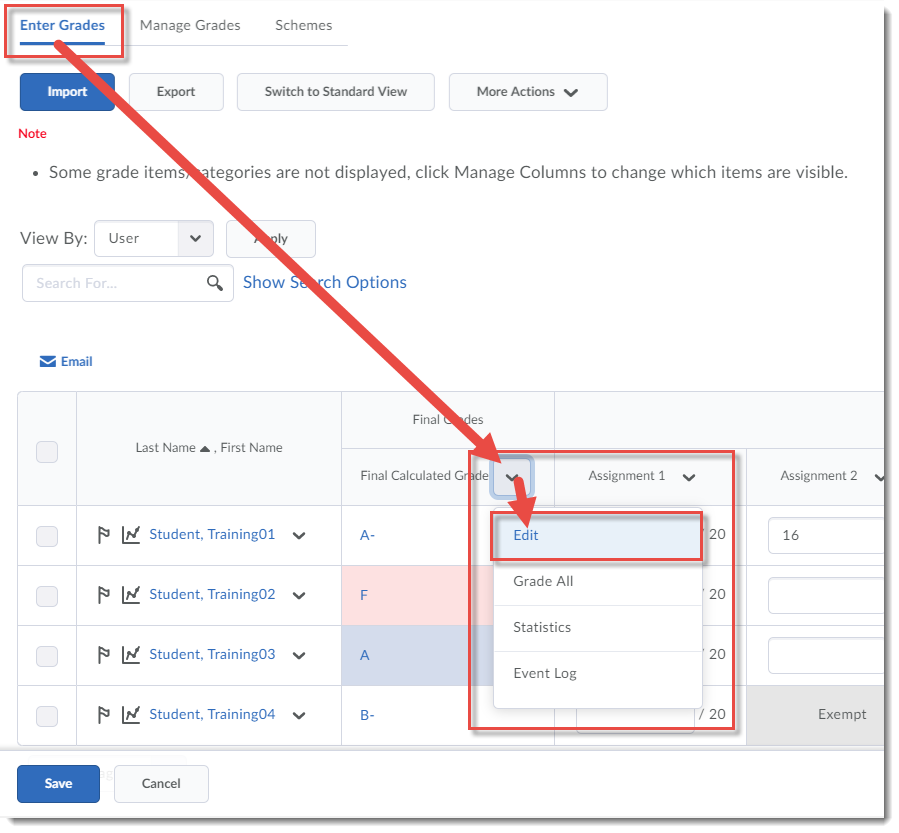
  2. From Enter Grades, or from Manage Grades, click on the down-arrow next to Final Calculated Grade (we will do this in the Enter Grades area), and select Edit.

    Click the down-arrow and select Edit.

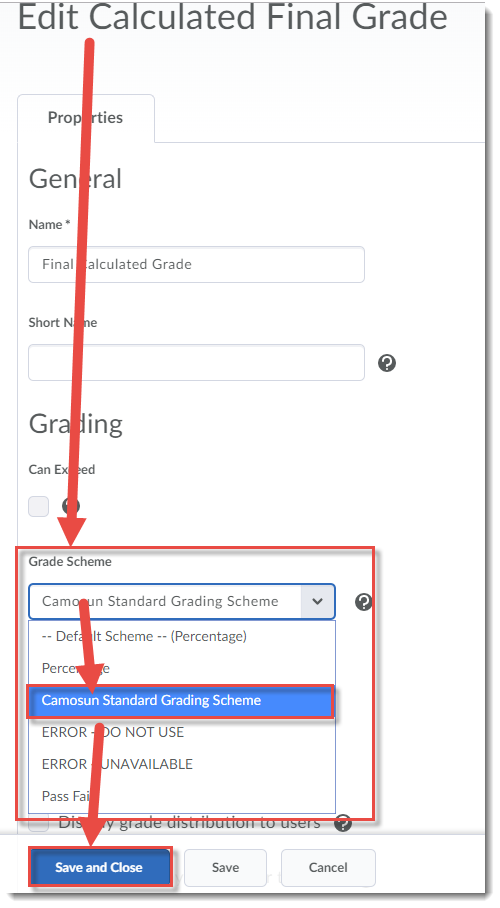
  3. In the Grade Scheme drop-down menu, select Camosun Standard Grading Scheme, then click Save and Close.

    Under Grade Scheme, select Camosun Standard Grading Scheme, click Save and Close.

Things to Remember

If you have a Grade Scheme already applied to your Final Calculated Grade which says ERROR, you will need to change it to the Camosun Standard Grading Scheme.

If you are not happy with the rounding as applied by this scheme, you can change individual students’ grades in the Final Adjusted Grades column. See the tutorial Releasing Final (Adjusted) Grades in the On-Demand Training course for more information.

If you have any questions, contact desupport@camosun.ca.


Cleaning Out Your D2L Course Site

For some of you, getting your D2L course ready for the next term means copying the latest version of the course into your Master or DEV course. But before you copy, make sure your Master or DEV course site is cleaned out, because if you copy duplicate content, quizzes, etc., D2L will duplicate all of those items, NOT write over them.

So, to prep your Master or DEV course site for copying back from the latest live course, follow the steps in this tutorial post for how to delete material from the various tools in D2L.  Note that you cannot “delete all” in a course in one step – you will need to delete the content/activities in each tool used in the course separately.  We recommend that you do not delete everything in course site that has student data in it (i.e., a course site for a past offering).  It is better to do this in a DEV or MASTER course site only.

If the course you are deleting from also has custom homepages or navigation bars, or incorporates tools beyond the list below (for example the Glossary or Survey tools), you will need to delete content contained in those tools as well.  If you are unsure of how to delete content from homepages, navigation bars or other tools not included in this tutorial, contact desupport@camosun.ca for assistance.

Deleting Content and Files in File Manager

  1. Go to the Content tool in your course
  2. CourseAdmin-DeleteAll-Content1
  3. CourseAdmin-DeleteAll-Content2
  4. CourseAdmin-DeleteAll-Content3
  5. CourseAdmin-DeleteAll-Content4
  6. CourseAdmin-DeleteAll-Content5

Deleting Quizzes

  1. Go to the Quizzes tool in your course.
  2. CourseAdmin-DeleteAll-Quizzes1
  3. CourseAdmin-DeleteAll-Quizzes2
  4. CourseAdmin-DeleteAll-Quizzes3
  5. CourseAdmin-DeleteAll-Quizzes4
  6. CourseAdmin-DeleteAll-Quizzes5
  7. CourseAdmin-DeleteAll-Quizzes6

Deleting Dropbox Activities

  1. Go to the Dropbox tool in your course
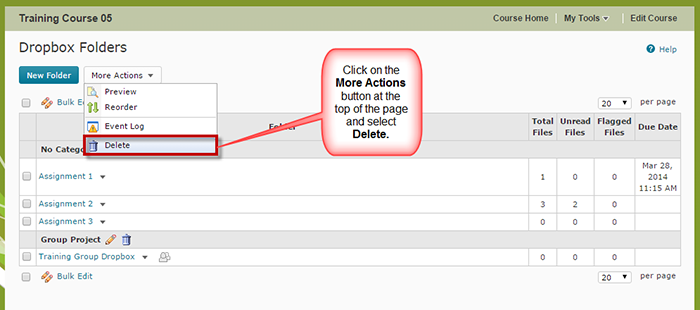
  2. CourseAdmin-DeleteAll-Dropbox1
  3. CourseAdmin-DeleteAll-Dropbox2
  4. CourseAdmin-DeleteAll-Dropbox3

Deleting Gradebook Items

  1. Go to the Grades tool in your course
  2. CourseAdmin-DeleteAll-Grades1
  3. CourseAdmin-DeleteAll-Grades2
  4. CourseAdmin-DeleteAll-Grades3

Deleting Discussion Forums and Topics

  1. Go to the Discussions tool in your course.
  2. CourseAdmin-DeleteAll-Discussions1
  3. CourseAdmin-DeleteAll-Discussions2

Deleting News Items

  1. Go to your Course Home.
  2. CourseAdmin-DeleteAll-News1
  3. CourseAdmin-DeleteAll-News2
  4. CourseAdmin-DeleteAll-News3

Things to Remember

Note that even if you delete Discussion Forums and Topics, you can restore them at any time (they are never really gone).  This is the same for Dropbox activities.

NEW: Assignment Feedback Notifications for Students in D2L!

You’ve been asking for it, and D2L has listened! Students can now sign up for notifications (email or instant message) of released and updated  Dropbox (soon to be called Assignments) feedback!

To sign up for these (and other) notifications:

  1. Log into D2L.
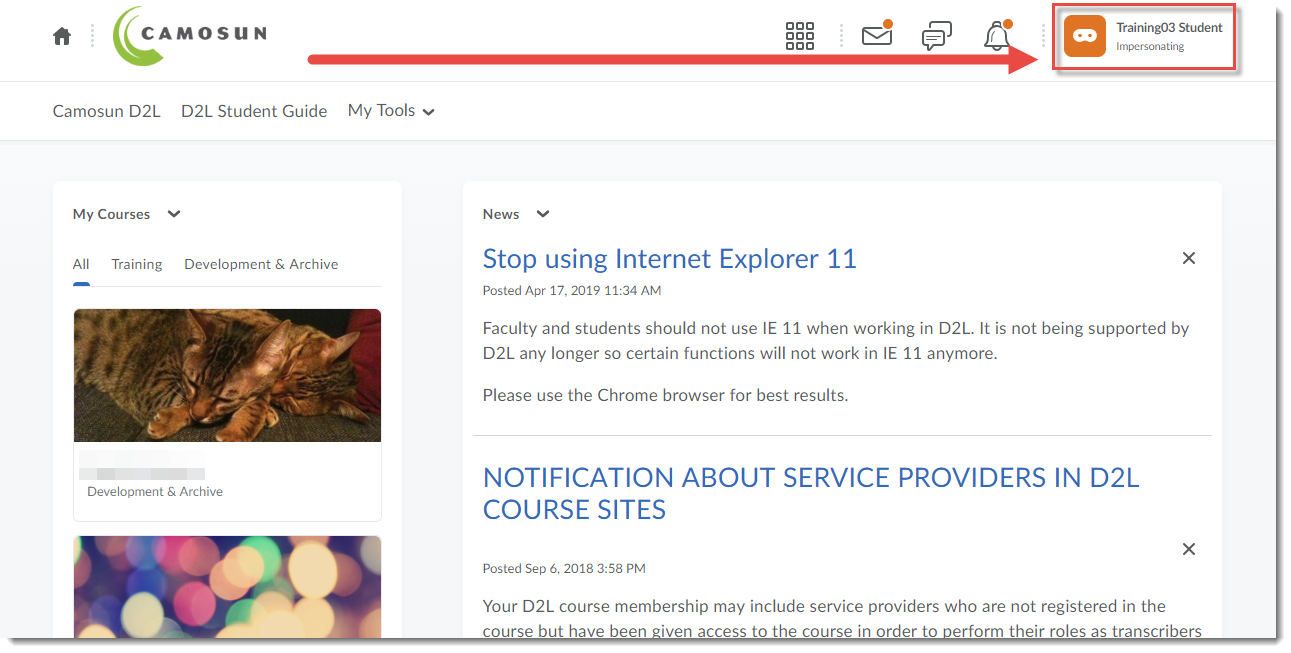
  2. Click your name (at the top right).
    Click your name
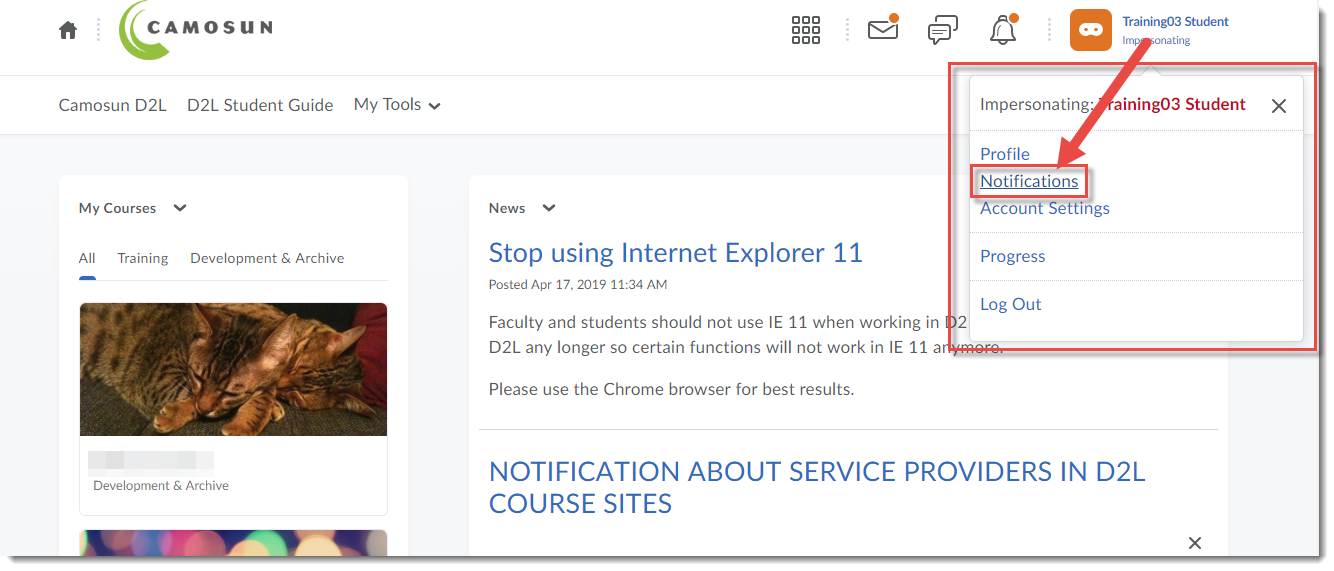
  3. Click Notifications.

    Click Notifications

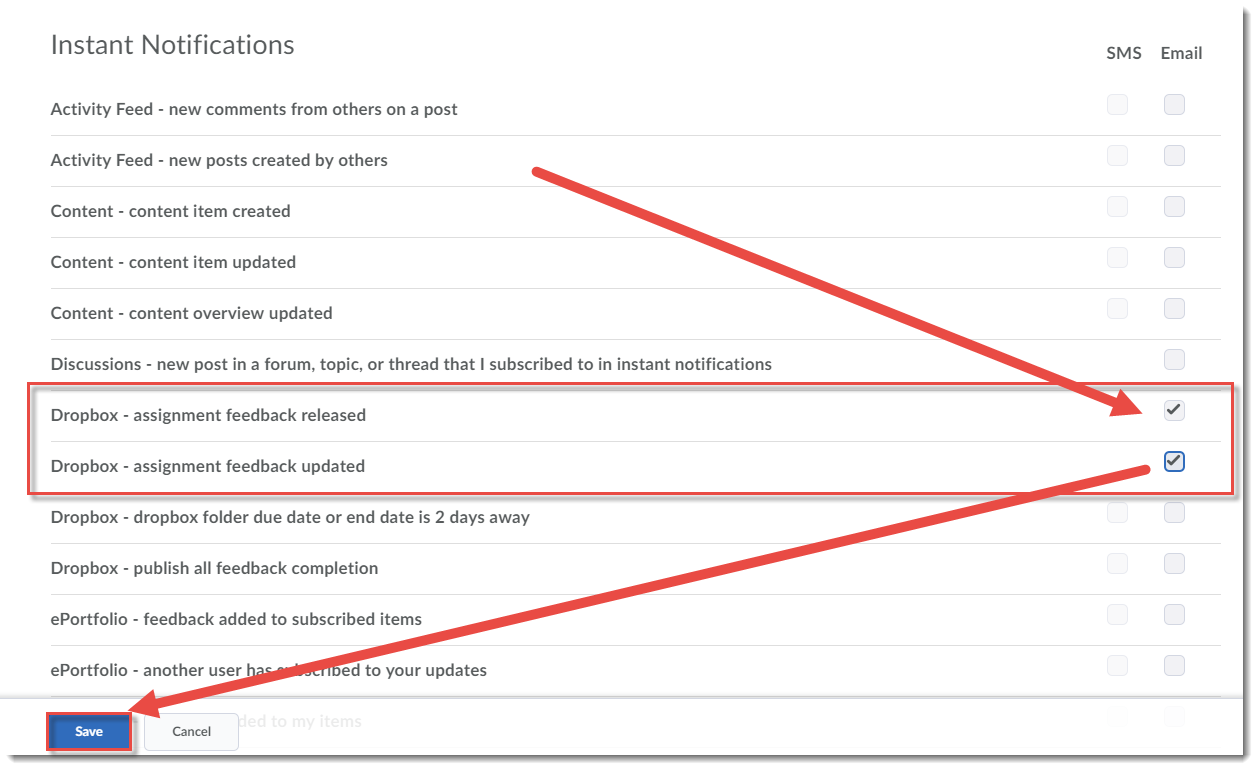
  4. Scroll down and select the Email box (or the SMS box if you have registered your mobile number) for Dropbox – assignment feedback released and/or Dropbox – assignment feedback updated. Click Save.

    Select the two Dropbox Feedback options and click Save

Note that next month (May), the Dropbox tool will be renamed Assignments.

How long will you have access to your course site? A Student D2L Tutorial

It’s the end of the term, and if you are a Camosun student whose courses use D2L, you may be wondering how long you will have access to your course site, and what to do if you want to keep materials from your course.

Due to how D2L integrates with the college’s systems, student have access to their D2L course sites for 20 days after the official course end dates. If you have an accommodation need (i.e., through the Centre for Accessible Learning) for extended access, talk to your instructor who will then confer with eLearning around options for you.

Before you lose access, you may want to save content or other items from your course site for future reference, so I’ll walk you through some of the options for this.

First, you can print or save files from the Content area. To do this:

  1. Go to the Content tool in your D2L course.

To print documents (WORD, PDF, PPT)

  1. In the Table of Contents box, click on the title of the Module containing the files/pages you want to print.
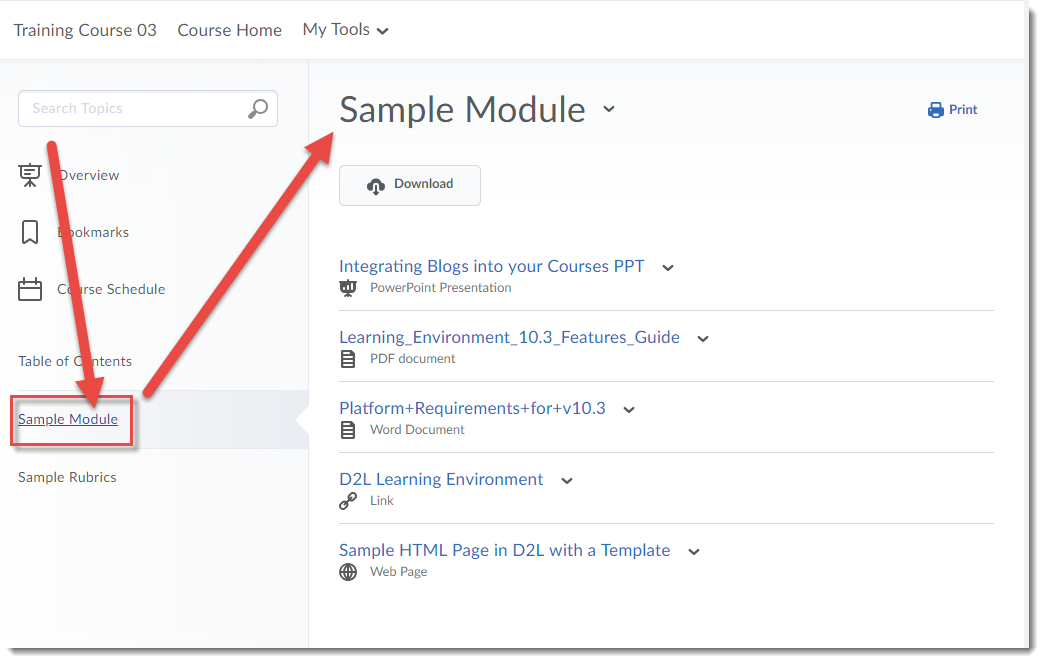
    Click the title of the Module you want to print from

  2. Click on the title of the content page you want to print.
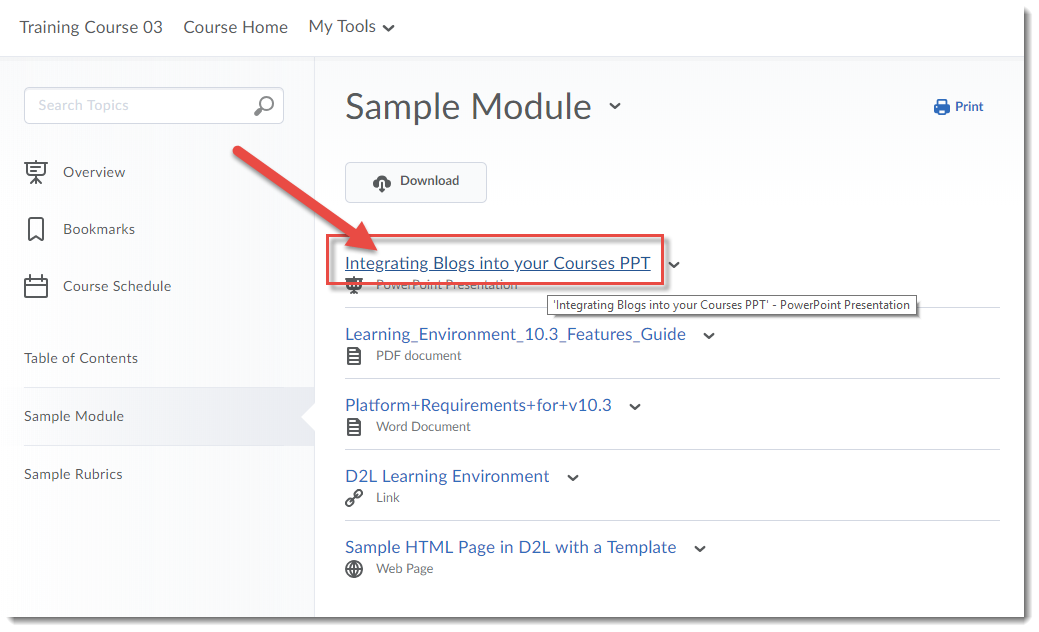
    Click on the title of the content page you want to print.

  3. Scroll down to the bottom of the content page and click the Download button to save the file to your computer, then open it in the appropriate program (for example, WORD or PowerPoint) and print the document from there.
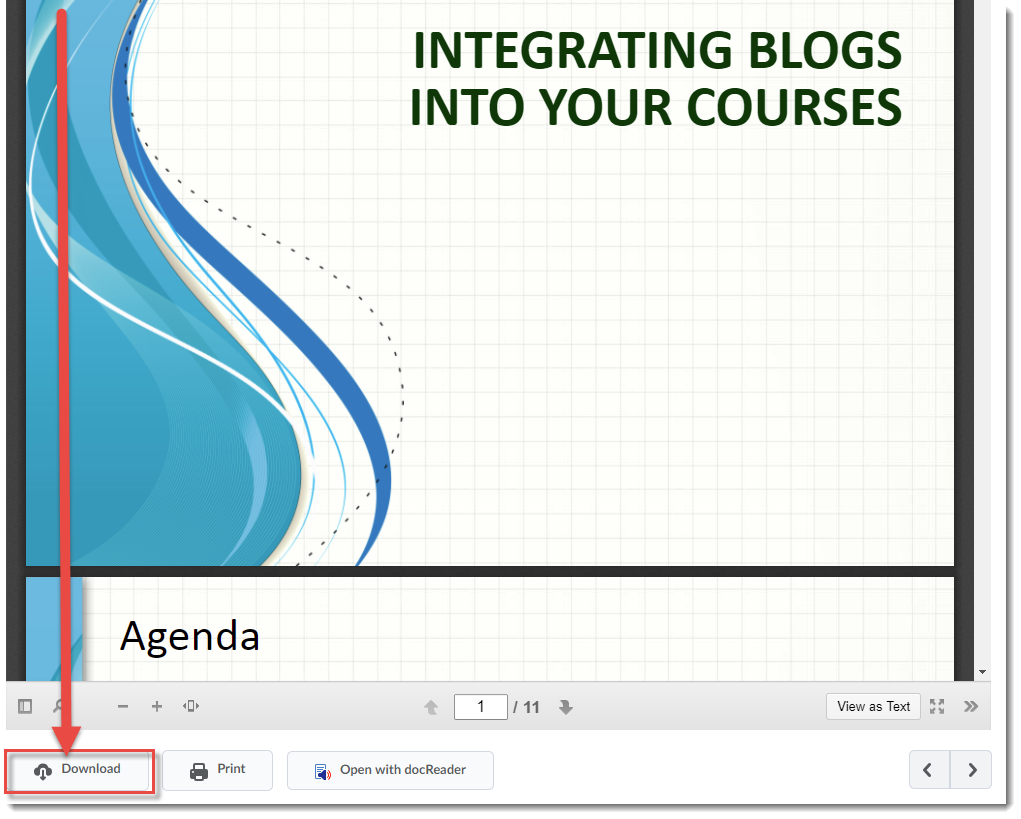
    Click Download

To print multiple pages of Content

  1. In the Table of Contents box, click on the title of the Module you want to work with.

    Click the title of the Module you want to print from

  2. Click the Download button at the top of the page. The files in the Module will be “compressed” into a zip file, which you can save onto your computer, and then unzip into separate files which you can then print.
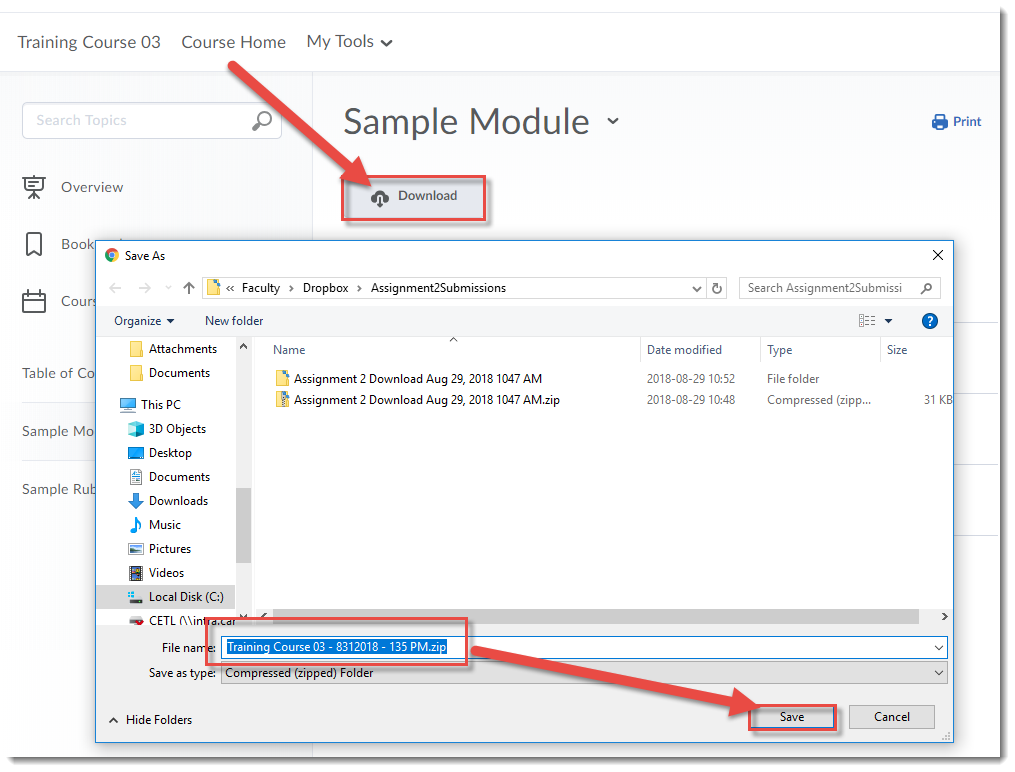
    Click Download

You can also print your Gradebook, or use the print function to save your Gradebook as a PDF file. To do this:

  1. Go to the Grades tool in your D2L course.
  2. Click Print (at the top, right of your Grades area).
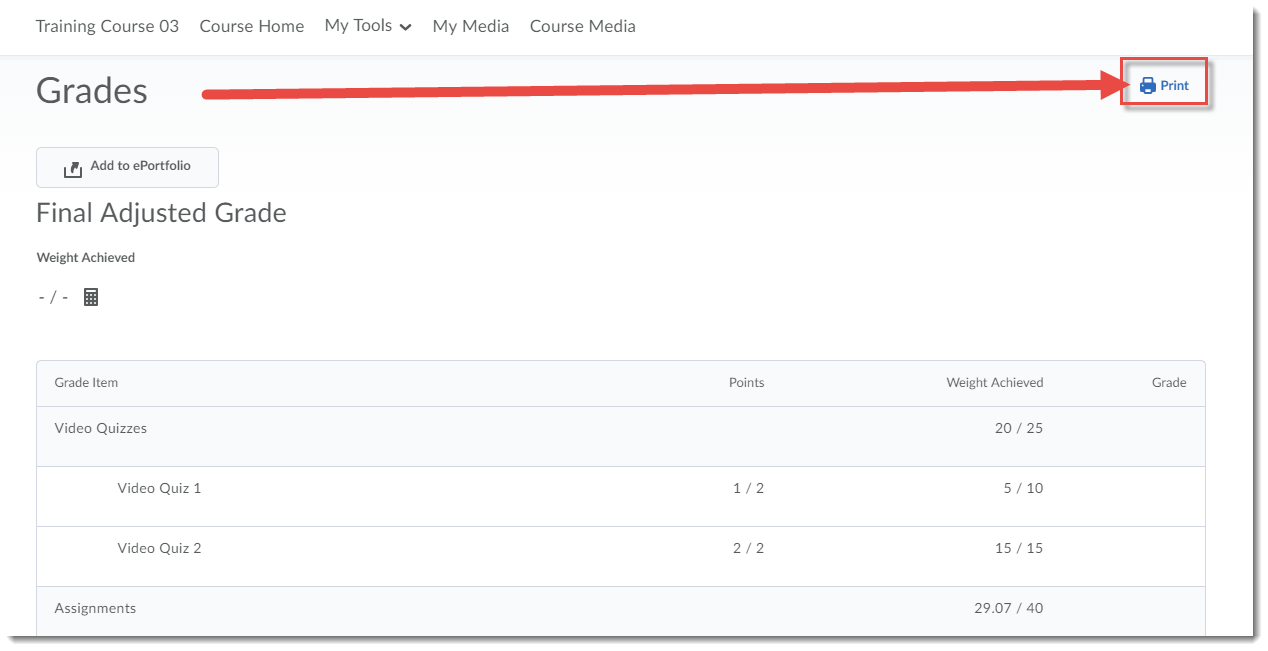
    Click Print

  3. Select your printer, or change the Destination to PDF to save your Gradebook as a PDF file on your device. Click Print.
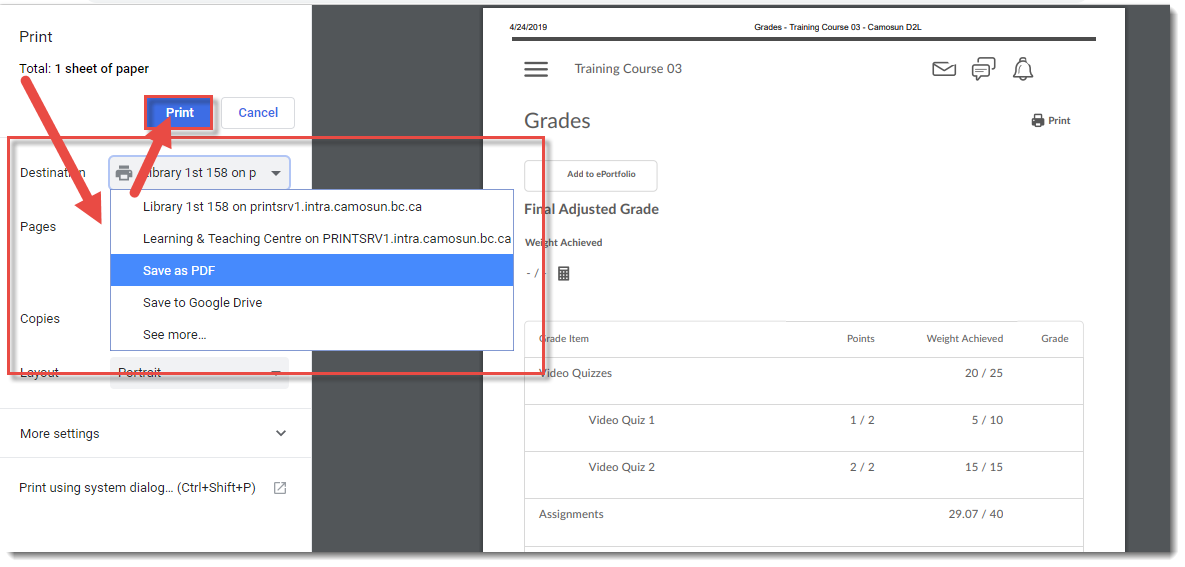
    Select Printer and click Print

To save Discussion posts, you can print threads by:

  1. Go to the Discussions tool in your D2L course.
  2. Click on the Topic you want to print from.
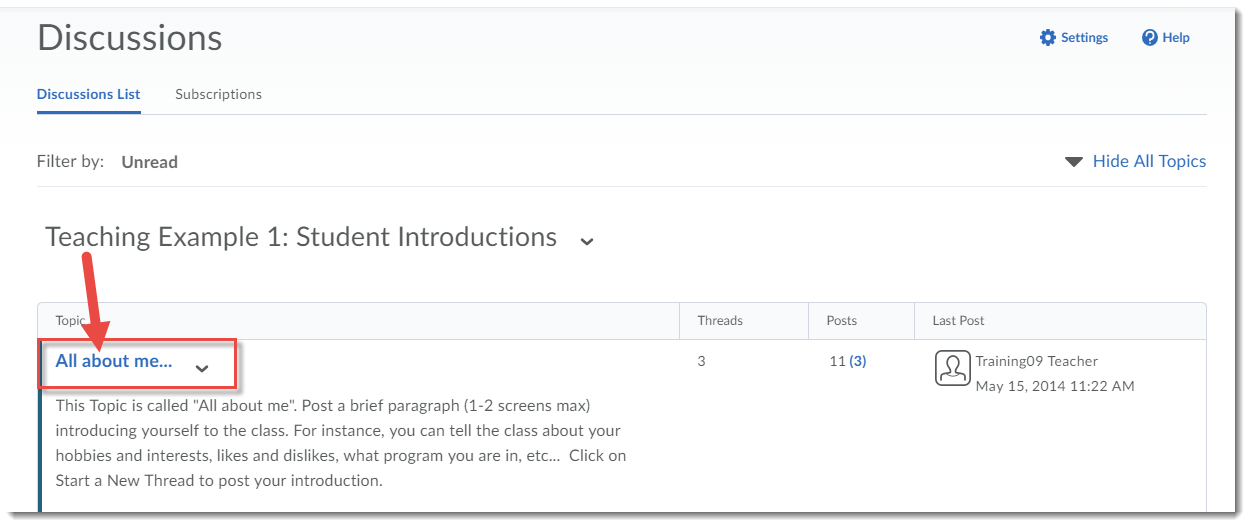
    Click the Topic

  3. Click on the Thread you want to print.
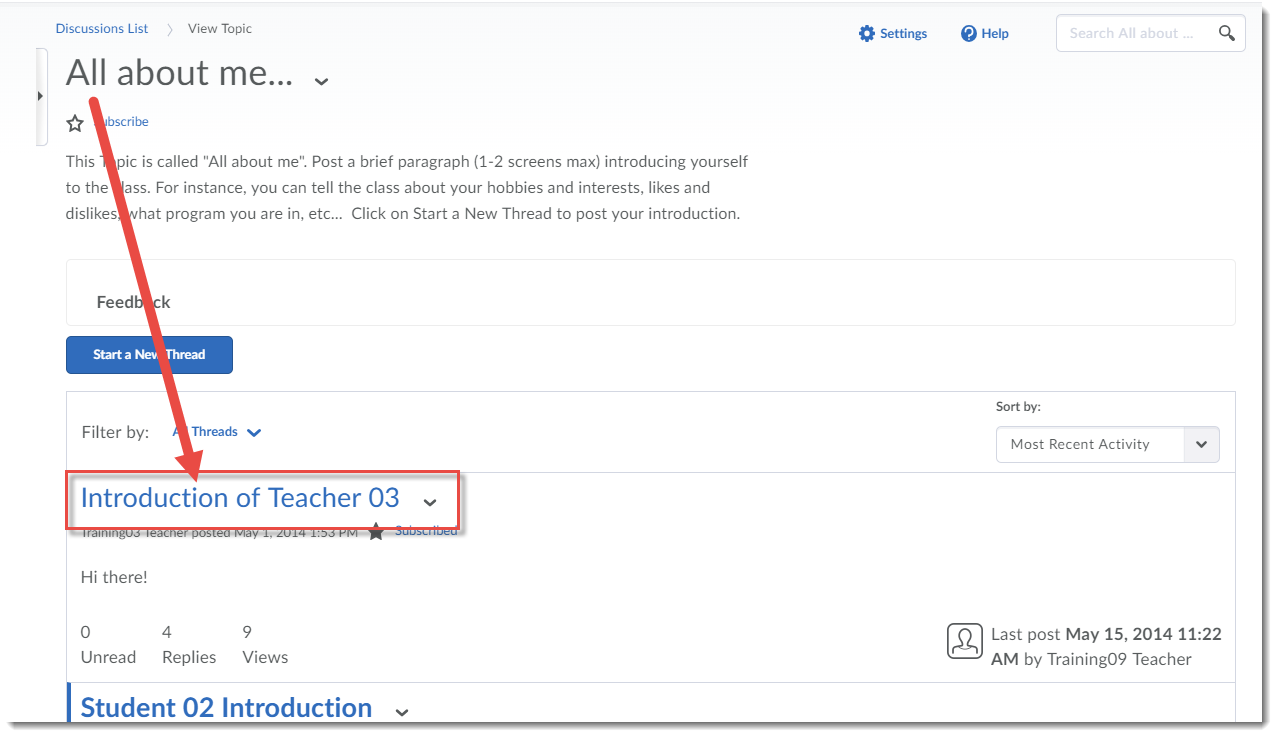
    Click the Thread

  4. Click on the down arrow next to the Thread title, and select Print Thread.
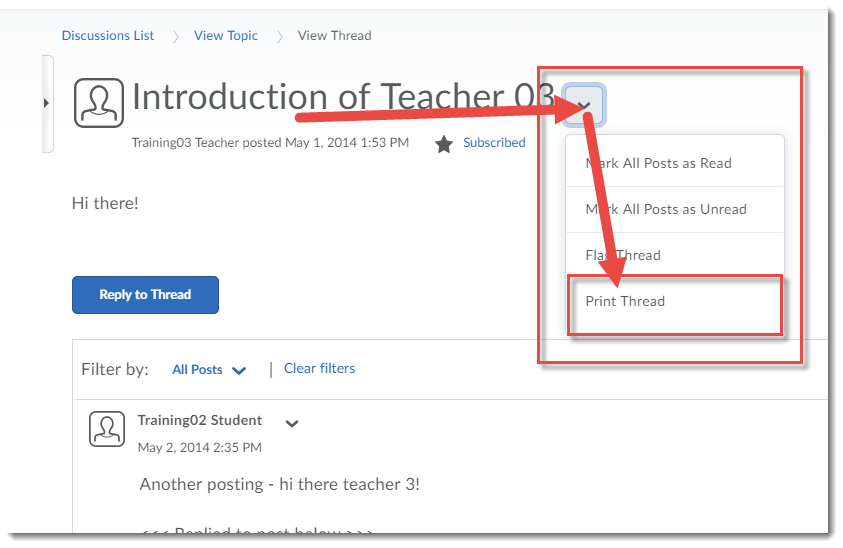
    Select Print Thread

  5. Select your printer, or change the Destination to PDF to save the Thread as a PDF file on your device. Click Print.
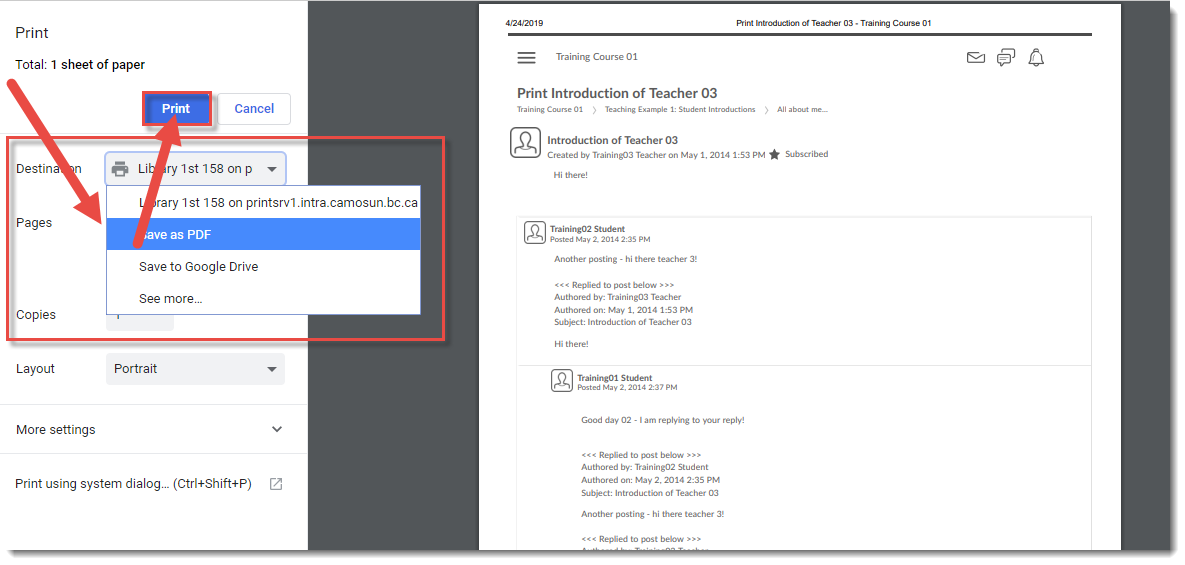
    Select printer and click Print

Make sure to download any feedback files you may have received from your instructor in the Dropbox tool by:

  1. Go to the Dropbox tool in your D2L course.
  2. In the Evaluation Status column, click the Read link to go to the feedback you wish to print.
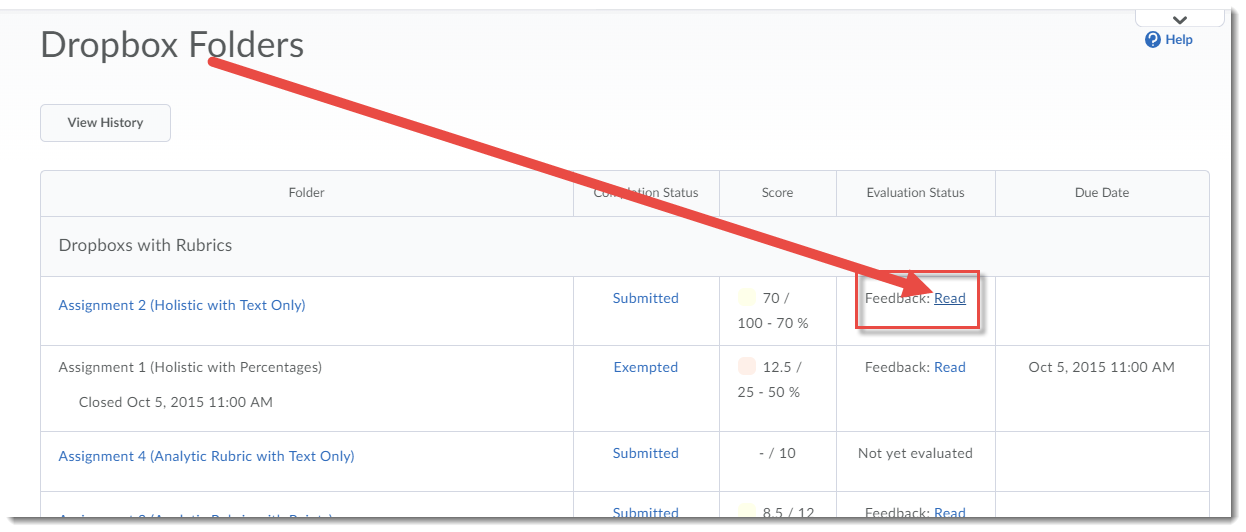
    Click the Read link

  3. Scroll down to the Attached Files, and click Download All Files to save the feedback files to your device.
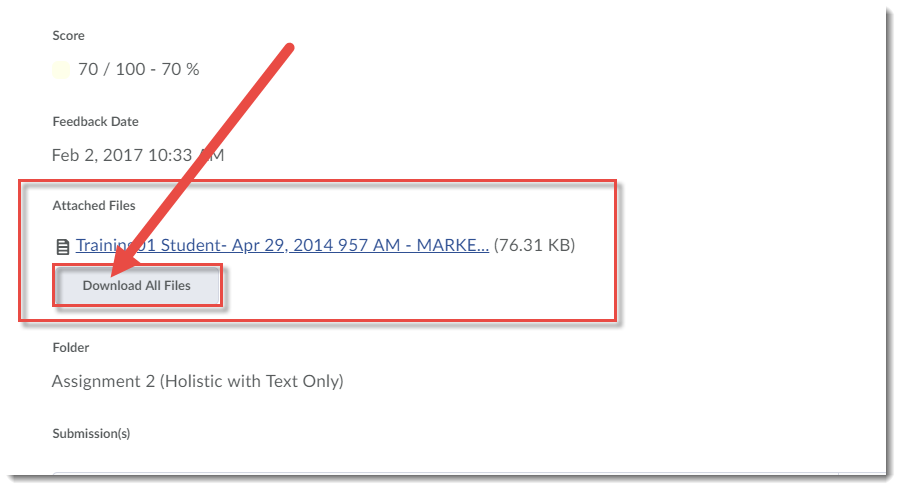
    Click Download All Files

  4. If you have graded Rubrics attached as feedback to your Dropbox submission, you will need to print them (or print them as a PDF to save to your device) by using the Print function in your Internet browser.

Note that you will not be able to save any Quizzes you completed.

If you have questions about saving any other information from your course site, talk to your instructor.

Releasing Final Grades (with Adjustments) – A D2L Tutorial

Scenario

It’s that time of year again.  Your grades are all entered in D2L and you want to finalize the Final Grades.  This tutorial will cover the steps involved when you wish to get your Final Calculated Grade ready to release to your students (including adjusting grades as needed). For further information, please contact desupport@camosun.ca for assistance.

Steps

  1. Go to the Grades tool in your course, and make sure you are in the Enter Grades.
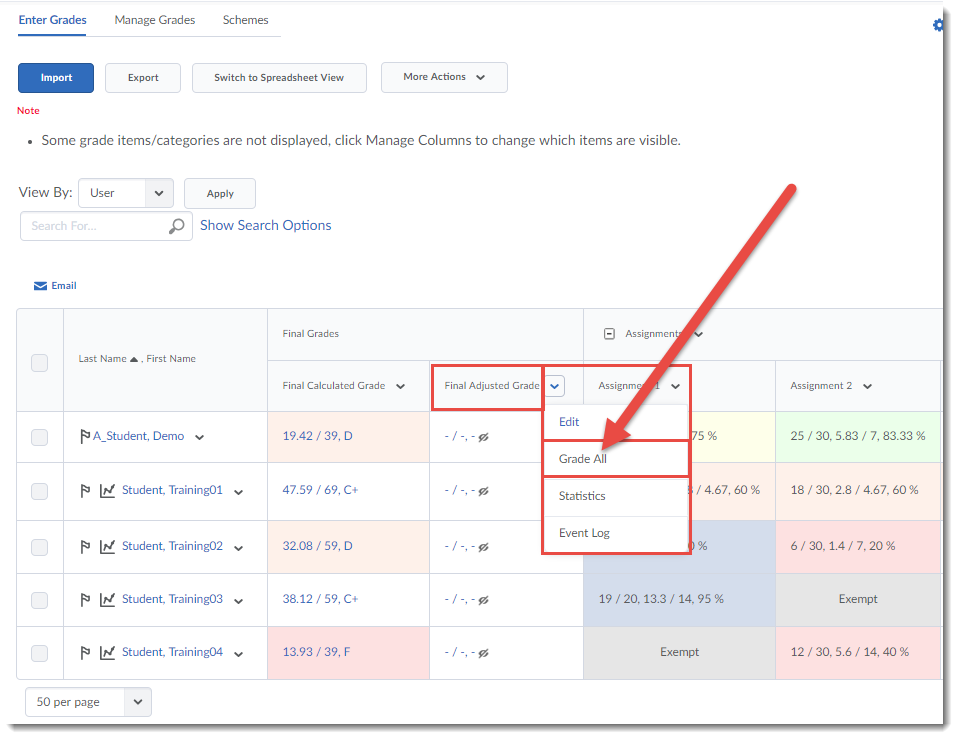
  2. Click on the down arrow next to the Final Grade (Calculated or Adjusted) and select Grade All.Click the down arrow nect to Final Grade and select Grade All
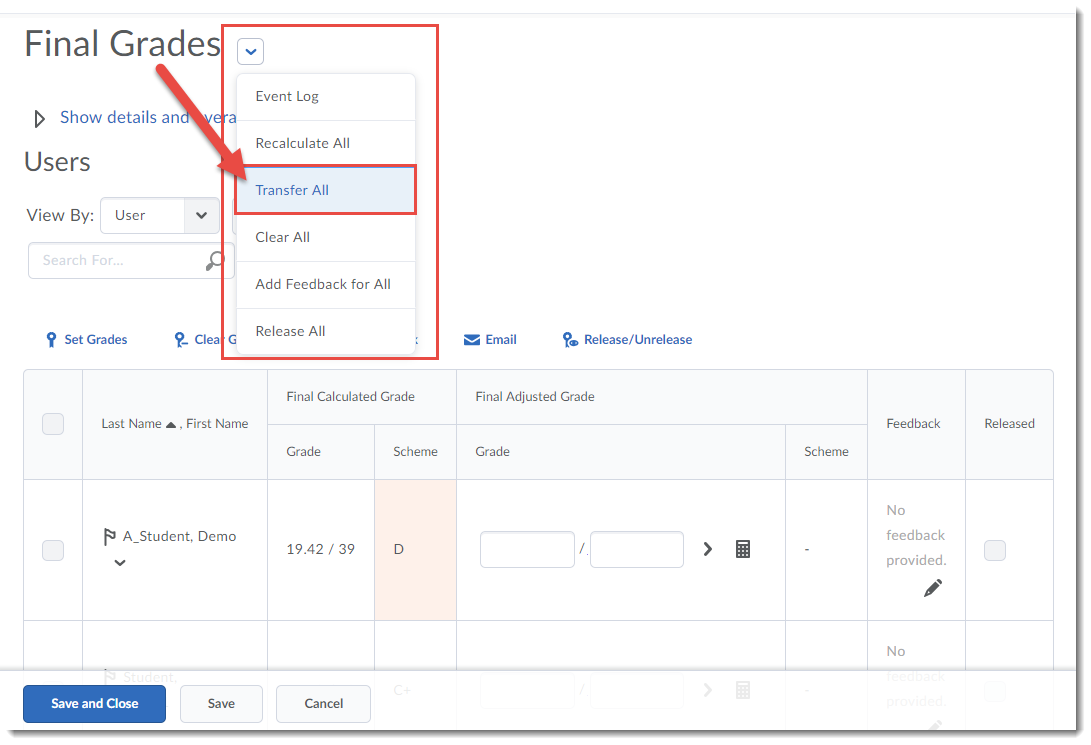
  3. First, you want to transfer all the Final Calculated Grades into the Final Adjusted Grade column. To do this, click on the down arrow next to the title Final Grades, and select Transfer All.Click the down arrow next to Final Grades and select Transfer All
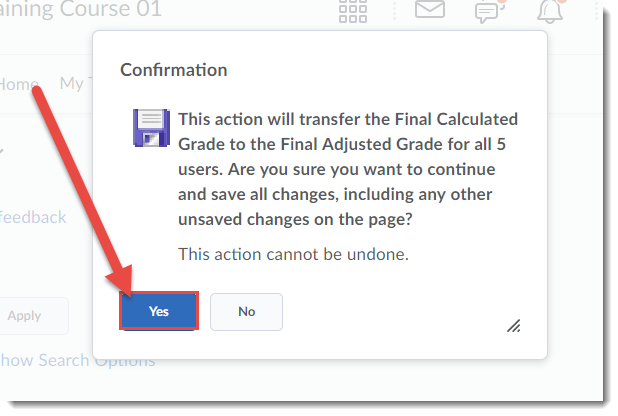
  4. Click Yes in the Confirmation pop-up box to continue.In the Confirmation box, click Yes
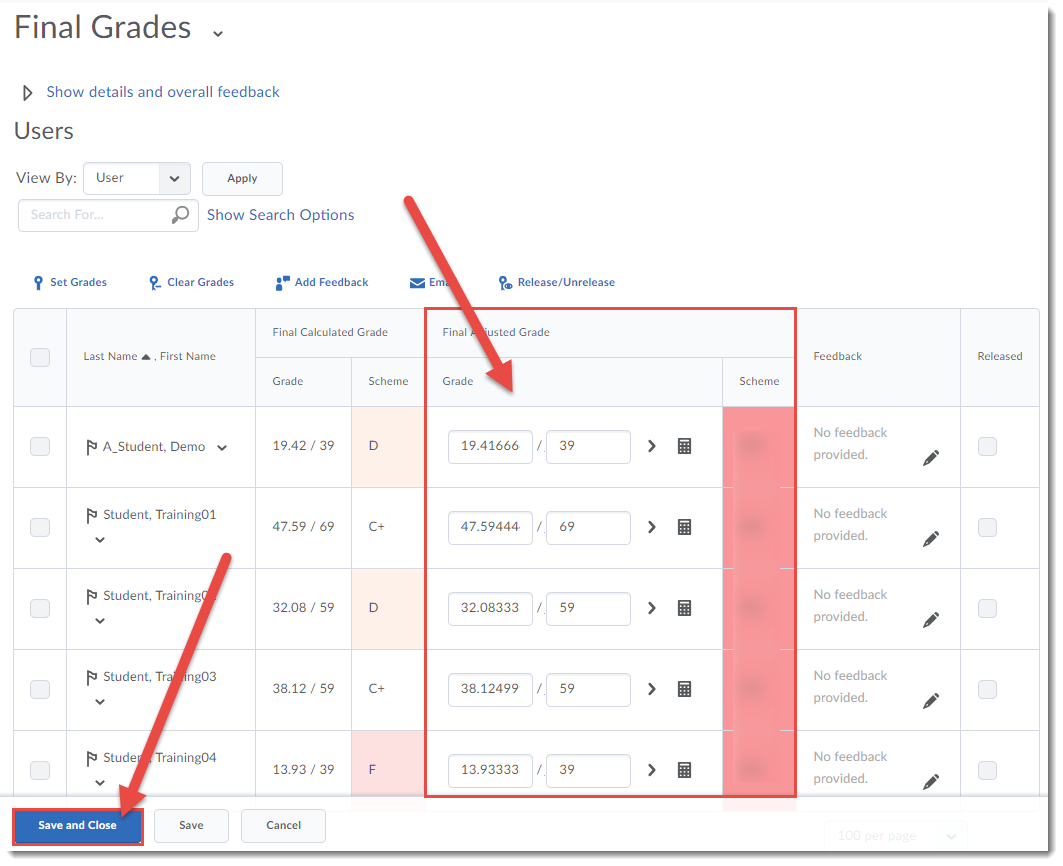
  5. Your Final Calculated Grades will be transferred into the Final Adjusted Grade column. To then release the Final Grades, move on to Step 6 below. If you do NOT want to release the grades at this time, click Save and Close. The final grades will be saved, but NOT released to students.Click Save and Close
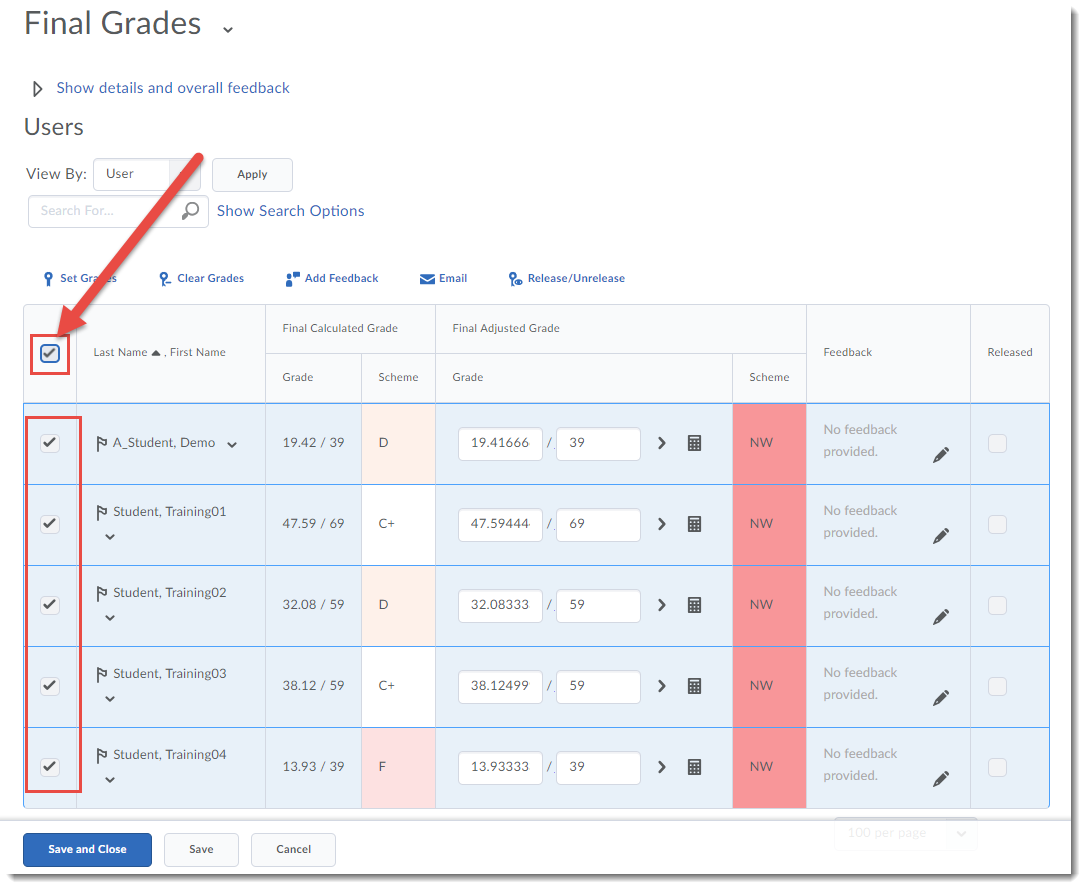
  6. To release your Final Grades, click on the select box at the top of the student grade table to select all students.Select all students
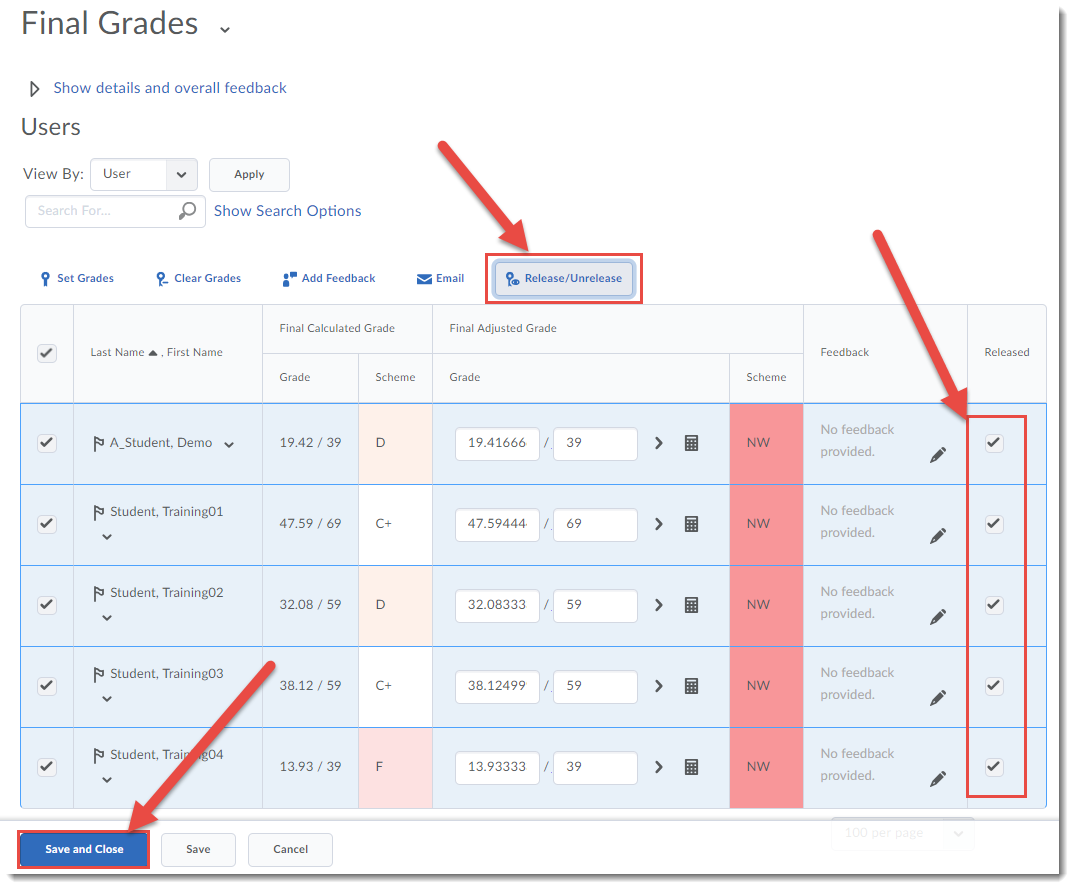
  7. Click Release/Unrelease. You will then see checkmarks in the Release Final Adjusted Grade column. Click Save and Close. Click Yes in the pop-up box that appears.Click Release/Unrelease, then click Save
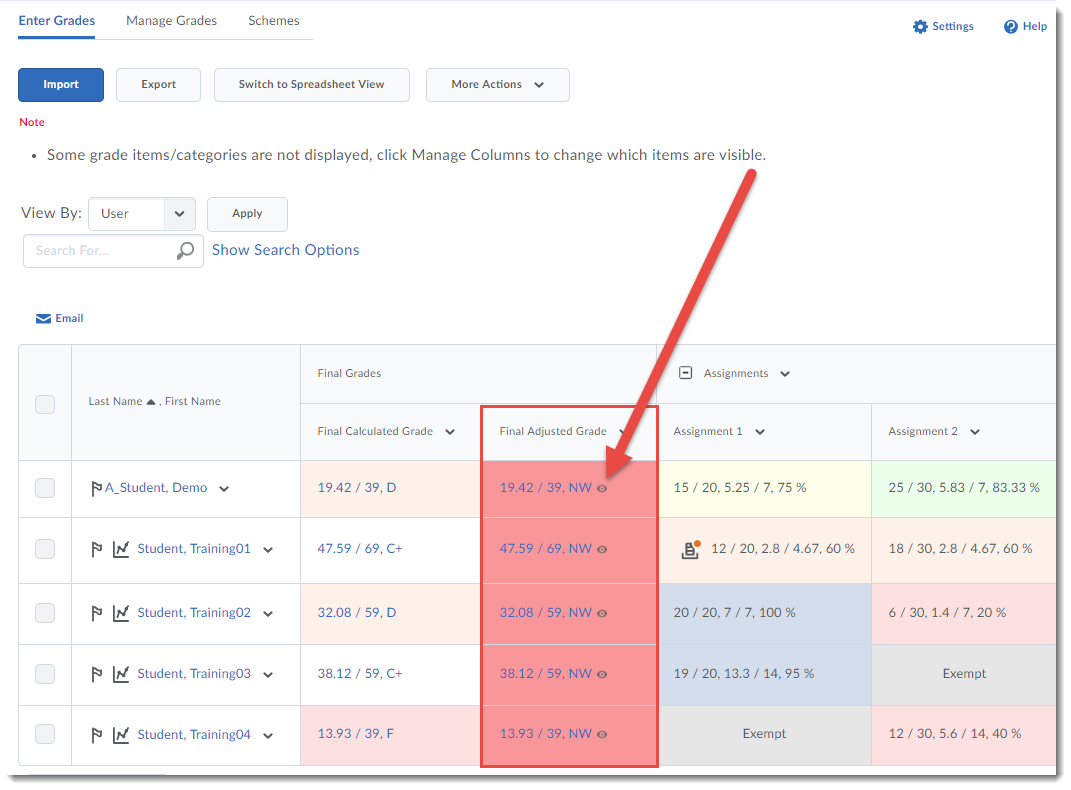
  8. You will then see the Final Adjusted Grades in the Enter Grades table, with open eye icons, indicating that those grades are now released to your students.The Final Adjusted Grades are now released

Things to Remember

As alluded to in Step 5, if you are not finalizing the grades for all your students at one time, you can set and save your Final Adjusted Grades without releasing them, and then release them once you have finalized all your students’ grades.


Exempting Students from Grades – D2L Tutorial

Scenario

This tutorial will cover the steps involved when you want to exempt a student from a specific grade item. For example, if a student has missed an assessment due to illness and you want that assessment to be excluded from their final grade (meaning that their final grade will be automatically recalculated to exclude that grade item). For further information, please contact desupport@camosun.ca for assistance.

Steps

  1. Go to the Grades tool in your course, and make sure you are in the Enter Grades.
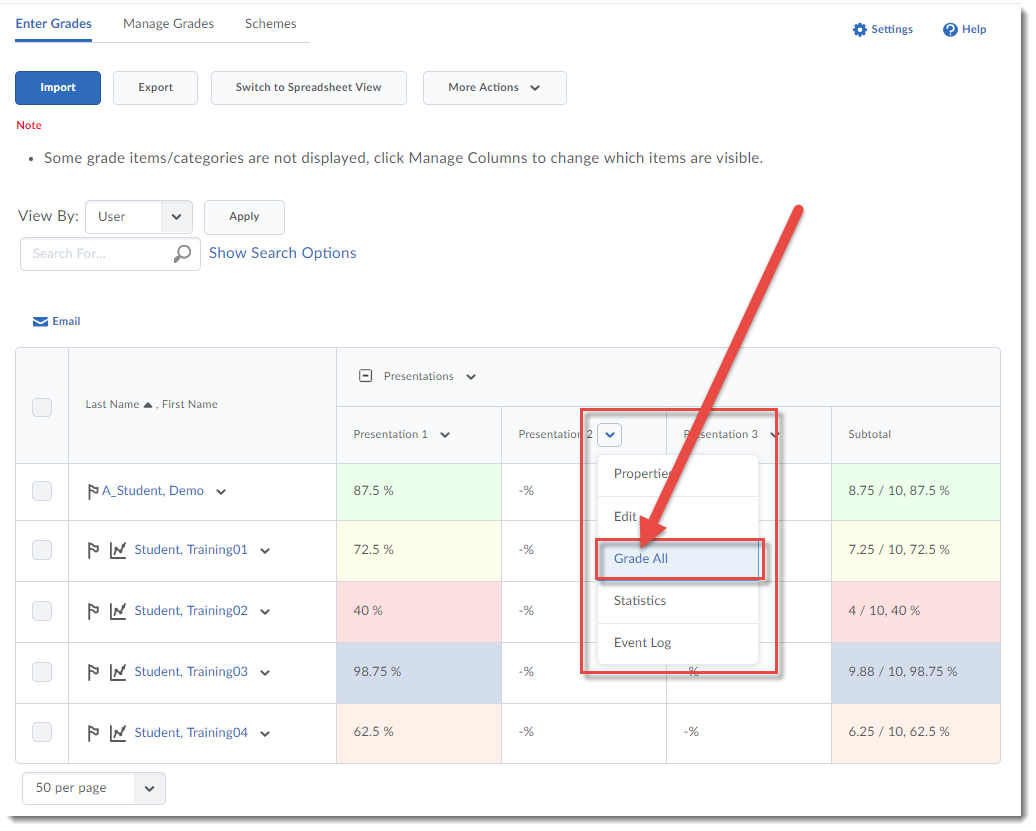
  2. Click the down arrow next to the title of the item you wish to exempt the student from, and select Grade All.Select Grade All
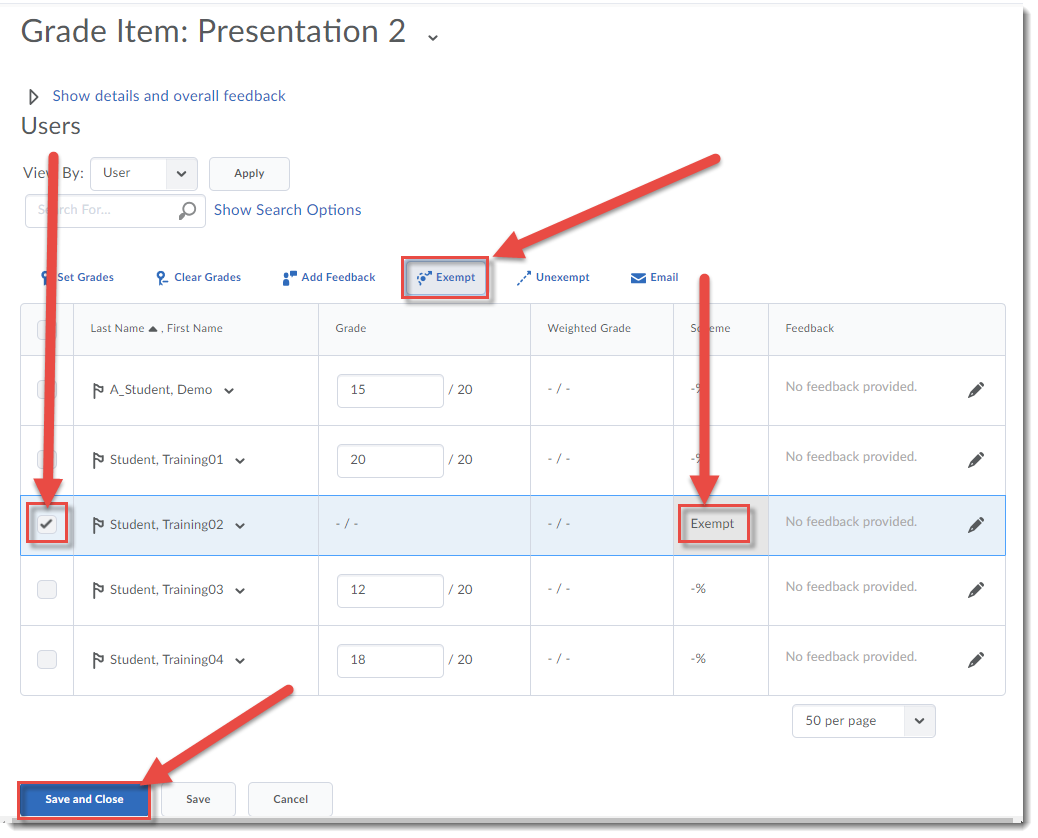
  3. Select the student you want to exempt, then click Exempt. The word Exempt will appear in the Scheme column for that student. Click Save and Close.

    Select the student, click Exempt.  Click Save and Close.

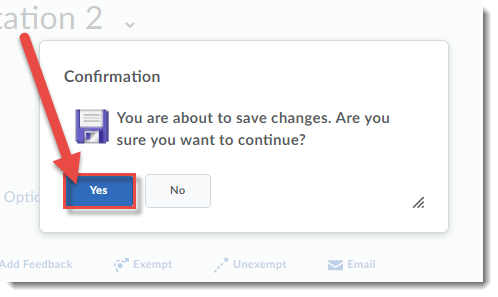
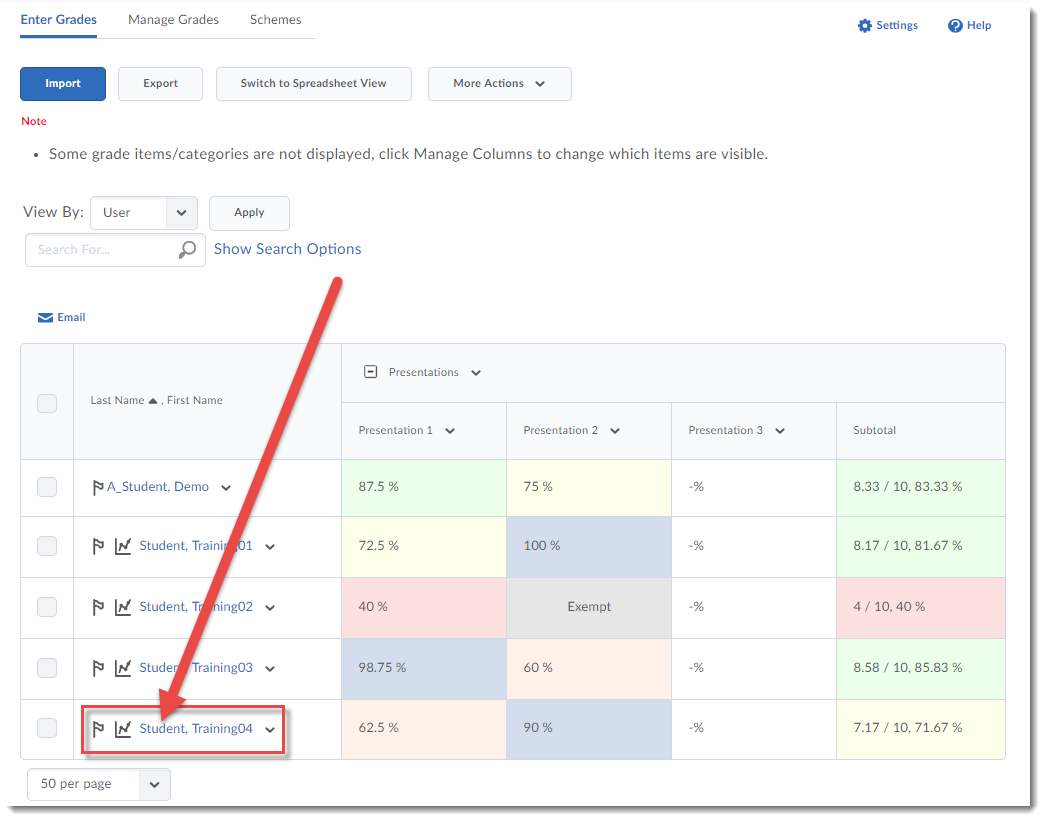
  4. In the Confirmation pop-up, click Yes. The selected student will now have a Final Grade calculation which excludes the exempted item.

    Click Save and Close, then in the pop-up, click Yes

  5. You can also exempt a student from multiple items. To do this, from Enter Grades, click on the name of the student you wish to exempt from multiple items.

    Click the name of the student you want to exempt from multiple items

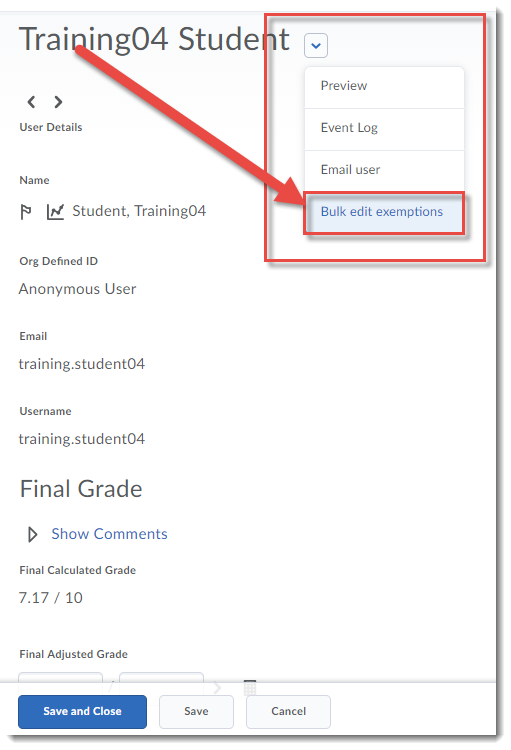
  6. Click on the down arrow next to their name, and select Bulk edit exemptions.

    Select Bulk edit exemptions

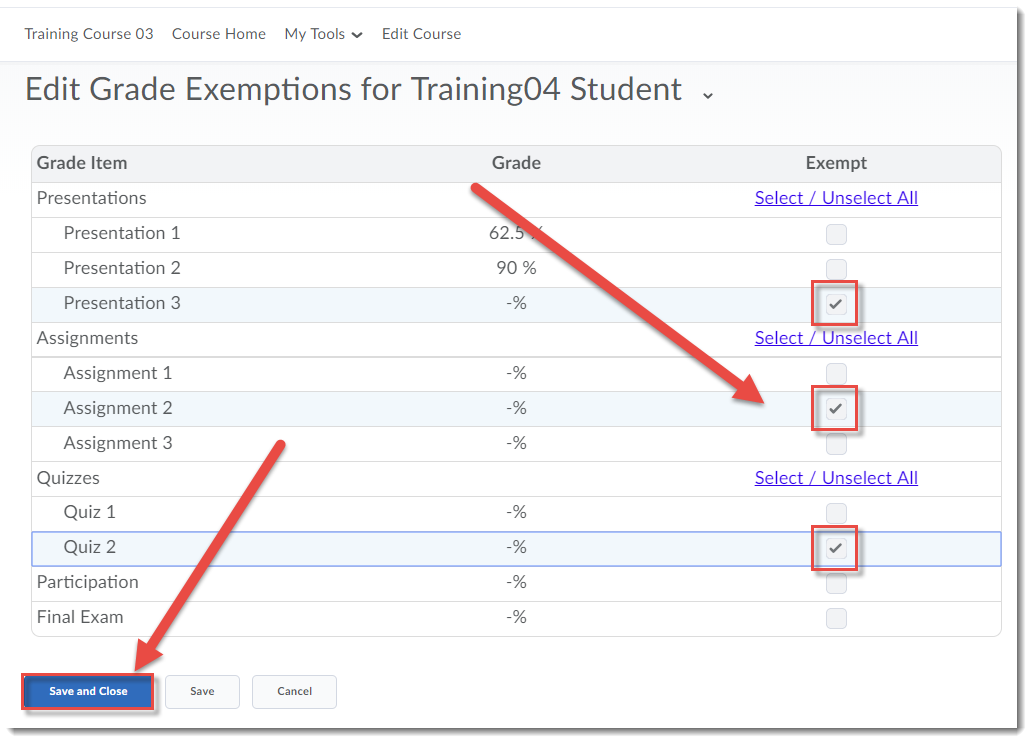
  7. Select the items you wish to exempt the student from, and click Save and Close.

    Select the items to exempt the student from

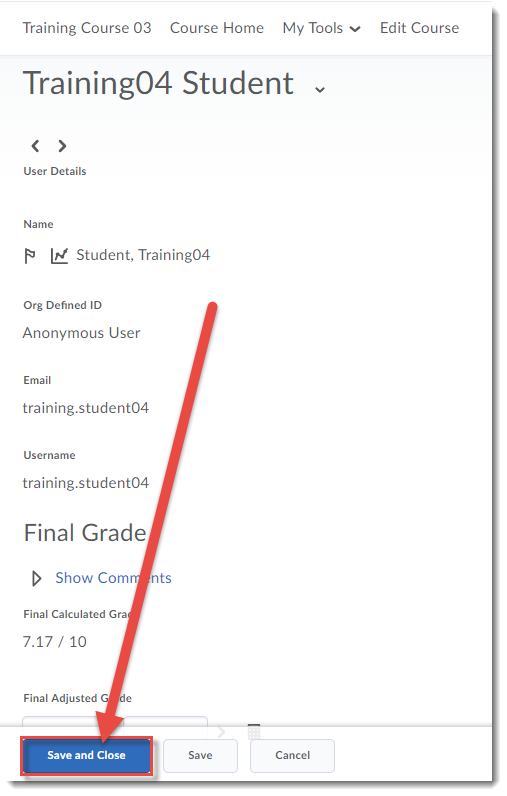
  8. In the Student details area, click Save and Close to return to Enter Grades. In the Confirmation pop-up, click Yes. That student will now be exempted from the items you selected.

    Click Save and Close

Things to Remember

Exempting a student from a grade is not the same as dropping the lowest grade item in a Category. See the tutorial Dropping the Lowest Grade Item in a Category for further information.


Restoring a Dismissed News Item – a Student D2L Tutorial

Scenario

This tutorial will cover the steps involved in dismissing a News item from, and restoring a News item to, the News widget in your D2L course site. “Widget” is the name for the boxes that contain information on your D2L homepage. Dismissing a News item means that you are deleting it from the widget, but it is still available to you in the News tool itself. We will show you how to both dismiss and restore News items in this tutorial. For further information, please contact desupport@camosun.ca for assistance.

Steps

  1. Go to your course in D2L.
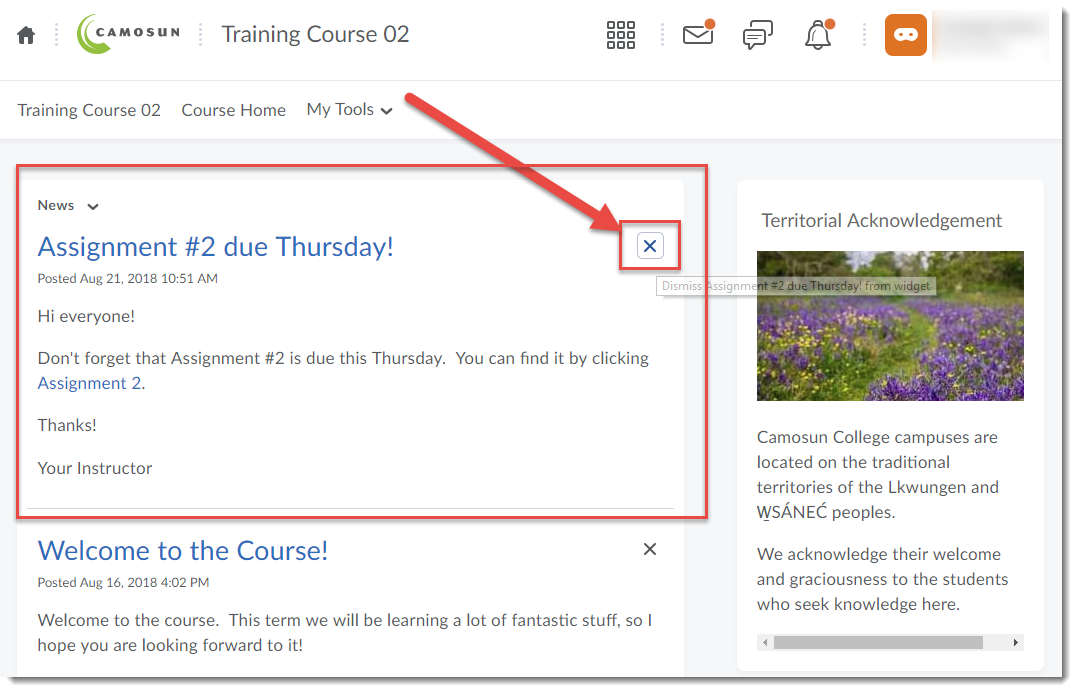
  2. Click on the X next to the News item(s) you wish to dismiss from the News widget. You will no longer see the News item in the widget.

    Click the X to dismiss the News item from the widget

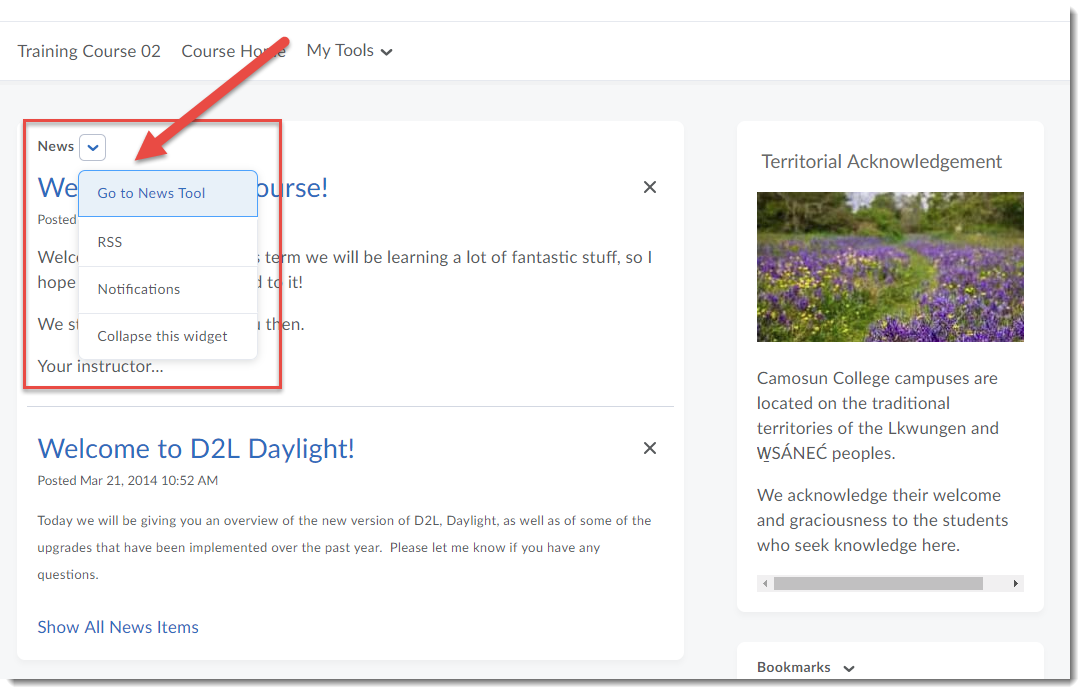
  3. To restore a News item into the widget, click on the down arrow next to News, and select Go to News Tool.

    Click the arrow next to News and select Go to News Tool

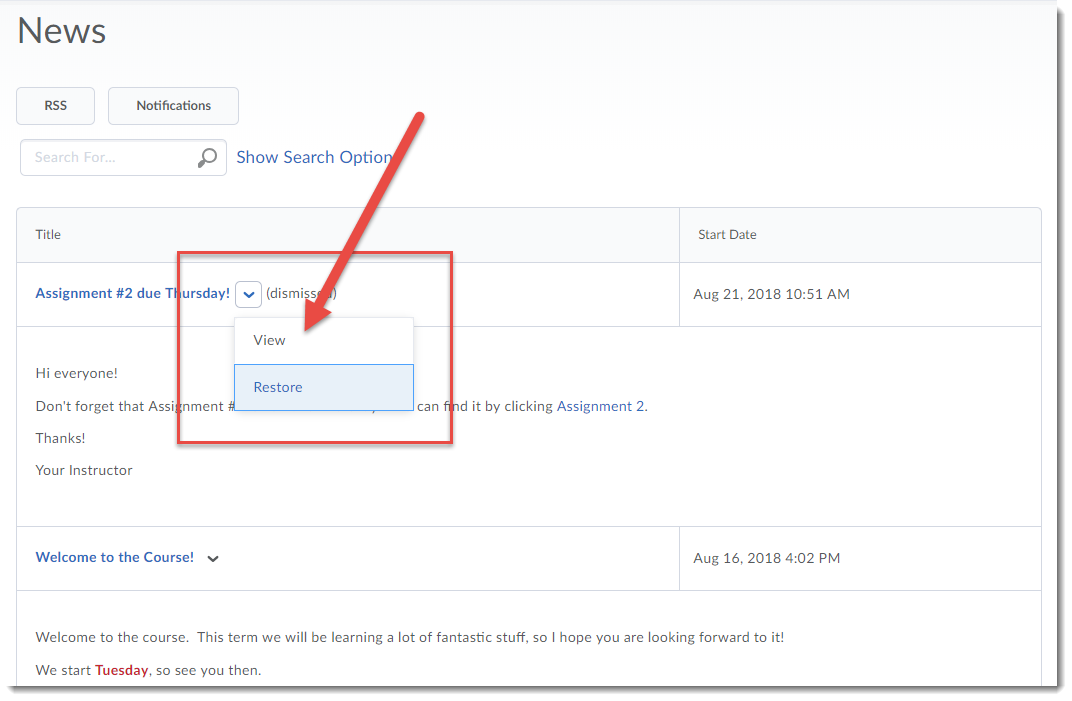
  4. Click on the down arrow next to the name of the News item you want to restore into the widget, and select Restore.

    Click the arrow next to the title of the News item and select Restore.

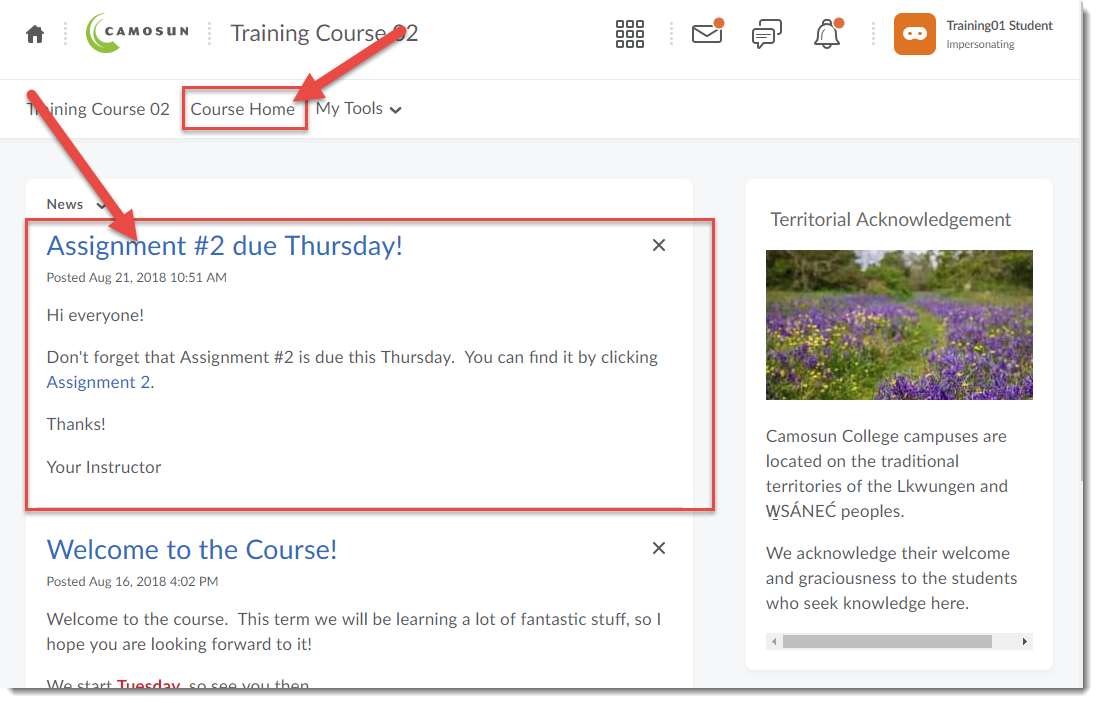
  5. Click Course Home to go back to the course’s homepage. The News item you restored will now appear back in the News widget on your D2L course homepage.

    Click Course Home to go back to the Homepage

Viewing Students Who have Not Attempted a Quiz – D2L Tutorial

Scenario

This tutorial will cover the steps involved when you wish to see a list of students who have not yet attempted a Quiz yet. For further information, please contact desupport@camosun.ca for assistance.

Steps

  1. Go to the Quizzes tool in your course.
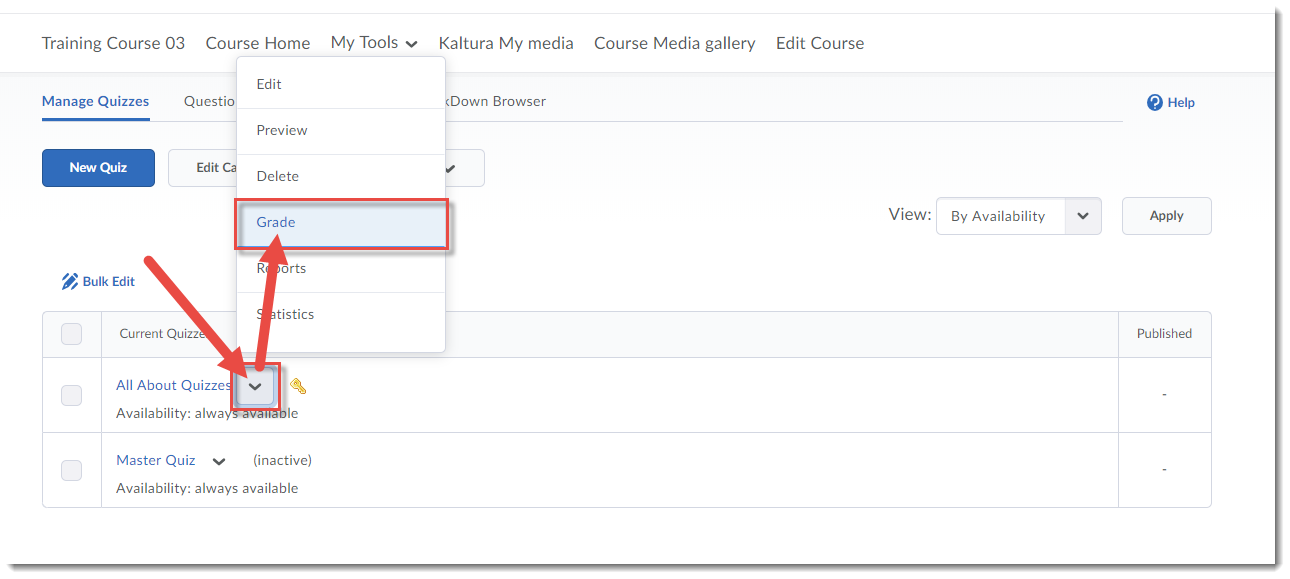
  2. Click on the down arrow next to the Quiz you wish to see attempts for, and select Grade.

    Click the down arrow and select Grade

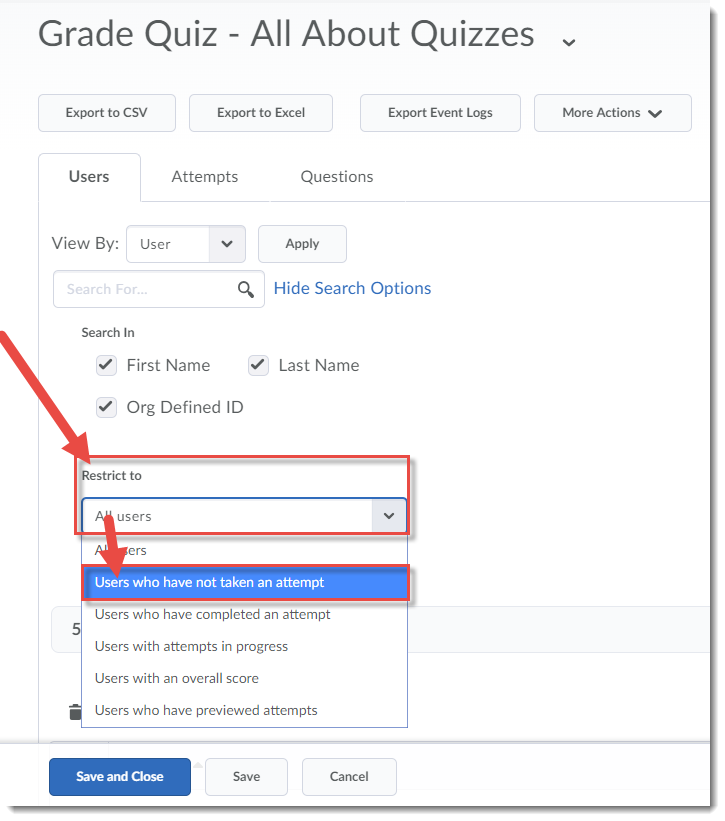
  3. In the Restrict to drop-down menu, select Users who have not taken an attempt.

    Select Users who have not taken an attempt

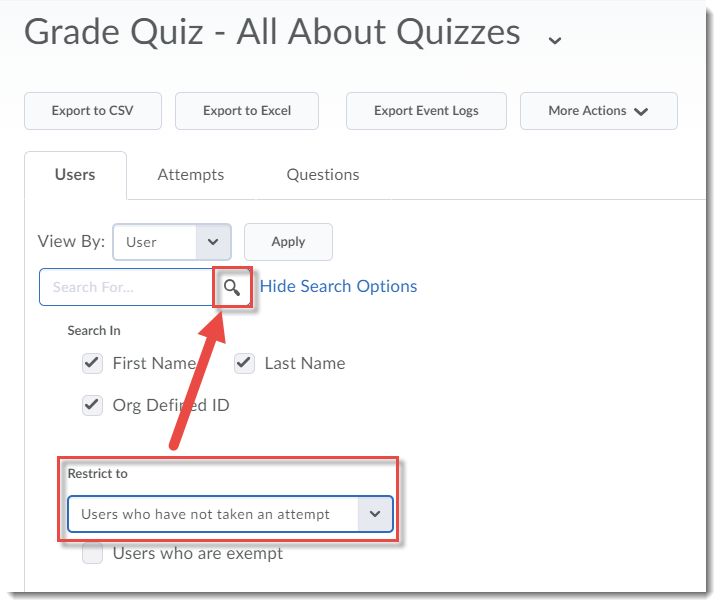
  4. Click the magnifying glass in the Search for box near the top of the Grade Quiz area.

    Click the Magnifying glass

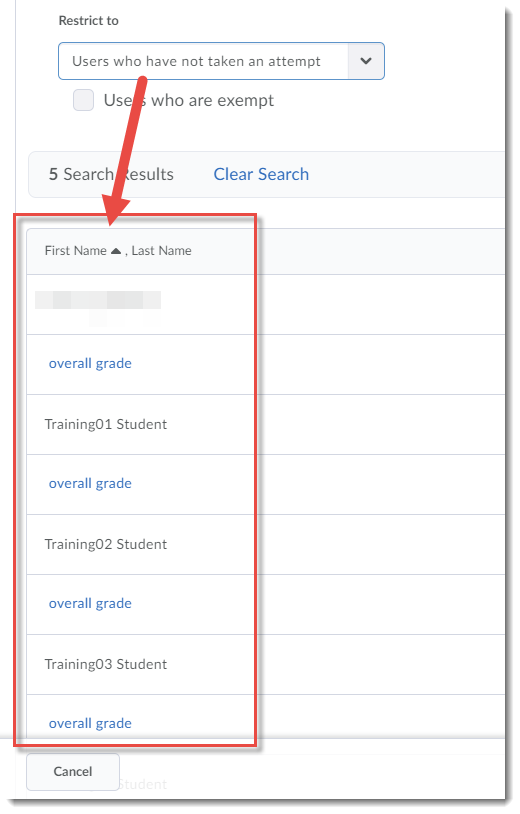
  5. Scroll down, and you will now see a list of the students who have not yet attempted the quiz.

    List of students who have not completed an attempt

Things to Remember

When you go back to the Grade Quiz area, the Restrict to drop-down should retain the last option you selected, meaning if you want to see a list of students who HAVE attempted a quiz, you will need to select that option (Users who have completed an attempt) from the drop-down.