D2L Tool Tip of the Week: Adding Links to Library Resources in the HTML Editor

This tutorial is designed for faculty who have previous experience using the HTML editor in D2L and will cover the steps involved with adding licensed library e-resource permalinks into the HTML editor. For the purposes of this tutorial, we will work in the Content tool.  For further information, please contact desupport@camosun.ca for assistance.

Thanks to Gwenda Bryan and Patsy Scott in the Camosun Library for helping me with this tutorial!!

Steps

  1. Go to the Content tool in your course.
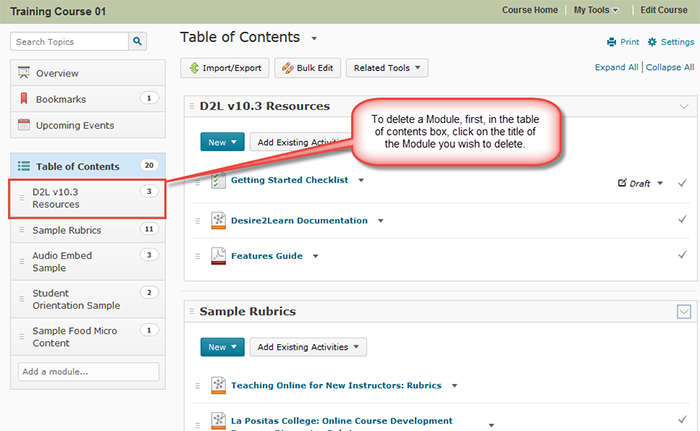
  2. In the Table of Contents box, click on the title of the Module to which you wish to add your library resource links.
  3. HTMLEd-AddLibraryResources1-700
  4. HTMLEd-AddLibraryResources2-700
  5. HTMLEd-AddLibraryResources3-700
  6. HTMLEd-AddLibraryResources4-700
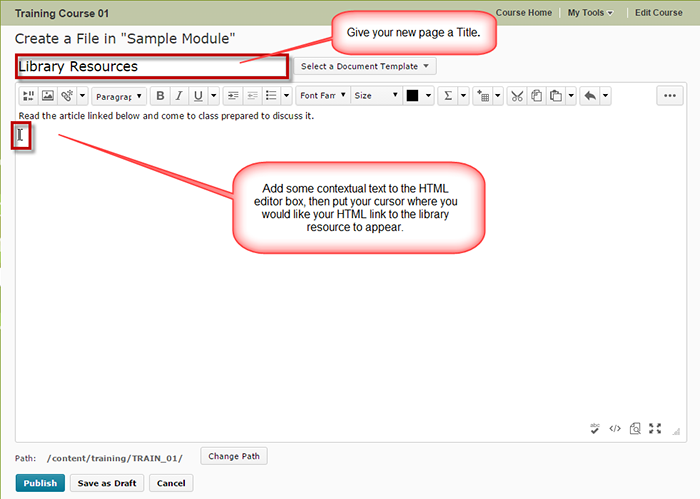
  7. Go to the Camosun Library website and search for the article you wish to link to in D2L. (For more information on permalinks, persistent links and stable URLs, go to the Camosun Library’s Libguides (http://camosun.ca.libguides.com/c.php?g=92275&p=1238057)
    1. If your licensed library e-resource has a permalink (or persistent link/stable URL) option:
      1. HTMLEd-AddLibraryResources5-700
      2. HTMLEd-AddLibraryResources6-700
    2. If your licensed library e-resource does NOT have a permalink option, contact Camosun Library staff for help.
  8. HTMLEd-AddLibraryResources9-700
  9. HTMLEd-AddLibraryResources10-700
  10. HTMLEd-AddLibraryResources11-700

Things to remember

DO NOT use the Quicklink à URL option to add permalinks to the HTML editor in D2L.

It’s a good idea to test the link once you have Published or Saved as Draft to ensure that it works, and that it opens the page/document you wish it to open.

D2L Tool Tip of the Week: Deleting Modules and Topics

This tutorial is designed for faculty who have previous experience using the Content tool in D2L, and will cover the steps involved when you wish to delete Modules or Topics in the Content tool.  For further information, please contact desupport@camosun.ca for assistance.

Steps

  1. Go to the Content tool in your course.
  2. Content-DeletingModulesAndTopics1-700
  3. Content-DeletingModulesAndTopics2-700
  4. Content-DeletingModulesAndTopics3-700
  5. Content-DeletingModulesAndTopics4-700
  6. Content-DeletingModulesAndTopics5-700

Things to Remember

If you are going to want to re-use the activities or files linked to the Module or Topic you are deleting, make sure to select the FIRST option in the Delete pop-up window!

Also note that it is NOT recommended that you delete other D2L activities (e.g. Surveys, Quizzes, Dropbox, etc.) through Content.  Delete specific activities in their tools!

D2L Tool Tip of the Week: Copy and Paste from Word into the HTML Editor

This tutorial is designed for faculty who have previous experience using the HTML editor, and will cover the steps involved with copying and pasting content from a WORD document into the HTML editor as part of a new News Item in the News Tool.  For further information, please contact desupport@camosun.ca for assistance.

Steps

  1. Open the HTML editor in whatever tool you are working in. For the purposes of this tutorial, we will work in the News tool.
  2. In the HTML editor, select Paste from WORD
  3.  Copy and paste your text from WORD into the box that opens
  4. Click Update to add text to the HTML editor
  5. Reformat text as needed, and Publish

Things to remember

Don’t copy and paste content from WORD into the HTML editor if the content is complex, for example if your WORD document contains tables or complicated formatting.  If the tables and formatting in your WORD document are vital, add the WORD document as an attachment (if you are in the News tool, for example) or directly as a Topic File (if you are in Content).

D2L Tool Tip of the Week: Setting Final Adjusted Grades

This tutorial is designed for faculty who have previous experience using the Grades tool in D2L and will cover the steps involved when you wish to set the Final Adjusted Grades in your gradebook.  For further information, please contact desupport@camosun.ca for assistance.

Steps

Step 1:  Setting the Adjusted Final Grade to be the Final Grade Released in the Settings area

  1. Go to the Grades tool in your course.
  2. Grades-AdjustingFinalGrades1
  3. Grades-AdjustingFinalGrades2
  4. Grades-AdjustingFinalGrades3
  5. Grades-AdjustingFinalGrades4
  6. Click Close to return to the Grades area.

Step 2:  Adjusting your Final Grades so that you can release them to the students

  1.   Grades-AdjustingFinalGrades6
  2. Grades-AdjustingFinalGrades7
  3. Grades-AdjustingFinalGrades8
  4. Grades-AdjustingFinalGrades9
  5. Grades-AdjustingFinalGrades10
  6. Grades-AdjustingFinalGrades11
  7. Click Cancel to return to the Enter Grades area.

Things to Remember

Note that after you save your Final Grades area changes, you will have to click on the Cancel button to return to the Enter Grades area.

D2L Tool Tip of the Week: Releasing Final Grades

As we near the end of the term, I thought this might be a useful little tutorial for you to bookmark.

This tutorial will cover the steps involved when you wish to release your Final Grades to your students, and is designed for faculty who have previous experience using the Grades tool in D2L.  For further information, please contact desupport@camosun.ca for assistance.

Steps

  1. Go to the Grades tool in your course, and make sure you are in the Enter Grades area.
  2. Grades-ReleasingFinalGrades1-700
  3.  Grades-ReleasingFinalGrades2-700
  4. Grades-ReleasingFinalGrades3-700
  5. Grades-ReleasingFinalGrades4-700

Things to Remember

Make sure you have entered the grades for all assessments, for all students before releasing the final grades to everyone.  You can also select individual students to release final grades to if you wish.

Note that after you save your Final Grades area changes, you will have to click on the Cancel button to return to the Enter Grades area.

D2L Tool Tip of the Week: Deleting Everything in a Course

This tutorial is designed for faculty who have experience using D2L and will cover the steps involved when you wish to delete everything (content and activities) in your D2L course in order to “start from scratch”.  Note that you cannot “delete all” in a course in one step – you will need to delete the content/activities in each tool used in the course separately.  We recommend that you do not delete everything in course site that has student data in it (i.e., a course site for a past offering).  It is better to do this in a DEV or MASTER course site only.

If the course you are deleting from also has custom homepages or navigation bars, or incorporates tools beyond the list below (for example the Glossary or Survey tools), you will need to delete content contained in those tools as well.  If you are unsure of how to delete content from homepages, navigation bars or other tools not included in this tutorial, contact desupport@camosun.ca for assistance.

Deleting Content and Files in File Manager

  1. Go to the Content tool in your course
  2. CourseAdmin-DeleteAll-Content1
  3. CourseAdmin-DeleteAll-Content2
  4. CourseAdmin-DeleteAll-Content3
  5. CourseAdmin-DeleteAll-Content4
  6. CourseAdmin-DeleteAll-Content5

Deleting Quizzes

  1. Go to the Quizzes tool in your course.
  2. CourseAdmin-DeleteAll-Quizzes1
  3. CourseAdmin-DeleteAll-Quizzes2
  4. CourseAdmin-DeleteAll-Quizzes3
  5. CourseAdmin-DeleteAll-Quizzes4
  6. CourseAdmin-DeleteAll-Quizzes5
  7. CourseAdmin-DeleteAll-Quizzes6

Deleting Dropbox Activities

  1. Go to the Dropbox tool in your course
  2. CourseAdmin-DeleteAll-Dropbox1
  3. CourseAdmin-DeleteAll-Dropbox2
  4. CourseAdmin-DeleteAll-Dropbox3

Deleting Gradebook Items

  1. Go to the Grades tool in your course
  2. CourseAdmin-DeleteAll-Grades1
  3. CourseAdmin-DeleteAll-Grades2
  4. CourseAdmin-DeleteAll-Grades3

Deleting Discussion Forums and Topics

  1. Go to the Discussions tool in your course.
  2. CourseAdmin-DeleteAll-Discussions1
  3. CourseAdmin-DeleteAll-Discussions2

Deleting News Items

  1. Go to your Course Home.
  2. CourseAdmin-DeleteAll-News1
  3. CourseAdmin-DeleteAll-News2
  4. CourseAdmin-DeleteAll-News3

Things to Remember

Note that even if you delete Discussion Forums and Topics, you can restore them at any time (they are never really gone).  This is the same for Dropbox activities.

D2L Tool Tip of the Week: Setting Up Release Conditions

This tutorial is designed for faculty who have experience using D2L and tutorial will cover the steps involved when you wish to create release conditions for a tool/activity in D2L. The purpose of Conditional Release is to guide students through the content and activities by connecting them to the completion of other tasks in D2L.  For the purposes of this tutorial, Conditional Release for the News tool will be highlighted.  For further information, please contact desupport@camosun.ca for assistance.

Steps

  1. ConditionalRelease-SettingConditions1-700
  2. ConditionalRelease-SettingConditions2-700
  3. ConditionalRelease-SettingConditions3-700
  4. ConditionalRelease-SettingConditions4-700
  5. ConditionalRelease-SettingConditions5-700

Things to Remember

When setting up multiple conditions for multiple activities, keep track of what you are setting up to avoid throwing students into an endless loop from which they may never emerge.


D2L Tool Tip of the Week: Setting Your D2L Email to Forward to an External Email

D2L Tool Tip of the Week: Setting Your D2L Email to Forward to an External Email

This tutorial is designed for faculty who have experience using D2L and will cover the steps involved when you wish have emails coming into the D2L Email tool forwarded to an external email account, for example, to your Camosun email address.  For further information, please contact desupport@camosun.ca for assistance.

Steps

  1. CourseAdmin-ForwardingYourEmail1-700
  2. CourseAdmin-ForwardingYourEmail2-700
  3. CourseAdmin-ForwardingYourEmail3-700

Things to Remember

When you reply to a forwarded email, it will go back to D2L – you don’t have to go into D2L to reply to a forwarded email address.

Note: If you want to have D2L email forwarded to a cloud-based email address (for example, Gmail or Yahoo mail) you will need to inform your student as this is potentially in violation of B.C. Privacy Legislation. For more information, please contact an Instructional Designer at eLearning Development and Support.

D2L Tool Tip of the Week: Customizing your Navigation Bar and My Tools Drop-down Menu

D2L Tool Tip of the Week: Customizing your Navigation Bar and My Tools Drop-down Menu

This tutorial is designed for faculty who have experience using D2L and will cover the steps involved when you wish to modify what is on your course’s Navigation Bar and/or in your My Tools drop-down menu. Note that this tutorial presumes you have NOT copied an already modified navigation bar from another course. If this is the case, all you will need to do is activate that navigation bar. For further information, please contact desupport@camosun.ca for assistance.

Steps

Step 1: Create a Navbar for your course

  1. CourseAdmin-CustomizeNavBar1-700
  2. CourseAdmin-CustomizeNavBar2-700
  3. CourseAdmin-CustomizeNavBar3-700
  4. CourseAdmin-CustomizeNavBar4-700
  5. CourseAdmin-CustomizeNavBar5-700

Step 2: Create a custom My Tools drop-down menu for your Navbar

  1. CourseAdmin-CustomizeNavBar6-700
  2. CourseAdmin-CustomizeNavBar7-700
  3. CourseAdmin-CustomizeNavBar8-700
  4. CourseAdmin-CustomizeNavBar9-700

Step 3: Add your custom link to your Navbar

  1. CourseAdmin-CustomizeNavBar10-700
  2. CourseAdmin-CustomizeNavBar11-700
  3. CourseAdmin-CustomizeNavBar12-700
  4. CourseAdmin-CustomizeNavBar13-700
  5. CourseAdmin-CustomizeNavBar14-700
  6. CourseAdmin-CustomizeNavBar15-700

Step 4: Activate your Navbar!

  1. Finally to activate your new Navbar, click on Navbars one more time.
  2. CourseAdmin-CustomizeNavBar16-700

Things to Remember

The edits you make to your Navbar and My Tools drop-down menu will only appear if you have activated your Navbar. Check this first if your NavBar changes do not appear.

Once you have created a new Navbar, you can copy it into other courses. If you do this, the only thing you will have to do is activate it in the new course.


D2L Tool Tip of the Week: Copying Course Components from One Course to Another

D2L Tool Tip of the Week:  Copying Course Components from One Course to Another

This tutorial is designed for faculty who have previously taught using D2L, and who will be teaching in a future term and would like their new D2L course site to be set up with the same structure (content, news items, quizzes, dropbox folders, grade book, etc) as their previous D2L course site. It is also for those faculty who have been working in a development course and are now ready to move their materials and activities into their live course. For further information, please contact desupport@camosun.ca for assistance.

Steps

  1. Go to the Course Home of the course you want to copy INTO.
  2. CourseAdmin-CopyCourseComponents1-700
  3. CourseAdmin-CopyCourseComponents2-700
  4. CourseAdmin-CopyCourseComponents3-700
  5. CourseAdmin-CopyCourseComponents4-700
  6. If you Selected Components,

    CourseAdmin-CopyCourseComponents5-700
  7. CourseAdmin-CopyCourseComponents6-700
  8. CourseAdmin-CopyCourseComponents7-700