Logging into D2L – A Student Tutorial – see document

As we gear up for the new school year, I wanted to remind you of some important information related to D2L, both for faculty and students.

This first post is for new students logging into D2L for the first time. And the next post, to follow this one shortly, will be for new faculty, and faculty who have enjoyed their summers so much that all things D2L have drifted away!

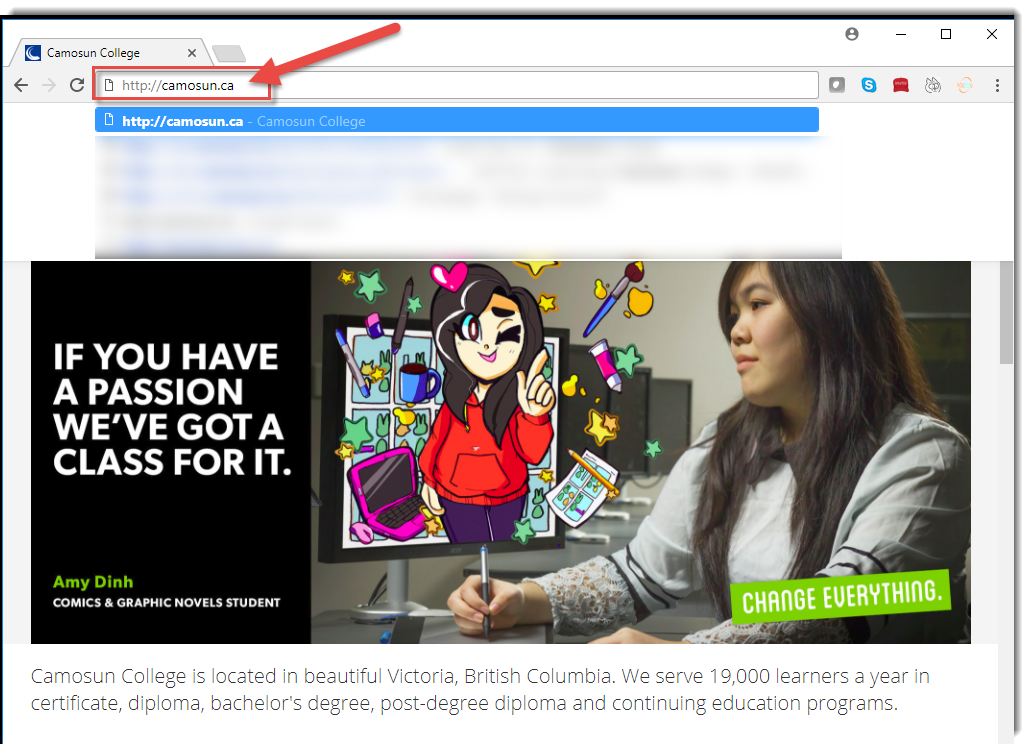
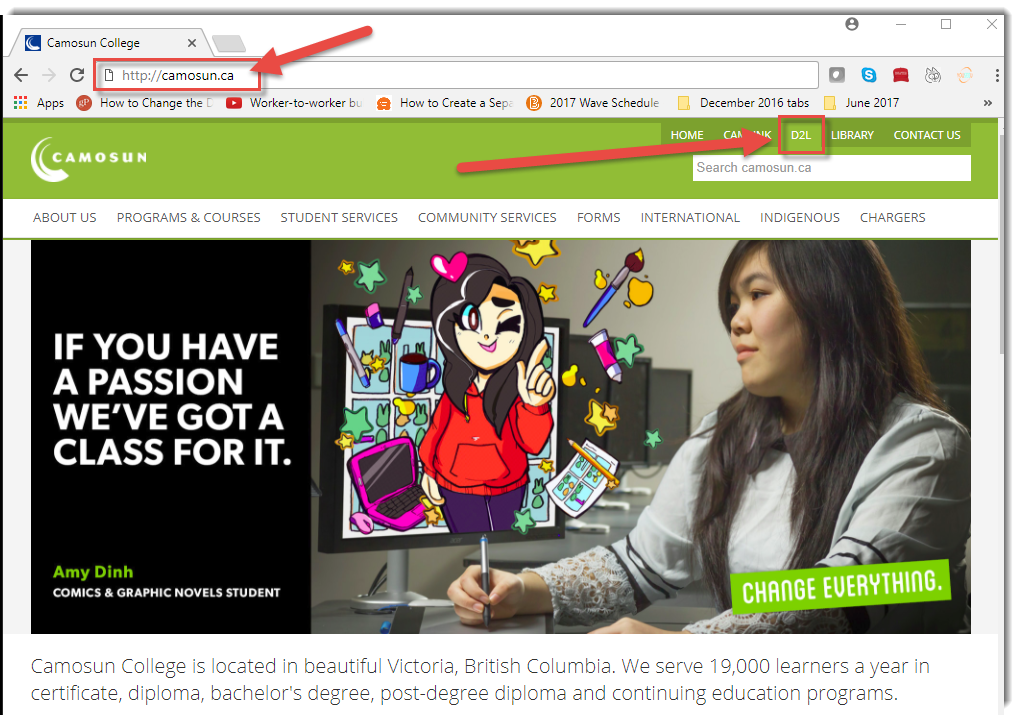
  1. Open an Internet browser and go to the Camosun College website (http://camosun.ca). We recommend you use Chrome as your Internet browser if possible. Then click D2L in the top, right-hand corner of the site.

    Camosun Homepage
    Click D2L

  2. Type in your Camosun ID number (your C#) and the Password you use with your C# to log into college computers. Then click Log in.
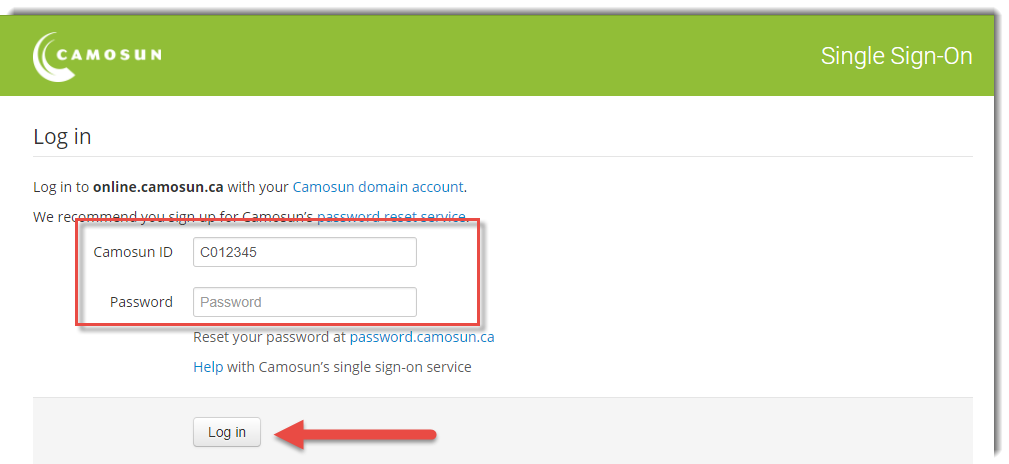
    Log in to D2L

    NOTE
    : IF you do not have a password for your C# yet, or if you have forgotten your password, you will have to go to http://password.camosun.ca, login, and click Forgot Password. If you are unable to reset your password, contact helpdesk@camosun.ca for assistance

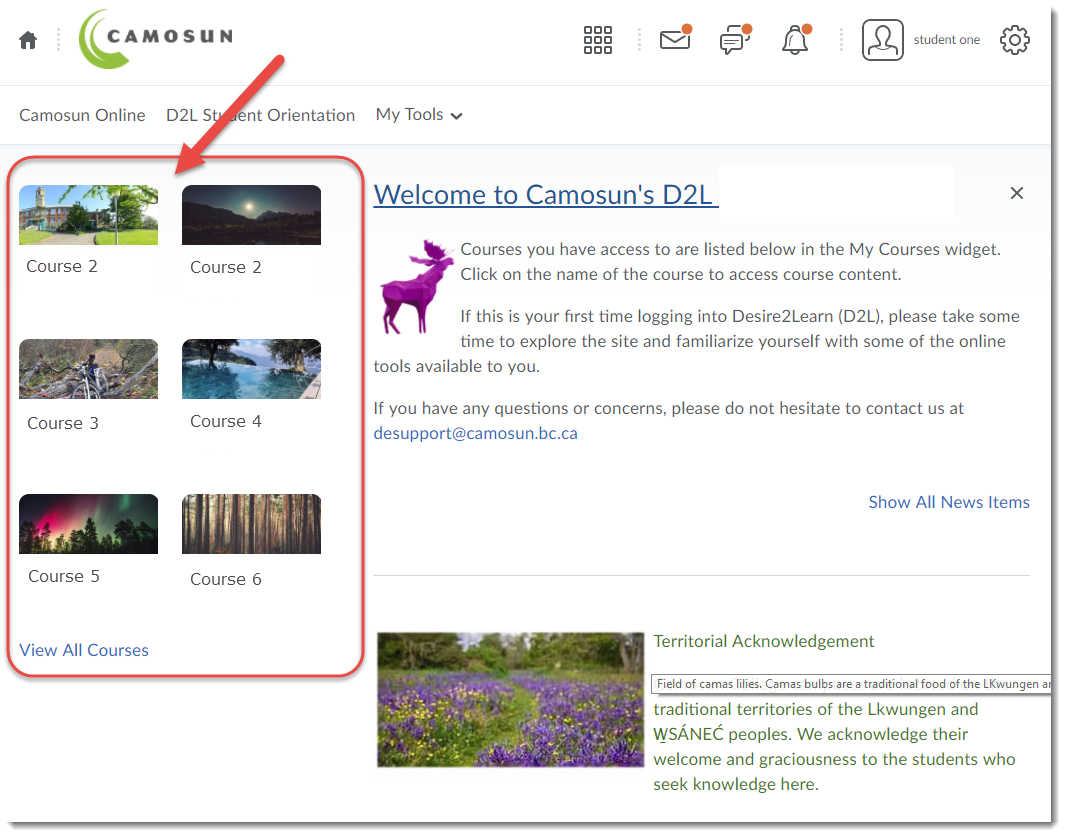
  3. Once you have logged into D2L, you will see the courses you have access to listed in the My Courses box on the homepage. Click on the title of the course you wish to access to go to it. Note that you will NOT be able to access your D2L course site until the start date of the course.

    D2L homepage

  4. Once you go into your course site, you may wonder where you will find you course content. This will vary from course to course, depending on your instructors. Some places to look include:

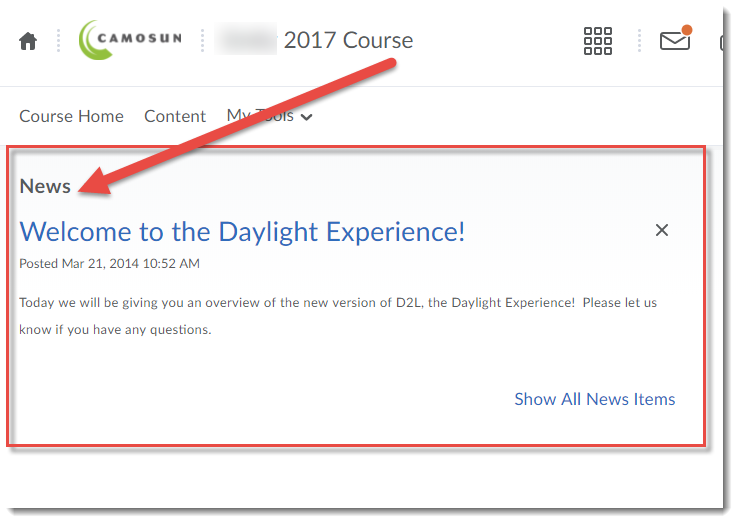
    The News tool on the course homepage:

    The News Tool
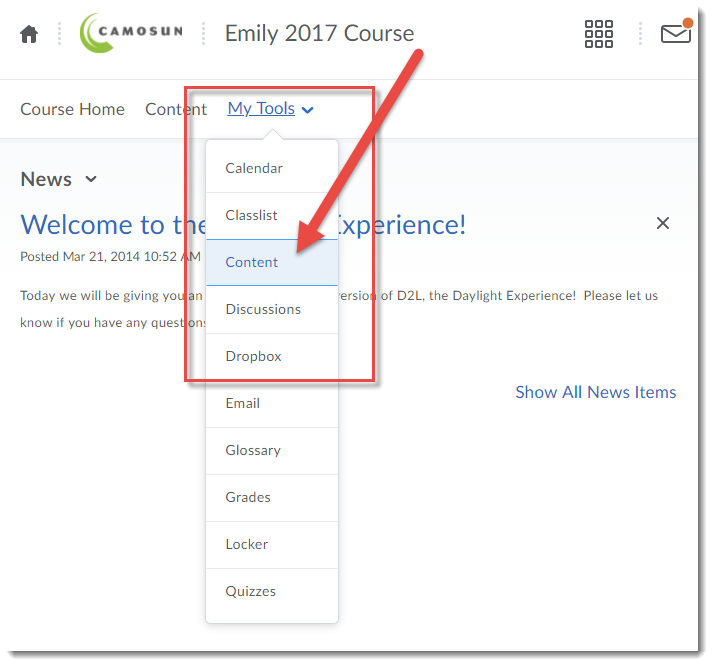
    The Content tool

    The Content tool

If you are still unsure where to find your course materials, talk to your instructor!

Finally, if you have technical issues with D2L during the term, contact desupport@camosun.ca for assistance.

Deleting Everything in a D2L Course Site – Updated

This tutorial will cover the steps involved when you wish to delete everything (content and activities) in your D2L course in order to “start from scratch”. Note that you cannot “delete all” in one step – you will need to delete the content/activities in each tool used in the course separately.

We recommend that you do not delete everything in course site that has student data in it (i.e., a course site for a past offering). It is better to do this in a DEV or MASTER course site only.

If the course you are deleting from also has custom homepages or navigation bars, or incorporates tools beyond the list below (for example the Glossary or Survey tools), you will need to delete content contained in those tools as well. If you are unsure of how to delete content from homepages, navigation bars or other tools not included in this tutorial, contact desupport@camosun.ca or an instructional designer for assistance.

Deleting Content and Files in File Manager

  1. Go to the Content tool in your course.
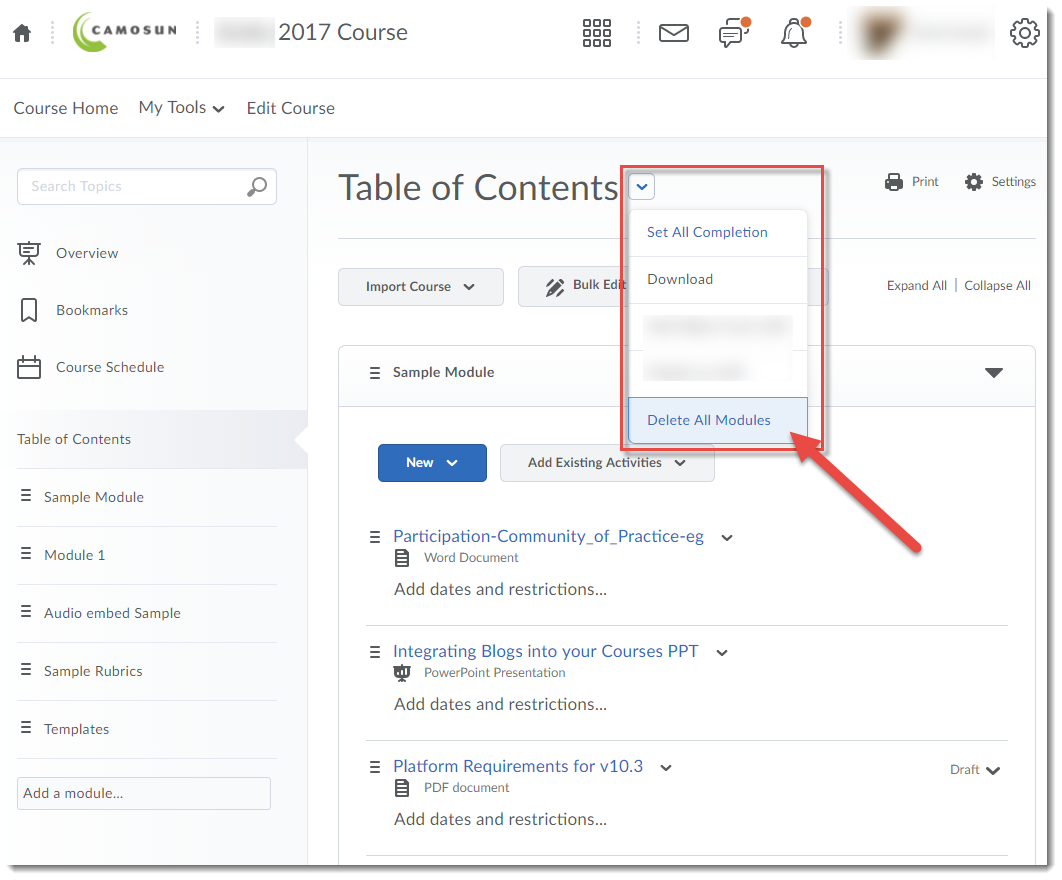
  2. Click on the down arrow next to Table of Contents (at the top of the page), and select Delete All Modules.Select Delete all Modules
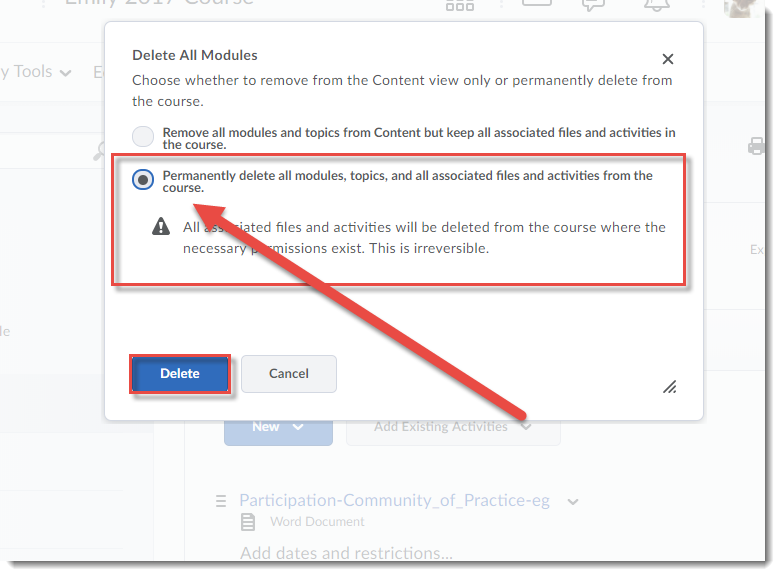
  3. To delete all Modules and Topics in the Content tool, as well as all the linked files (stored in Manage Files) AND linked activities (in other D2L tools), select the second option in the pop-up box.Select the second option and click Delete
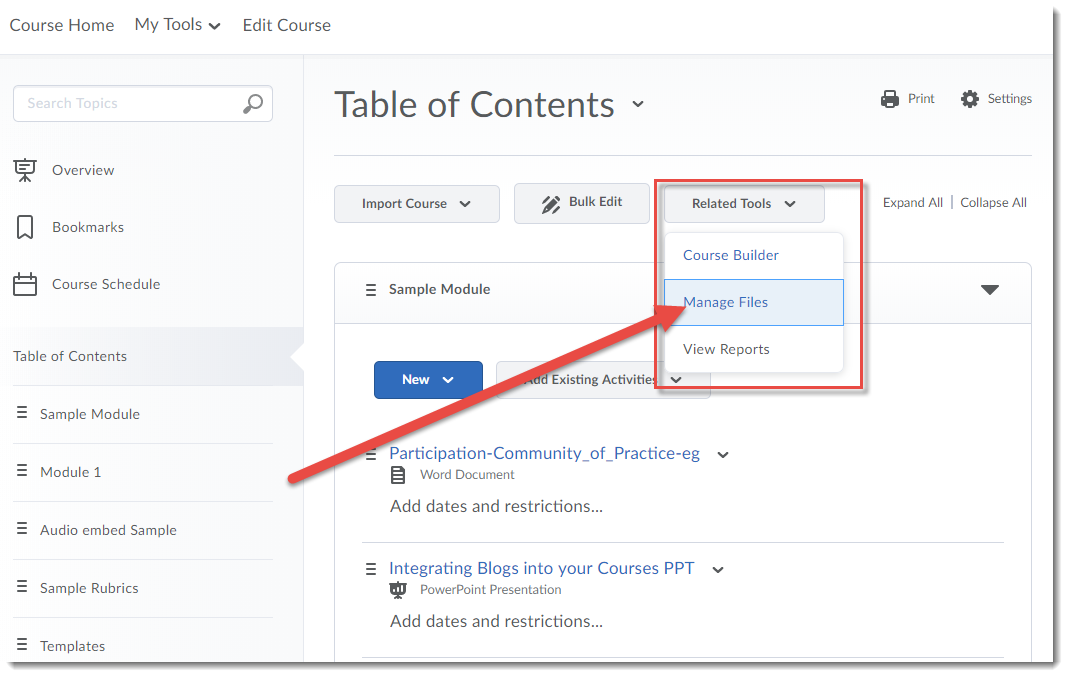
  4. Now, click on Related Tools and select Manage Files.Under Related Tools, select Manage Files
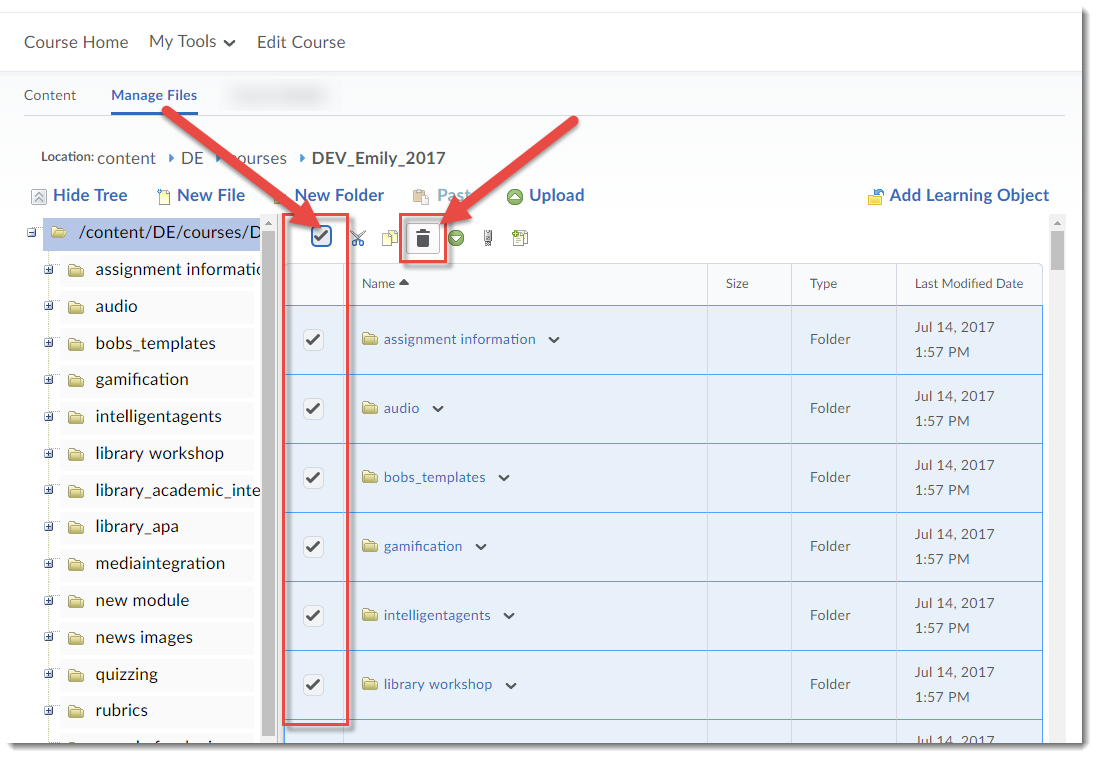
  5. Click on the select box at the top of the File Manager table to select everything in the table. Then click on the trash can, and click Yes in the Confirmation pop-up window.Select all in Manage Files and click the trash can to delete

Deleting Quizzes

  1. Go to the Quizzes tool in your course.
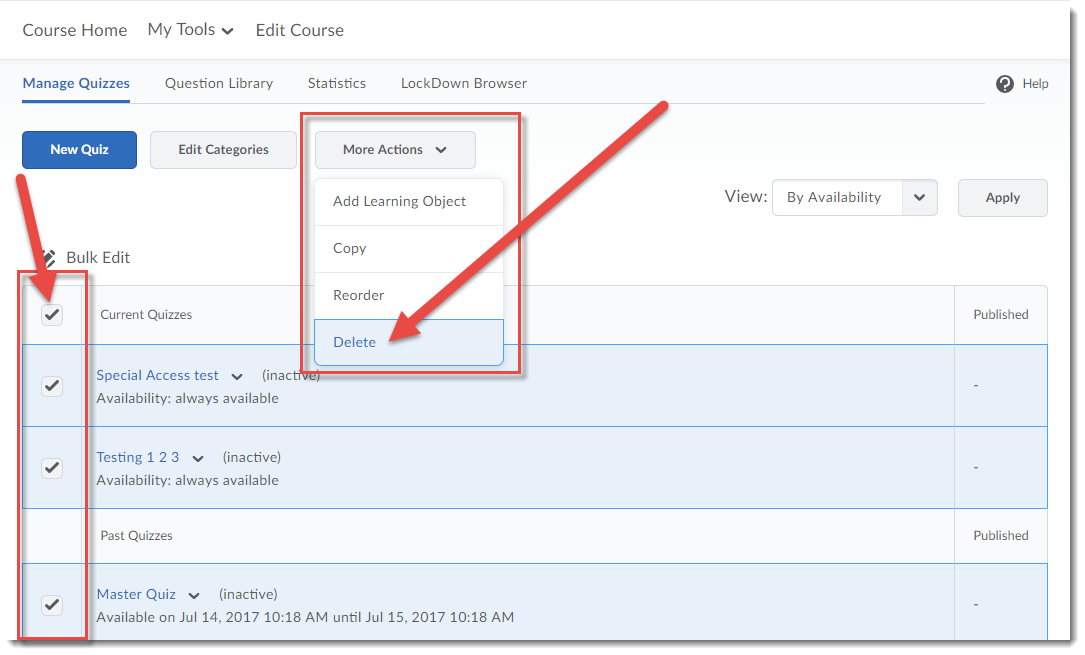
  2. Click on the select box at the top of the quizzes table to select all quizzes in your list. Click on the More Actions drop-down menu, and select Delete.Select all quizzes, under More Actions select Delete
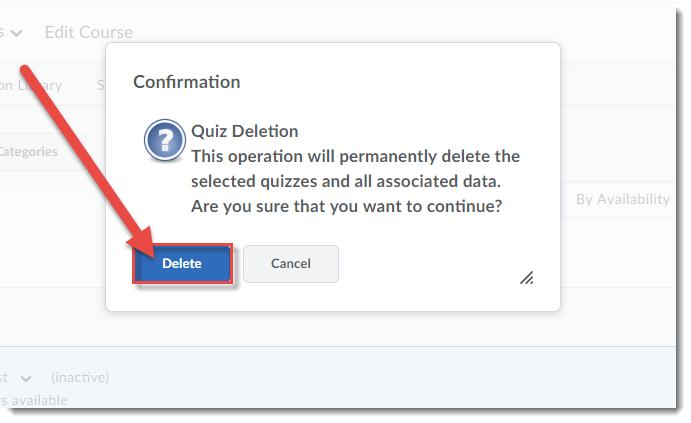
  3. In the Confirmation pop-up box, click Delete.In the pop-up box select Delete
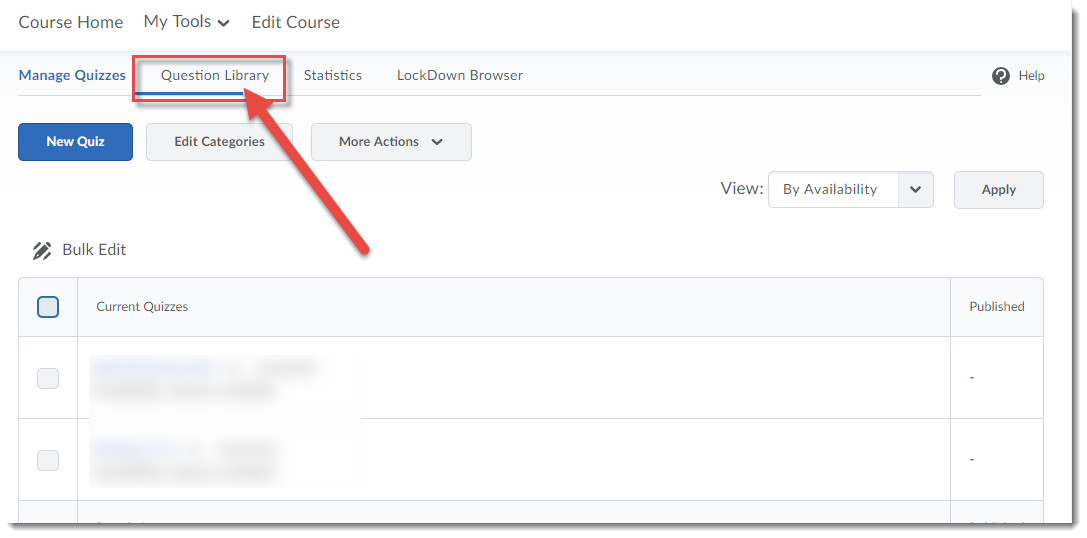
  4. Next, click on Question Library.Click Question Library
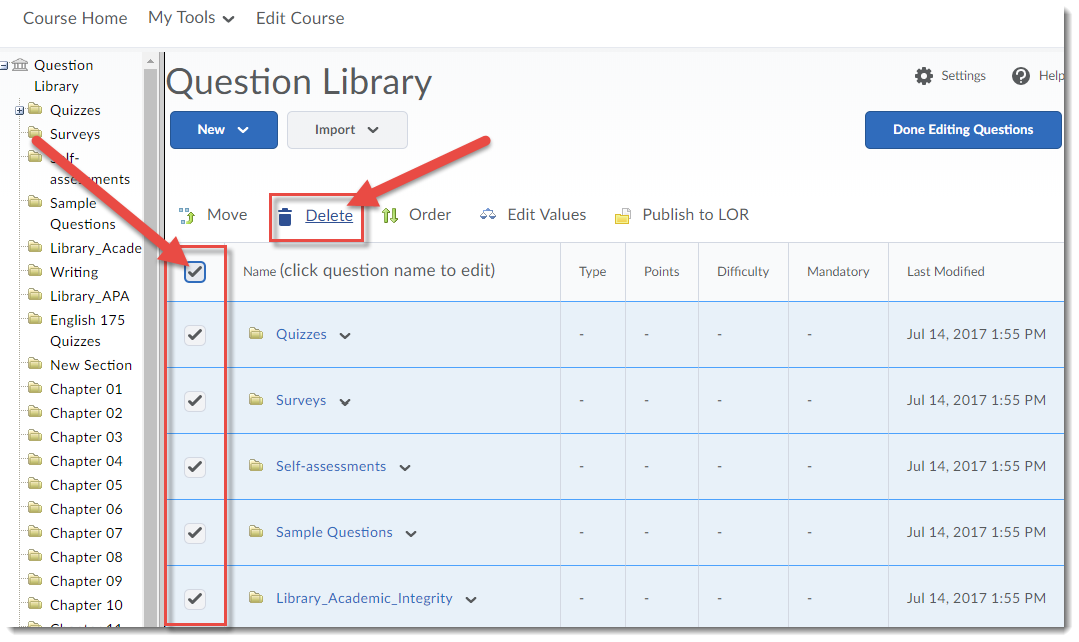
  5. Click on the select box at the top of the Question Library table to select everything in the list. Click on the trash can/Delete.Select all in the Question Library, then click Delete
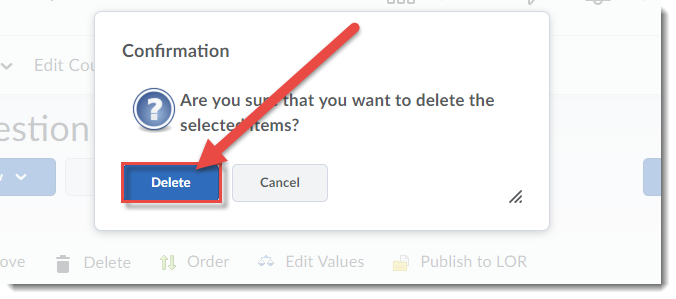
  6. In the Confirmation pop-up box, click Delete.Click Delete

Deleting Assignment Activities

  1. Go to the Assignments tool in your course.
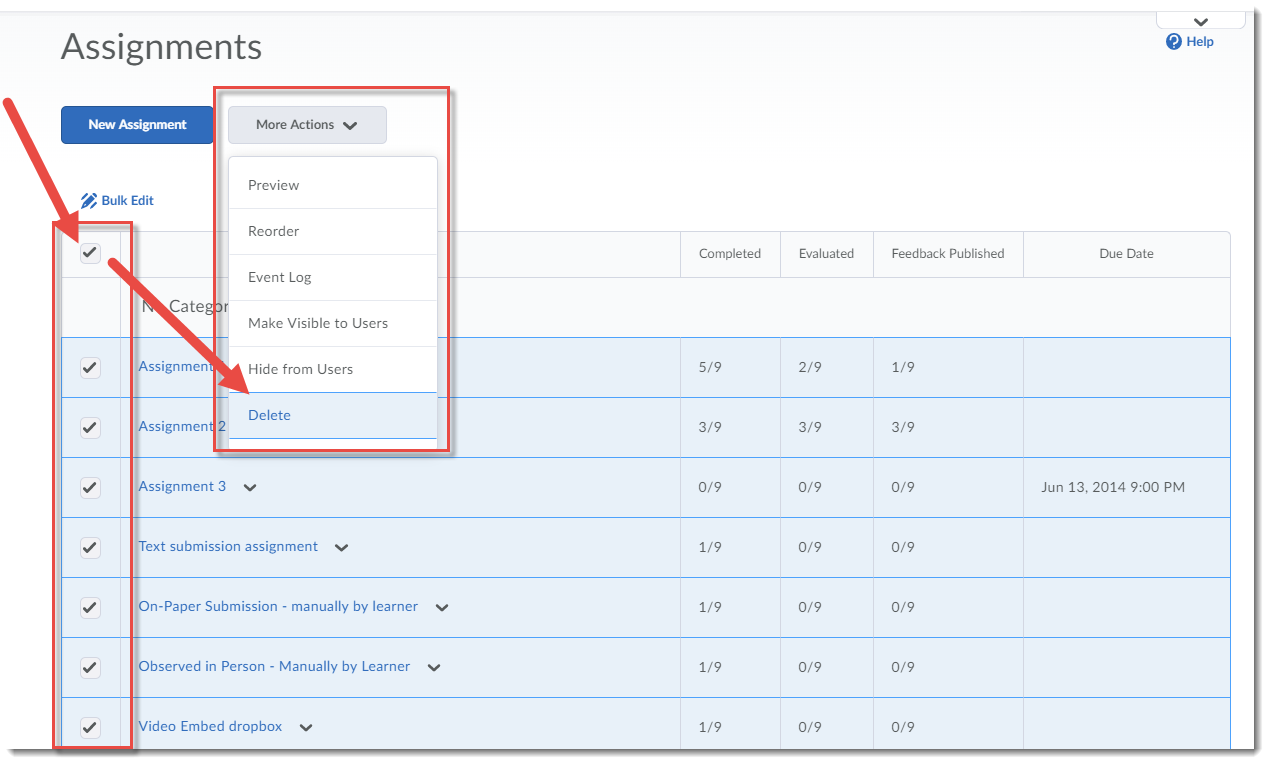
  2. Click on the select box at the top of the Assignments table to select all Assignments in your list. Click on the More Actions drop-down menu, and select Delete.Select all Assignments, under More Actions, select Delete
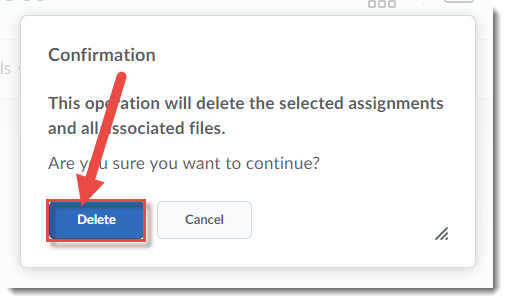
  3. In the Confirmation pop-up box, click Delete.Click Delete

Deleting Gradebook Items

  1. Go to the Grades tool in your course.
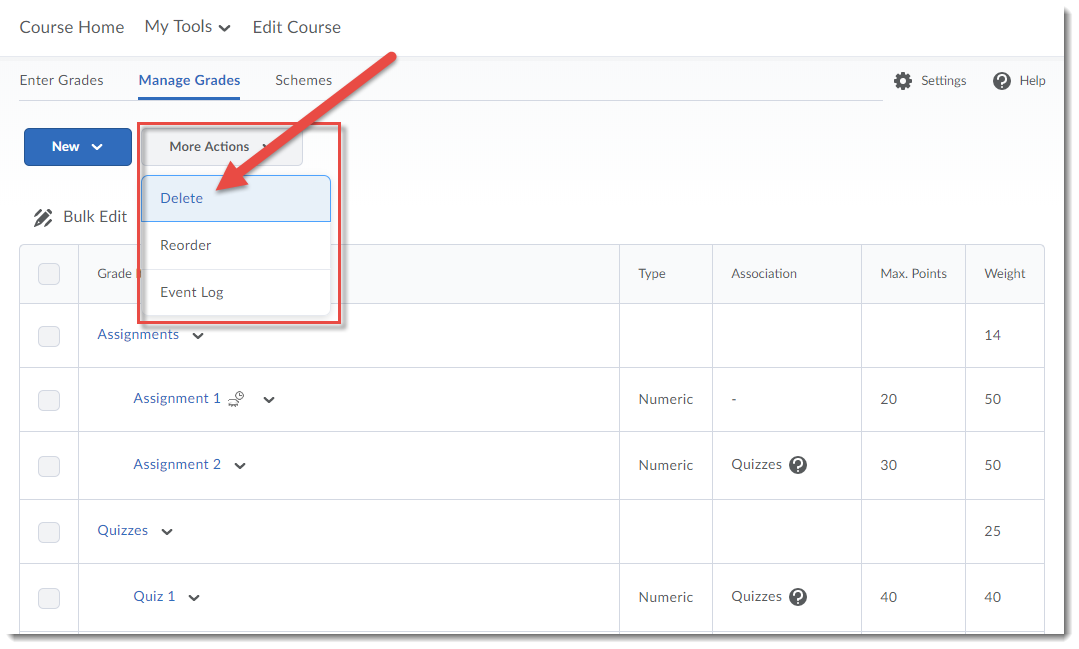
  2. Click on the More Actions drop-down menu, and select Delete.

    Under More Actions, select Delete

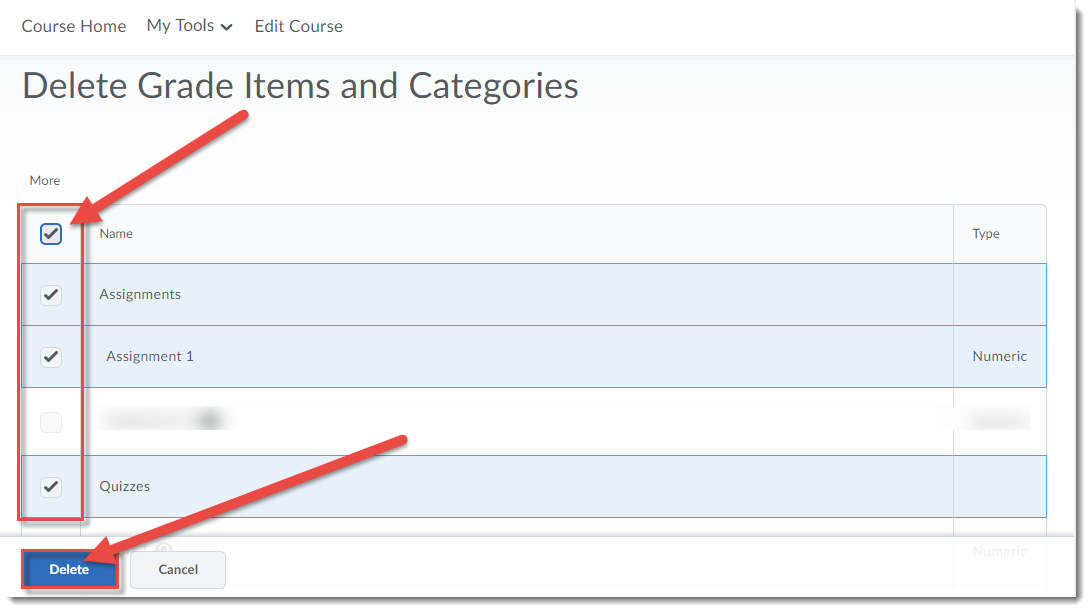
  3. Click on the select box at the top of the Delete Grade Items and Categories table to select everything in the list and click Delete. NOTE: If grade items are attached to other activities in your D2L course site (eg, a dropbox or quiz), you will need to delete those activities BEFORE you can delete their grade items.

    Select all grade items, and click Delete

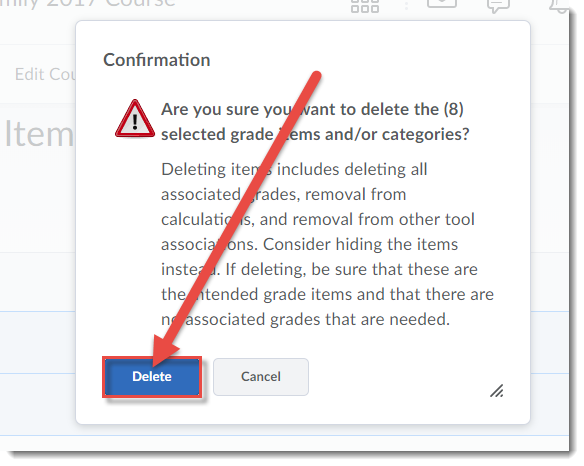
  4. In the Confirmation pop-up box, click Delete.

    In the pop-up box, click Delete

Deleting Discussion Forums and Topics

  1. Go to the Discussions tool in your course.
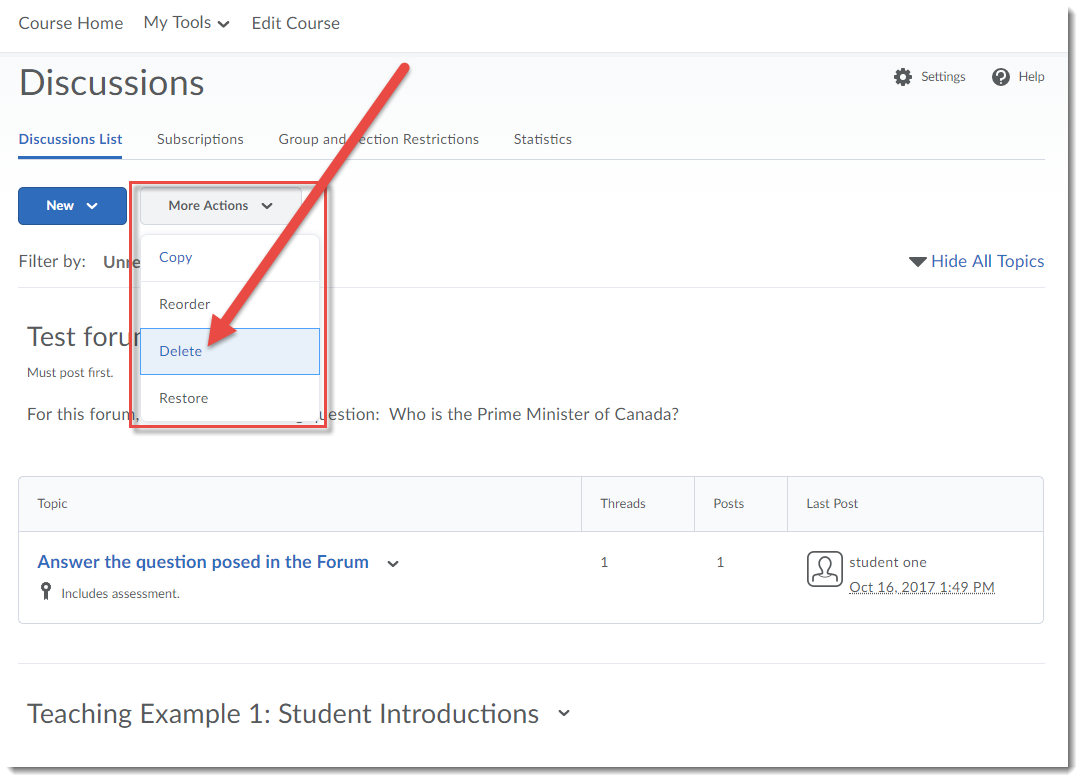
  2. Click on the More Actions drop-down menu, and select Delete.

    Under More Actions, select Delete

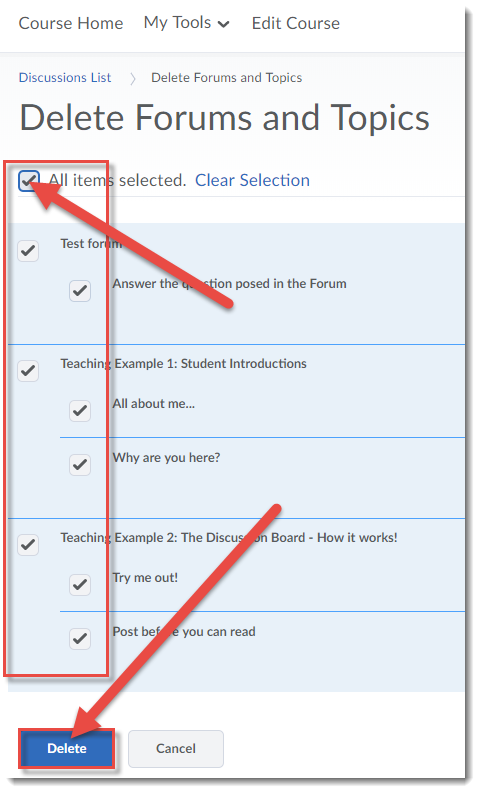
  3. Click on the select box at the top of the Delete Forums and Topics table to select everything in the list and click Delete.

    Select all the forums and topics, and click Delete

  4. NOTE: You will NOT be asked to confirm the deletion of Discussion Forums and Topics. BUT you will be able to restore them later if you have deleted them in error.

Deleting News Items

  1. Go to your Course Homepage.
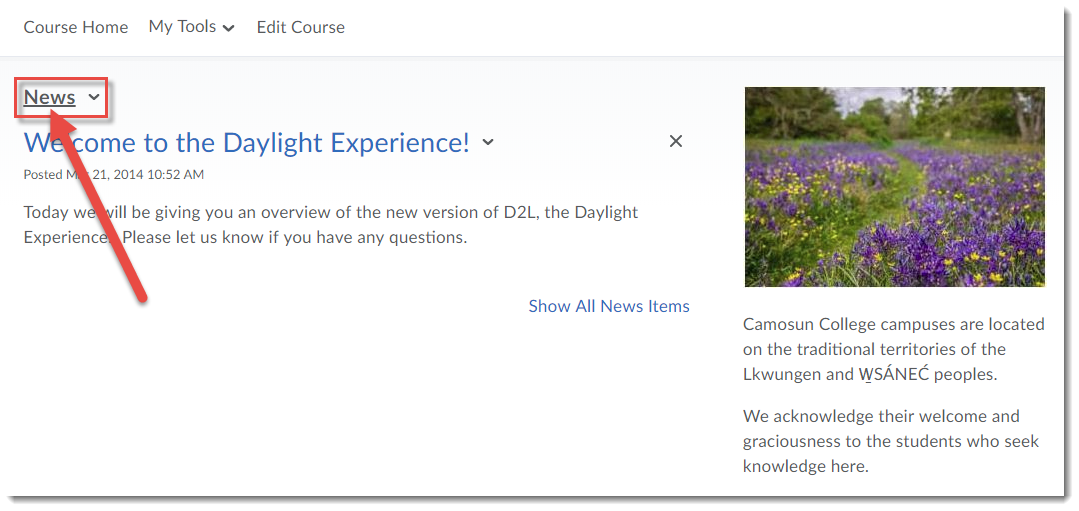
  2. Click News (to go to the News tool).

    Click News to go to the News tool

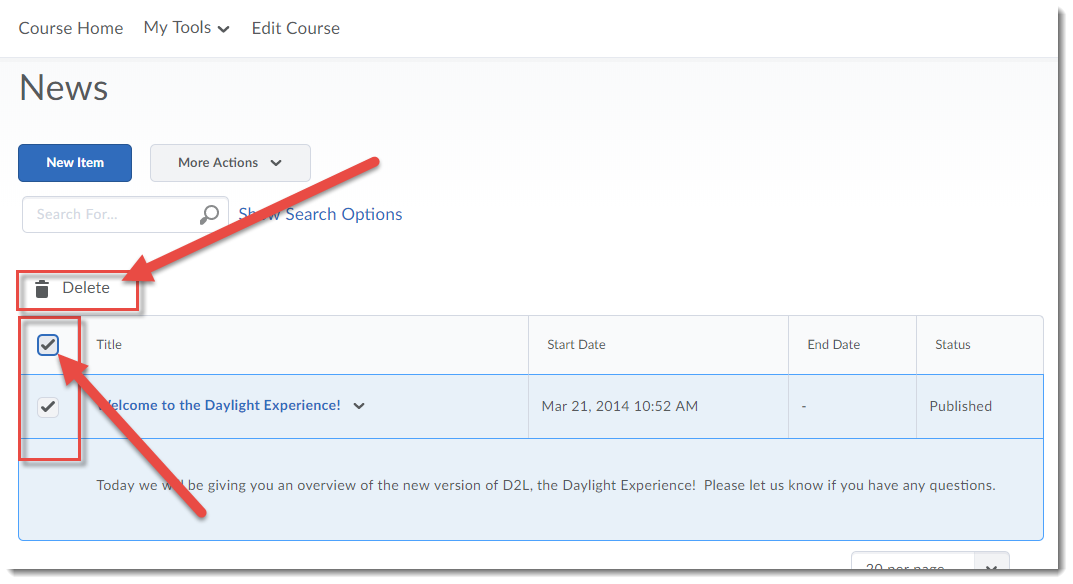
  3. Click on the select box at the top of the News listing to select everything in the list and click Delete.

    Select all your News items, and click Delete

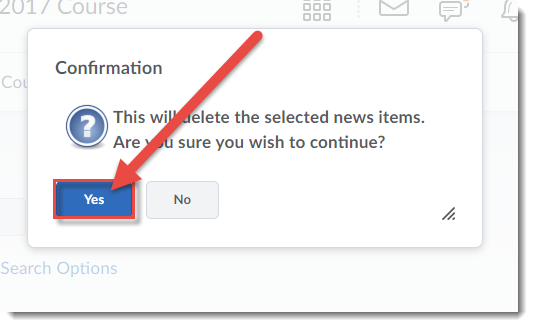
  4. In the Confirmation pop-up box, click Yes.

    In the pop-up box, click Yes

Things to Remember

Note that even if you delete Discussion Forums and Topics, you can restore them at any time (they are never really gone). This is the same for Dropbox activities, Grade items, and News items.

This content is licensed under a Creative Commons Attribution 4.0 International Licence.Icons by the Noun Project.


Adding Links to Library Resources – a D2L Tutorial

I posted a version of this tutorial about 4 years ago (can you believe it?), but things in D2L have changed a bit, so I thought it would be a good time for a refresher!  So, here I will cover the steps involved with adding licensed library e-resource permalinks into the HTML editor. For the purposes of this tutorial, we will work in the Content tool. For further information, please contact desupport@camosun.ca  for assistance.
Steps

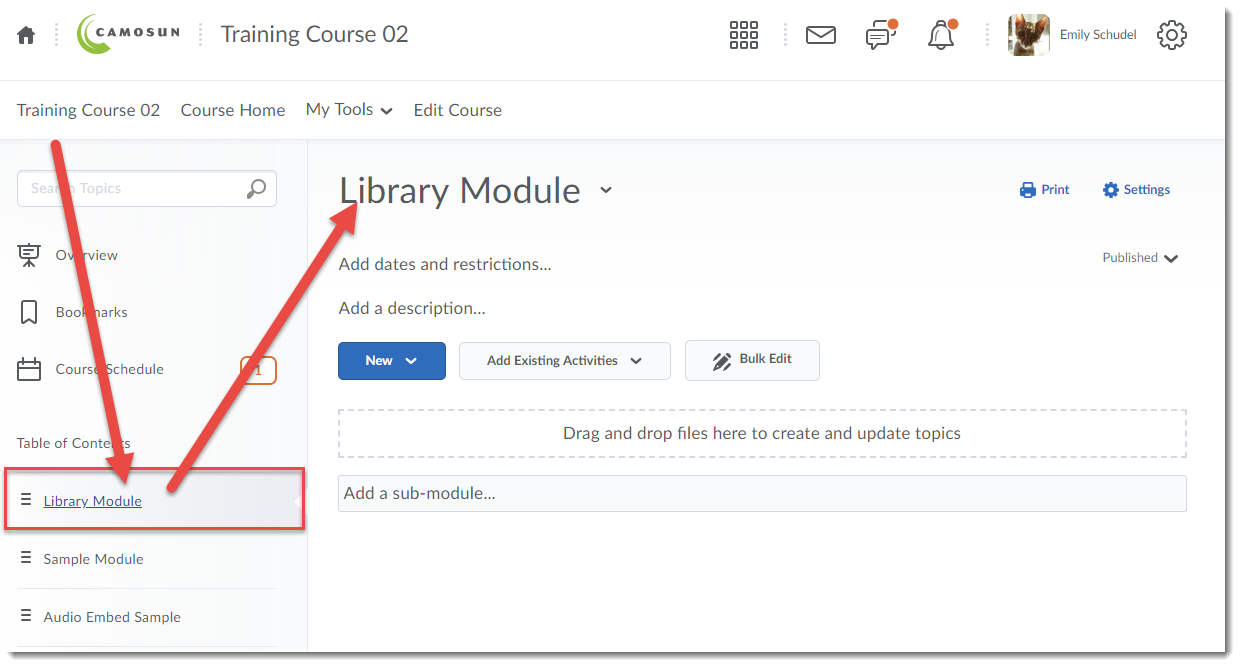
  1. Go to the Content tool in your course.
  2. In the Table of Contents box, click on the title of the Module to which you wish to add your library resource links.Click the title of the Module to which you want to add your library resource links
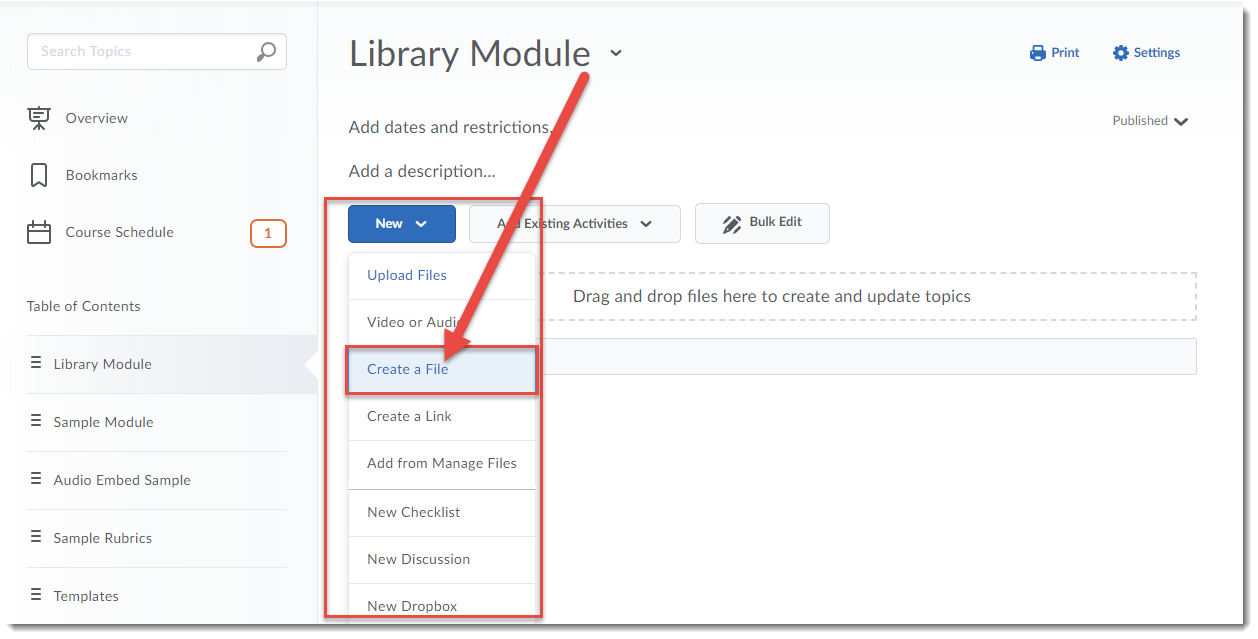
  3. Click on the New button and choose Create a File.Click New then Create a File
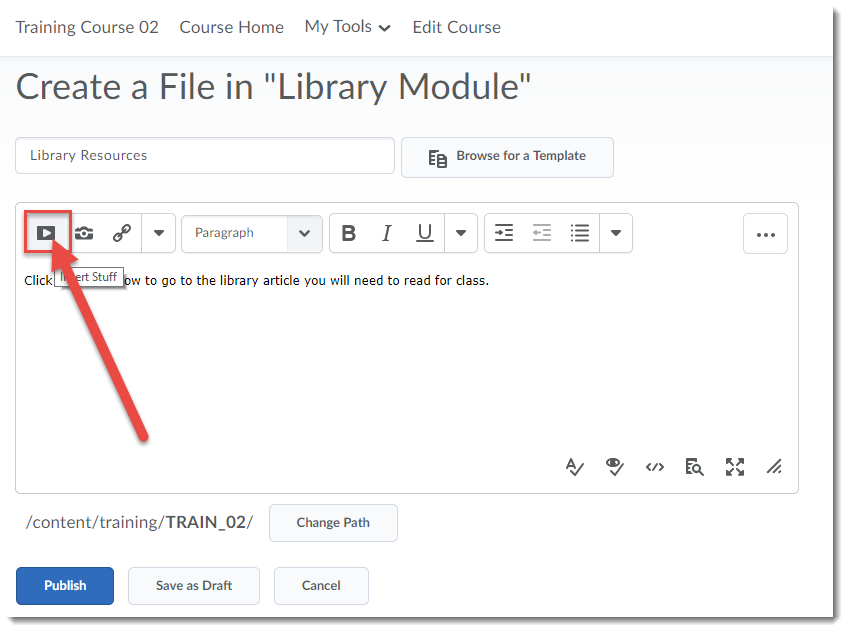
  4. Give your new Content page a Title, then add some text into the HTML editor (for example, to set the context for the article you are going to link to), then put your cursor where you would like the link to the library resource to appear (in the image below, the cursor is below the text). Then click the Insert Stuff icon.Give your page a title, then click Insert Stuff
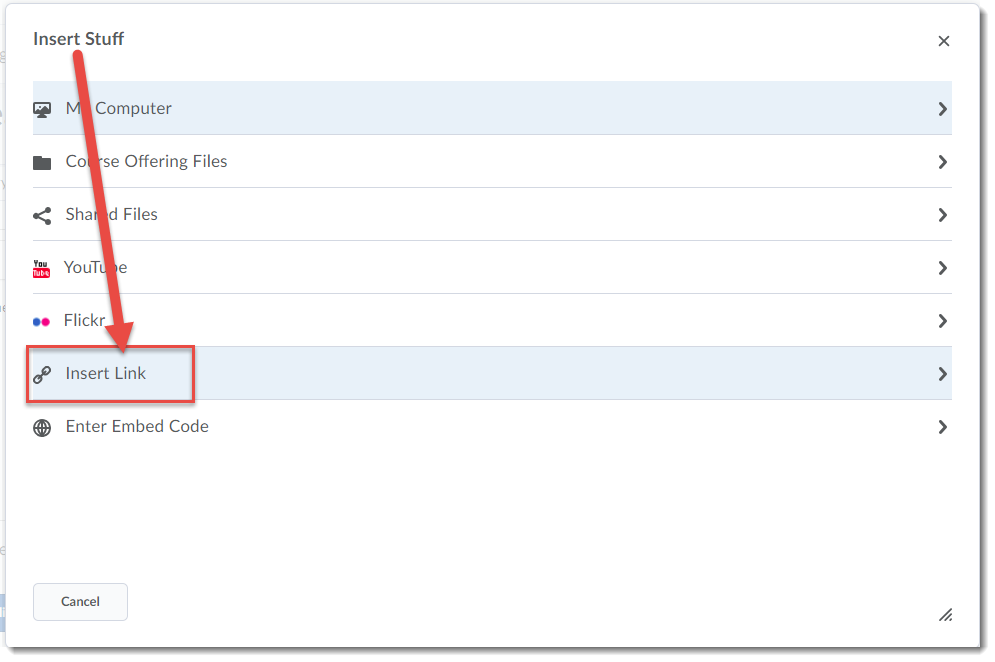
  5. In the Insert Stuff box that opens, click Insert Link.Click Insert Link
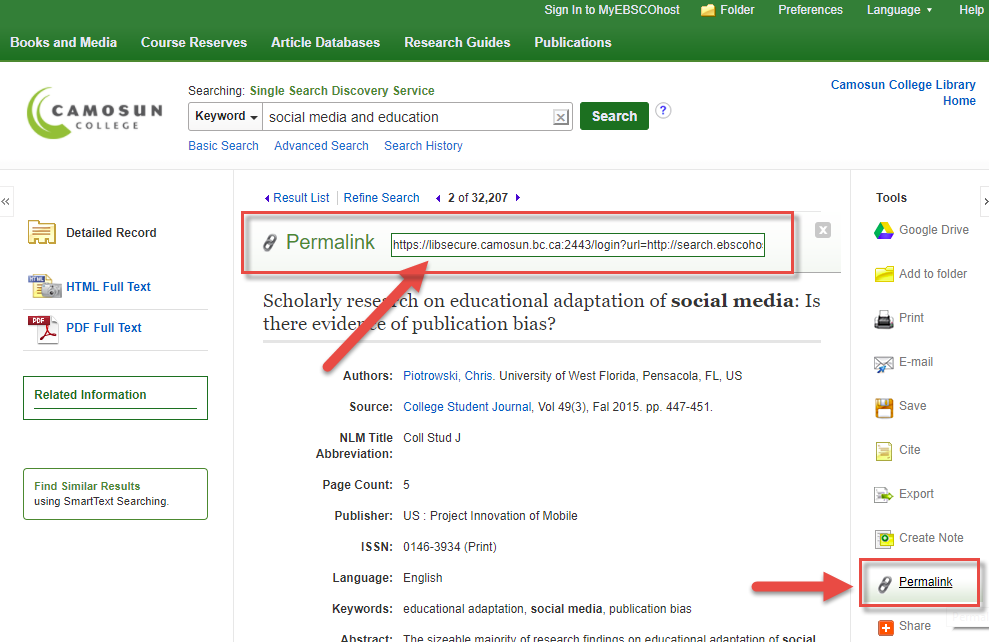
  6. Open a new browser tab or window, and go to the Camosun Library website to search for the article you wish to link to in D2L. (For more information on permalinks, persistent links and stable URLs, go to the Camosun Library’s Libguides (http://camosun.ca.libguides.com/c.php?g=92275&p=1238057).
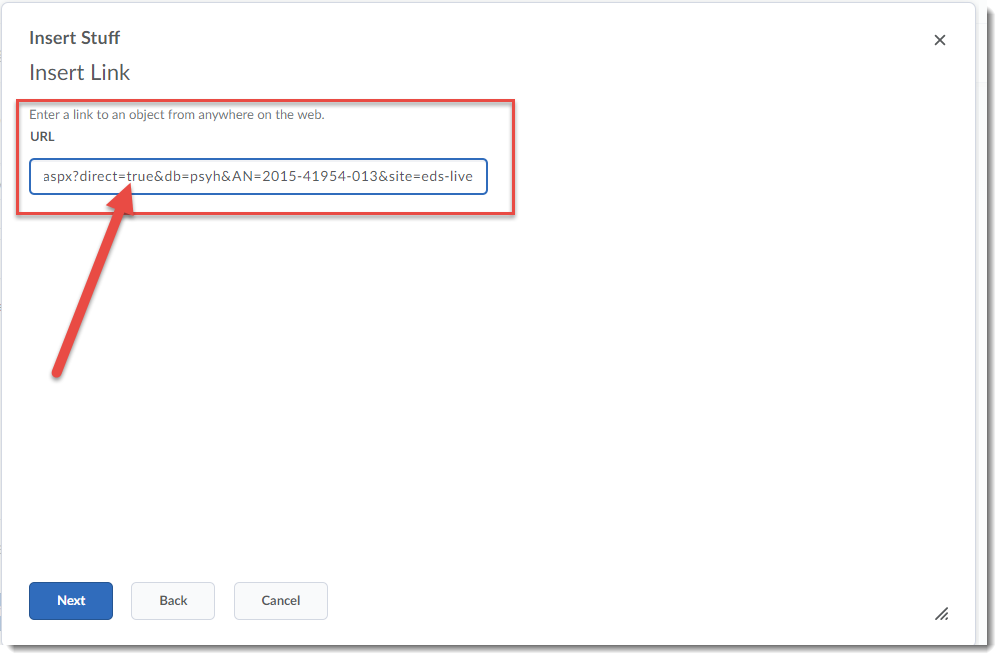
    1. If your licensed library e-resource has a permalink (or persistent link/stable URL) option, first click on the Permalink option, then copy the link that appears in the Permalink box and paste the permalink into the Insert Link URL box.

      Find a permalink for your article and copy it
      Paste the permalink into the Insert Link URL box

    2. If your licensed library e-resource does NOT have a permalink option, contact Camosun Library staff for help.
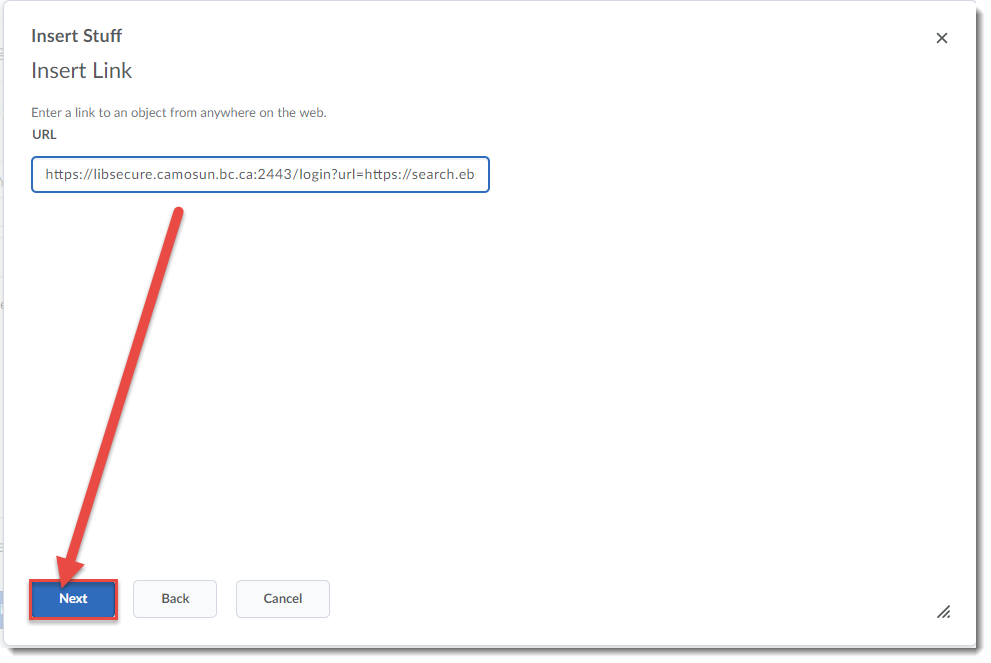
  7. Once you have copied the appropriate link into the Insert Link box, click Next.

    Click Next

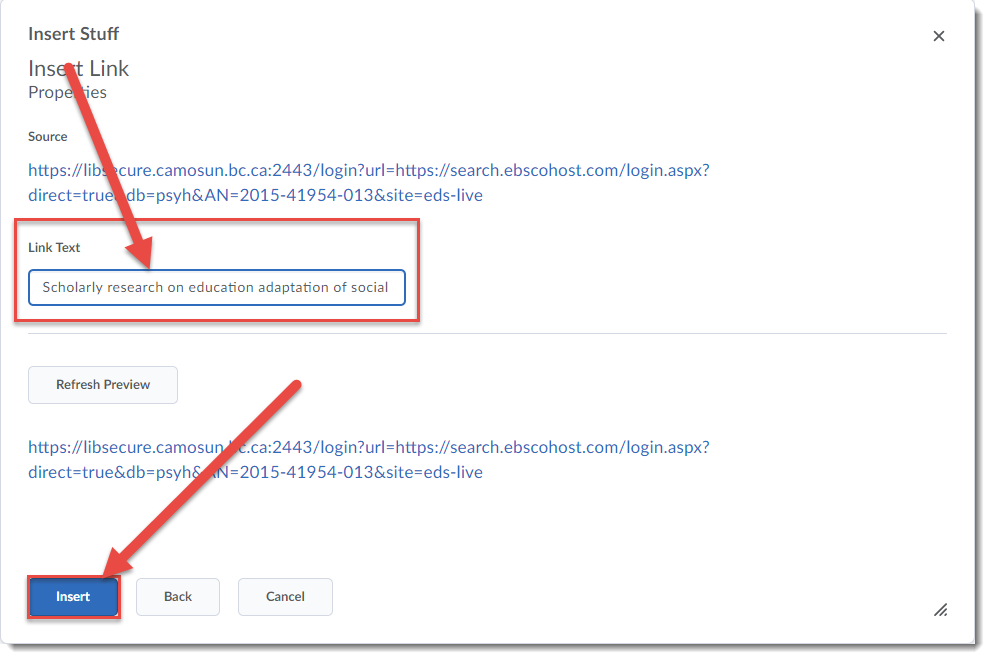
  8. Add the title of the article into the Link Text box. If you don’t add anything here, students will see the full URL (which can be a bit long). Click Insert. The library resource has now been linked in your Content page. Note that the link will open in a new tab or window when the students click on it.

    Add Link Text, then click Insert

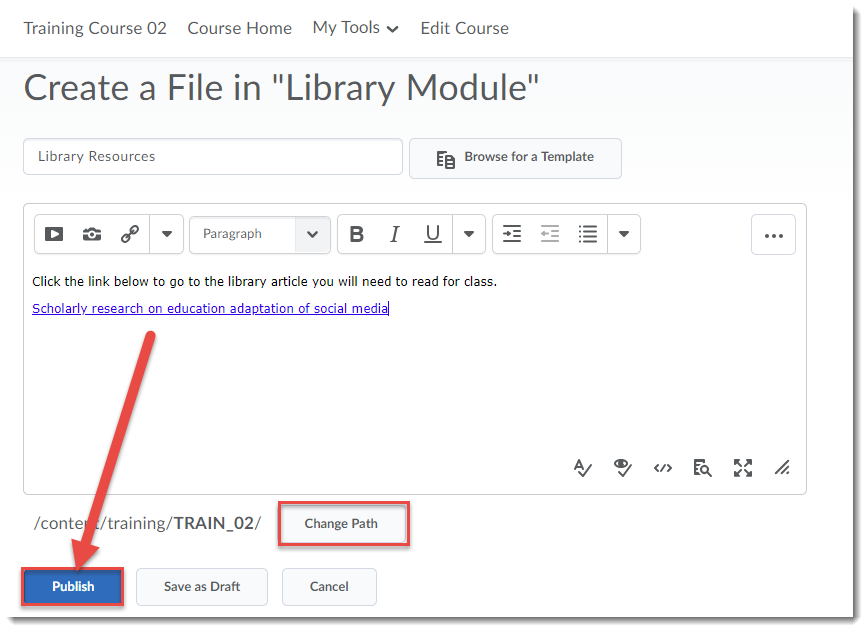
  9. Make sure that you use the Change Path button to save your file to the appropriate folder in your Manage Files area. Then click Publish or Save as Draft. Remember that if you save your file as draft, you will need to publish it before students can see it.

    lick Change Path to make sure your file is saving to the right place in Manage Files, then click Publish or Save as Draft.

Things to Remember

DO NOT use the Quicklink –> URL option to add permalinks to the HTML editor in D2L. Always use Insert Stuff. In fact, we recommend you always use Insert Stuff when adding web links of any kind into an HTML page in D2L.

It’s a good idea to test the link to your library resource once you have Published or Saved as Draft to ensure that it works, and that it opens the page/document you wish it to open. We also recommend you test opening the link from off-campus to make sure students will also be able to access it from off-campus (using their C# and password.)

This content is licensed under a Creative Commons Attribution 4.0 International Licence.Icons by the Noun Project.

A Brief Introduction to ePortfolio in D2L

Looking for options for your students to collect and share documents, assessments, presentations, etc. with other students and faculty across their Program? You might want to come see us to find out how ePortfolio in D2L might support you and your students!

D2L’s ePortfolio is a personal portfolio tool for storing, organizing, reflecting on, and sharing items that represent their learning. Students can include items such as documents, graphics, audio files, videos, presentations, and course work to demonstrate their improvement or mastery in certain areas.

ePortfolio is a system-wide tool which can be accessed by students in any course, and because it is a D2L tool, students can use ePortfolio to save course-related materials so that they can access them for as long as they are registered at Camosun, and they can export some of their ePortfolio items when they leave.

Students can control what items they want to include in their portfolios, how portfolios are organized, and who they are shared with. When items are shared items with peers, mentors, or potential employers, students can control permission to view items, edit items, see or add comments, and see or add assessments to receive feedback.

ePortfolio items and collections can be shared with other students and with instructors, added to the Assignment tool, and used to create presentations. In addition, comments can be enabled on artifacts, collections, reflections, presentations (which can be shared externally to D2L as well), etc., and others in the course can provide evaluation and feedback through the Assignments tool or using Rubrics.

Items that can be saved to ePortfolio include:

  • Reflections (to which you could embed a video or audio file, for example from Kaltura)
  • Links to external websites
  • Files uploaded from a device (documents, images, audio files, etc.)
  • D2L News items
  • D2L Grade items (but ONLY if the instructor has enabled that feature)
  • D2L Quiz Submissions (but ONLY if the instructor has enabled that feature)
  • D2L Assignment submissions (but ONLY if the instructor has enabled that feature)

If you would like to find out more about ePortfolio and how it could be used to support you and your students, contact desupport@camosun.ca to arrange for a consult with one of our instructional designers. To find out more about the benefits of keeping an ePortfolio, check out the following websites:

Setting up Special Access in a D2L Quiz

Wondering how to provide specific students with extra time to write a quiz?  Wanting to open a quiz again for one student?  This tutorial will cover the steps involved with setting up Special Access options in a quiz for a student requiring accommodations. Included are considerations to keep in mind when setting up the quiz, depending on the kind of accommodation required by the student. For further information, please contact desupport@camosun.ca for assistance.
Steps

  1. Go to the Quizzes tool in your course.
  2. Open and existing quiz, or click on the New Quiz button to create a new quiz.
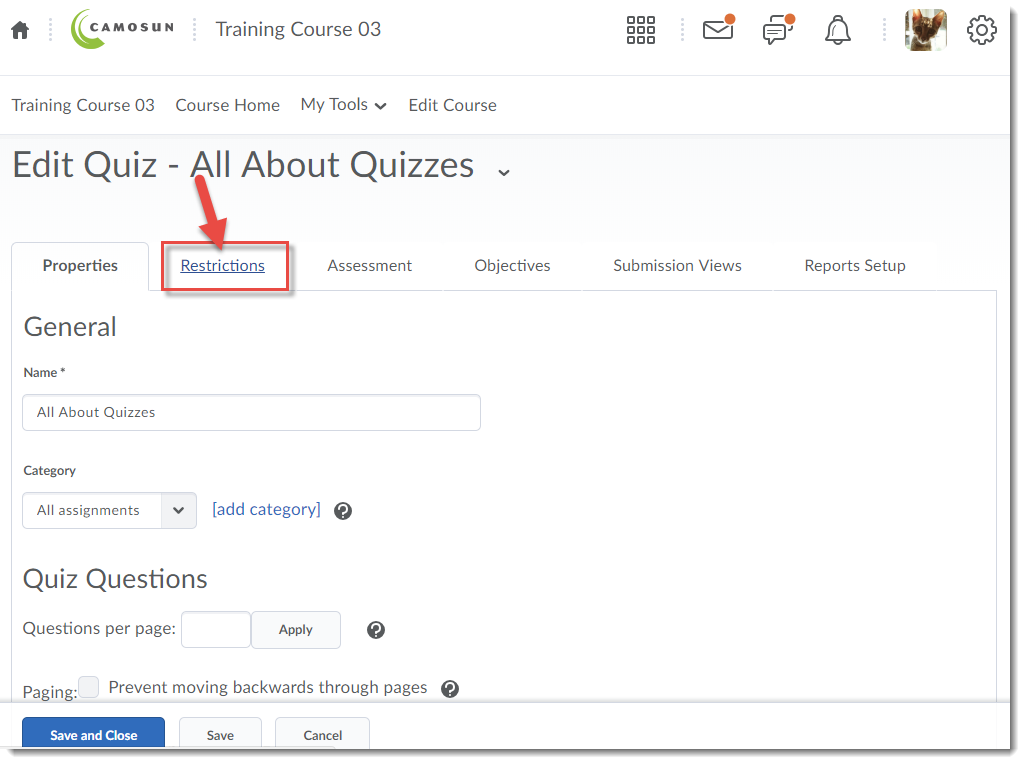
  3. Click the Restrictions tab.

    Click Restrictions

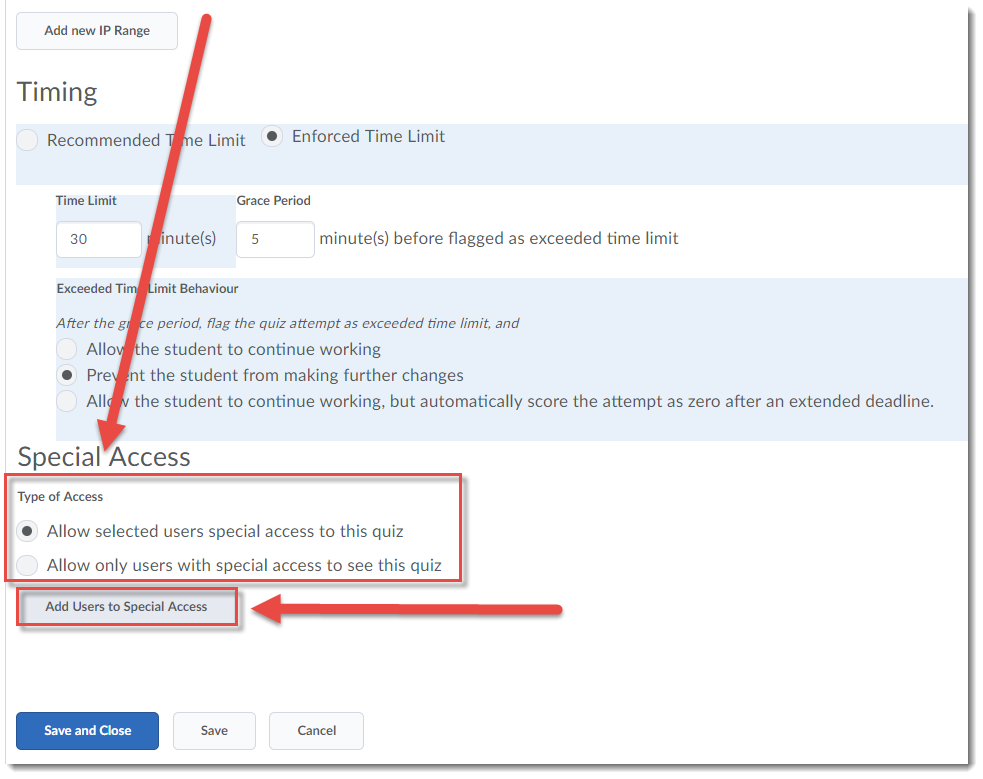
  4. Set any general restrictions required for the quiz (due date, start and end dates, timing, etc.). Make sure to click Save before the next step (adding users to Special Access) otherwise your other restrictions will NOT be saved. Then, to set up Special Access restrictions for a student or group of students, scroll down to Advanced Availability.

    Select the appropriate Type of Access: Allow selected users with special access to this quiz, allows you to add specific settings for specific students, while leaving the quiz open with its “normal” settings for the rest of your class. Allow only users with special access to see this quiz, means that the quiz is closed to all your students EXCEPT for those you add to the Special Access.

    Once you have selected the Type of Access, Click Add Users to Special Access to begin.

    Under Advanced Availability, select Type of Access, click Add Users to Special Access.

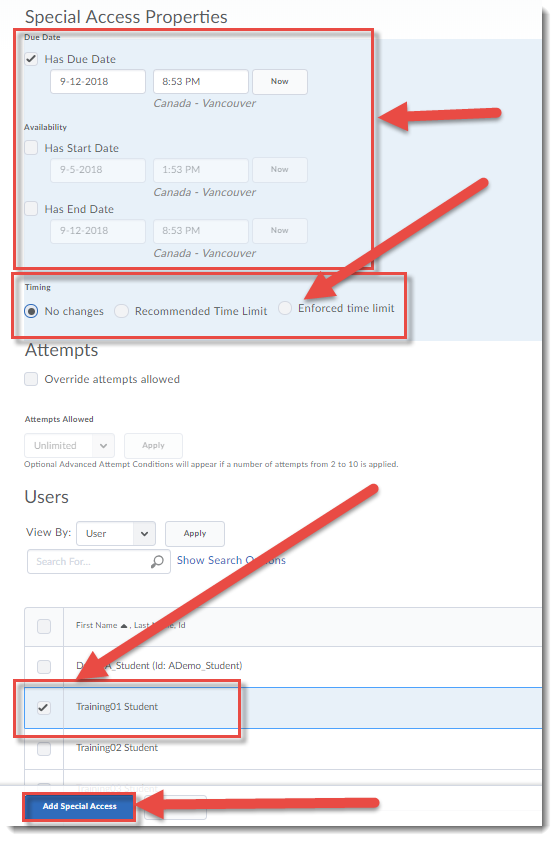
  5. On the Special Access Properties page, you can:

    – Give selected students a different due, start, and/or end date for the quiz.
    – Assign special time limits, grace periods, etc. NOTE: to enforce a time limit on an exam, click Enforced Time limit, and make sure Auto-Submit Attempt is selected.

    Select the students who need this special access, then click Add Special Access.

    Select due date, adjust Timing, select students, click Add Special Access.

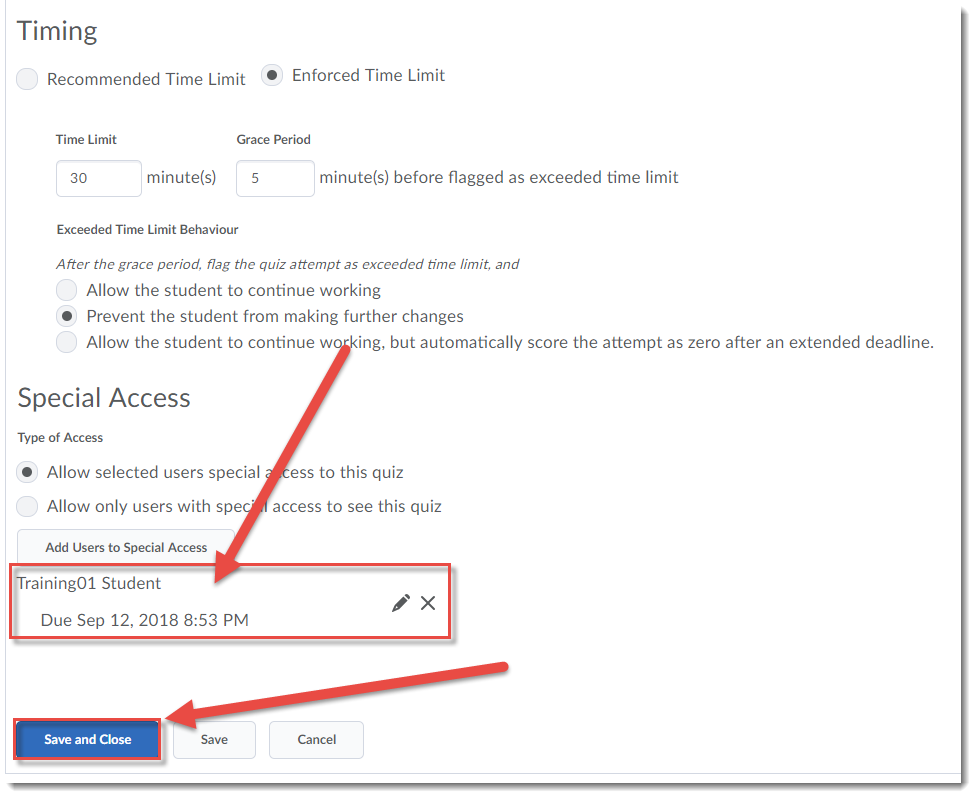
  6. You will now see the student’s name and their special access settings at the bottom of the Restrictions page. Now you can finish editing your quiz, and click Save and Close.

    Click Save and Close

Things to Remember

Specific accommodation considerations Special Access WON’T help with:

  • Students requiring spellcheck to be on (you will likely need to set up a separate quiz to accommodate for exams with long answer questions if you want to keep spellcheck off for other students).
  • Student requiring larger font for their questions as well as for question textboxes (i.e., for answering Long Answer questions).


Creating a Checklist in D2L

The Checklist is a neat little tool in D2L which you can use to create a list of tasks (for a Module, for a Week, for a Course) that students can check off as they complete them.  This tutorial will cover the steps involved in creating a Checklist for your students, and for integration into the Content tool.

Steps

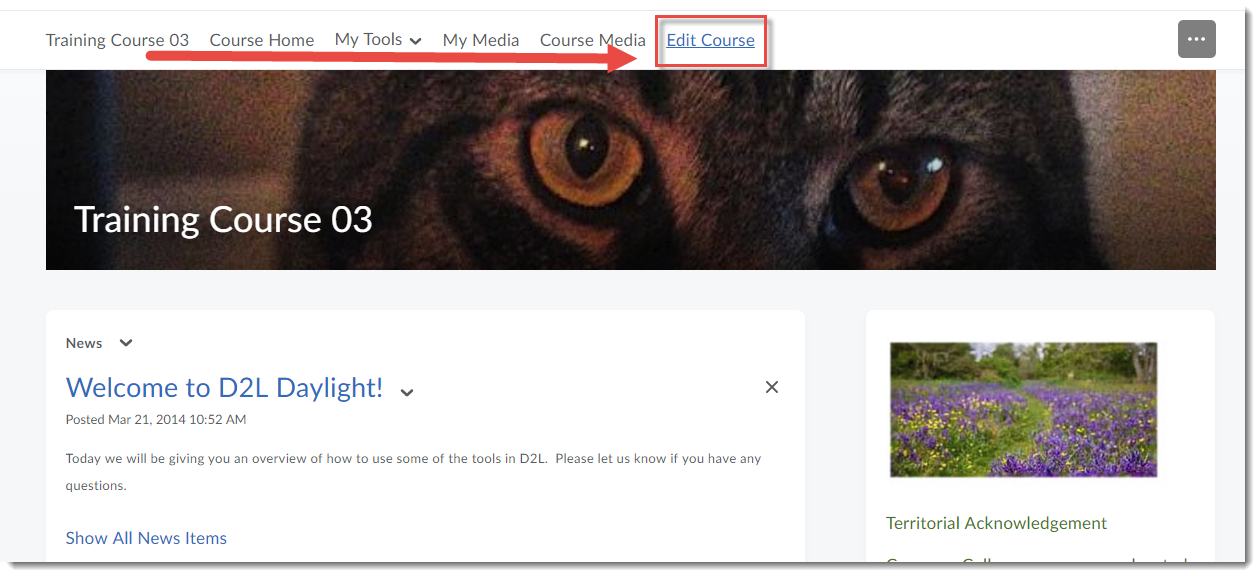
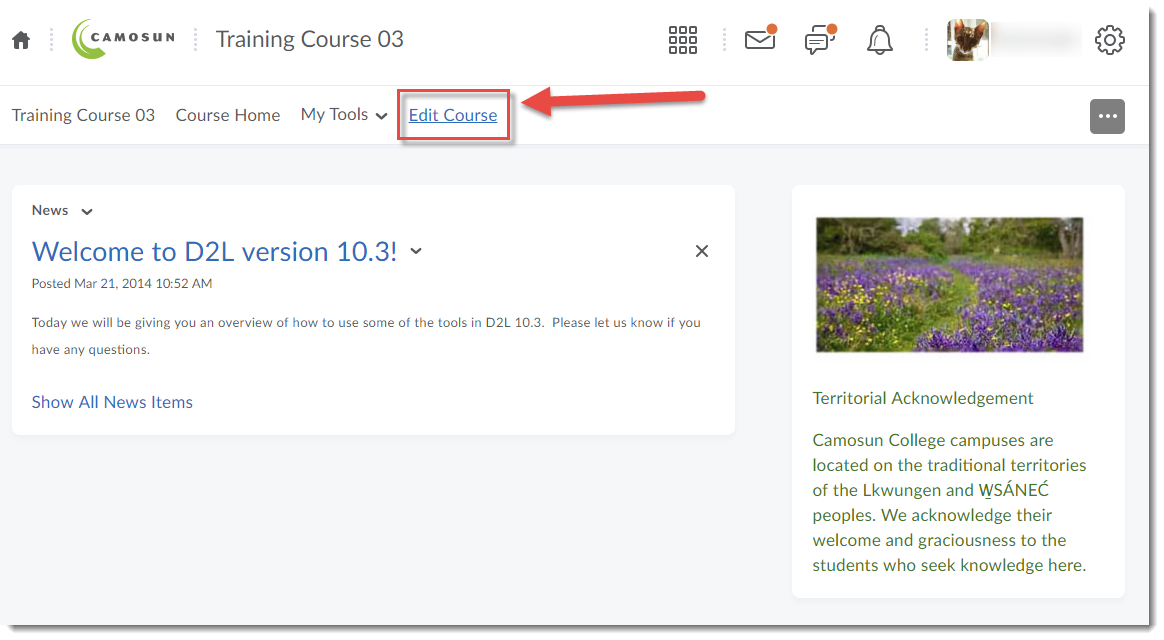
  1. Go to your course homepage, and click Edit Course.Click Edit Course
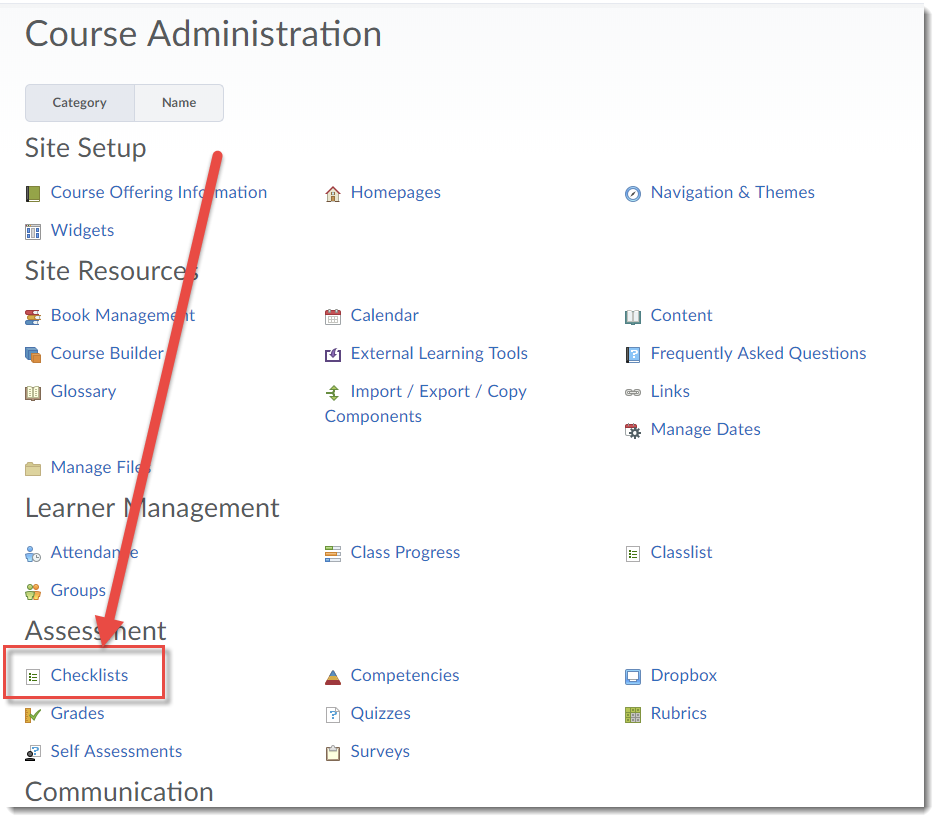
  2. Click Checklist.

    Click Checklist

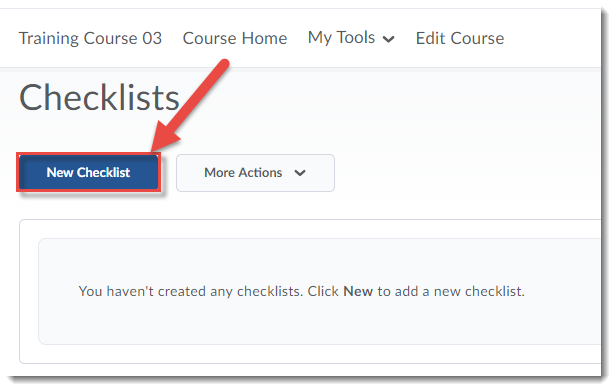
  3. Click New Checklist.

    Click New Checklist

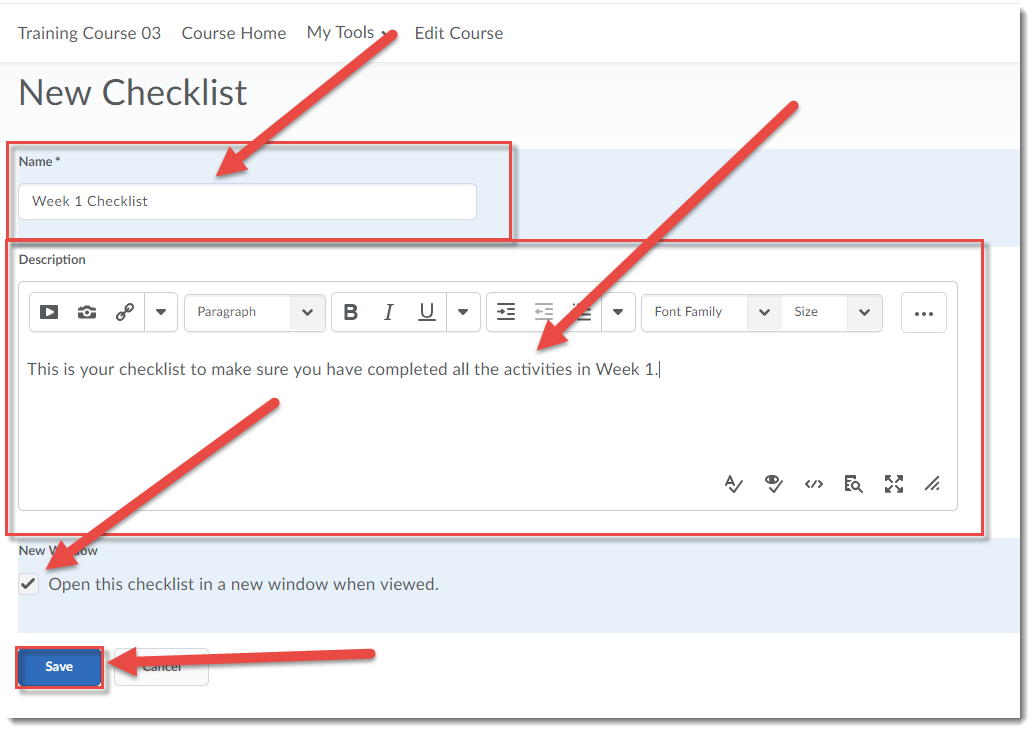
  4. Give your Checklist a Name, add a Description if you like. Select Open this checklist in a new window when viewed – this will allow students to have the Checklist open as they complete tasks in the course. Click Save.

    Give your checklist a name, select Open this checklist in a new window when viewed, and click Save

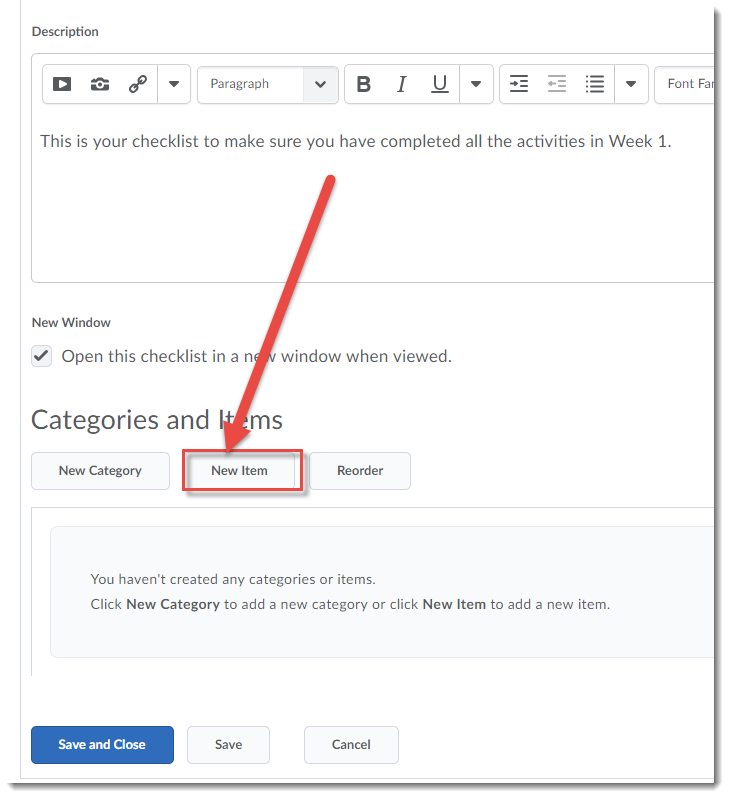
  5. Now you can add tasks (items) to your Checklist. Scroll down, and click New Item to get started.

    Click New Item to create items for your checklist

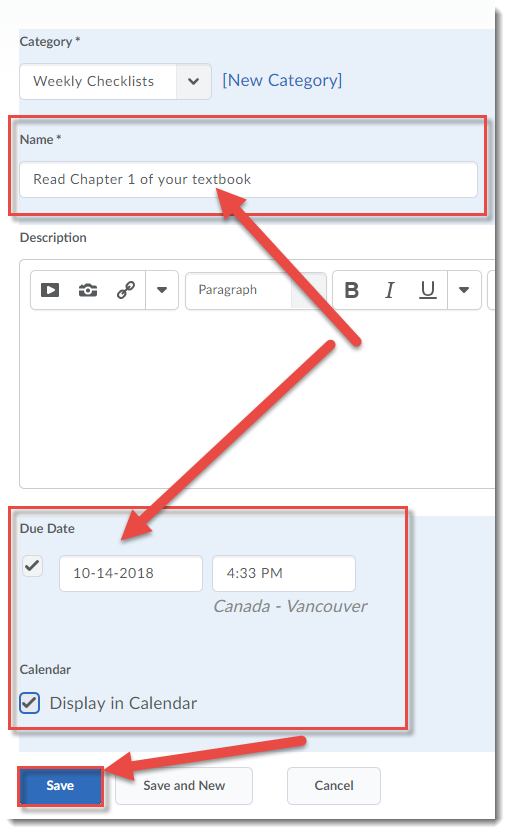
  6. Select a Category for your item using the Category drop-down, or create a New Category for it by clicking on New Category. Items MUST be in a category!

    Select or Create a category for your Item

  7. Give your item a Name, and a Due Date if you like. Then click on Save. Click on Save and New if you would like to create another New item.

    Give your item a name and due date (if needed) and click Save

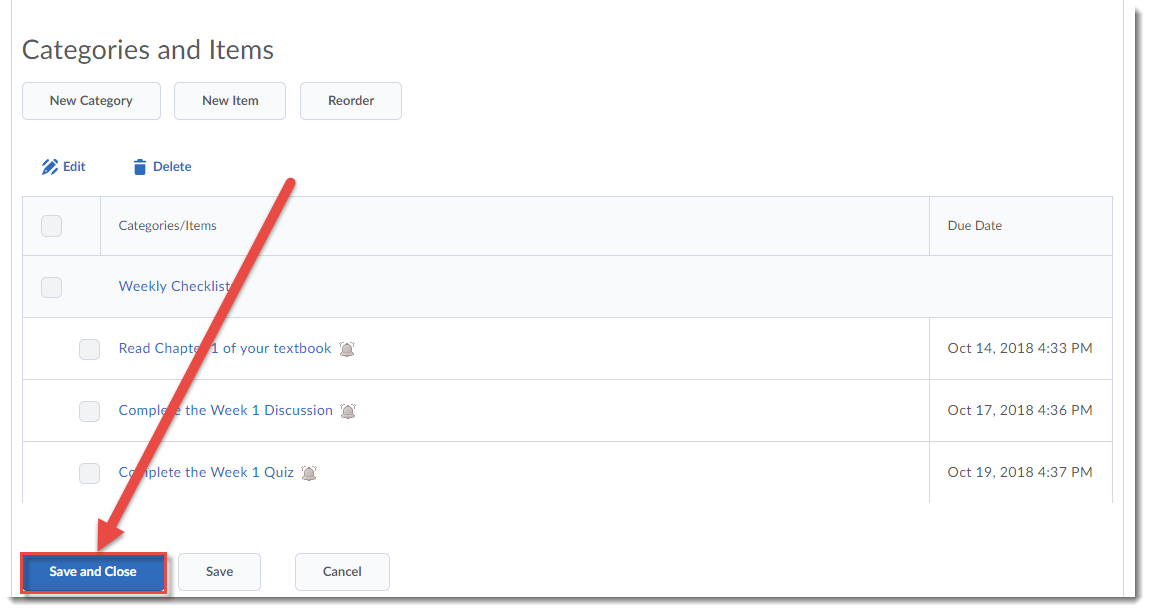
  8. Continue adding Items until your Checklist is completed. Click Save and Close.

    Click Save and Close

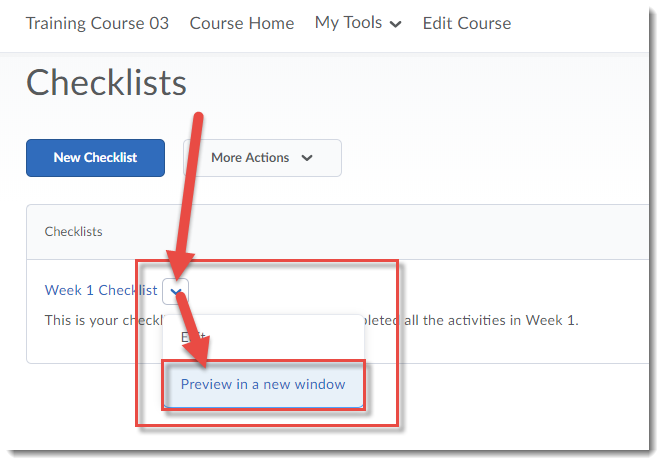
  9. Preview your Checklist by clicking on the drop-down menu (down arrow) next to the Checklist’s title and selecting Preview in a new window.

    Preview your Checklist

Things to Remember

Once you have created your Checklists, you can either add the Checklist tool link to your Navbar or My Tools drop-down menu, or link to it in Content using Add Existing Activities (see the Adding Links to Activities in Content tutorial for more information).

You can also Reorder your Checklists or Delete them by clicking on the More Actions button in the Checklists tool.

Resetting Quiz Attempts – D2L Tutorial

Has one of your students accidentally started and/or submitted a quiz?  Are they unable to check their email because an unsubmitted quiz has blocked the email tool for them?  You can help by deleting their quiz attempt so they can start over, and this post will show you how.

For further information, please contact desupport@camosun.ca for assistance.
Steps

  1. Go to the Quizzes tool in your course.
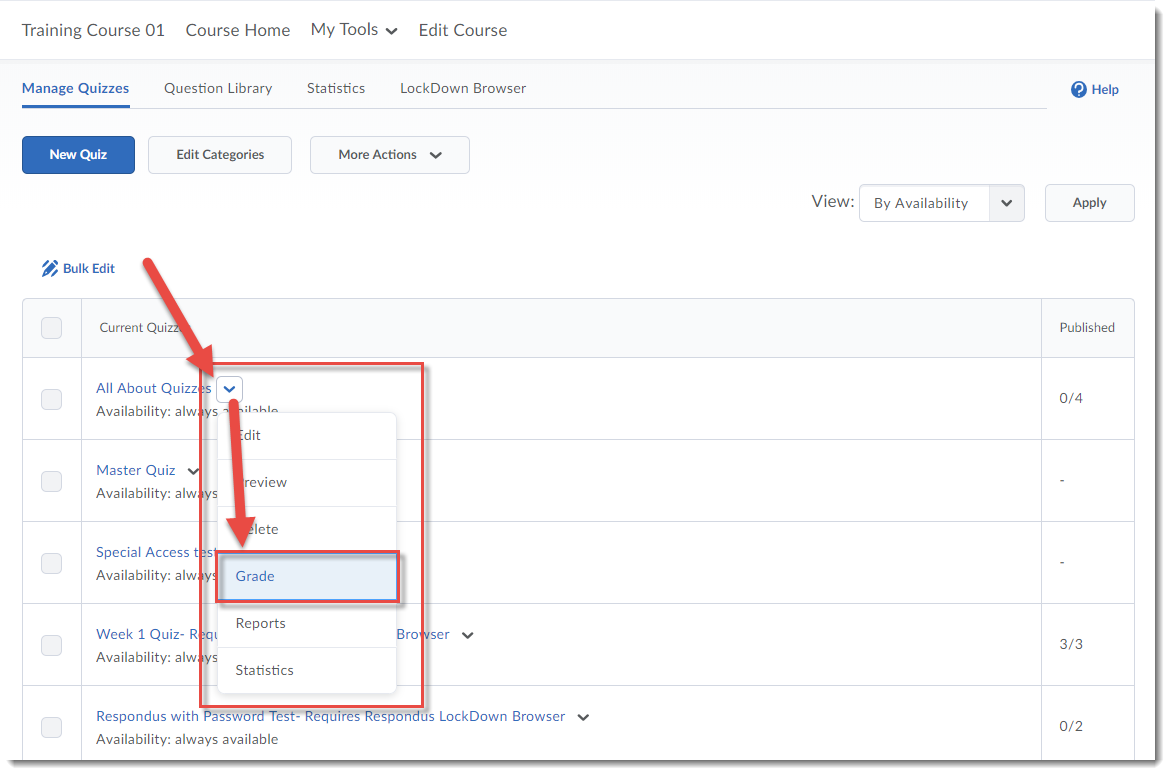
  2. Click the arrow next to the title of the quiz you wish to grade, and select Grade.Select Grade
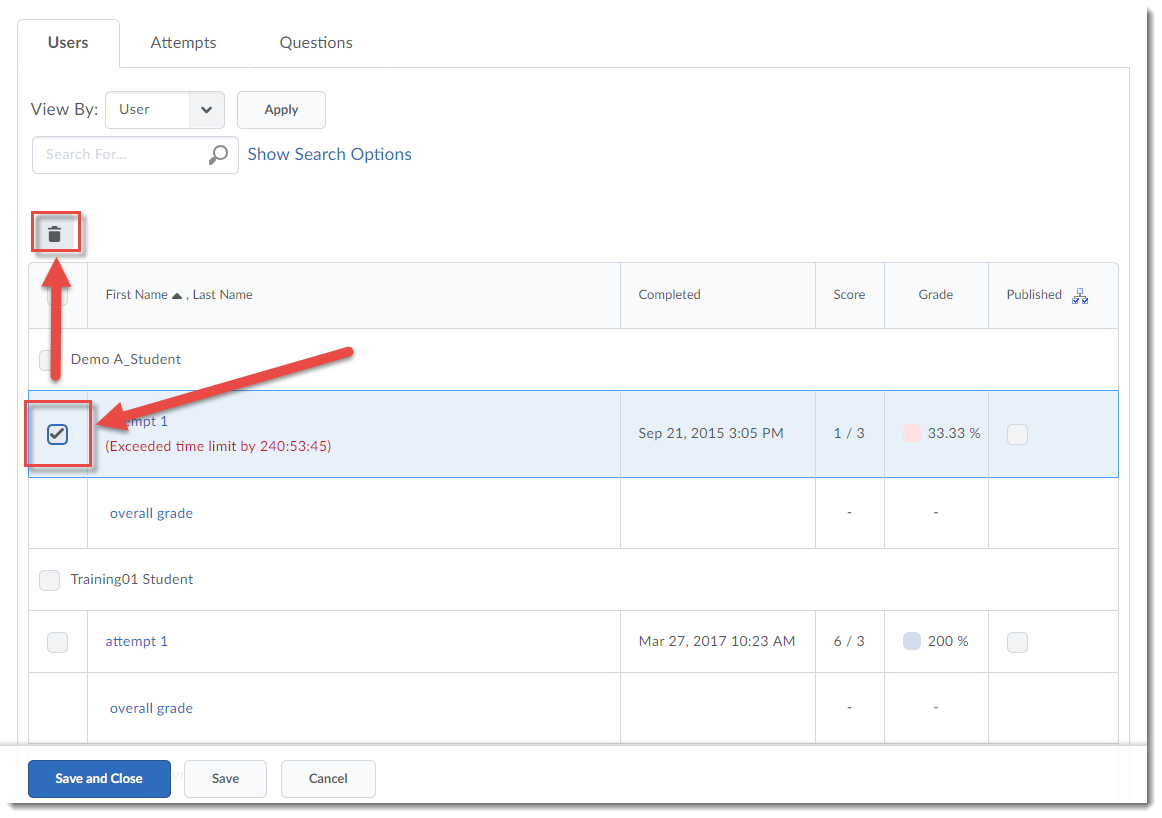
  3. Click the select box for the attempt you want to delete, and click the trashcan.Select the quiz and click the trashcan
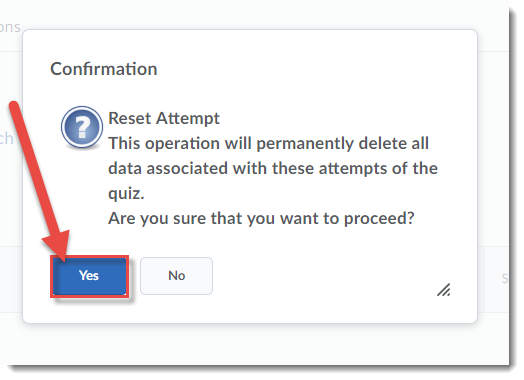
  4. Click Yes in the Confirmation pop-up box.Click Yes
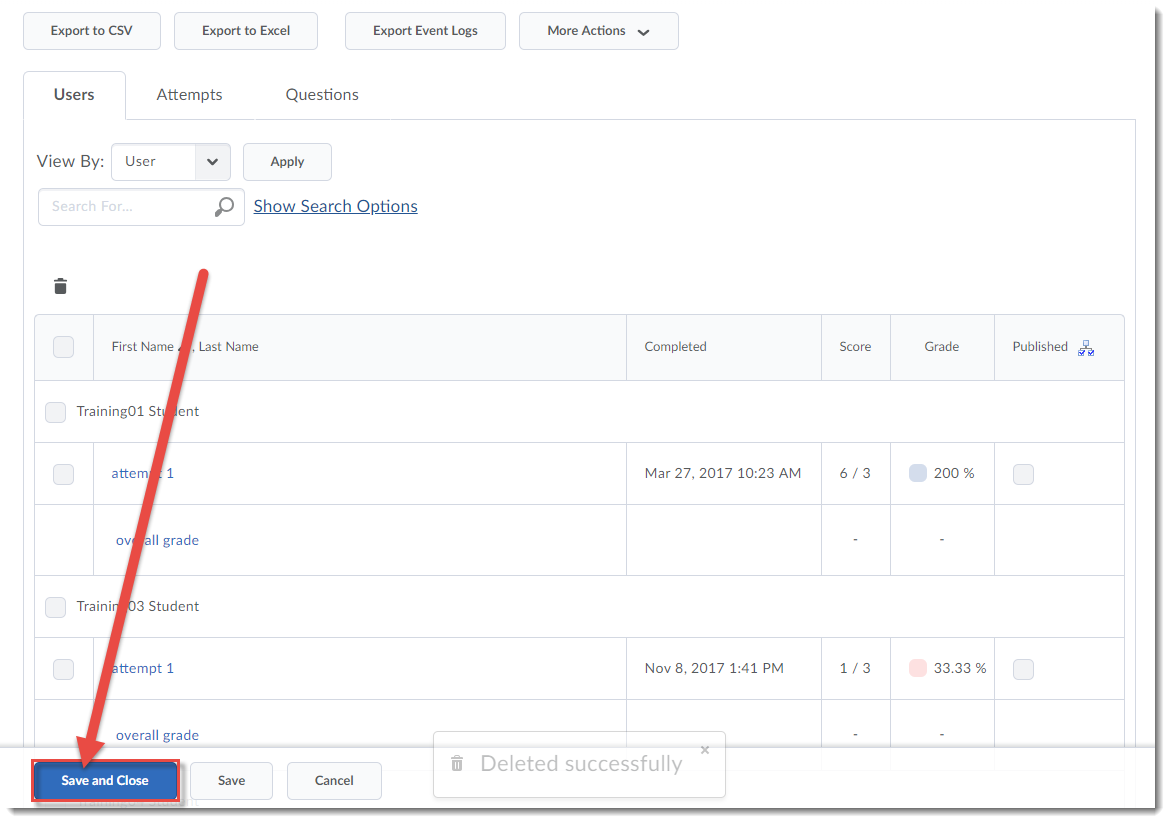
  5. Click Save and Close (this is VERY important when you need to update a published grade in the gradebook if the student has made MULTIPLE attempts).Click Save and Close

Things to Remember

If you delete an attempt (and have clicked on the Save and Close button in the Grade Quiz area) AFTER the quiz grade has been published to the gradebook, the grade in the gradebook should automatically update.

NOTE that the student’s grade will NOT be updated in the gradebook if you deleted the only attempt a student had made. In this case, you will need to go to the Grades tool and reset the student’s grade manually. When the student re-submits the quiz, that grade will automatically populate the gradebook.

D2L Dropbox now called Assignments!

Looking for the Dropbox in D2L and not sure where it went? Well, with the latest upgrade, it has been renamed Assignments. We have posted a News item on the main D2L page for all faculty so you can let your students know. The tool works the same, it’s just the name that has changed.

If you want to keep the name Dropbox, you can change the name of the tool as it appears on your Navbar or My Tools drop-down menu NOT in the tool itself (which will still be named Assignments) through the following steps:

  1. Click Edit Course.

    Click Edit Course

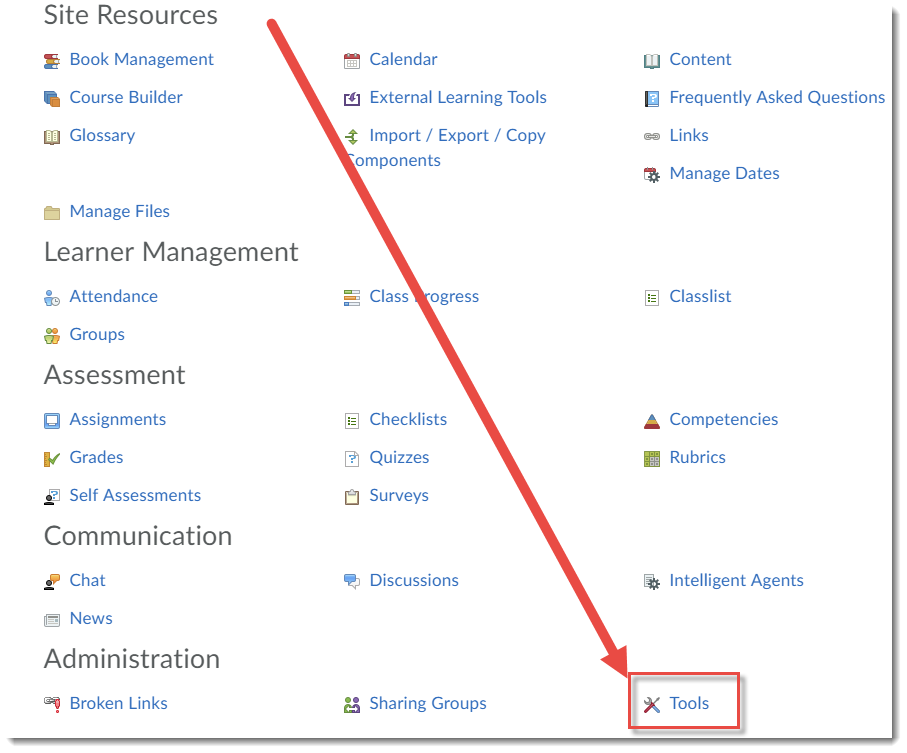
  2. Click Tools (under Administration in the Category view).

    Click Tools

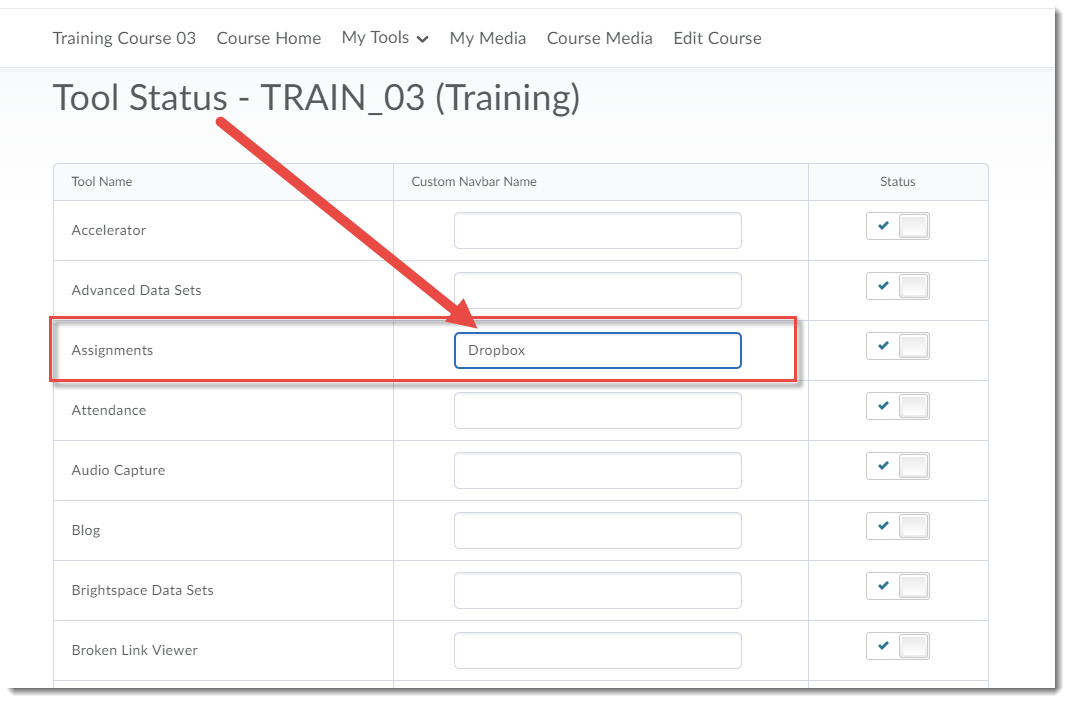
  3. Type a new name in the box next to Assignments and hit Enter. The name will change automatically wherever it appears on your Navbar once you go back to your course homepage.

    Change the name and hit Enter.

If you have any questions, let us know at desupport@camosun.ca.