How do I keep my Final Calculated Grades updated as I add grades?

Here’s a topic from the The Amazing D2L Gradebook workshop:  Keeping final grades updated so you don’t have to calculate them all at the end of the term.


Are you wondering why you don’t see the Final Calculated Grade appearing as you add grades for students? Does it look like this?

Final Calculated Grades not updated

Wonder no more!

In order to see the Final Calculated Grade changing in the Enter Grades area as you add grades for students, you need to adjust a Setting. So, here’s how you do that!

  • Go to the Grades tool in your course
  • Go to Enter Grades
  • Click on Settings (in the upper, right-hand corner)Click Settings
  • Click on the Calculations Options tab.Click the Calculations Options tab
  • Scroll down, and under Auto Update, select Automatically keep final grade updated. Note that this will keep the Final Calculated Grades column updated for you, but students will NOT see their final grades until you release them. Then click Save.Select Automatically keep final grades updated, and click Save
  • Click Close to return to Enter Grades.
  • You will now see that your Final Calculated Grade column is updated.  This column will now be updated every time you enter new grades.Final Calculated Grades are now updated as the course continues

Want to know more? Contact desupport@camosun.ca to book an appointment with an instructional designer!

D2L Monthly Upgrades – What’s new in March 2017!

Welcome to our monthly Camosun D2L Upgrade Report.

Grades – Exempting a Learner from Multiple Grade Items

If you remember from December, D2L added a feature where you could exempt a grade item for individual students (from the grading area for a Grade Item).  You can read about it at D2L Monthly Upgrades – What’s new in December!

This month, we are seeing an improvement to this feature.  Now you can go straight to a student’s gradebook, and exempt that one student from multiple grade items.  If you’re looking for options around dropping different grade items for different students that aren’t covered by dropping the lowest grades in an equally weighted category, this may be an option for you!

Here’s how to do it:

  1. Go to the Grades tool.Go to the Grades tool
  2. Go to Enter Grades.Go to Enter Grades
  3. Click on the name of the student who you want to exempt from some grade items.Click Student's Name
  4. Click on the down arrow next to the student’s name and select Bulk edit exemptions.Select Bulk Grade Exemptions
  5. Select the grade items you wish the student to be exempted from, and click Save and Close.Select Grade Exemptions

Those exempted grade items will then be automatically excluded from the final grade calculation for that student.


How do I make sure files I add to a Module are saved in the right place in Manage Files?

Here’s a topic from the Getting the Most out of the Content Tool in D2L workshop:  Did you know that you can set a Module in Content so that any file you upload to it automatically is saved in the same folder in the Manage Files area?

Yes.  You can set a Module so that all files uploaded to that Module are automatically saved in a specific folder in Manage Files.  Why is this important? Well, managing your files in D2L is important to ensuring that you can find files that you upload and link in Content.  So, in this post we will look at the steps involved when you wish to set a Default Path to a specific Manage Files folder for a Module in the Content tool.

Steps

  1. Go to the Content tool in your course.
  2. In the Table of Contents box, click on the title of the Module you want to work with.

    Click on the title of the Module

  3. Click on the down arrow next to the title of the Module and select Set Default Path.

    Select Set Default Path

  4. In the pop-up box, click on Change Path. You will then see a list of the folders you have available in the Manage Files area.

    Click Change Path

  5. Select the title of the folder you want to connect to your Module. If you don’t see the folder you want, either use the + signs to open the folders to check for sub-folders, or click on New Folder at the tops to create a new folder.

    Select Folder Titld

  6. Once you have selected a folder, click Select Path.

    Click Select Path

  7. Then click Save. All files you upload to the Module will now be automatically saved in the folder you selected.

    Click Save

Things to Remember

Remember to set up your Default Paths at the same time as you create your Modules. This will save you from having to reorganize your files in Manage Files later.

Want to know more? Contact desupport@camosun.ca to book an appointment with an instructional designer!

How do I create groups students can self enrol into?

d2l2wHere’s a topic from the Working with Groups in D2L workshop:  Did you know that you can have students self-select into groups?

Why might you want to do this?

Well, imagine a scenario where you had a variety of possible topics for group discussion and/or group presentation or assignment submission, but you wanted to give students the option of choosing which topic they wanted to contribute to and work with. Use one of the self-enrolment options to create a set of groups, one for each topic, and let students choose which one to enrol in!

The group self-enrolment options you have in D2L are:

  • Groups of # – Self Enrolment
  • # of Groups – Self Enrolment
  • # of Groups, Capacity of # – Self Enrolment

Groups enrolment options

Note that after they self-enrol in a groups, students will have the option of leaving one group and enrolling in another if they change their mind about which group they want to work with.

Also note that in each case, you can set a self-enrolment expiry date and ask D2L to enrol any student who has not self-enrolled into a group into a group automatically (select Set Self Enrollment Expiry Date, and Allocate unenrolled users after Self Enrollment Expiry Date). In addition, once this date has passed, students can no longer leave one group and enrol in another.

Let’s look at each of these in turn.

Groups of # – Self Enrolment

With this option, you would be telling D2L how many students should be in each group. How this works is that students will enrol themselves in the group they want, and when it is full it will no longer be open for enrolment. The number of groups initially created will be the number of students in the course divided by the maximum number of students each group can contain (you can add additional groups later if you like) This is a good option for when you want to control the maximum number of students in each group.

*Note: If students are not enrolled in your course site yet, then only one group is initially created. You can use the Edit Category page to add additional groups. You might want to add additional groups even if students are already enrolled to ensure all students have options when forming groups.

# of Groups – Self Enrolment

With this option, you would be telling D2L how many group you want in this category. How this works is that students will enrol themselves in the group they want. Remember that this option is based on an established number of groups, so you may end up in a situation where more students enrol in one group than in the others.

# of Groups, Capacity of # – Self Enrolment

With this option, you would be telling D2L both how many groups there should be AND how many students should be in each group. How this works is that students will enrol themselves in the group they want, and when it is full it will no longer be open for enrolment. You will need to make sure that you have the right number of groups for the number of students in your class (given the group number limit you have assigned).

Here is what these self-enrolment options look like to students:

Student View of self enrolment options

facsupp_id2

Want to know more? Contact desupport@camosun.ca to book an appointment with an instructional designer!

How do I create a Contact Information Widget for my D2L Homepage?

d2l2wHere’s a topic from the Customizing Your Homepages and Widgets workshop: did you know that you can create a widget on your homepage with your contact information in it?

Need a place to let students know when, how, and where they can contact you with questions? Afraid that they may have lost the information you handed out to them in class? Why not create a Contact Information Widget on the homepage of your D2L course site!

A widget is a box that appears on the Homepage of your D2L course site. It can be a box for a tool, like the News or the Calendar widgets, or a box containing information, like a Contact Information widget.

Creating a Contact Information widget is easy – so let me walk you through the steps here! Note that this is not a complete tutorial, and it presumes you have some familiarity with D2L. If you have any questions about this process, or get lost at any point, contact eLearning (desupport@camosun.ca) to arrange to meet with one of our instructional designers.

The first thing you need to do is click on the Edit Course link on your D2L course Homepage.

Click Edit Course

Then click on Widgets.

Click Widgets

Click Create Widget.

Click Create Widget

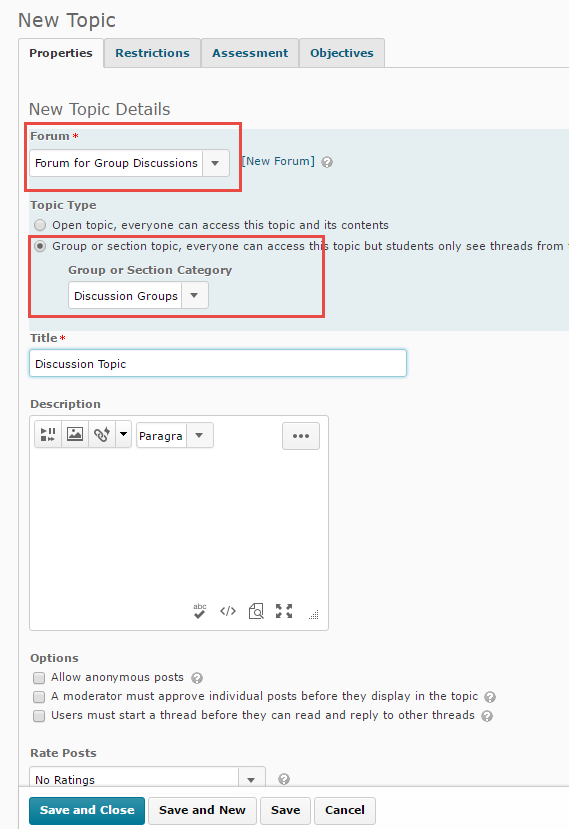
You will need to give your new Widget a name, perhaps something like “Contact Information”? Then click on the Content tab. Note that information added to the Description box on this Properties tab will NOT be seen in the Widget. It is the Content tab that contains the information you wish students to see.

Add a Name for your Contact Information Widget

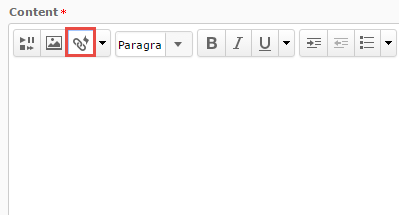
Once you are on the Content tab, you can enter the information you wish students to see in your Contact Information widget. Since you are entering informaiton in the HTML editor, you also have the option of adding a picture, as well as links to another website. When you are finished entering your information, click Save and Close.

Add your information on the Content tab

You will then need to add your widget to your D2L course Homepage so students can see it. To do this, click Homepages.

Click Homepages

Click on the title of your active Homepage. If you can’t click on the title, you will need to copy the default, activate it, and then edit the copy. You can find out how, but reading this blog post: D2L Tool Tip of the Week: Customizing your Homepages and Widgets.

Once you are on the editing page for your active Homepage, you can add your widget to one of the widget areas (see below) click Save and Close.

Add your Widget to your homepage

When you go back to your Course Homepage, you will see your Contact Information widget.

To edit it, click on the down arrow and select Edit this Widget.

Click Edit this Widget to edit your widget

To move it to another location on your Homepage, go back to Edit Course –> Homepages and edit your active Homepage.

An there you have it – a Contact Information widget that you can copy to any course you have access to, and change as you need!facsupp_id2

More questions about D2L and customizing your homepages and widgets? Contact eLearning (desupport@camosun.ca) to arrange a meeting with an instructional designer at Interurban or Lansdowne!

Do you know when you and your students have access to D2L courses at Camosun?

d2l2wThis term I thought I would begin writing a series of posts based on our eLearning workshops – both for those of you who can’t attend, as well as to remind those who did of some of the amazing things you learned at the workshops!

Today, from the workshop Getting Started with D2L, I am answering the question: “Do you know when you and your students have access to D2L courses at Camosun?”

D2L at Camosun is connected to our registration system (Colleague). That means that faculty and students are automatically added to live D2L course sites through that connection.

What this means for faculty, is that if your course is “flagged” for D2L in the registration system, you will see a blank shell for that course appear in your D2L course listing approximately 30 days before the course start date. Then, 7 days before the course start date, you will see your students appear in the D2L course Classlist. This is also the point at which your students will have access to D2L in general – but NOT to your course site.  Your student will not have access to your course site until the day it starts (the official start date in Colleague). Note that this is all controlled through Colleague – we in eLearning cannot give your students access to your D2L course materials earlier than the official start date.

You may also be wondering how long students have access to your D2L course site after the course ends. Well, they will have access to the course site for 20 days past the end date as it appears in Colleague.

Sometimes faculty want to work on a course D2L site before their live course appears in their course list (for example, when planning/developing a September course in May/June for Scheduled Development). If this is the case, you can ask eLearning to create a DEV site for your course. This is a static D2L course site (meaning that it is not dependent on start and end dates) containing NO students (meaning you can use it to create, experiment, etc. without worrying that students may see what you’re doing). If you would like a DEV site for a course (and I recommend having one), contact desupport@camosun.ca.

facsupp_id2More questions about D2L and getting started? Contact eLearning (desupport@camosun.ca) to arrange a meeting with an instructional designer at Interurban or Lansdowne!

D2L Monthly Upgrades – What’s new in January 2017!

Welcome to our monthly Camosun D2L Upgrade Report.

It’s the first upgrade of the new year, and there is a nice new feature for you to explore in the Discussions tool when using Groups.

Remember, if you have questions about the basics around using the Groups or Discussions tools in D2L, you can arrange to meet with an instructional designer by contacting desupport@camosun.ca

Discussions – Improvements to Group Discussions

While you can still create Group Topics (meaning that the Topic as a whole is restricted to a specific group of students, so if you have 5 groups, you would have to create a Topic for each group), you can now also create one Topic which contains a set of threads – one Thread for each group!

To do this, first create your Groups in D2L using the Groups tool.  Then go to the Discussions tool and create a New Forum into which to place your Topic.

Next:

  • In the New menu, select New Topic.Under New, Select New Topic
  • In the Properties Tab for the New Topic, Select the Forum you want the Topic in, then select the Group or section topic… radio button and select the Group you wish to connect the Topic to.Select Group or section topic...and select the group
  • When you’ve finished creating your Topic settings, click Save and Close.

When you go into your new Topic to post a message, click Start a New Thread, and then select which Group you wish to post to, type your message, and click Post.

When posting to the thread, select the Group you want to post to

Note that students will only have access to the Thread(s) belonging to THEIR group, while you will be able to view and post to all the Threads in the group Topic.

This is a quick and easy way to set up Group discussion areas in the Discussions tool.


D2L Monthly Upgrades – What’s new in December!

Welcome to our monthly Camosun D2L Upgrade Report.

The December D2L upgrade has a few holiday gifts for you!

Grades – Exempting a Grade Item for an Individual Student

You can now exempt a grade item from an individual student’s gradebook!

I think this is the most exciting change we’ve seen in D2L since the great Rubrics-Now-Transfer-Grades-Into-Gradebook-From-Discussions-And-Grades-Too change of a few months ago.

In a nutshell, instructors can now exempt numeric, select-box, pass/fail, calculated, formula, and text grade items for specific students, thus excluding those individual grade items from that student’s final grade calculation.  For example, if one student is unable to complete a graded assessment (let’s say she is in the hospital having her appendix out when one of the class essays is due) and you want to exempt that assessment from her final grade calculation, now you can do easily do this!

In fact, it’s as simple as selecting the student(s) for whom you want to exempt a grade item (in the Grade Item area for an assessment), and clicking Exempt (and, of course, saving your changes)!

Instructors can exempt a learner from an assignment. The exemption appears in the Scheme field of the grade table.

That grade will then be automatically excluded from the final grade calculation for the exempted students.

Want to know more?  Contact desupport@camosun.ca to arrange for a consult with an instructional designer.

Quicklink Directly to a News Item

You can now add a direct link to an individual News item using the Quicklink option in the HTML editor (so, in a News post, a Discussion post, a New Page in Content, etc.)

To do this:

  1. Go to the HTML editor box in any tool in D2L.
  2. Click the Insert Quicklink icon at the top of the HTML editor, on the left side.quicklink
  3. Click News.

    quicklink-news

  4. Select the News Item you wish to link to.   Your link will appear with the title of the news item as the link text.

    quicklink-news2quicklink-news3

  5. Publish or Save your HTML file when you are finished.


D2L Monthly Upgrades – What’s new in November!

Welcome to our monthly Camosun D2L Upgrade Report.

There are a couple of small improvements coming your way this November.

HTML Editor – Copy and Paste from WORD

The change here is that you can now copy and paste content from a WORD document into the HTML editor in D2L and “retain the look and feel of the source document”.

Consider, however, that there may still be some formatting features in WORD that won’t translate this smoothly into an HTML editor, especially if you use, for example, tables.  That being said, it is a big improvement that I am definitely looking forward to!

User Progress tool is now called Class Progress

This is a small change, but it’s good for you to know in case you go to the Edit Course area to look for User Progress, because you won’t find it.  Instead, look for Class Progress (see below). Have no fear though – the tool still works the same!

Class Progress

D2L Tool Tip of the Week: Restoring a Deleted News Item

This tutorial is designed for faculty who have previous experience using the News tool or the HTML editor in D2L and will cover the steps involved with restoring a deleted News Item in the News Tool in D2L.  For further information, please contact desupport@camosun.ca for assistance.

Steps

  1. Go to the Homepage of your course.
  2. In the News widget context menu, click on Go to News Tool
    In the News widget context menu, click on Go to News Tool
  3. In the News widget context menu, click on Go to News Tool
    Click on the More Actions menu and select Restore
  4. Select the News Item(s) you wish to restore, and click the Restore button
    Select the News Item(s) you wish to restore, and click the Restore button
  5. Click on News in the breadcrumbs (top left) to return to the News tool
    Click on News in the breadcrumbs (top left) to return to the News tool

Things to remember

This Restore function is to restore deleted News items. You can also “restore” dismissed News items by clicking on a News item’s context drop-down menu and selecting Restore.