eLearning: Spring Cleaning – Tips for Pruning Your Media Collections

With limited server space and the need to better manage our carbon footprint, we cannot accumulate volumes of media. As end of term approaches, it is time to start pruning your Collaborate and Kaltura media collections.

Collaborate:

  • At end of term, delete Collaborate recordings from your courses.
  • If there are specific recordings you want to keep, you can download them and upload them to Kaltura MyMedia for future re-use.
  • Revisit courses from past terms and delete those historical recordings.

Kaltura

  • Go through your MyMedia account and delete copied or duplicate videos that you have created or uploaded but don’t need.
  • Delete any single use videos that you do not plan to use again.
  • Encourage your students to delete any videos created for the course that they won’t need in the future.

Camosun is working on a more formal data retention plan to help manage the growing volume of media. In the meantime, it is good practice to get in the habit of cleaning out your media at end of term or making it part of your annual SD plans.  Questions?  Email elearning@camosun.ca.


Camosun eLearning Updates

There have been some changes with some of the tools we support here in eLearning at Camosun we wanted to let you know about here:

D2L/Colleague Integration

The new D2L/Colleague Integration will result in changes and improvements to the faculty and student experience in D2L. Read our CETL notice to learn more.

Coming Soon to Collaborate: Gallery View with 25 Simultaneous Videos

Blackboard Collaborate Ultra has been working on improvements to its video gallery to enable Moderators and Participants to view up to 25 simultaneous video feeds. Moderators will see up to 25 simultaneous video feeds beginning April 8, and Participants will get access to this functionality later in the month. Note that we still recommend not having all videos active all the time during a session to conserve bandwidth especially for students with poor connections.

Read our CETL notice to learn more about what’s coming to Collaborate in the future.

How to Release an Individual Submission Assignment to a Specific Group of Students in D2L

If you are an instructor in a D2L course site containing multiple instructors where each instructor is responsible for a specific group of students in the course, or if you are working in a D2L site with merged sections where you want to create separate assignments for each group/section’s students, this post is for you!

In this tutorial post, we will cover the steps involved with setting up Release Conditions in an assignment when you want an Individual Assignment Type assignment folder available only for a specific group of students (you will need to create Groups in your D2L course first to use this feature – see the various Groups tutorials for more information.)  For more general information about Conditional Release see the Conditional Release – Setting up Release Conditions tutorial under Course Admin.

Note that this tutorial will show how this process works in the new Assignment Creation Experience interface. If you are using the old interface, the steps will be similar, but you will find all of the Release Conditions functions under the Restrictions tab. For information on how to turn on the new Assignment Creation Experience, see the tutorial Creating an Assignment in D2L in the New Assignment Creation Experience.

For further information, please contact elearning@camosun.ca for assistance.

Steps

  1. Go to the Assignments tool in your course.
  2. Open an existing assignment folder, or click on the New Assignment button to create a new assignment folder.
  3. After adding an assignment Name, and any other settings in the main assignment creation area, click Availability Dates & Conditions to open that part of the right side panel.

    Click Availability Dates & Conditions

  4. Click Add Release Condition. Select Create New. NOTE: Once you have created a release condition, you can click Add Existing to use it again.

    Click Add Release Condition and select Create New

  5. From the Create a Release Condition pop-up, click the Select Condition Type drop-down, and for this tutorial, we will choose Group Enrolment. (For information on all the various Release Conditions, see the tutorial What Release Conditions are Available in D2L under Course Admin for more information.)

    Click Select Conditional Release and select Group Enrolment

  6. Click the Condition Details drop-down, here, a Select Group drop-down, and select the Group you wish to attach this assignment folder to. Then click Create.

    Select group and click Create

  7. Finish setting up your Assignment, and click Save and Close.

    Click Save and Close

Things to Remember

Note that connecting an Individual Assignment folder to a group is NOT the same as creating a Group Assignment folder. For a Group Assignment folder, every student in a group can see everything submitted into their group folder – it is set up for group submissions. Conditionally releasing an Individual Assignment folder to a Group means each student in that Group only sees their own individual submissions.

Once you create a Group Assignment folder you can NOT change it back to Individual. You have to delete it and start over.

Grading Assignments Using Rubrics in D2L

Starting to use Rubrics in D2L?  This tutorial is for faculty who have previous experience using the Assignments tool in D2L, and will walk through attaching a Rubric, grading using a Rubric, and showing you what students see as well. NOTE: Make sure you have created your rubric(s) in the Rubrics tool first!

Steps for Attaching Rubrics to Assignments

  1. Go to the Assignments tool in your course.
  2. Click the down arrow next to the title of the Assignment you wish attach a Rubric to, and select Edit Folder.Select Edit Folder
  3. In the Edit Folder area, scroll down to the Evaluation and Feedback area, then click Add Rubric (NOTE: we advise creating your Rubrics in the Rubrics tool first, then attaching them to other tools).Click Add Rubric
  4. In the Select Rubric pop-up, select the Rubric you wish to attach, and click Add Selected.Select Rubric and click Add Selected
  5. Your Rubric will now appear under the Add Rubric Finish editing your Assignment, and then click Save and Close.Click Save and Close

Steps for Grading Assignments Using Attached Rubrics

  1. Go to the Assignments tool in your course.
  2. Click on the title of the Assignment you wish to see submissions for.Click the Assignment title
  3. Click the Evaluate link for the student you wish to assess.Click Evaluate
  4. Click the Rubric link under Evaluation and Feedback.Click the Rubric link
  5. In the Rubric’s pop-up, click the cells for the feedback you wish to leave (checkmarks will appear indicating you have selected those cells), click Add Feedback for any criteria you wish to add custom feedback for, then click Close.Select cells and add feedback, then click Close.
  6. For Points rubrics, the rubric will then automatically generate a grade for the Assignment. Click Publish or Save Draft, and move on to the next student’s assignment.Click Publish or Save Draft

What Students See when Viewing Rubrics in Assignments before Grading

  1. Go to the Assignments tool in your course.
  2. Click on the title of the Assignment.Click the Assignment title
  3. Click Show Rubrics to open the Rubric.Click Show Rubrics
  4. The Rubric will then appear for students to review.Rubric appears for review

What Students See when Viewing Rubrics in Assignments after Grading

  1. Go to the Assignments tool in your course.
  2. Click link under Feedback in the Evaluation Status column (here the link is Unread).Click the feedback link
  3. The Rubric will open and students can review their feedback, then click Done.Review feedback and click Done

Things to Remember

Only Points and Percentages rubrics will adjust the score in an Assignment. Text only rubrics will only generate text-based feedback, and you will have to add a score manually in the Submissions area if the Assignment has a grade.

Allow Students to Retake Incorrect Questions Only in a Quiz

There is a new setting available in Quizzes, which allows you to set an additional attempt on a quiz to only show students the questions they answered incorrectly in the previous attempt. New Attempt feature in Quizzes (to only do incorrect answers). And cautions (about grade export and conditions).

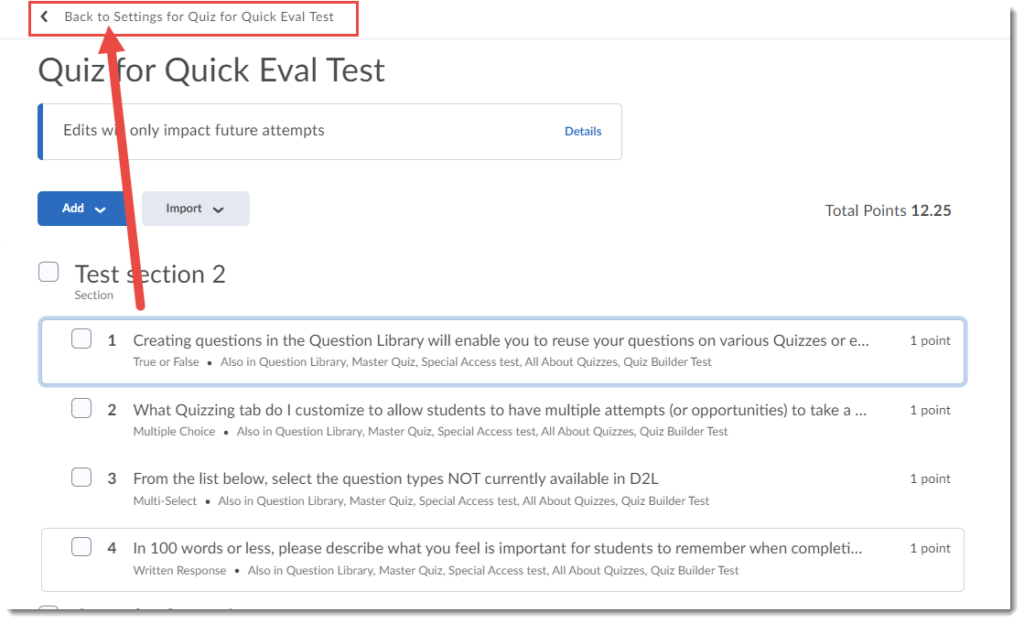
When this setting is selected, learners who attempt a quiz more than once can only answer questions that were incorrect on the previous attempt.  You will find this setting under the Assessment tab when editing a quiz, and here is what this setting looks like:

Retake Incorrect Questions Only setting

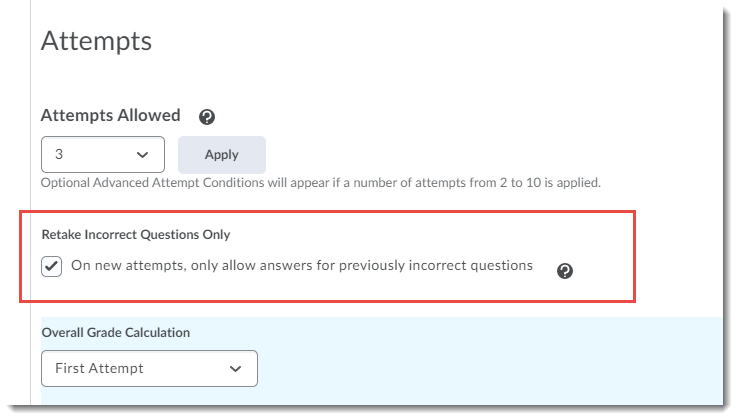
Some things to note:

First, if you are sending the grade from the quiz to the Grades tool, choosing First Attempt will ensure that the grade does not change when a student completed a second (or third, etc.) attempt. If you choose Highest Attempt, the system will add the grades from the first and second attempt (etc.) together, for example if the student received 2/5 on the first attempt, and answered 2 more questions correctly on the second attempt, they will receive 4/5 in the gradebook. If you choose Average of all Attempts, each subsequent attempt will mean a new average will be generated, for example if the student received 2/5 on the first attempt, then answered 1 more question correct on the second attempt, their grade in the Grades tool will change from 2/5 to 2.5/5.

Second, if you conditionally release other activities to a Quiz grade, that condition will be dependent on how you have set the grading for the attempts. So, if a student gets 2/5 on their first attempt, and the First Attempt is set as the overall grade for that quiz (whether or not it is sent to the Grades), and if a release condition is set for completion of that quiz with a mark greater than 60%, this student will never be able meet that condition, even if they eventually get a 4/5 on a subsequent attempt.

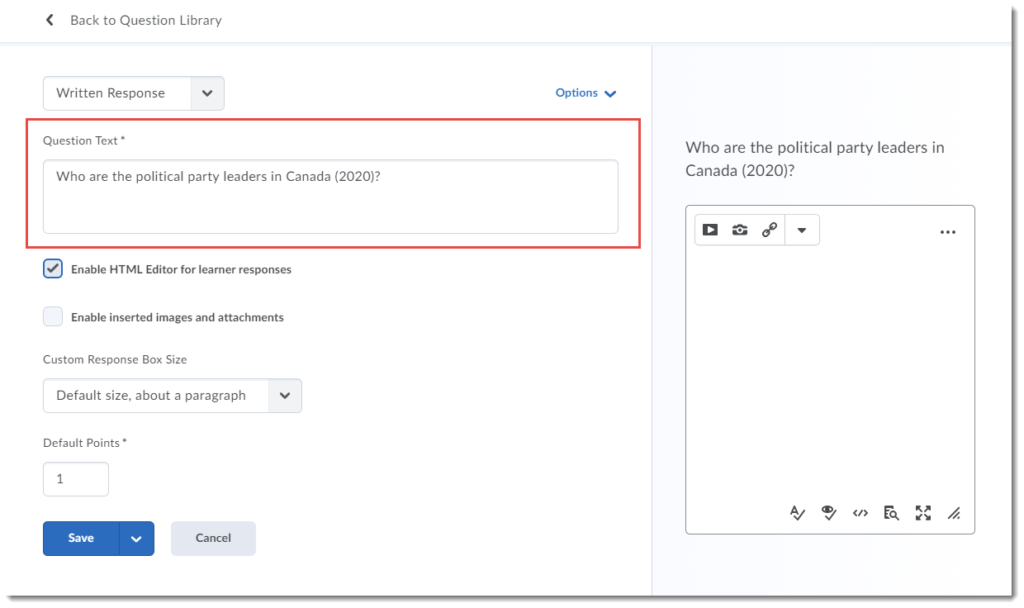
Third, if you include Written Response questions, they will be marked as 0 and included in future attempts until they are graded manually.

Finally, while this may seem like a good setting for self-assessment quizzes, sometimes it’s better to let students do all the questions multiple times as they may have gotten an answer correct accidently the first time, and this setting will not present that question again.

Questions?  Contact eLearning@camosun.ca to book an appointment with an instructional designer

Rubrics in D2L

I wanted to take a moment to update you on where we are at as we begin to create new tutorials for the Rubrics tool in D2L.

Rubrics in D2L can be attached to Assignments, Discussions, or Grades.  When you integrate a Rubric in D2L, the grade you assign on the Rubric automatically becomes the grade for the assessment it is attached to.

There are 2 kinds of Rubrics you can set up in D2L:  Holistic and Analytic.

  • Holistic – Performance is assessed holistically, LEVELS only, with multiple criteria being assessed at once.  For tasks where it is not easy to evaluate performance on one criterion independently of performance on a different criterion. For example, many writing rubrics are holistic because it is not always easy to disentangle clarity from organization or content from presentation.
  • Analytic – Most rubrics are analytic. An analytic rubric breaks performance into multiple criteria. You assess each criterion separately, resulting in an overall assessment score. For example, an analytic rubric for assessing essays could have separate criterion for spelling, grammar, and expression.

Note that once a Rubric has been attached to something (assignment, discussion, grade item) it can NOT be deleted!

So far, we have finished 3 rubric tutorials (which can also be found on our Tutorials site).  Check them out here as well!

Have questions about rubrics, want to know how to add your own rubrics to D2L, or just need some help?  Contact eLearning@camosun.ca to arrange for a consult with an instructional designer.

Some Changes Coming to Camosun’s D2L

Camosun College is updating its integration with the Colleague student information system. Faculty and Students will notice changes to some of the D2L communications tools as a result of this update.  And there are also some exciting (and long awaited) changes coming up!!

January, 2021

Email

As of January 2021, the D2L Email tool will be limited to student-instructor communications only. Students will no longer be able to communicate with each other through this tool. This change has been made in order to protect students’ personal information.

Students will continue to have access to their historical emails but will not have the ability to reply to or forward those messages.

Messenger

Students will have access to a new Message tool in D2L that will enable students to connect with other students from within D2L. The Message tool has replaced the existing Pager tool.

Audio Note (the Record Audio button)

Audio Note recording time has now been increased to 5 minutes.

March, 2021

“Chosen names” for students and faculty (also sometimes called “preferred names) will be available in Colleague and will cascade into the D2L Classlist.

Data updates between Colleague and D2L will occur in real time (meaning that if a student registers late, they will immediately have access to D2L and not have to wait until the next day).

Summer, 2021

An option to export grades directly from D2L to Colleague will be available.  More information on this change will be available closer to its availability – stay tuned!

Help?

The tutorial for how to use the Message tool is now available on the eLearning Tutorials at Camosun site.

For more information or questions, contact eLearning@camosun.ca.

Using Short Answer versus Written Response Questions in D2L

There is often confusion in the world of D2L Quizzes: when to use Short Answer questions, and when to use Written Response questions.

To sort out this confusion a bit, thinking of Short Answer questions as questions with one or two word answers. Not sentences! This is because Short Answer questions are set up to be graded by D2L, and it is very hard to accommodate the number of potentially correct answers if there are more than two words.

In the example here, we have two possible answers listed, one with two words (Justin Trudeau), and one with just one word (Trudeau). Use a Short Answer question for this kind of question.

Short Answer question

Have a question that requires a longer response? Use a Written Response question. The downside is that you need to grade Written Response questions yourself, but if you use a Short Answer question for multi-word answers, you will likely need to grade those questions yourself anyway since students will likely give correct answers you have not accounted for.

In the example here, we are asking a question that would require multiple words which could be presented in any order, making it impossible for the system to grade easily. Use a Written Response question for this kind of question.

Written Response question

If you have questions or want to run a scenario past an instructional designer in eLearning, email elearning@camosun.ca to arrange for a consult.

New feature coming to Quizzes – Import from Question Library into Quiz Section

As some of you may know, the newer Quiz Creation interface has at least one feature that has been driving me personally crazy:   If you create a Section in a Quiz, you can’t import questions from the Question Library directly into that Section. Right now you have to import questions into the root directory (the main page) of the quiz, and then move them into a section. How cumbersome.

Well, no more!

In our next upgrade, happening at the end of this week, you will be able to import questions from the question library into a Quiz Section. Here’s how:

  1. Go to the Quizzes tool in your D2L course, and go to Edit a Quiz.
  2. On the Properties tab, click Add/Edit Questions.

    Click Add Edit Questions

  3. Make sure you have added at least one Section (Add a Section).
  4. Click Import and select Browse Question Library.

    Browse Question Library

  5. Select the questions you want to import into your Section in the quiz, then click the arrow next to Import and select Import to Section.

    Import to Section

  6. Select the Section you want to import the questions to. They will automatically be imported into that section.

    Select section

  7. Finish adding questions to your quiz, then click Back to Settings for Quiz …

    Go back to Settings

  8. Finish creating your quiz, and click Save and Close.


eLearning Tutorials – updates and new tutorials being added this month!

This month is “Update eLearning Tutorials and Add New Ones” month for our eLearning Tutorial site (and the On-Demand Training D2L site). We will be updating and adding new tutorials for the next several weeks, so check back on a regular basis.

For example, this week we have been working on a new structure for our D2L tools tutorial pages, and updating/creating new Assignment tutorials. Find out more at eLearning Assignment Tutorials.

And now, I wanted to showcase one of our new tutorials here, which will introduce you to a new Assignment Creation Experience which is available for opt-in in Camosun’s D2L right now. This interface will eventually replace the current interface, so I encourage you to try it out and let us know if you have any comments or problems that we can pass on to D2L.

Using the New Assignment Create/Edit Experience – D2L Tutorial

This tutorial is for faculty who have previous experience using D2L and will cover the basic steps involved when you wish to create an assignment submission folder using the New Assignment Create/Edit Experience interface (opt-in as of August 2020).. For further information, please contact elearning@camosun.ca for assistance.

Steps

  1. Go to the Assignments tool in your course (e.g., through the My Tools drop-down).
  2. Click New Assignment.
  3. You will be given the option to turn on the new Assignment Create/Edit Experience. Click Turn it on to enable it.

    Turn on the new assignment create/edit experience
    If you have previously clicked Leave it off, you can turn it on by clicking the arrow at the top right, and clicking turn it on.

    Click arrow to find the enable settings

  4. The new creation interface consists of a main area, a side panel, and a bottom set of buttons.  We will look at each area in turn.

    New Creation/Edit interface

  5. First, the main area. You will need to give your assignment a Name. You can then choose to add a Score Out Of and a Due Date. When you click Score Out Of, you are given the option to connect your Assignment folder to or disconnect it from a Grade Item (Choose from Grades, Remove from Grades, or Reset to Ungraded). You can then add instructions into the Instructions box.

    Add Name, Score, Due Date, Instructions
    Under the Instructions box are options to add additional items such as an instructional document or a template file (File Upload – the first icon), Attach Link to Existing Activity in D2L such as a Content page (the second icon), Attach a Weblink (the third icon) or Record Audio instructions (note that the Record Video option is currently not enabled at Camosun).

    Upload file, attach activity or web link, record audio instructions

  6. Availability Dates and Conditions allows you to set a Start Date (which opens the Assignment folder) and an End Date (which closes the Assignment folder). As of the August upgrade, you will also be able to attach Release Conditions to the Assignment folder. Special Access is not yet available in the new interface, so if you have students needing special access, you will need to return to the old interface.

    Availability Dates & Conditions

  7. Submission and Completion allows you to set the Assignment folder as an Individual or Group Assignment, and to add your preferred Assignment and Submission Type settings.

    Submission & Completion options

  8. Evaluation and Feedback allows you to attach a Rubric, and select or deselect the Annotation Tools setting.

    Evaluation & Feedback options

  9. Finally, at the bottom you can save your changes, or toggle to make the Assignment folder Visible or Hidden.

    Save, or Hide

Things to Remember

You can turn off and on the New Assignment Create/Edit Experience as needed, but be aware that eventually this new interface will become the default. New features will be added to this interface over the next few months.

Once you have turned on the new experience, any old assignments you have in your Assignments area will open it automatically when you go to edit them.