Complex Images and Accessibility – Portland Community College Website

When adding images to your documents or web pages/WordPress pages, to meet best practices around accessibility you need to add appropriate descriptive text to your images so that learners who can not see the images have an alternate way to access the images.  But adding text to images can be tricky when you are dealing with more complex images like graphs, maps, diagrams, charts, etc.

This Complex image Accessibility site (which opens in a new tab or window) from Portland Community College has some excellent guidelines for how to make complex images accessible to all.

Managing the Chatroom in Blackboard Collaborate Ultra in D2L

This tutorial is designed for faculty who have previous experience using D2L and Blackboard Collaborate Ultra, and will cover how you can manage your Blackboard Collaborate Ultra (BBCU) session Chatroom. For further information, please contact desupport@camosun.ca for assistance.

Steps

  1. Go to the location in your D2L course site where you have linked to your Blackboard Collaborate Ultra room (for example, in the Content tool), click on your Blackboard Collaborate Ultra session and enter your session.
  2. Open the Collaborate panel (the bottom right icon).

    Open the Collaborate panel

  3. Click the Chat icon.

    Click the Chat icon

  4. Moderators will be able to chat to Everyone or to Moderators only. Participants will be able to chat to Everyone, and may also be able to Private Chat another participant if the Moderator has not disallowed that function. Click Everyone to chat to the whole group.

    Click Everyone

  5. Type your message in the Say something box and hit Enter. Click the down arrow to select an emoji to add to your message.

    Type your message

  6. To toggle from Everyone to Moderators (or to chat with an individual) click the back arrow next to Everyone.

    Click the arrow next to Everyone

  7. To find a specific person to private chat with, start typing their name into the Find someone to chat with box, select them, and hit Enter.

    Find someone to chat with

Things to Remember

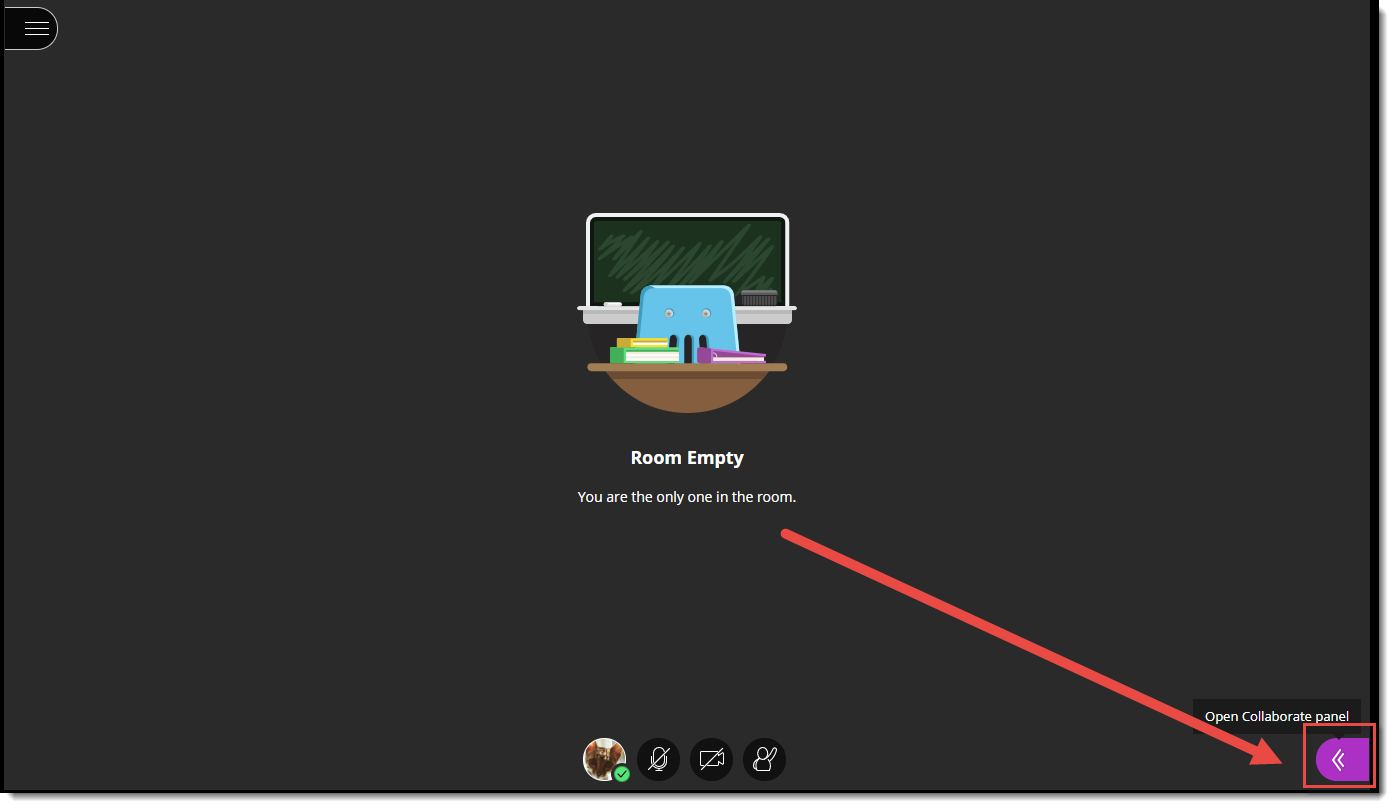
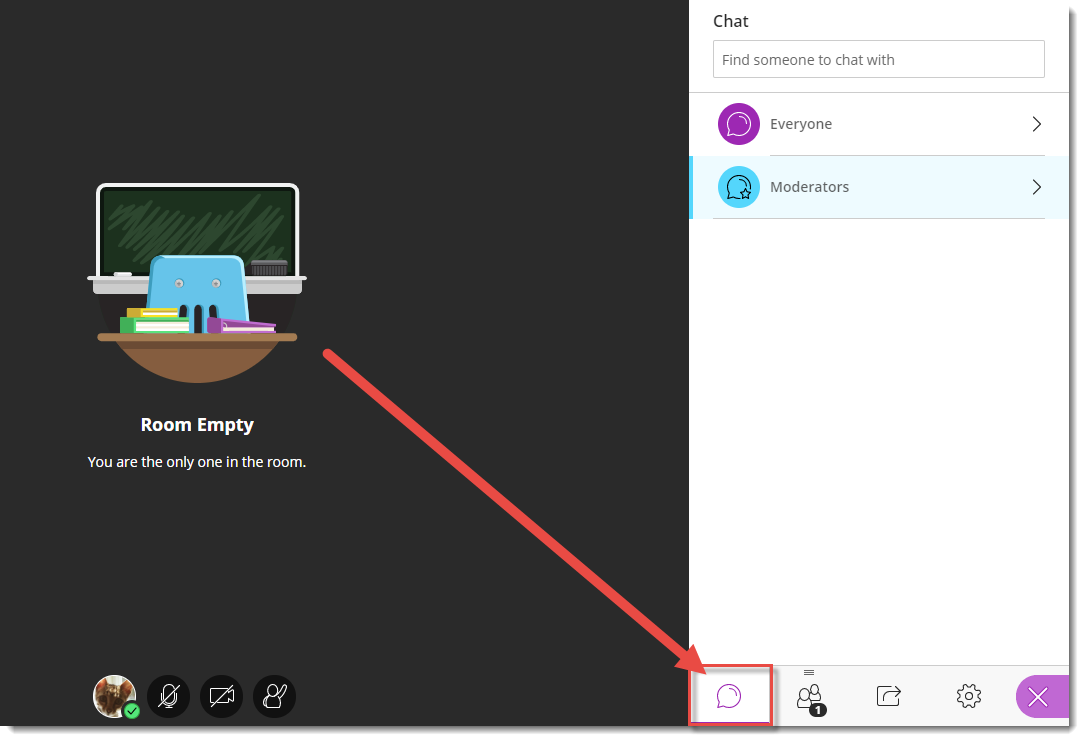
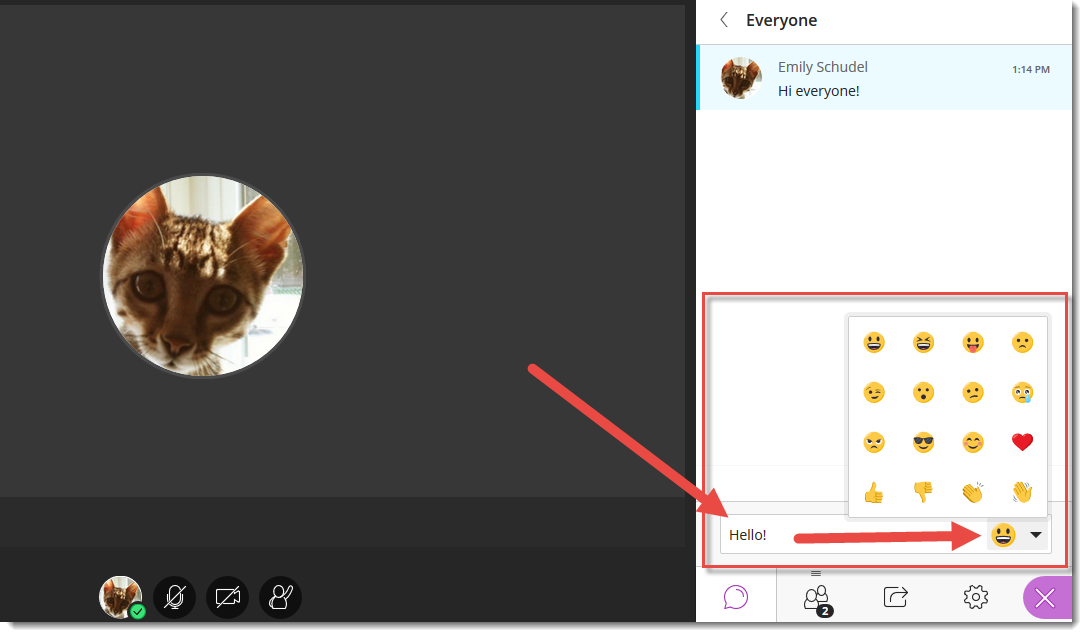
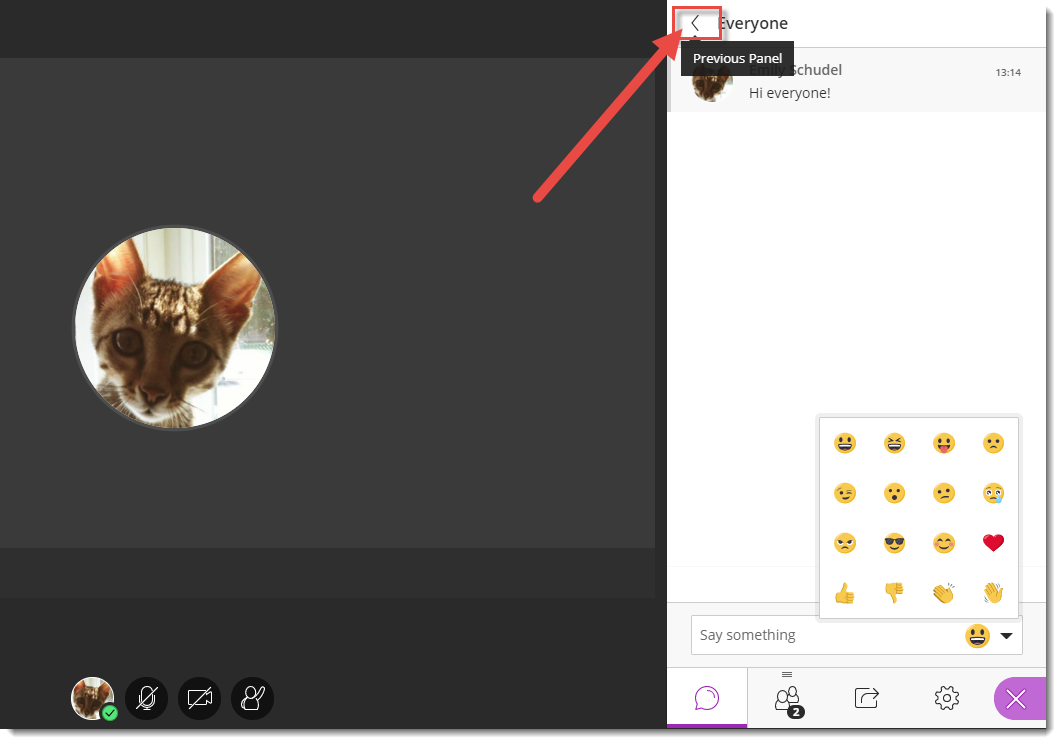
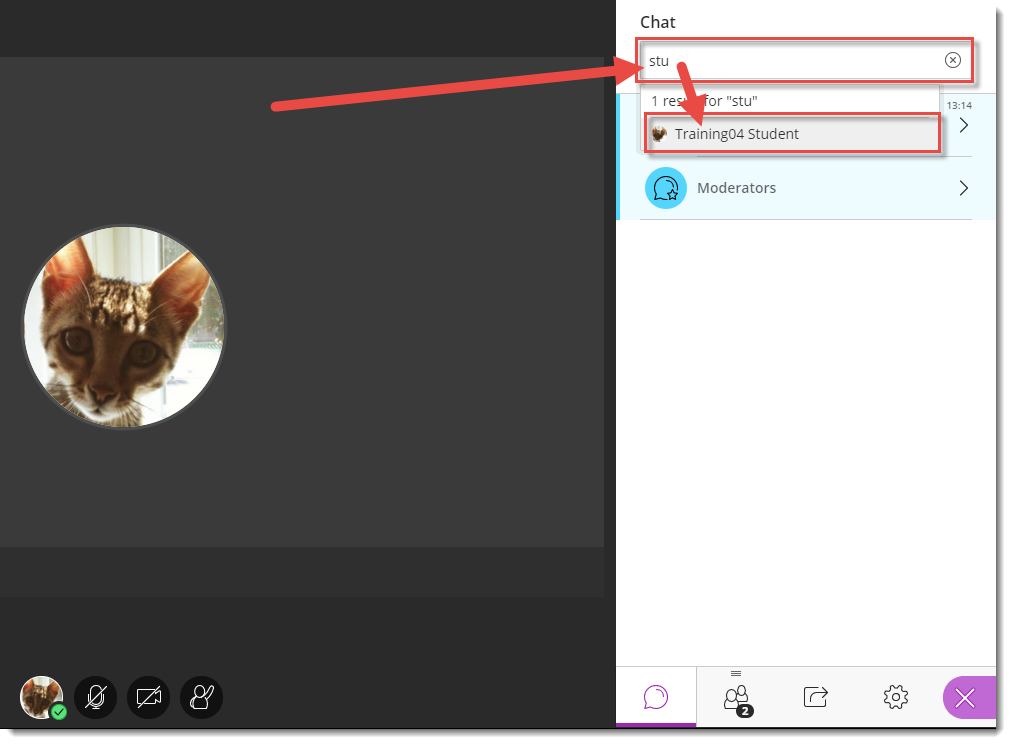
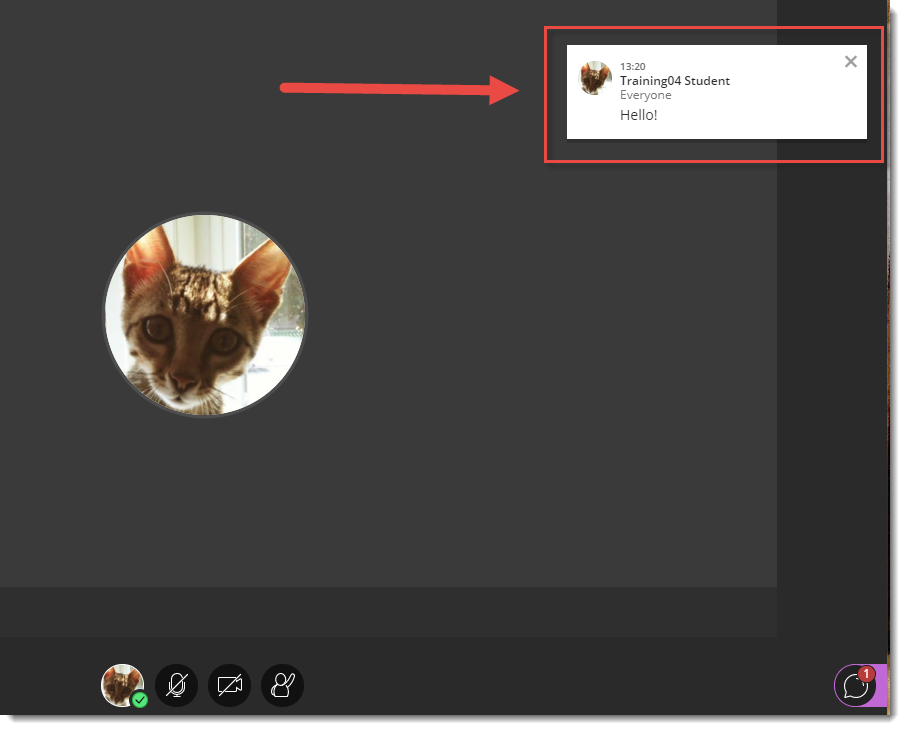
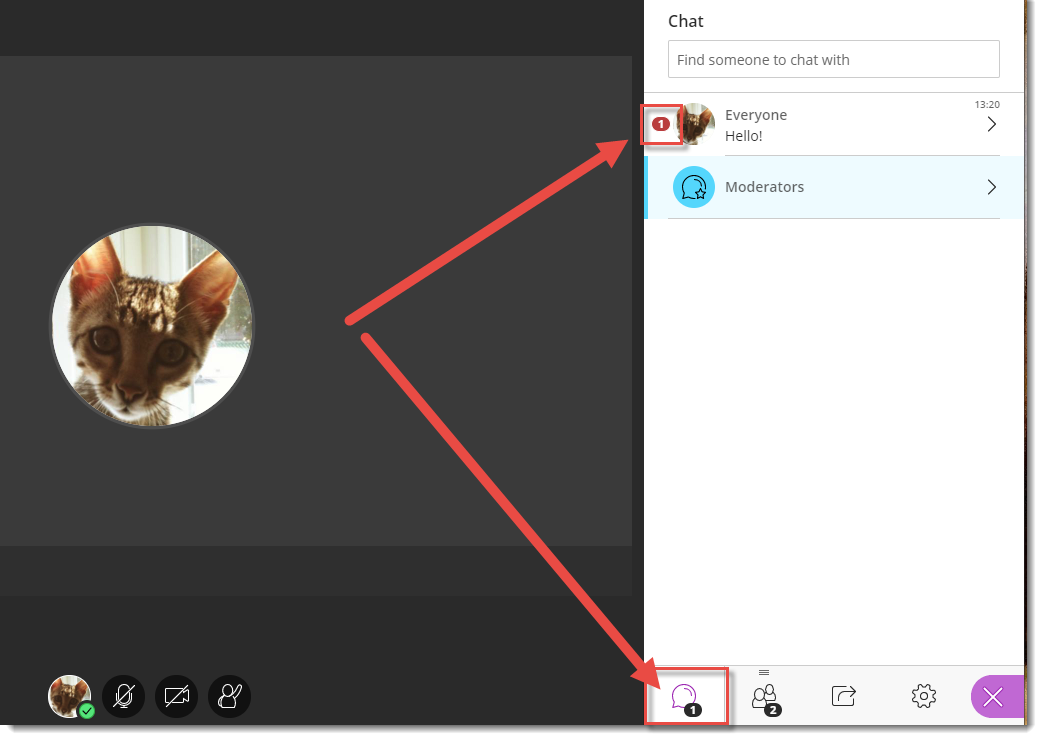
If the Collaborate panel is closed while you are facilitating your session, chat messages will pop up in the main window, and if your Collaborate panel is open, but NOT on Chat, chats will register as numbers at the bottom of the Collaborate panel next to the Chat icon.

Chat messages pop up Numbers appear next to Chat

CC-BYThis content is licensed under a Creative Commons Attribution 4.0 International Licence.Icons by the Noun Project.

Reminder of where to get help to get ready for January

Looking for help with setting up your final grades, etc.? Getting ready to set up your courses for the Winter term? eLearning is here to help.

We have drop-in times at Interurban in LACC251J on Fridays from 11:30am-12:30pm and in December, on Tuesdays and Thursdays from 10:00am-12:00pm.  And don’t forget, you can also schedule one-on -one consults with an instructional designer at either campus.

Email desupport@camosun.ca to book an appointment today!!

Creating PowerPoint Presentations with Voiceover in Kaltura Capture in D2L

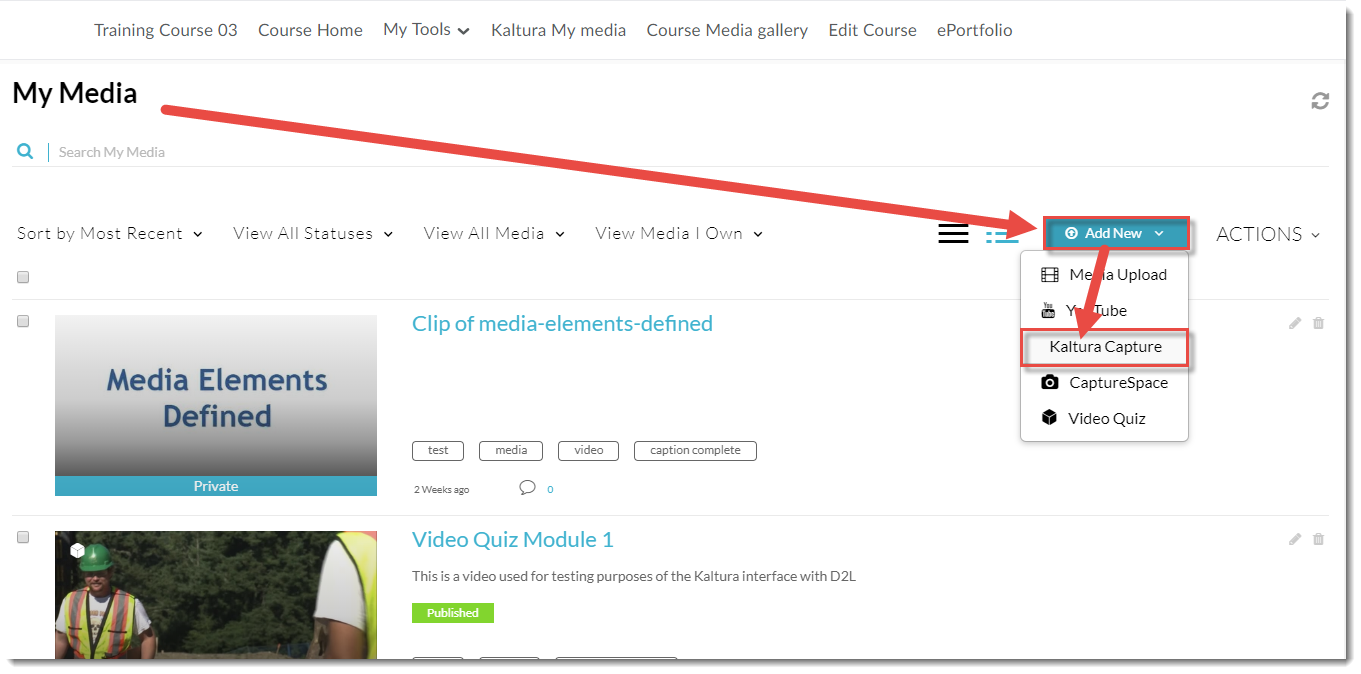
This tutorial is designed for faculty who have previous experience using Kaltura in D2L, who have already downloaded Kaltura Capture, and will cover the steps involved when you wish to record a PowerPoint presentation with voiceover using Kaltura Capture through D2L. For further information, please contact desupport@camosun.ca for assistance.

Steps

  1. Go to your course in D2L.
  2. Go to My media (through the link on your Navbar, or in your My Tools drop-down menu, or in a draft Topic in the Content tool).
  3. Click Add New and select Kaltura Capture, then click Open Kaltura Capture.

    Click Add New and select Kaltura Capture
    Click Open Kaltura Capture

  4. First, open your PowerPoint presentation so you are ready to play the presentation once you start recording.
  5. In order to record a PowerPoint presentation with voiceover, you need to record your Screen and Audio, so in the recorder, click on Camera to turn that feature off (the icon will appear with a line through it).

    Click Camera to turn that feature off.

  6. In the recorder, click Screen and select the screen you wish use (if you have more than one monitor source option on your device), select Full Screen or Select Area (to capture only a specific part of your screen), click Audio and select the audio source/microphone you wish use (if you have more than one microphone option on your device), then click the record button (the big red button on the left side of the recorder). For the purposes of this tutorial, we will select Full Screen.

    Select your screen and audio sources and click record

  7. Click the record button. There will be a 3-second countdown before the recording started (you can click Cancel at any time).

    Countdown clock

  8. When the recording begins, start your PowerPoint presentation, and begin clicking through it while talking about the slides. Click the Stop button when you are finished and want to save your recording, the Pause button to pause the recording, and the X to cancel the recording (this will NOT save it).

    Stop, Pause, Cancel

  9. You can also click the Pencil icon to open the drawing tools options. You can circle, point, add text, and change the colour and size of any of these options.

    Click the Pencil to open the drawing options.

  10. When you click the Stop button, click Yes, Stop it to stop and save the recording.

    Click Yes, Stop it

  11. The recording preview will then appear. You can play the recording, edit the Title, and add a Description and Tags. Click Save to save your changes, Save and Upload to save the recording and upload it to your My Media space, or Delete to delete the recording.

    Recording preview

  12. The video recording will now appear in your Kaltura Capture Library.

    The recording is now in the Kaltura Capture Library

Things to Remember

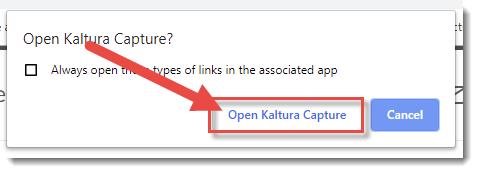
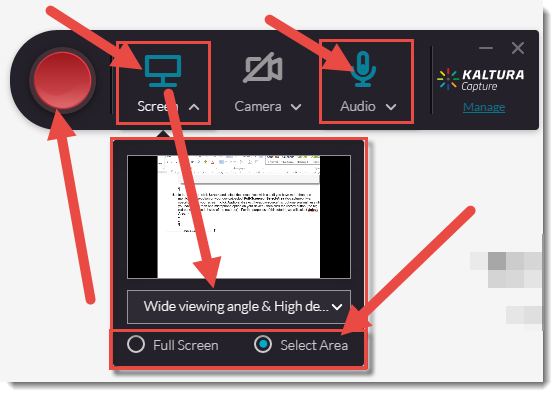
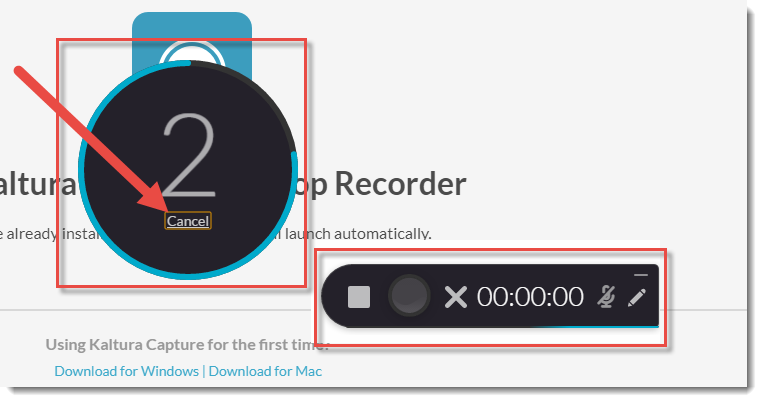
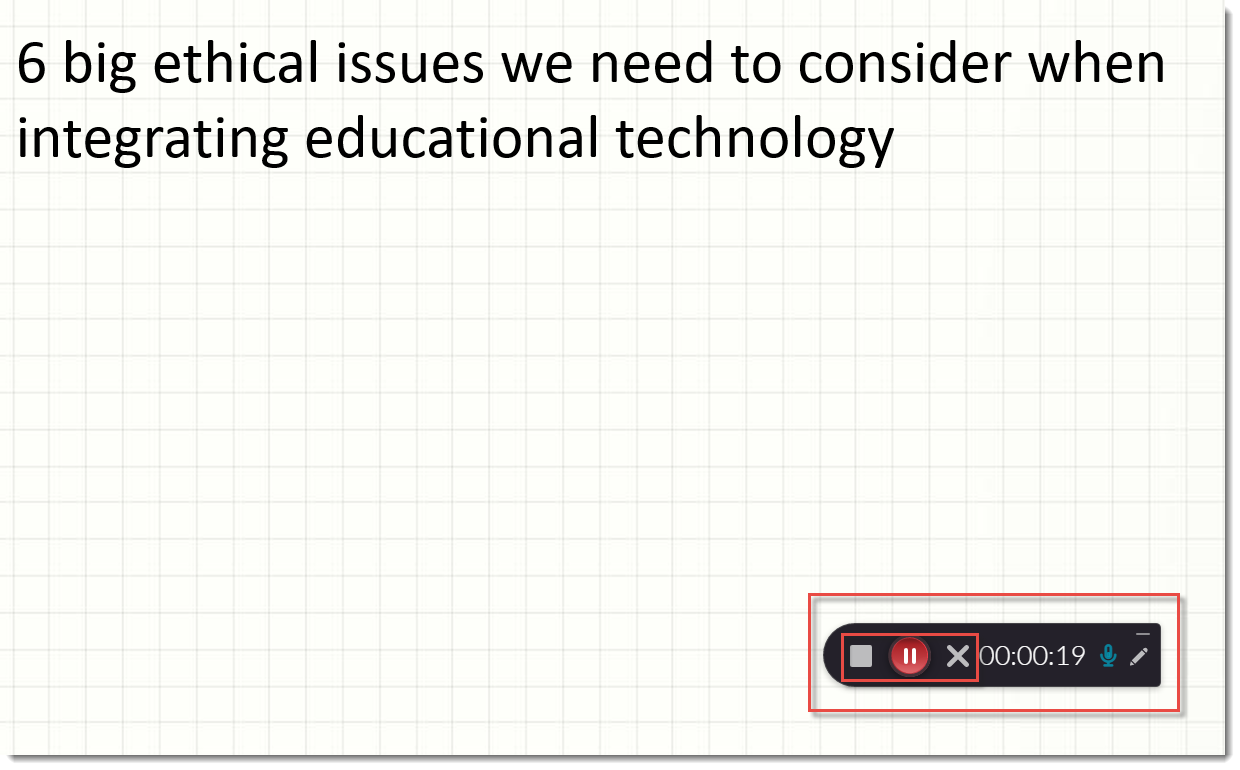
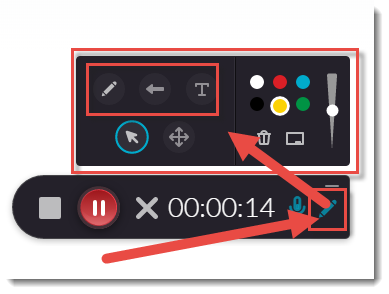
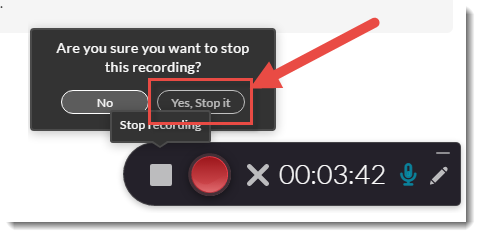
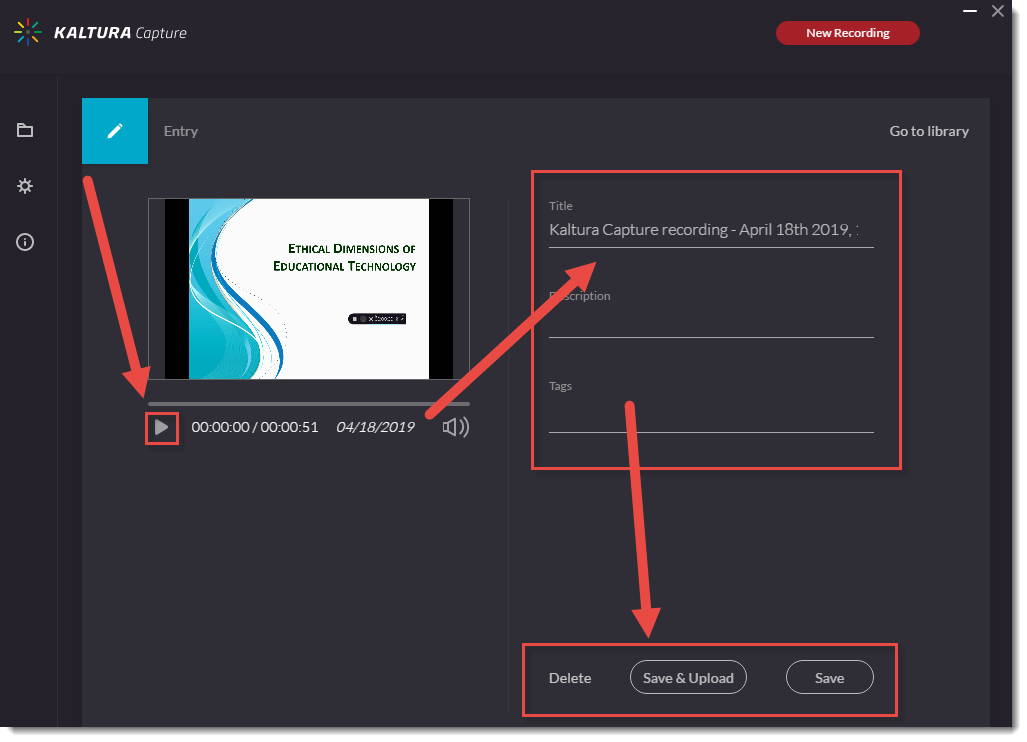
Before starting your recording, make sure to write down what you want to say, and what you will be doing in your presentation – where will you click, what and when will you circle things, what order are the steps, etc.? This is your script, and it will come in handy to keep you on track while you record, and to upload as an attachment with your recording for students who like to read along while they listen.

CC-BYThis content is licensed under a Creative Commons Attribution 4.0 International Licence.Icons by the Noun Project.

Managing Attendees in Blackboard Collaborate Ultra (D2L) – Blackboard Collaborate Ultra Tutorial

This tutorial is designed for faculty who have previous experience using D2L and Blackboard Collaborate Ultra, and will cover how you can manage Blackboard Collaborate Ultra (BBCU) session attendees. Information on how to use individual feature is contained in relevant tutorial documents. For further information, please contact desupport@camosun.ca for assistance.

Steps

  1. Go to the location in your D2L course site where you have linked to your Blackboard Collaborate Ultra room (for example, in the Content tool), click on your Blackboard Collaborate Ultra session and enter your session.
  2. Open the Collaborate panel (the bottom right icon).

    Open the Collaborate panel

  3. Click the Attendees icon.

    Click the Attendees icon

  4. To manage an attendee’s settings, click the Attendee controls icon (the three dots) to the left of their name.

    Click Attendee controls

  5. From here you can:
    1. Send a private chat message to that attendee.
    2. Change the role of that attendee, for example (as shown here) promoting a Participant to Moderator, Presenter, or Captioner status.
    3. Mute the attendee’s microphone.
    4. Remove the attendee from the session/room.

      Manage attendees options

  6. You can also view an attendee’s Internet and audio connection by clicking the Attendee connection icon (to the left of the Attendee controls).

    View Attendee connection

  7. Finally, you can set the Attendee panel to stay open to make it easier to manage your attendees. Click the More Options icon (the three dots at the top of the Attendees panel) to:
    1. Find an attendee (especially useful if you have a large group).
    2. Detach the Attendee panel completely to keep it open.
    3. Mute all attendees at once.

      More Options to manage attendees

Things to Remember

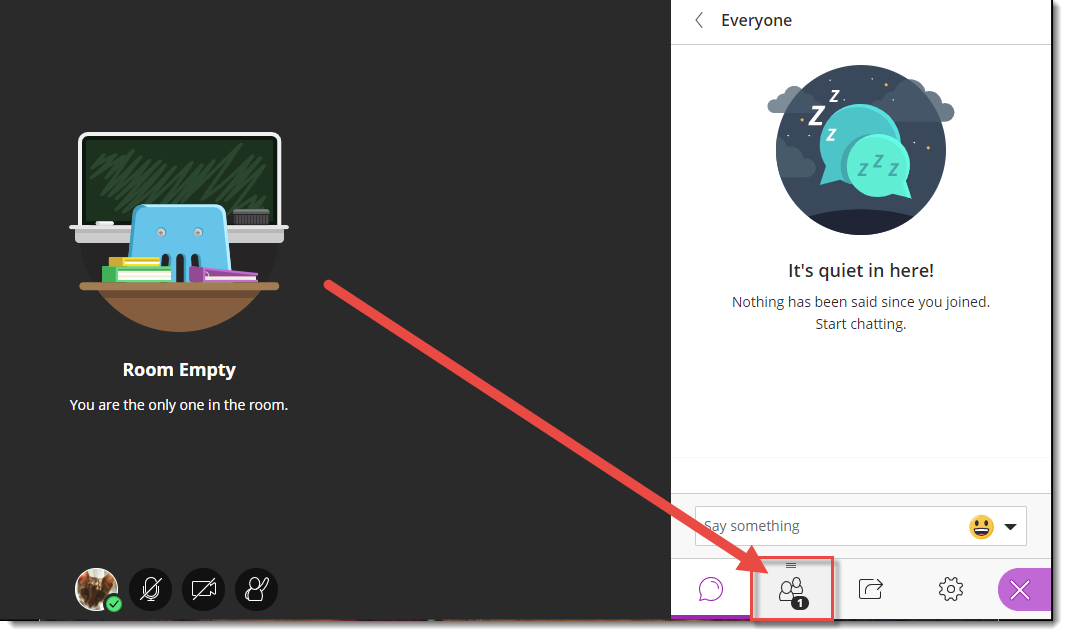
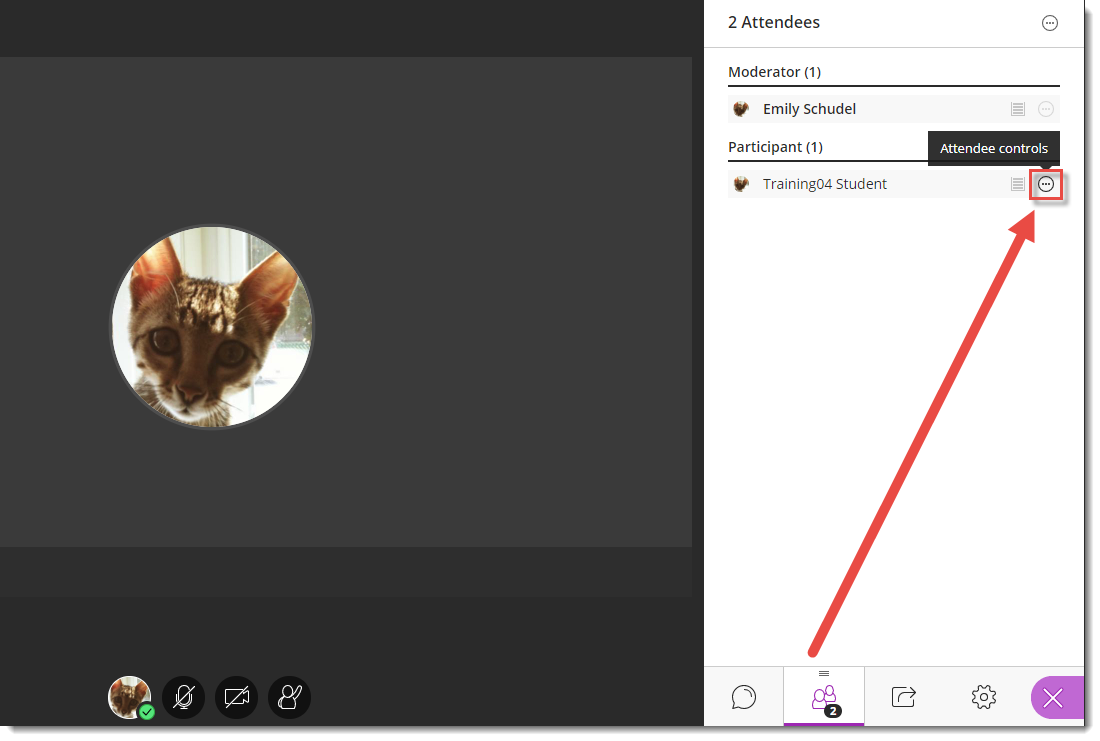
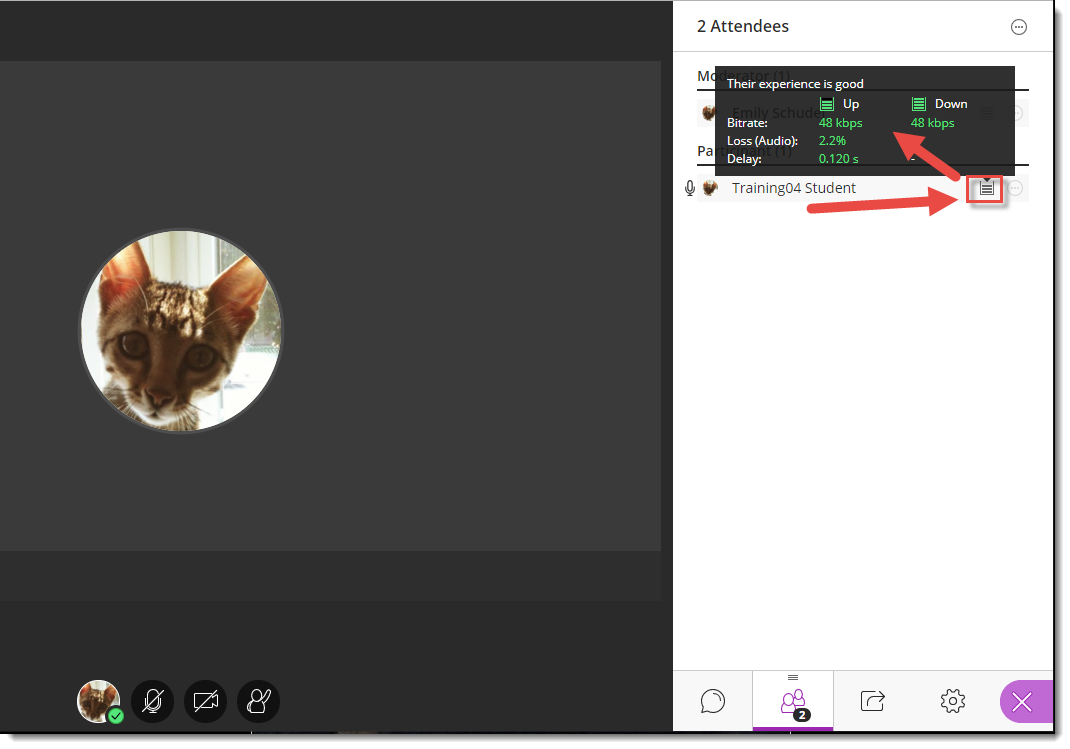
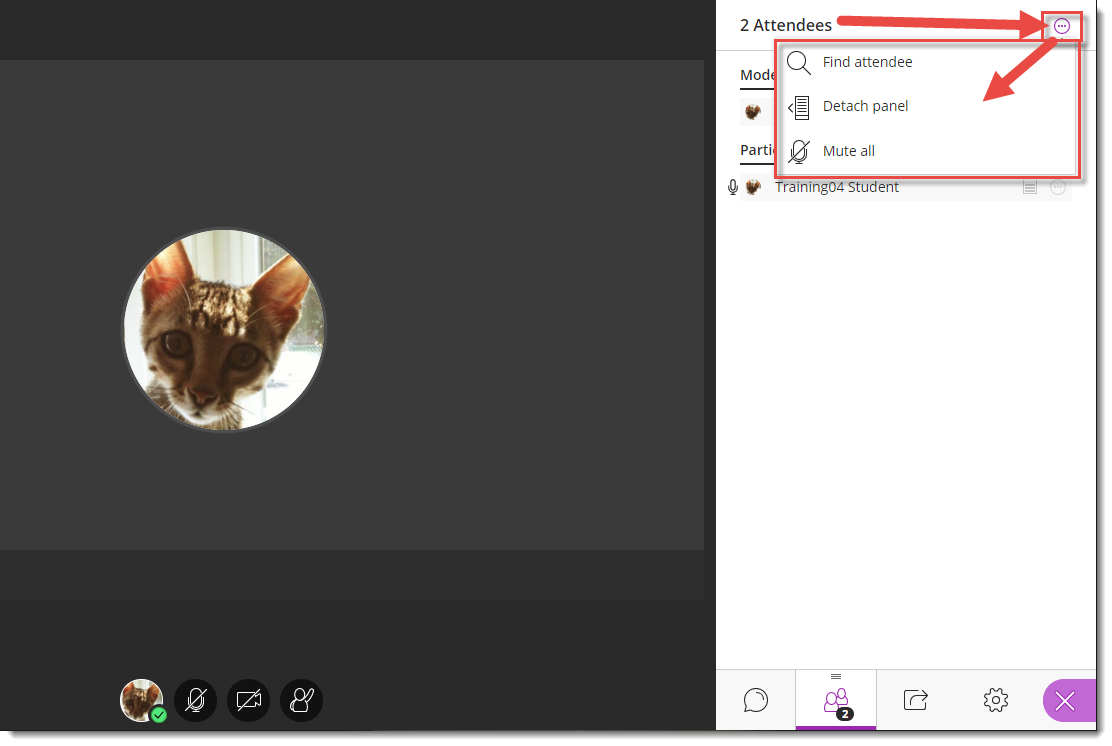
It’s a good idea to recommend to attendees/participants that they mute their microphones upon entering the session, and to remind them they will need to unmute them to talk. That way you don’t have to worry about distractions from a lot of background noise.

CC-BY-SA

This content is licensed under a Creative Commons Attribution 4.0 International Licence.Icons by the Noun Project.

Customizing Student Gradebooks (using conditional release) – a D2L Tutorial

Here’s something that just came up last week for us!

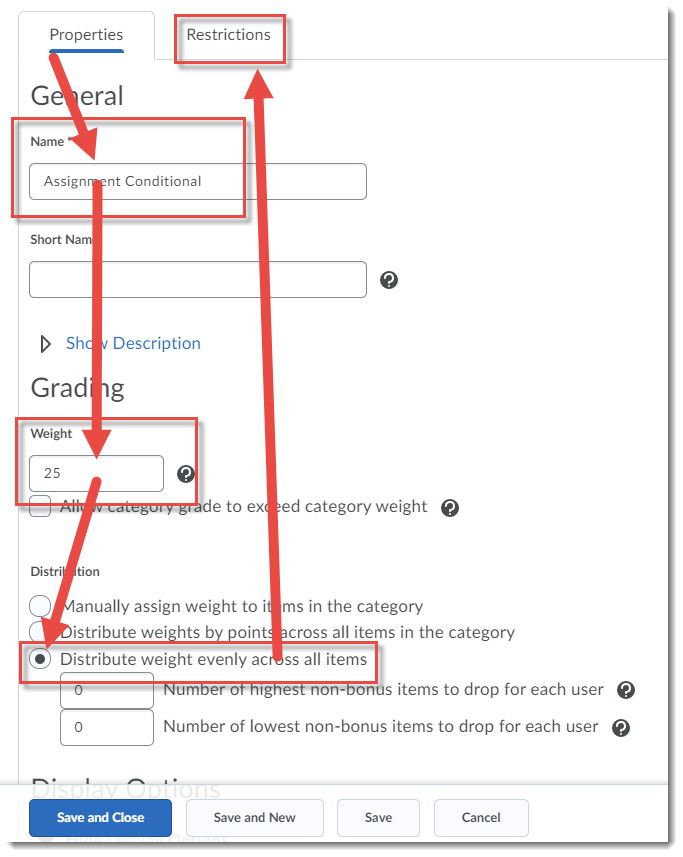
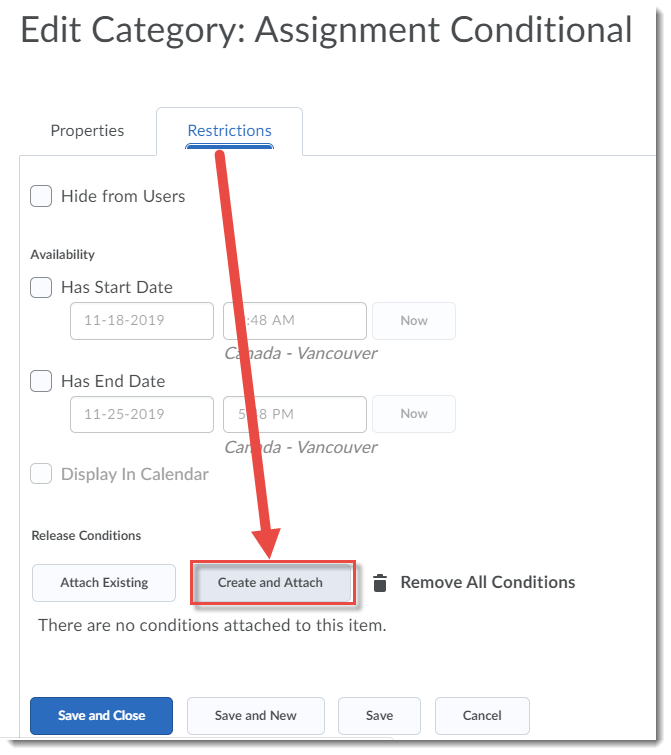
Looking for ways to individualize a student’s gradebook, for example, if they missed the midterm and you want to move 25% of that grade to Assignments, 25% of that grade to Quizzes, and 50% of that grade to the Final Exam? We have a solution for you: Conditional Release.

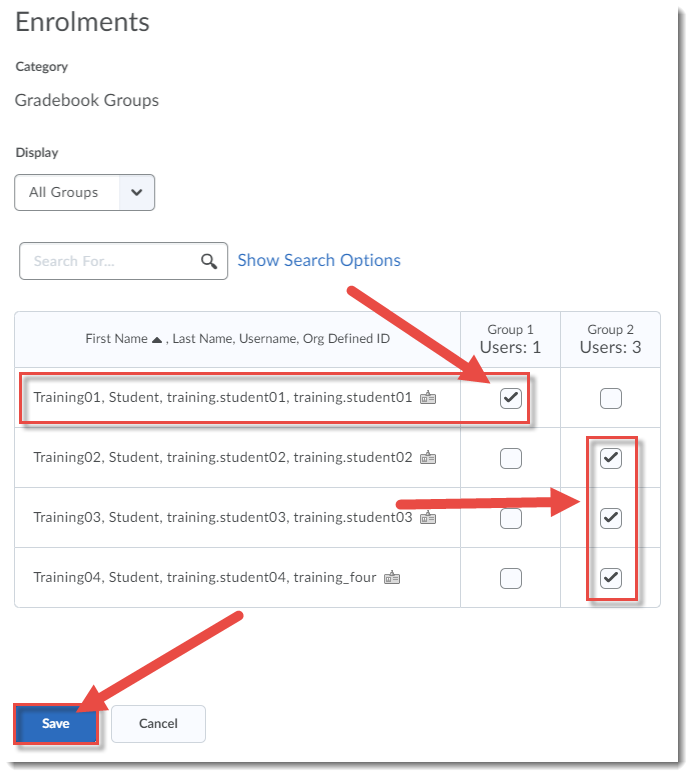
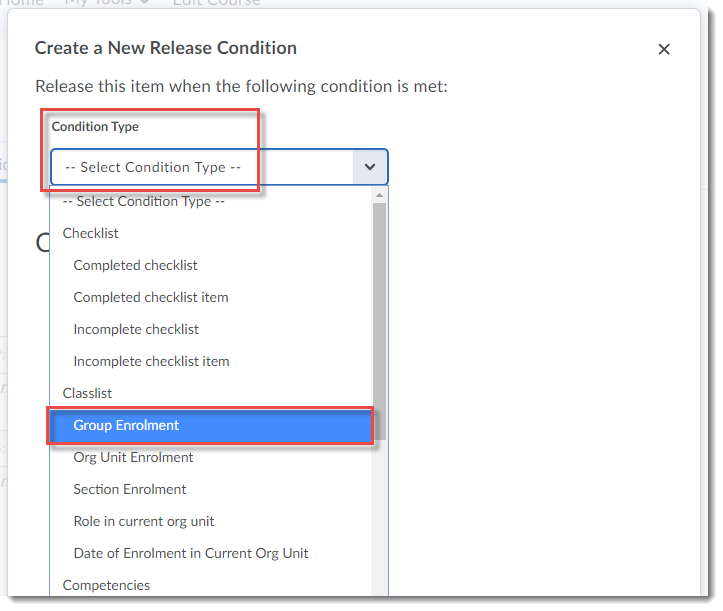
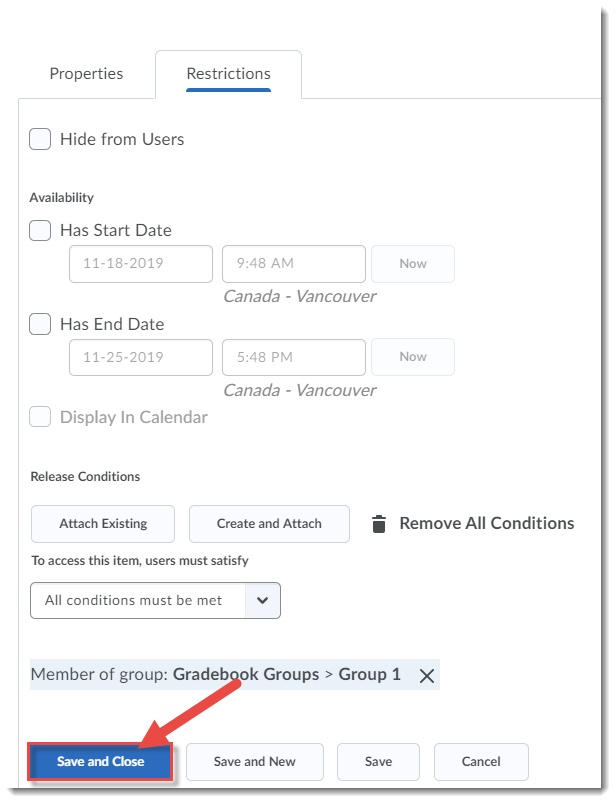
You can’t use Exempt for a situation like this. Exempting a student from a grade item means that item’s weight will be equally distributed across the other items in the gradebook (or in a Category if that item is part of a Category). You can, however, put that student in a Group by herself, and create new items just for them, weighted the way you want them to be. You just need to Conditionally Release all items to the appropriate Groups.

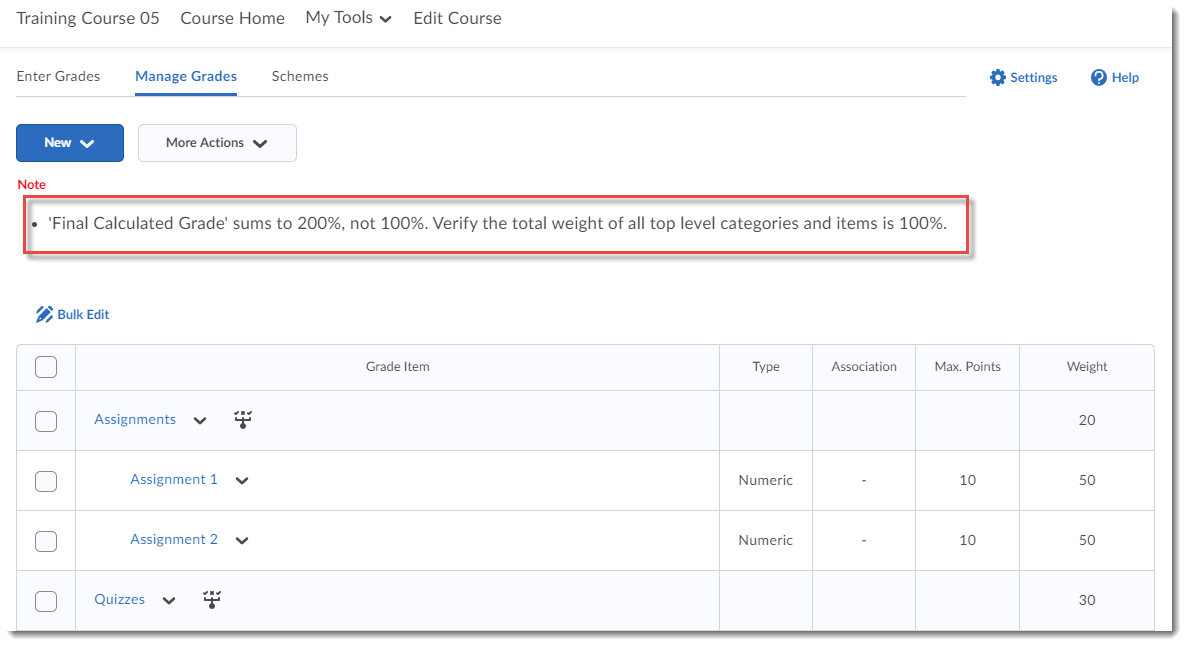
Of course, this will also mean your gradebook will calculate to MORE than 100%, because you will, in effect, have two gradebooks, but your students will only see the grade items they are attached to.

This takes a few steps, and if you are not very comfortable with creating grade items and/or using conditional release options, we recommend you contact desupport@camosun.ca and arrange to meet with an instructional designer to go over the steps with you.

So, let’s begin!

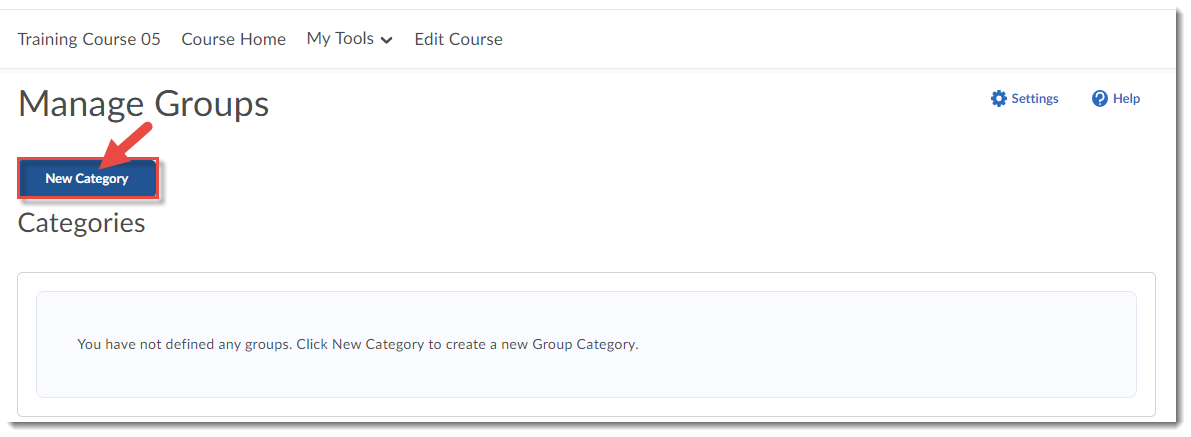
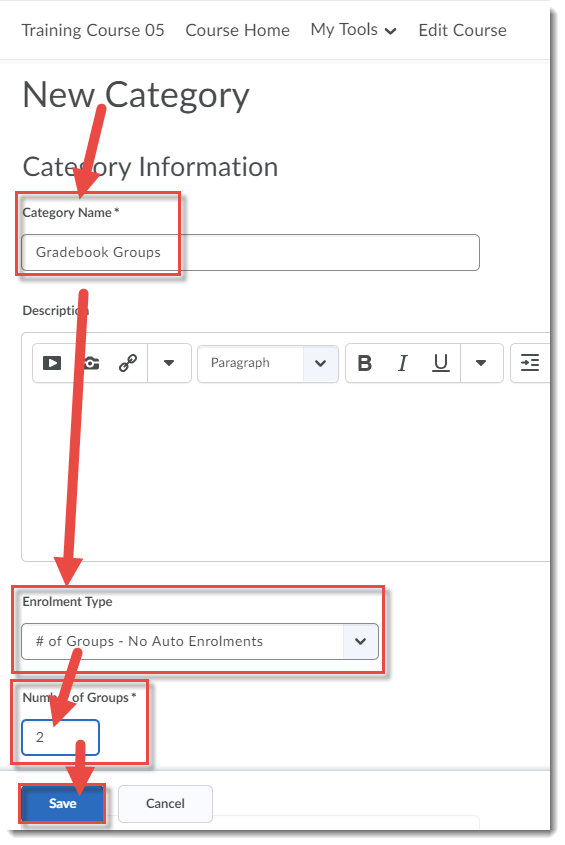
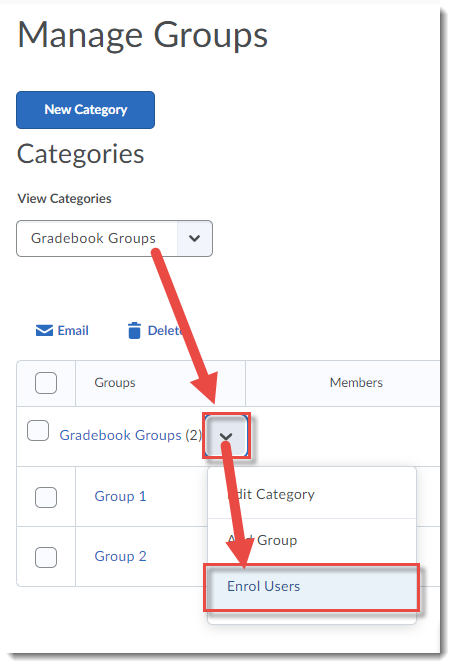
For this scenario, we will be creating Groups, creating new Grade Items/Categories (duplicating most of what is already there), and applying Conditional Release restrictions to each item.

Create Groups

  1. Go to the Groups tool, and click New Category.Click new Category
  2. Give your Category a name (we will call it Gradebook Groups). Select the Enrolment Type # of Groups – No Auto Enrolments, and add the number 2 into the Number of Groups box (we will create one group with one student, and the other group with the rest of the students). Click Save.Create your Group Category
  3. Click the down arrow next to Gradebook Groups and select Enrol Users.Enrol Users
  4. Use the select boxes to place each student into a group – the student you wish to exclude from the Midterm should be in a group on her own. For our scenario, Student 1 needs to be excluded, so we will put her in Group 1, and the others in Group 2. Note: You can rename the Groups by clicking on the Group name. Otherwise you will need to remember which Group contains which students. Click Save.Enrol students into groups and click Save

Create and Conditionally Release Grade Items

  1. Go to Grades.
  2. For our scenario, we will create a new Category/Grade Items for each of Assignments, Quizzes, and Final Exam. We will add the word “Conditional” after each. As we create the Categories for Assignments and Quizzes, and the item Final Exam, we will add Conditional Release to them. I will show this for Assignments, then you can do the rest yourself.
  3. Click New and select Category.Click new and select Category
  4. Add a Name (here Assignments Conditional). The weight will now be 20% + 25% of the 20% Midterm, so add 5% to the Assignments = 25%. For this scenario, select Distribute weight evenly across all items. Then click Restrictions.Create your category settings
  5. Click Create and Attach.Click Create and Attach
  6. Under Condition Type, select Group Enrolment.Under Condition Type, select Group Enrolment
  7. Under Group, select Group 1 (the group your single student was in), and click Create.Select Group 1 and click Create
  8. Click Save and Close. The Assignments in this category will now ONLY be seen by the student in Group 1.Click Save and Close
  9. Repeat steps 4 – 9 for a Quizzes Conditional Category (also add 5%) and a Final Exam Conditional grade item (add 10%). Then make sure to add new Assignment items to the Assignments Conditional category and new Quizzes to the Quizzes Conditional category.
  10. You will now need to edit all your OLD categories and items and conditionally release them to Group 2 so your other students only see those items in their gradebooks. When you are done, your gradebook should total to 200%.Gradebook totals 200%
  11. You should now be ready to re-enter the grades for this student. If you have already entered grades for this student, you will need to MOVE those grades to the NEW grade items so they do not get double the marks (go to Enter Grades, delete the grades from the old items and add them to the new items you just created).

As I mentioned earlier, this may seem complicated – but we are here to help! If you want to go over these steps with an instructional designer, or just ask them to check to make sure your gradebook is setup correctly for your situation, contact desupport@camosun.ca.

CC-BY-SA

This content is licensed under a Creative Commons Attribution 4.0 International Licence.Icons by the Noun Project.

Exempting Students from an Item in a Category: a D2L Tutorial

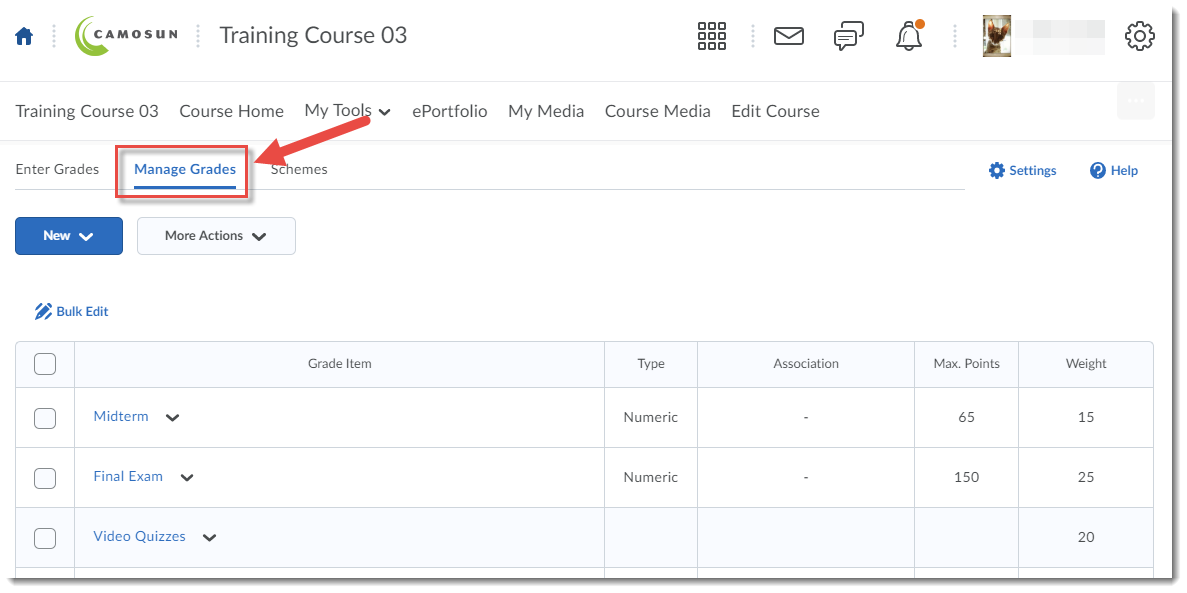
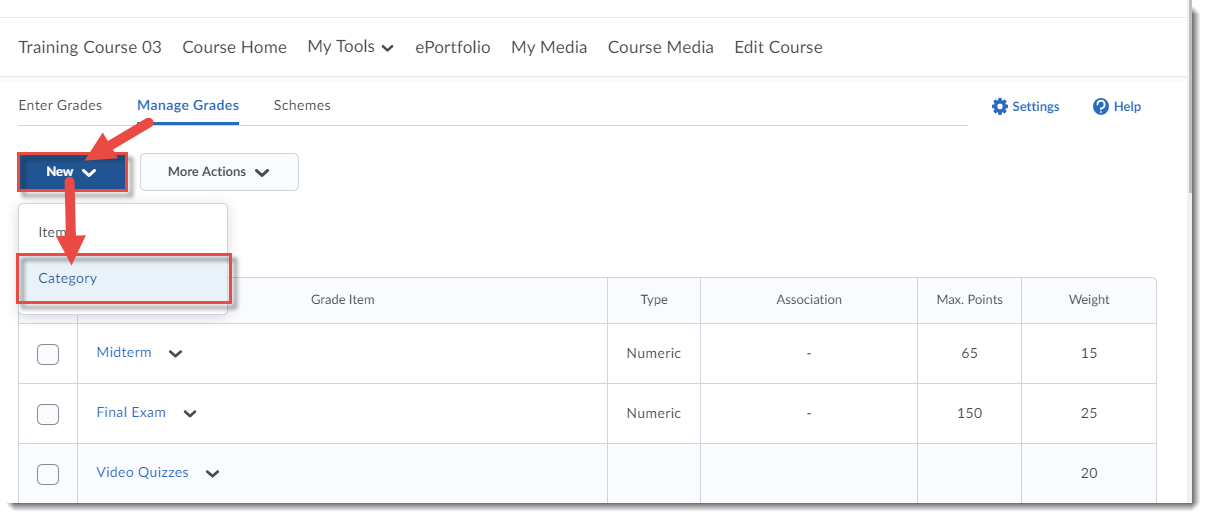
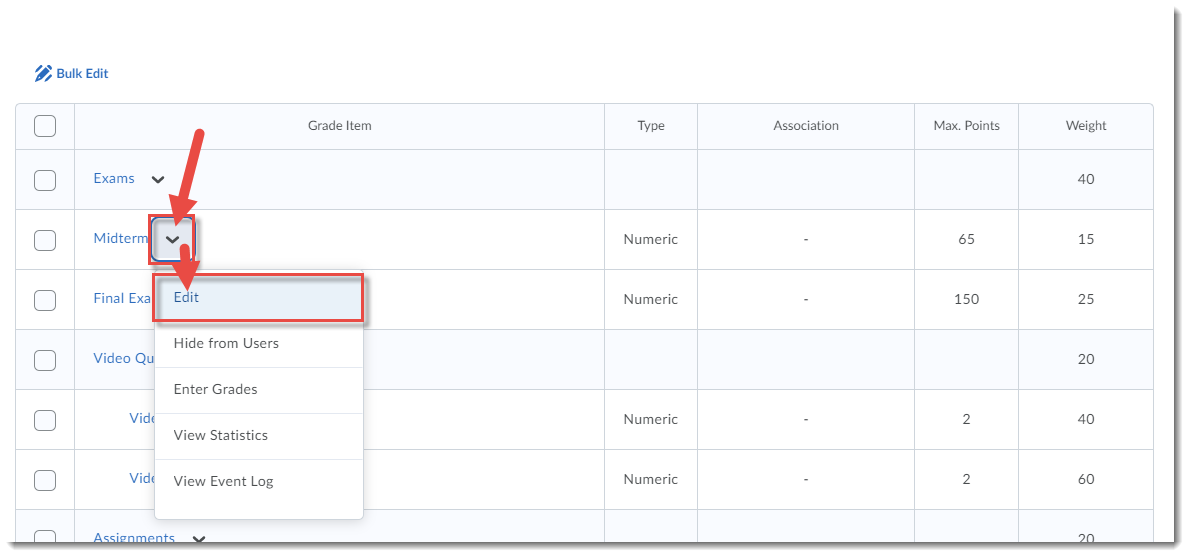
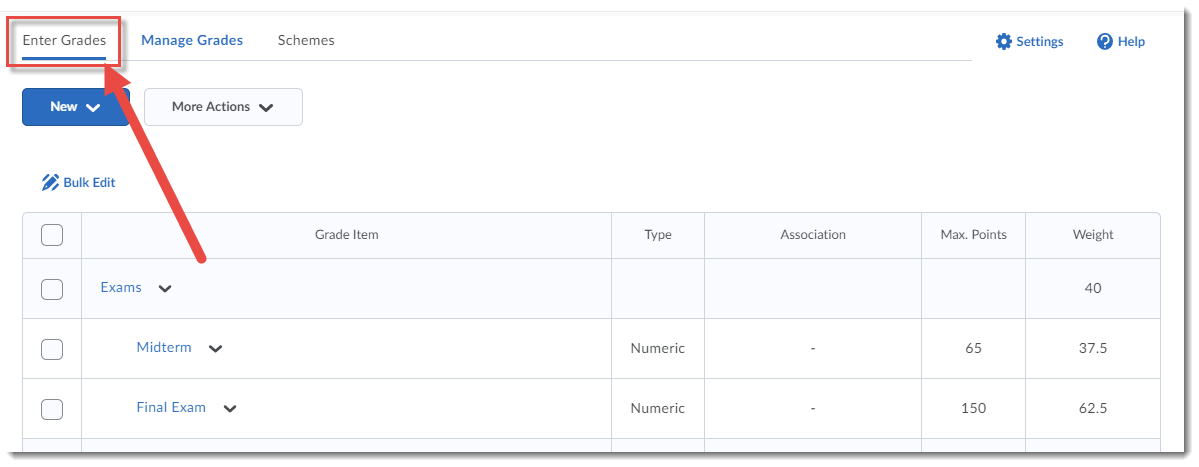
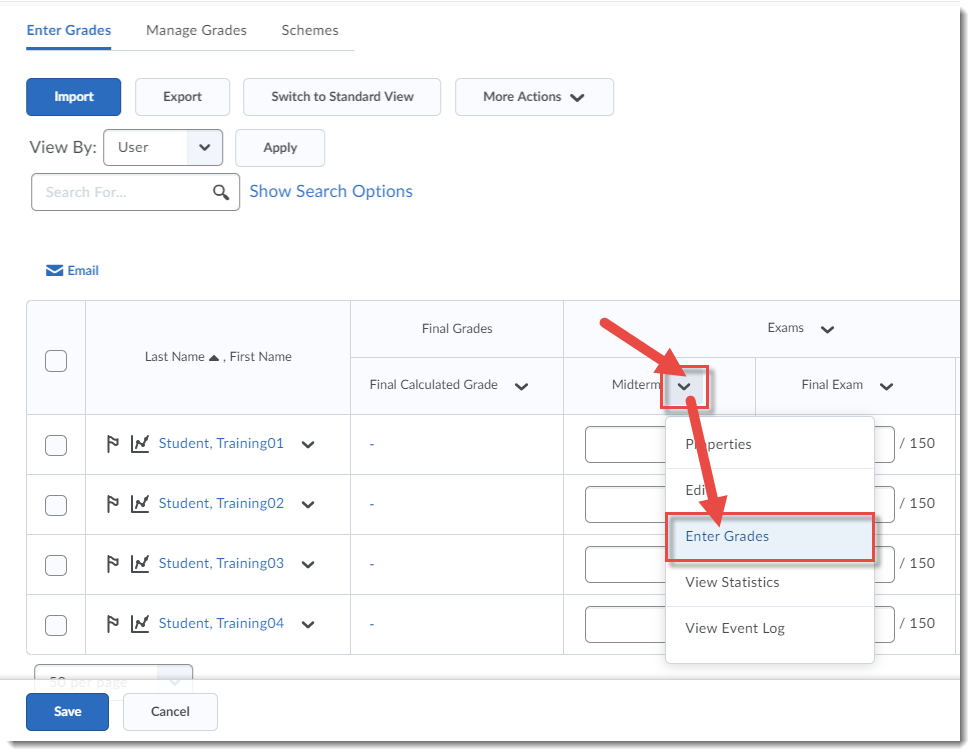
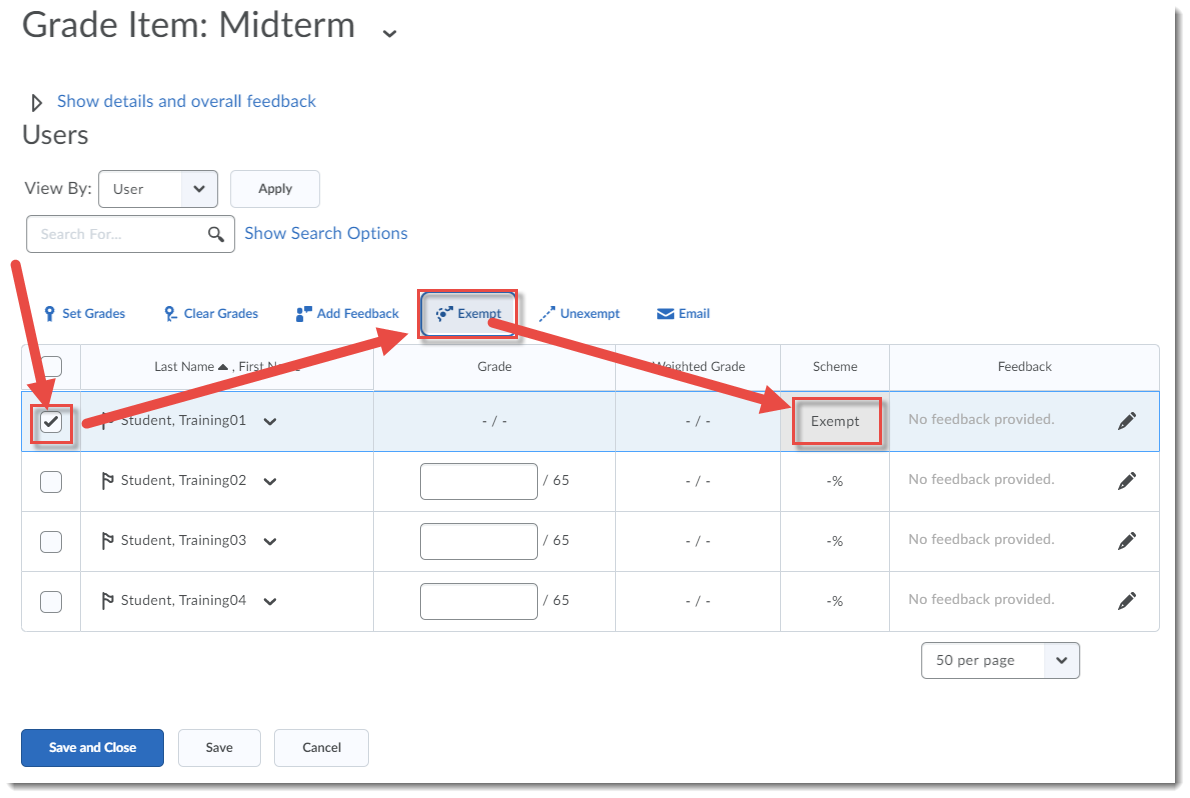
This tutorial is designed for faculty who have previous experience using the Grades tool in D2L and will cover the steps involved when you want to exempt a student from a specific grade item, but have her grade go to another specific grade item (for example, if she missed the Midterm and you want to exempt her from the Midterm and have the Midterm grade to automatically go to the Final Exam grade). For further information, please contact desupport@camosun.ca for assistance.

Steps

  1. Go to the Grades tool in your course, and make sure you are in the Manage Grades area.

    Manage Grades

  2. Create a Category for the items in question, here, the Midterm and Final Exam items – we will call the Category Exams. Make sure the Category weight is the sum of the Midterm (here 15%) and Final Exam (here 25%) weights in the gradebook. Here, the Category weight will be 15% + 25% = 40%. Select Manually assignment weight to items in the category, and click Save and Close.

    New Category

    Set up your Category

  3. Edit each grade item (Midterm and Final Exam) and move then into the Exams Category, setting their weightings accordingly (so that they will still hold the same weight in the gradebook.) For this example, the Midterm should be weighted to 37.5% (15×100/40) within the Category, and the Final Exam weighted to 62.5% (25×100/40) within the Category.

    Edit the Grade Item

    Put items in the Exam Category and reset the weights

  4. When you are ready to exempt the student from the Midterm, go to the Enter Grades area.

    Go to Enter Grades

  5. Click the down arrow next to the title of the item you wish to exempt the student from, and select Enter Grades.

    Enter Grades for an item

  6. Select the student you want to exempt, then click Exempt. The word Exempt will appear in the Scheme column for that student. Click Save and Close.

    Exempt the student from the grade item

  7. In the Confirmation pop-up, click Yes. The selected student will now have a Final Grade calculation which excludes the exempted item.

    Click Yes

Things to Remember

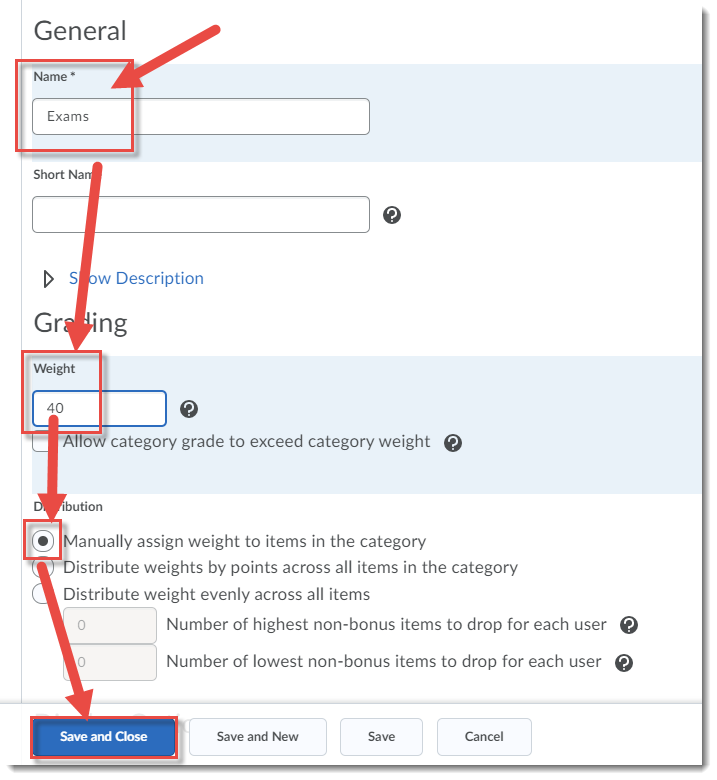
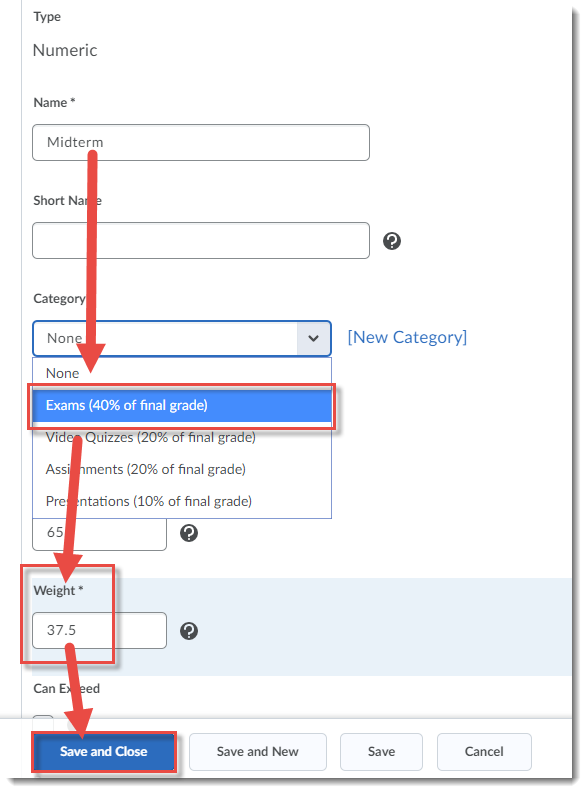
Note that you can move items into a Category at any point during the term – just make sure the calculations are the same and other students won’t see a difference in their grading.

Exempting a student from a grade is not the same as dropping the lowest grade item in a Category. See the tutorial Dropping the Lowest Grade Item in a Category for further information.