CETL Blog

Showing PowerPoints in Blackboard Collaborate Ultra in D2L

This tutorial is designed for faculty who have previous experience using D2L and Blackboard Collaborate Ultra, and will cover how to show PowerPoints in your Blackboard Collaborate Ultra session. For further information, please contact desupport@camosun.ca for assistance.

Steps

  1. Go to the location in your D2L course site where you have linked to your Blackboard Collaborate Ultra room (for example, in the Content tool), click on your Blackboard Collaborate Ultra session and enter your session.
  2. Open the Collaborate panel (the bottom right icon).

    Open the Collaborate panel

  3. Click the Share Content icon.

    Click Share Content

  4. Click Share Files.

    Click Share Files

  5. Click Add Files to upload a PowerPoint from your computer (or drag the PowerPoint into the Add Files box).

    Click Add Files

  6. When the file has finished uploading, select it, then click Share Now.

    Click Share Now

  7. Select a slide to begin sharing (the slide will appear in the main window of your session).

    Select a slide to being sharing

  8. You can either use the arrow under the main slide to navigate through your presentation, or click on any slide in the Navigate Slides area to jump to another slide. Use the drawing/pointing icons at the top-left to enhance the presentation. Click the Stop icon (top right of the slide in the main window) to end the presentation.

    Presentation controls

Things to Remember

Once you have added a PowerPoint file to a session, it will stay there as long as the session is active. Once the session is over (and disappears from your Blackboard Collaborate Ultra room in D2L), it will disappear and have to be re-uploaded to any new sessions you create.

This content is licensed under a Creative Commons Attribution 4.0 International Licence.Icons by the Noun Project.

Some additional notes about using the Annotations Tool (in Assignments) in D2L

On September 5, I announced the new Annotation Tool in the Assignments tool in D2L . And today, I wanted to give you some additional notes about this tool, because of some questions that have come up for us from faculty.

First, the Annotation tool, which is enabled by default, can be disabled for specific assignments.  To do this:

  1. Click the down arrow next to the assignment you want to edit, and select Edit Folder.
  2. Scroll down to the bottom of the Properties tab to Annotation Tools, and deselect “Make annotation tools available for assessment”. Then click Save and Close.

    Disable Annotations

Second, I wanted to mention the difference between downloading the annotated version (PDF version) and downloading the original document when assessing assignment submissions. Note that this is for file submissions when the Annotation tool is enabled.

  1. Click the down arrow next to the assignment you want to grade, and click View Submissions.
  2. Click on the Evaluate link for the student’s assignment you want to assess.
  3. To download the document itself, click the arrow next to the assignment link, and select Download.

    Download assignment file

  4. To view and download the Annotated file (as a PDF), click on the document link to open the Annotation tool, add your annotations, then click Download.

    Download annotations file

  5. To close the Annotations tool window and return to the original view, where you can download the assignment document itself, click the X above, on the right side, of the Annotation window.

    Click X to close the Annotations tool

Stay tuned next Monday where I will tell you about a few new updates regarding the connection between the Assignments and Discussions tools, and the Grades tool.

Creating Groups in D2L

This tutorial is designed for faculty who have previous experience using the various tools in D2L, and will cover the steps involved when you want to put your students into groups in D2L.

Using Groups means that you can release tools, activities, and content to specific groups of students, for example, Assignment folders which would be accessible only by a group of students, or modules of content which only specific groups of students can view. For further information, please contact desupport@camosun.ca for assistance.

Steps

  1. Go to the Groups tool in your course. If you don’t see Groups in your My Tools drop-down, you can find it by going to Edit Course.
  2. Click New Category. A Category will contain the groups you will put your students into. For example, Assignment 1 Groups might be your Category, then you will have several Groups within that category into which you will enrol students.Click New Category
  3. Give your Category a Category Name (e.g., Assignment 1 Groups).Give your Category a Category Name
  4. Scroll down and select your Enrolment Type. Here are the choices:
    1. # of Groups – No Auto Enrolments – Use this when YOU want to enrol students into specific groups yourself
    2. Groups of # – Use when you know how many students you want in each group, but you want D2L to automatically enrol them
    3. # of Groups – Use when you know how many groups you want, but you want D2L to automatically enrol students into them
    4. Groups of # – Self Enrolment – Use when you know how many students you want in each group, but you want students to self-select which group they want to be in. (Self-enrolment can also be given an Expiry Date, after which remaining students will be auto-enrolled into empty group spaces),
    5. # of Groups – Self Enrolment – Use when you know how many groups you want, but you want students to self-select which group they want to be in
    6. # of Groups, Capacity of # – Self Enrolment – Use when you know how many groups you want AND how many students you want in each group, but you want students to self-select which group they want to be in
    7. Single user, member-specific groups – Use when you want to create groups of ONE (this is great if you want to provide students with Discussion forum space for personal journaling – so they can post journal entries that only you can see).Fill in the required boxes for whichever enrolment type you chose (e.g., Number of Groups, Number of Users), then select which tools/workspaces you would like to automatically create as you create your groups (note that you can connect tools/activities/content to groups AFTER you have created them as well). Then click Save.

      Select Enrolment Type, then select tools/workspaces. Click Save

  5. Follow the instructions for creating the additional tools (Discussion, Locker, Assignments) if you have selected them, clicking Create and Next as you go. When you are finished, click Done.Click Done
  6. Finally, click Save.Click Save

Things to Remember

Note that if you have created self-enrolment groups, you will not be able to use View as Student to see what this looks like to your students – you need to be a registered student in the course to see how the process works. However, we have created a handoutfor students on Self Enrolling into Groups that you can find in the On-Demand Training course in D2L look at, or point students to in the D2L Student Guide.

This content is licensed under a Creative Commons Attribution 4.0 International Licence.Icons by the Noun Project.
Supporting Students with Disabilities in BC Postsecondary Online Course

Today, I’d like to take a moment, and a short post, to promote an online course offering, available for you, for free, from the Justice Institute of BC:  the open, online course Supporting Students with Disabilities in BC Postsecondary .  In addition, content in the course and associated resource site are Creative Commons licenced, so material is available for you to Retain, Reuse, Revise, Remix, Redistribute!

From the website:

“In collaboration with Selkirk and Camosun Colleges, Justice Institute of British Columbia (JIBC) has developed this course and a resource website to educate trainers on disability issues in the classroom. The purpose of the course is to increase the success of people with disabilities in a trades / technical program by dispelling common myths about students with disabilities and to address faculty’s concerns and questions about different disabilities. It will help each faculty member to obtain the appropriate knowledge and problem-solving skills to offer accommodations and select appropriate teaching strategies for their disabled students. The expectation is that the new techniques learned will help students achieve their full potential and success in their chosen programs.

This multi-modal course can be taken online independently, or in a facilitated face-to-face group. Throughout the course there are several engaging learning activities including scenarios with reflection questions, case studies followed by discussions, and simulation exercises aimed to trigger learner empathy.

This course provides practical information and easy-to-use strategies to help you to better support the learning of students with disabilities in your classrooms and campuses.

At the end of the course, you will be able to

  • Define what is meant by having a disability and become familiar with a wide range of disabilities and how they impact learning
  • Identify the concepts of duty to accommodate and understand the process of reasonable accommodation
  • Apply strategies and tools from Universal Design for Learning (UDL) to create an inclusive learning environment to accommodate your students
  • Develop personal goals, address institution-wide responsibilities and identify next steps for creating inclusive campuses”


Introducing ReadSpeaker (in the D2L Content tool)

ReadSpeaker “is a web-based personal literacy support tool that makes it possible for the user to listen to texts and documents using text-to-speech technology in a standard web browser”. We will be looking at the version of ReadSpeaker which is found in the Content tool of D2L. Some of you may have already seen ReadSpeaker in action, but for those of you who haven’t, this post will introduce you to how to access and use it in Content.

As noted above, one of the functions of ReadSpeaker is to read text-based content (HTML files, WORD documents, PDF files, etc.) aloud. This gives your students the opportunity to either listen to the content through headphones in situations where they might not be able to read easily (for example, while driving, or when using a phone), or to read and listen to the content at the same time (which is especially useful when trying to assimilate complex content).

There are two main ways ReadSpeaker can be accessed in Content, and we will look at each in turn.

First, for reading “web pages”.

  1. Go to the Content tool in your D2L course.
  2. Click on a page that is identified as a Web Page (if your course does not have “Web Pages”, see reading for WORD documents, etc.)

    Click a Web Page

  3. Click the Listen button at the top, left, and ReadSpeaker will start reading the webpage from the beginning, highlighting words as it reads them.

    Click Listen

  4. The Listen toolbar controls include: Pause or Stop buttons to pause/stop play, the Seek bar slider to move forward through the document, the speaker icon to adjust Volume, and the Download icon to save the audio file to your device as a MP3 file.

    The Listen toolbar

  5. Click the little down arrow to the left of the Listen button to find additional options, including:
    1. Settings: change the Reading speed, Highlighting (word and/or sentence, and colour options), Text Settings (font size, type, colours), General (scrolling, etc.).
    2. Changing between American and Canadian English
    3. Read on Hover: click then hover your mouse over the part of the document you want to hear.
    4. Enlarge Text
    5. Simple View: Highlight text first, then click Simple View. A box will open showing the selected text without any formatting.
    6. Page Mask allows you to highlight parts of the text as it is being read (the mask is a light horizontal block while the rest of the page is darkened). Click + to make the block larger, and – to make it smaller, click X to turn off Page Mask.
    7. Translation: Highlight text first, then click Translation (and the language you wish the text translated to). A box will open with the translation.
    8. Word Lookup: Highlight a word, then click Word Lookup. The definition will open in a box.
    9. Help (opens a Help box).

      Additionl functions

Second, for reading WORD documents, PDFs, and PPTs.

  1. Go to the Content tool in your D2L course.
  2. Click on a page that is identified as a Word Document, PDF document, or PowerPoint Presentation.

    Click a WORD, PDF or PowerPoint document

  3. Scroll down to below the page that opens, and click the Open with docReader button.

    Scroll down and click Open with docReader

  4. The page will load into a new interface with a toolbar at the top, a left sidebar allowing you to view Thumbnails or an Outline of the pages in the document, and the document itself on the right.

    docReader interface

  5. In the toolbar, you can Show/Hide the Sidebar, jump to specific pages in the document, click Listen to hear it read aloud (using the Pause or Stop buttons to pause/stop play).

    Sidebar, Listen, Pause, Stop

  6. You can control how you view the document using the Layout mode or Text mode (which will show the text without formatting) options.

    Layout and Text mode buttons

  7. Under More tools, you can access Settings, Page Mask, Reading Ruler, Download mp3 of page, and Save document.Settings gives you the following options:
    1. General: Change the Speed, change the menu language, change how you select your reading area, change how the pages flip,
    2. Highlight settings: Sentence highlighting, Word highlighting
    3. Text settings: Text Colours, Font size, Font type (all with a Preview window)

    Page Mask allows you to highlight parts of the text as it is being read (the mask is a light horizontal block while the rest of the page is darkened). Click + to make the block larger, and – to make it smaller, click X to turn off Page Mask.

    Reading Ruler allows you to move a dark block (like a ruler on the page) over the page, for example, to underline the text as it is being read. Click + to make the block larger, and – to make it smaller, click X to turn off the Reading Ruler.

    Settings, Page Mask, Reading Ruler

  8. To return to the Content area, use the breadcrumbs at the top of the page (you can’t move to the next page through the docReader application).

    Return to Content using the breadcrumbs


eLearning Workshops, Drop-ins, Booking Appointments, and Support Reminders

We wanted to remind you that if you need any help setting up your D2L course sites, or have any questions now or during the term about D2L or how to use (or why you might want to use) any of its functions, or about the other tools we support, such as Kaltura and Blackboard Collaborate Ultra (BBCU), we are here for you!

Our eLearning Support team is available for faculty and students from 8:30-4:30, Monday-Friday by phone (250-370-3488) or by email (desupport@camosun.ca) or even by in-person in the Centre for Excellence in Teaching and Learning (CETL) offices in the Lansdowne Library.

We also have 5 instructional designers who are available to help you by appointment at both campuses, or during our eLearning drop-ins at Interurban. These drop-ins, in our CETL offices in the Liz Ashton Campus Centre, room 251J, are:

September

  • Tuesdays, September 3, 10, 17, 24, from 11:00-12:00pm
  • Thursdays, September 5, 12, 19, 26, from 11:00-12:00pm
  • Fridays, September 6, 13, 20, 27, from 11:30am-12:30pm

October 4 to December 13

  • Fridays, from 11:30am-12:30pm

If you would like to contact an instructional designer to schedule a consult regarding a specific question you are having around using D2L, Kaltura, or BBCU, or for information on how to use a specific D2L tool, or with any questions you may have about using other educational technologies to support your teaching (or even if you have a pedagogical challenge and are wondering what educational technology might help you with your challenge), contact eLearning support (desupport@camosun.ca) and we can set you up!

You can also find out more about who is available to help you with your eLearning needs by visiting the Contact Us section of the main CETL website (http://camosun.ca/about/teaching-learning/contact-us.html) and email an instructional designer directly.

Finally, we also have a number of workshops scheduled at Interurban campus this fall. Lansdowne workshops will be scheduled later this month. Check out descriptions below, and register at our Survey Monkey form.

Setting up Your Gradebook

Date & Time: Friday, September 13 from 10-11:30am
Location: LACC 251J, Interurban Campus
Description: This hands on workshop will focus on setting up your Gradebook from start to finish. Please bring your course outline (or a breakdown of your assessment items) if you wish to build your own Gradebook during the workshop.

Managing Groups in D2L

Date & Time: Friday, September 20 from 10-11:30am
Location: LACC 251J, Interurban Campus
Description: This workshop will provide an overview of how to create and manage groups in D2L. A demonstration of how to create private group discussions and group assignment folders will be provided.

Building Quizzes in D2L

Date & Time: Friday, September 27 from 10-11:30am
Location: LACC 251J, Interurban Campus
Description: This workshop will explore ways to create, customize and grade quizzes. We’ll also tackle creating Question Pools and how to organize your questions in the Question Library.

Managing Assignments

Date & Time: Friday, October 4 from 10-11:30am
Location: LACC 251J, Interurban Campus
Description: The Assignment tool in D2L enables students to submit assignments while streamlining the grading process for instructors. This workshop provides hands-on practice creating, managing and grading assignments.

Getting Started with Kaltura (Streaming Media Service)

Date & Time: Friday, October 11 from 10-11:30am
Location: LACC 251J, Interurban Campus
Description: Kaltura is Camosun College’s streaming media service that integrates into D2L. This means faculty and students now have a place to create, edit, and house their course-related videos. Kaltura also integrates with D2L.Come find out more about what Kaltura is, what it can do, and how you can use it for your courses. Bring a laptop to the session if you have one.

Connecting with Your Students in Real-time

Date & Time: Friday, October 25 from 10-11:30am
Location: LACC 251J, Interurban Campus
Description: Blackboard Collaborate Ultra is Camosun’s web conferencing tool. Whether you teach face-to-face, blended, or online, this tool can help you increase instructor-student and student-to-student engagement. Come find out more about how you can connect with learners synchronously. This session requires you bring a laptop to participate.

Managing Final Grades in D2L

Date & Time: Friday, December 13, 10-11:30
Location: LACC 251J, Interurban Campus
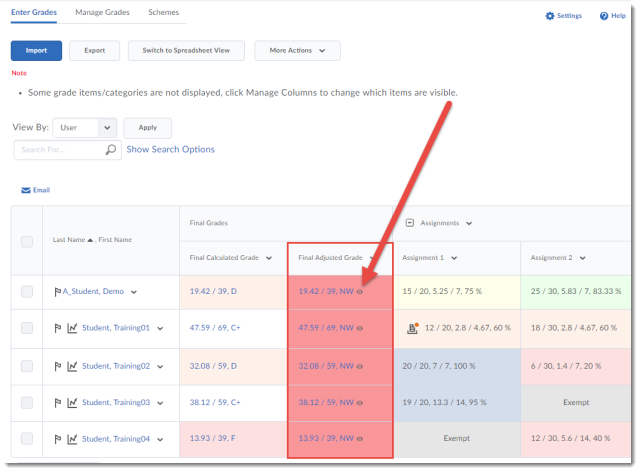
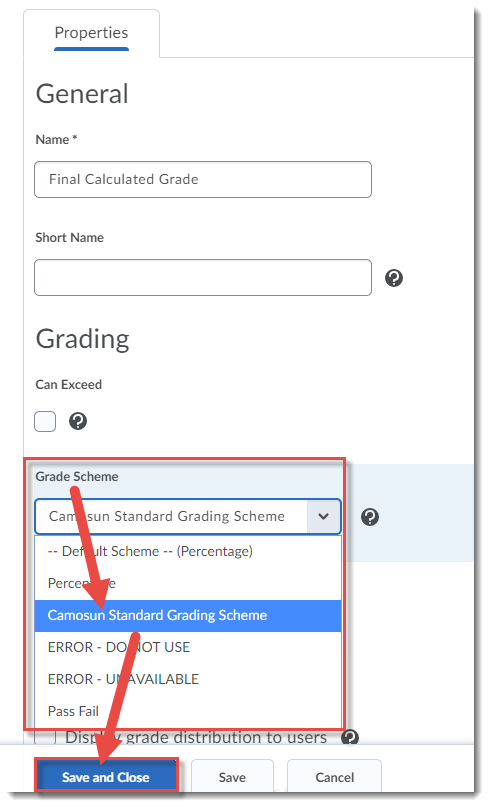
Description: It’s grading time again! This workshop is designed to provide a quick refresher on how to input and manage grades in D2L. An overview of how to apply grade schemes and release calculated and adjusted final grades will also be provided.

We look forward to hearing from you!

How to get started with Kaltura in D2L – a Student Tutorial

Kaltura is a new streaming media tool recently adopted by Camosun. Integrated into D2L, and supported by eLearning, Kaltura gives faculty and students a place to upload, create, and edit their course-related videos, audio files, and images.

This tutorial will cover the steps involved when you wish to upload a video (or audio file) from your device into Kaltura’s My Media area in D2L so that you can then embed it into an Assignment folder, or into a Discussion post (covered in separate tutorials).  If you need additional help, contact desupport@camosun.ca.

Steps

  1. Go to your course in D2L.
  2. Go to My Media (it may be a link on the NavBar or in the My Tools drop-down menu) to open your personal Kaltura space. If you do not see a My Media link, talk to your instructor as they will have to add a link for you.

    Click My Media

  3. Click Add New, and select Media Upload.

    Click Add New and select Media Upload

  4. Click Choose a file to upload, find the video file you want to upload from your device, and click Open. All common video, audio and images formats are accepted. Only one file can be uploaded at a time.

    Upload your file

  5. It may take a bit of time for the video file to upload – the bar at the top of the screen will track the upload, and let you know when the upload is complete (as shown in the second image).

    Wait for file to finish uploading

    Upload complete

  6. Fill in the Details as listed. You will be required to give your video file a Name, and we highly recommend adding information to the Description, Tags, and the additional fields to help you filter/sort your media files as you build your collection, and to help you search for specific media files in the future.

    Tags are words that can be used to search for specific media files, so think of terms that would most likely be used by you to search for your video.

    Keep your video Private – you do NOT need to Publish your video for you to embed it into Assignments or Discussions. Click Save when you have filled in all the details (you can edit this information later if needed). Your media file has now been saved to My Media, meaning that it is available for you to use in any of your D2L courses.

    Add details and click Save

Things to Remember

There are additional features you may want to set up before using your video in a course. This will be covered in a tutorial entitled Adding Features to Your Kaltura Media.

Introduction to the Annotation Tool in Assignments (D2L)

There is a new tool to help you with giving feedback to students in submitted Assignments. When students submit WORD docs, PDF files, EXCEL spreadsheets, or images as Assignment submissions, you can add comments, and other markups right on the file in D2L.

This tool is especially handy for short assignments where commenting is minimal (rather than using the feedback box and referring back to the document). For longer assignments, we would still recommend you download them and provide feedback using track changes and commenting.

Here’s how it works:

  1. Go to the Assignments tool, and click on the title of the assignment you want to grade. Note that to use the annotation tool, the assignment must be a File submission type (i.e., not a Text submission type).
  2. Click on an assessment document to open the Evaluate Submission
  3. You will see a notice “Document conversion is in process”.
  4. Then the document will open in the annotation tool.
  5. First we will look at the annotation tools on the left side of the annotation toolbar, from left to right:
    1. Document view: Thumbnails (the default), Outline (opens a table of contents for multi-page documents), Bookmarks (allows you to bookmark pages so you can quickly navigate back to them)
    2. Page forward and back (if you have a multi-page document to grade)
    3. Page Layout: Page Mode (Single page, Double page, Automatic); Page Transition (Continuous – gives you a scroll bar, Jump – move from page to page using the table of contents); Page Rotation (Rotate Right, Rotate Left) – play around and choose the layout that works best for you.
    4. Pan Mode (allows you to drag the page up and down)
    5. Zoom Out and Zoom In
    6. Fit Page (fits the document page to the annotation tool window)Annotation tool left toolbar
  6. Now, the tools on the right side of the annotation toolbar, from left to right:
    1. Pen, Highlighter, reverse Highlighter, Eraser
    2. Note tool (add comments to locations in the document)
    3. Text box tool
    4. Line, Arrow, Rectangle (underline and point things out in the document)
    5. Print
    6. Search Document
    7. Download
    8. Toggle FullscreenAnnotation tool right toolbar
      The Note tool opens another toolbar which includes options to change the Note colour, shape, and icon style.

      The Note tool toolbar
      The Text box tool opens another toolbar which includes options to format the text (size, colour, font), and align it top, centre, or bottom.

      Textbox toolbar

  7. As you add annotation to the document (e.g., using arrows, text boxes, notes, etc.) they will appear on the document.

    Annotations

  8. Click Save Draft if you need to go back to finish annotations (or if you will be marking several students and want to publish all feedback at once). Finish grading the assignment as you normally would, adding the Score, or using a Rubric, then click Publish to publish the annotated feedback to students.

Students can download annotated feedback file as a PDF (would have to actually rewrite the file if they were submitting a rewrite, not just accept changes).

Here’s what the annotated file looks like to a student (once they have gone to the Assignments tool and clicked the Feedback: Unread link:

  1. Students click View Inline Feedback.

    Click View Inline Feedback

  2. Students can view the feedback, and Print or Download it (it will save as a PDF file).

    Student view

Things to Remember

Re students using screen readers to access online content: The images placed on documents using the annotation tool are NOT tagged, therefore screen readers DO NOT read them. We advise that you not use the annotation tool for submissions from students who require screen reader technology to access their online course content.

Understanding Blackboard Collaborate Ultra Rooms and Sessions in D2L

Designed for faculty who have previous experience using D2L, and who have had some experience with Blackboard Collaborate Ultra (e.g., attended an information session or a hands-on session), this tutorial will cover the features available to you in BBCU rooms and sessions. Information on how to use individual feature is contained in relevant tutorial documents. For further information, please contact desupport@camosun.ca for assistance.

Steps

  1. Go to the location in your course site where you have linked to your Blackboard Collaborate Ultra room (for example, in the Content tool). For information on how to set up this link, see the tutorial Create a Blackboard Collaborate Ultra Room in D2L.
  2. Click on the Blackboard Collaborate Ultra For information on how to set up a session, see the tutorial Create a Blackboard Collaborate Ultra Session in D2L.
  3. Click on the title of the Room or Session you want to access.
  4. You will first be asked if you want to join the session from a browser, or from the Blackboard or Blackboard Instructor app. We recommend joining with a browser, unless you are familiar with and have downloaded the appropriate app.Session login screen
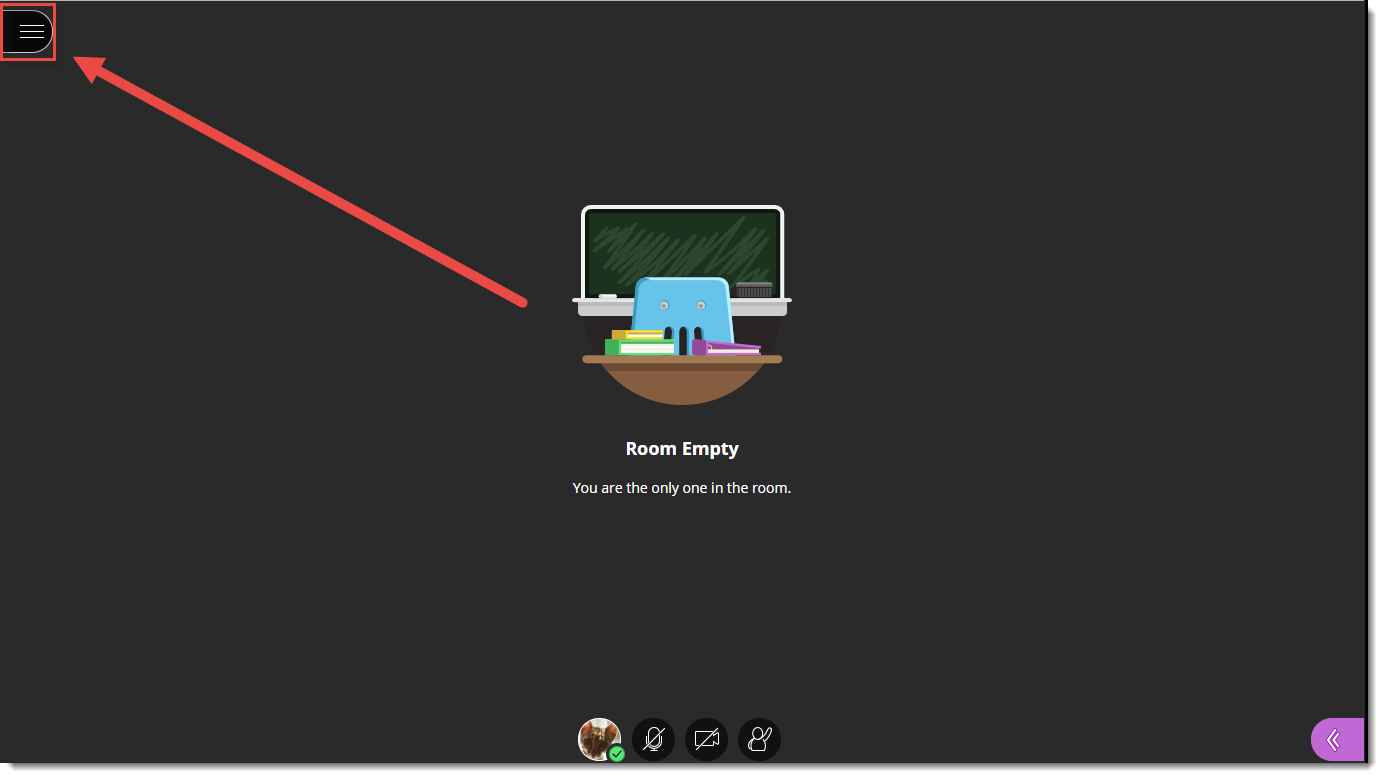
  5. Here is what you will see when you enter your session. You will see a menu at the top left, a list of tools at the bottom, and another menu at the bottom right. We will look at each of these in turn.

    Your Session room

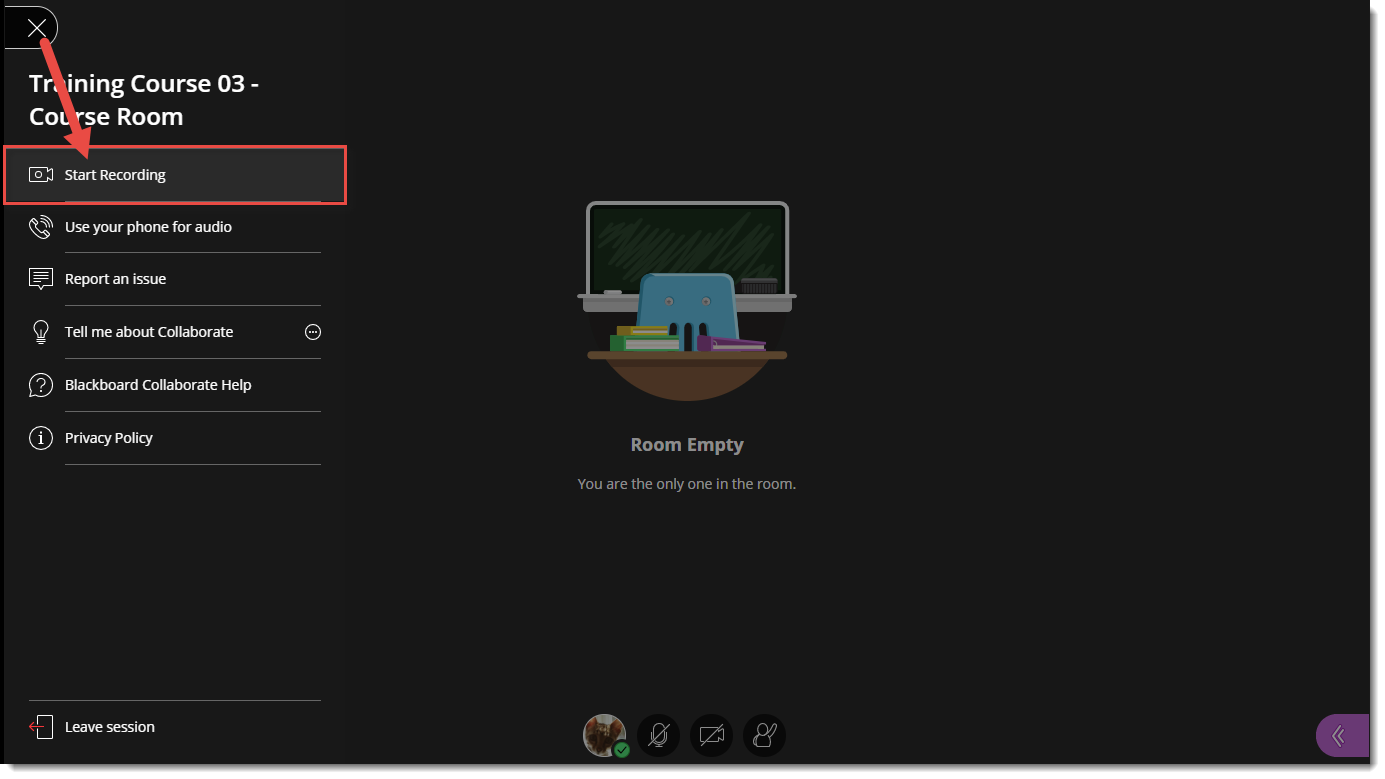
  6. If you click the menu at the top-left, you will see
    1. Start Recording (see the tutorial Recording Sessions in Blackboard Collaborate Ultra for more information)
    2. Use your phone for audio (see the tutorial Using your Phone for Audio in Blackboard Collaborate Ultra for more information)
    3. Report an issue
    4. Tell me about Collaborate
    5. Blackboard Collaborate Help
    6. Privacy Policy

      Contents of the top-left menu

  7. If you click on the menu at the bottom-right, you will see:
    1. The Chat area (see the tutorial Using Chat in Blackboard Collaborate Ultra for more information).
    2. The Attendee area (see the tutorial Managing Attendees in Blackboard Collaborate Ultra for more information).
    3. The Share Content area (see the tutorials Managing the Whiteboard in Blackboard Collaborate Ultra, Screen/Application Sharing in Blackboard Collaborate Ultra, Sharing Files in Blackboard Collaborate Ultra, Polling in Blackboard Collaborate Ultra, Using the Timer in Blackboard Collaborate Ultra, and Creating Breakout Rooms in Blackboard Collaborate Ultra for more information).
    4. The My Settings area (see the tutorial Managing your Settings in Blackboard Collaborate Ultra for more information).

      Contents of the bottom-right menu

  8. Finally, the bottom icons are features you can use during a session to indicate you are away from your computer, to indicate feedback, to raise hand as a request to speak, or to control your microphone and camera:
    1. My Status and Settings (Away, Leave Session, Feedback emoticons, Agree/Disagree)
    2. Microphone share/unshare
    3. Video share/unshare
    4. Raise hand

      Bottom icons

Things to Remember

Before you run your first Blackboard Collaborate Ultra session with live participants, take some time to practice running a session and learning how to use all the features you will need. We also recommend inviting a colleague (or an instructional designer in eLearning) to attend with you to help you practice!

This content is licensed under a Creative Commons Attribution 4.0 International Licence.Icons by the Noun Project.
Setting Email and Mobile Notifications in D2L – A Student D2L Tutorial

This tutorial will cover the steps involved when you wish to have notifications about course activities (news additions/updates, new content, dropbox feedback, etc.) sent to your personal email or to your mobile device. Make sure to do this if you are not logging into D2L regularly so you don’t miss any important information posted by your instructor! For further information, please contact desupport@camosun.ca for assistance.

Steps

  1. Log into D2L.
  2. Click on your name to open your personal drop-down menu, and select Notifications.

    Click your name and select Notifications

  3. To set up email notifications, click Enable email notifications. Then in the pop-up box, select Use custom email, enter your personal email, and click Save.

    Enable email notifications, enter your email and click Save

  4. To set up mobile notifications, click Register your mobile. Then in the pop-up box, select your Country, Mobile Carrier, and enter your Mobile Number. Click Save.

    Register your mobile, fill in the form and click Save

  5. Scroll down to the Instant Notifications section, and select the notifications you would like to receive, and how you would like to receive them. Note that you can also go to the Exclude Some Courses section to prevent receiving notifications from selected courses. Click Save when you have finished.

    Select your notifications and click Save

Things to Remember

You can return to Notifications at any time to make changes to your settings. Note that you will receive notifications for ALL courses you are registered in unless you choose to Exclude Some Courses.