Getting Ready for the New Term at Camosun with D2L and eLearning

I can’t believe it’s almost September – the fall term is almost upon us and it’s time to refresh our courses, and our memories, about D2L, how to get started setting up your course in D2L, and where to get help.

Are you a new instructor at Camosun, or coming back looking for a memory tweak?  See our Things for Faculty to know about eLearning and D2L at Camosun PDF.

Are you a new student wondering how to access D2L (and what to expect in your D2L course)?  See our Logging into D2L PDF tutorial and also our Introduction to D2L Videos!

Need help? eLearning is here for you all year round!  Just visit our Support Portal to find help.

Have a fabulous term.

D2L Orientation videos for new students!

While I generally prefer not creating tutorial videos for our eLearning supported tools (mainly because they all change so quickly and I simply don’t have it in me to re-create videos every term), recently a small team of us in eLearning produced three Introduction to D2L videos for new Camosun students.

While these videos were created specifically to support English Language Development and International students, they can be viewed and used by any students who are new to Camosun and our D2L (Brightspace) learning management system.

So, have a look at our Introduction to D2L for Students Videos and if you like what you see, send me a note at schudele@camosun.ca!

Grading Assignment Submissions using Anonymous Marking – D2L Tutorial

This tutorial is for faculty who have previous experience using the Assignments tool in D2L and will cover the steps involved when you wish to grade student submissions for an Assignment using Anonymous Marking.  For further information or assistance, go to our Team Dynamix Support portal and click the appropriate Category to submit a ticket. 

Steps for enabling Anonymous marking 

  1. Go to the Assignments tool in your course.
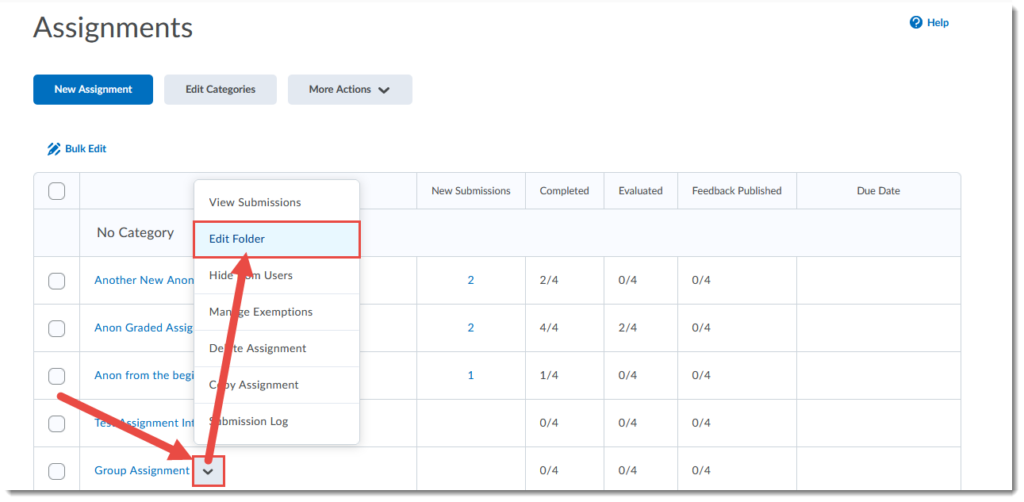
  2. Either create a new Assignment, or click on the drop-down menu (down arrow) next to the title of the Assignment you want to set for Anonymous Marking and select Edit Folder.

    Click Edit Folder

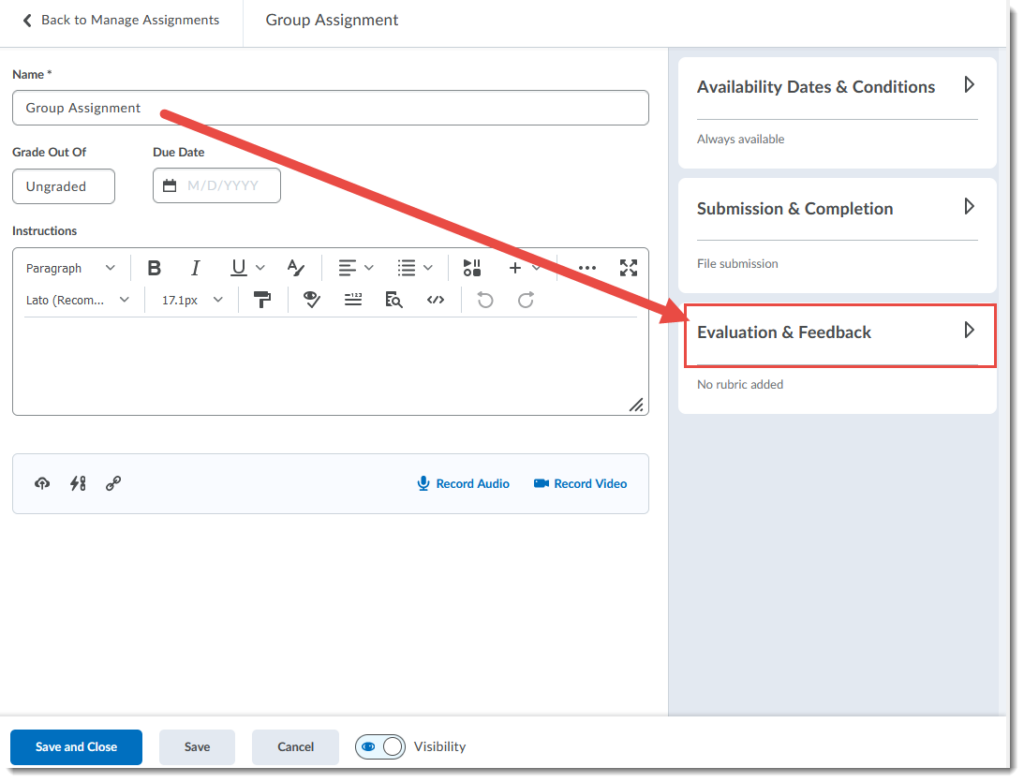
  3. Give your Assignment a Name if needed, then click Evaluation & Feedback on the right.

    Click Evaluation & Feedback

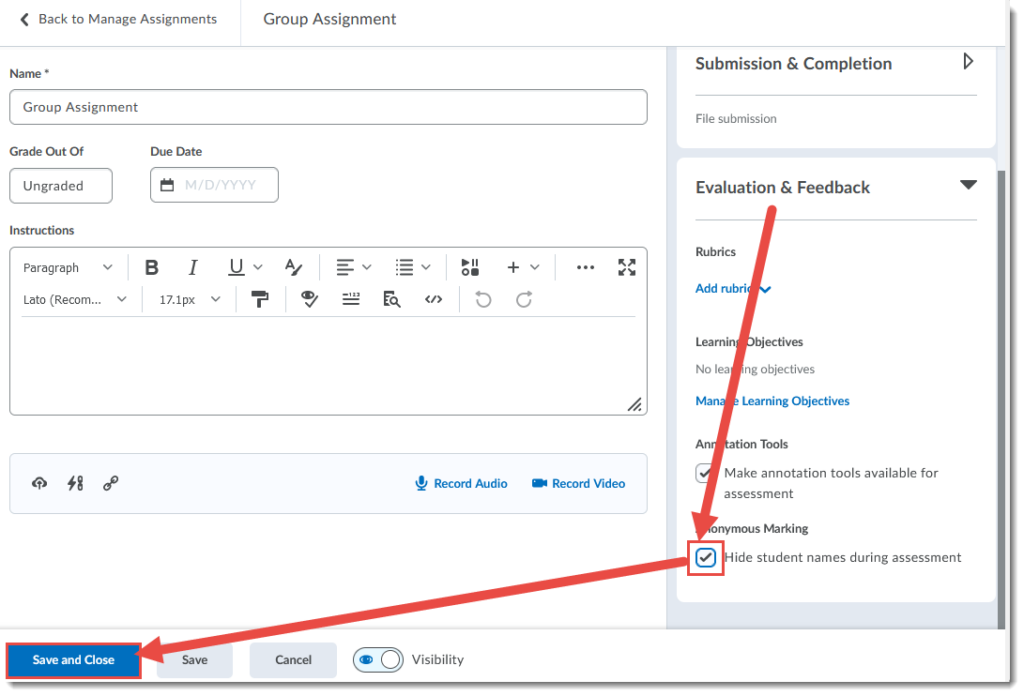
  4. Under Anonymous Marking, select Hide student names during assessment.  Finish editing the Assignment and click Save and Close.

    Select Hide student names during assessment

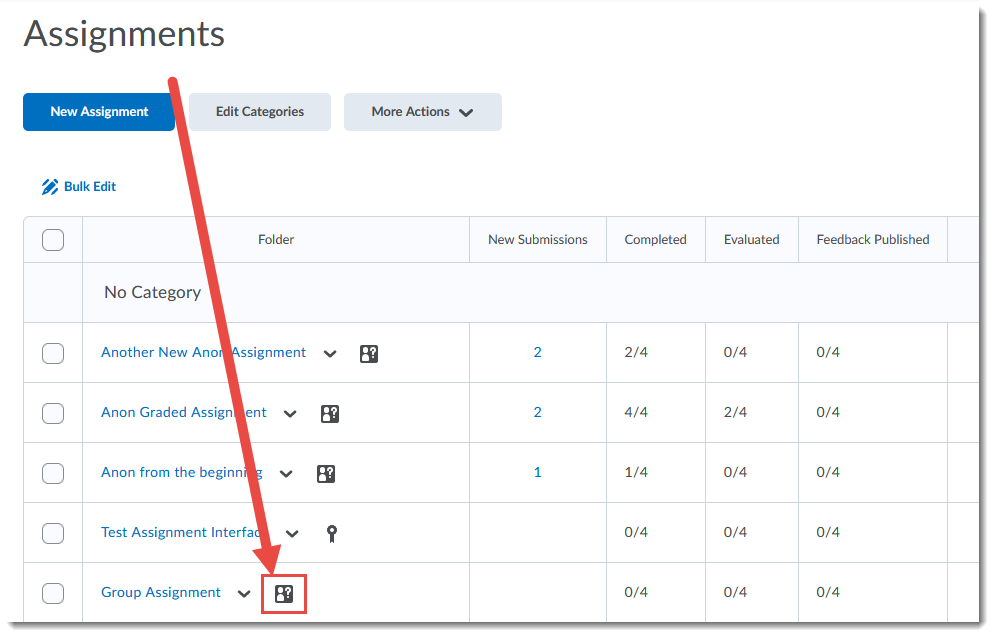
  5. You will now see a symbol next to your Assignment title indicating that it has Anonymous Marking enabled.

    Anonymous marking enabled symbol

 Steps for grading using Anonymous marking 

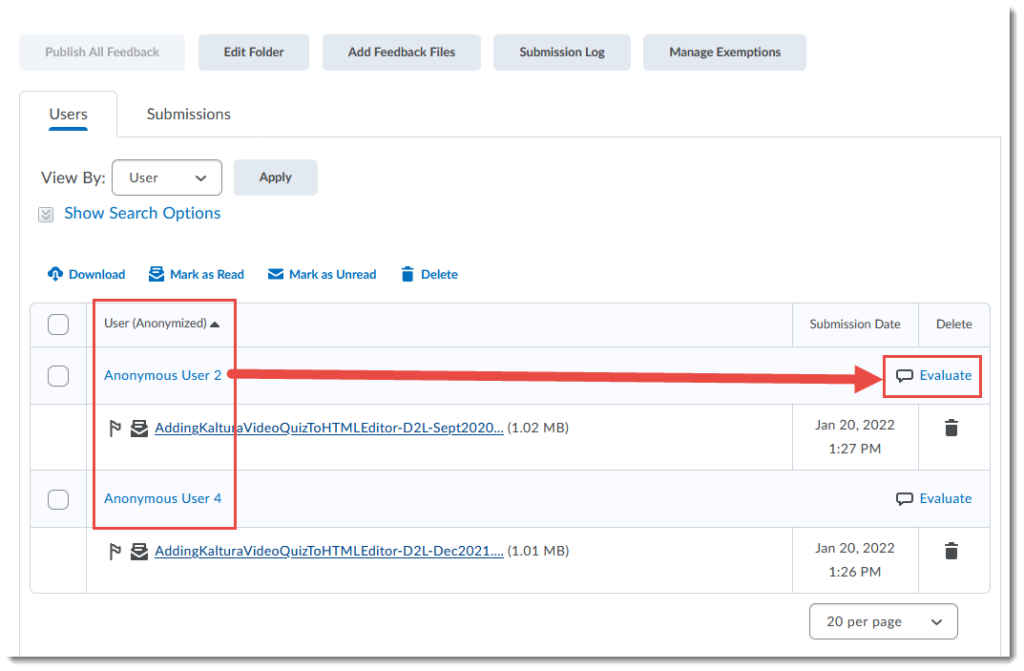
  1. Go to the Submission area for the assignment and click the Evaluate link for an assignment.  Note that student names are anonymized.

    Click Evaluate

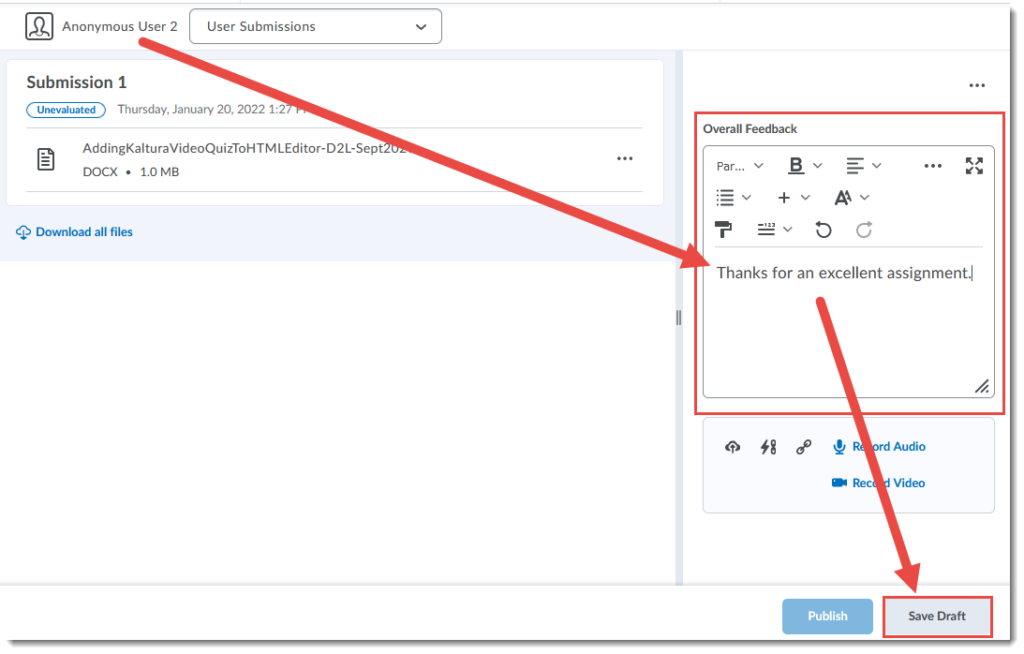
  2. You will not see student names in the Submission areas, nor in the names of the submitted files if you choose to download them for offline marking.  Add your feedback, and/or upload your feedback files, and click Save DraftYou will NOT be able to Publish individual student grades – you will need to Publish All at the same time.

    Add feedback and click Save Draft

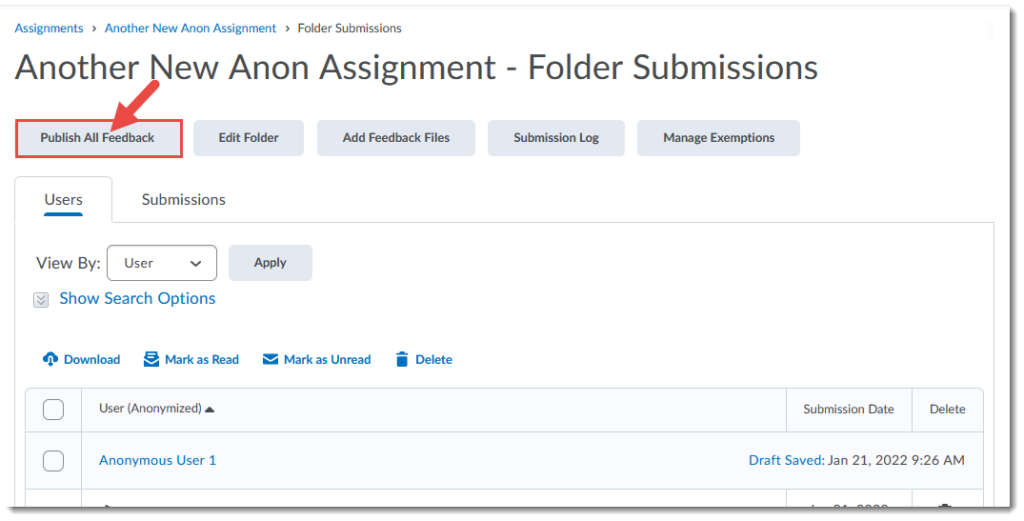
  3. Once you have finished saving all Draft feedback, return to the main submission area, select all students and click Publish All Feedback.  In the Confirmation pop-up box, click Yes.  You may need to refresh your browser window to see that the submissions have been published.

    Click Publish All Feedback

Things to Remember 

You can enable and disable Anonymous Marking as you need to, but once it is enabled and you have a submission, you will NOT be able to disable it. 

If you publish some assignments, and not all (for example if you are grading assignments before all students have submitted), after publishing you will be able to see all student names (so you will not be able to grade any new submissions anonymously).

Introduction to Kaltura Express Capture in D2L – Kaltura Tutorial 

This tutorial is designed for faculty who have previous experience using Kaltura in D2L, as well as the Assignments tool. For further information or assistance, go to our Team Dynamix Support portal and click the appropriate Category to submit a ticket. 

This tutorial will cover the steps involved when you wish to create a simple video right within D2L.  Kaltura Express Capture allows you to created videos using your webcam and audio within various assessment tools in D2L (such as Assignments) as well as in your My Media area. Kaltura Capture Express recordings are saved in your My Media space in D2L. 

Scenario 1: Adding a Kaltura Capture Express recording to My Media 

  1. Go to your course in D2L. 
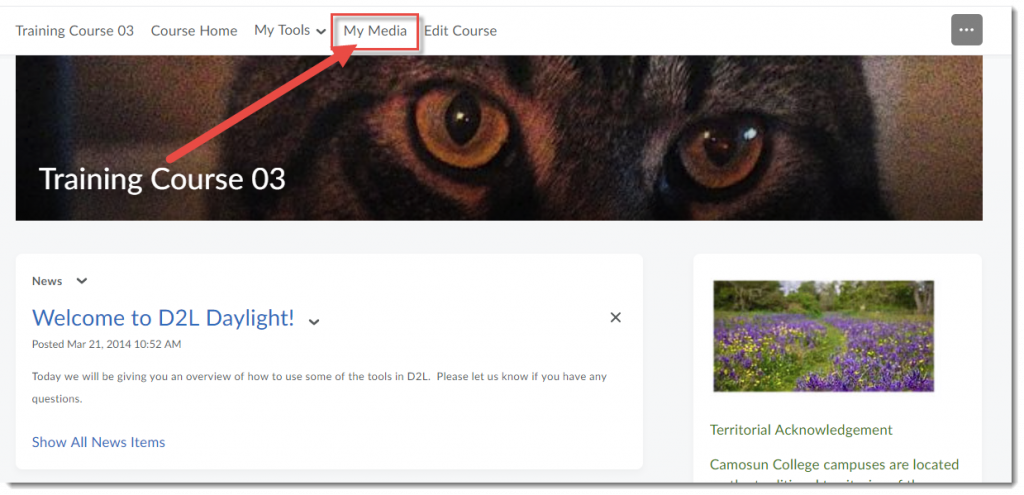
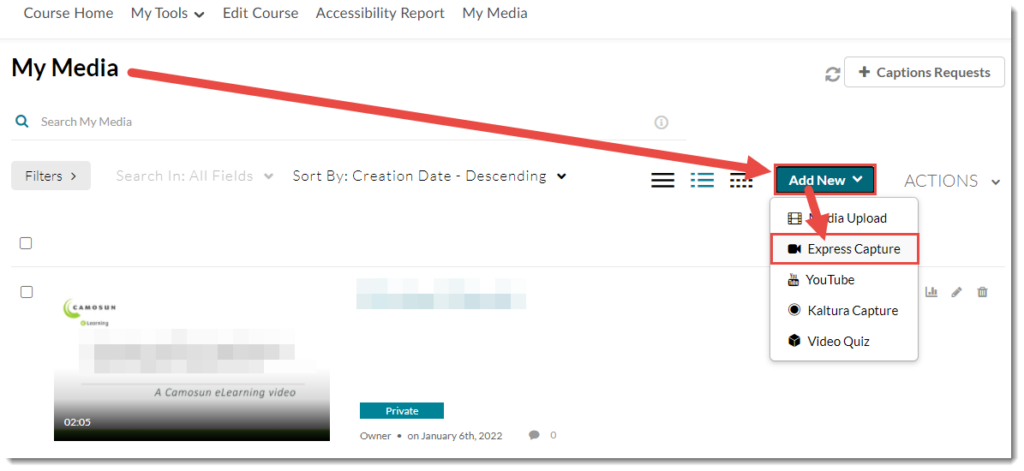
  2. Go to My Media.Click My Media


  3. Click Add New and select Express Capture.Click Add New and select Express Capture


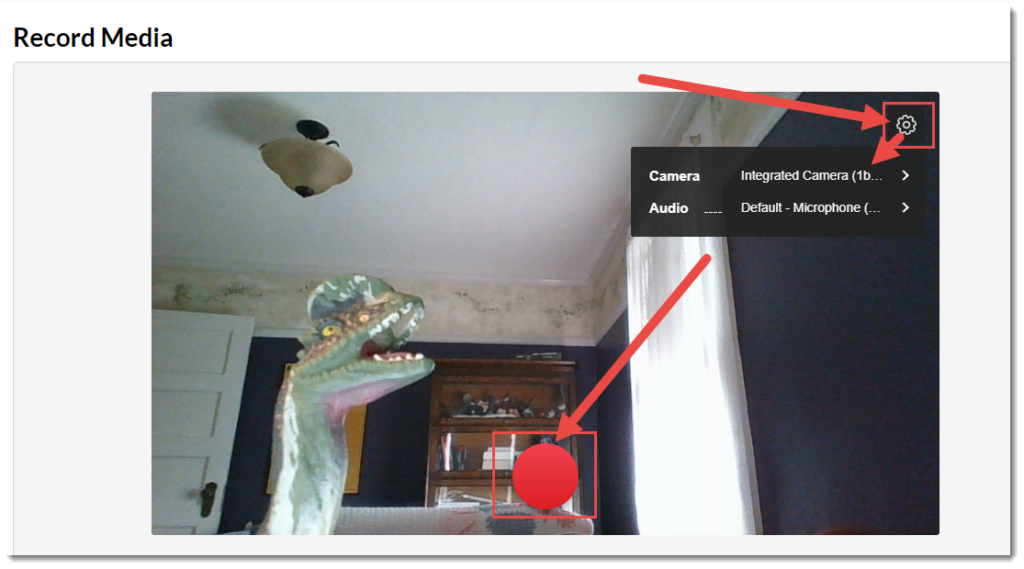
  4. You will see your webcam video appear with a red round record button at the bottom centre. Click the Settings icon at the top right of the video to change your camera and/or microphone settings.  Click the record button to begin recording your video.Click Record


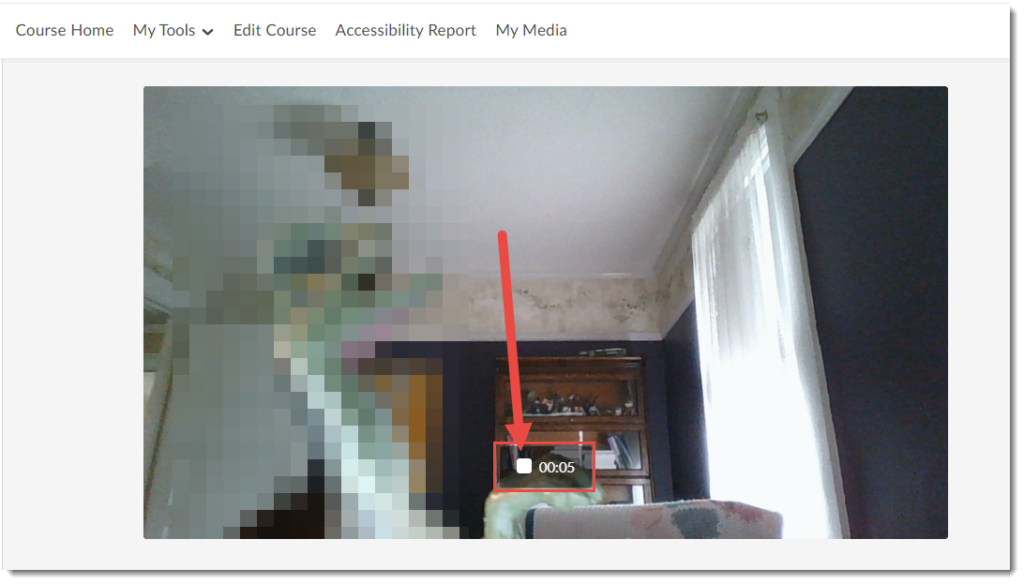
  5. After the countdown (from 3) ends, start talking (note that it’s good to have a script or very clear idea of what you want to say to avoid having to re-take or edit your video(s) later.  Click the Stop button to end the recording.Click Stop


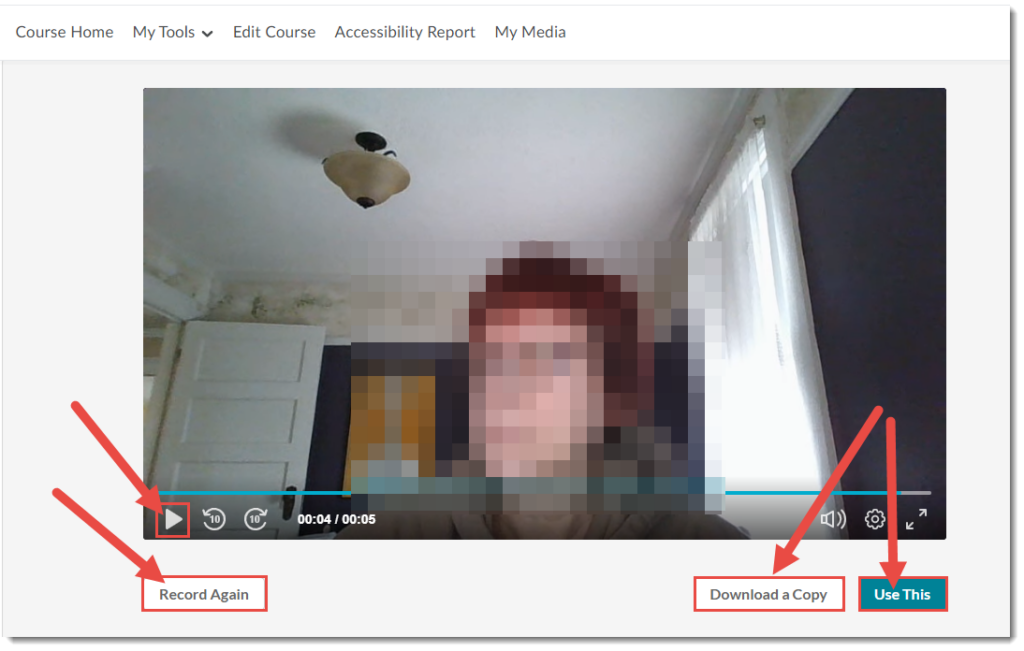
  6. Click the Play icon to play the video.  Click Record Again to re-record your video.  Click Download a Copy to download the video to your device.  Click Use This to save the video to My Media.Click Use This


  7. Once the video is saved to My Media you can change the Name, add a Description, etc. See the Tutorial Uploading Media to My Media (page 4) for more information.

Scenario 2: Adding a Kaltura Capture Express recording as feedback to an Assignment submission 

  1. Go to your course in D2L.  Go to Assignments (through the link on your Navbar, or in your My Tools drop-down menu, or in a draft Topic in the Content tool).
  2. Go to the Submissions area for an assignment and go to a specific assignment submission. 
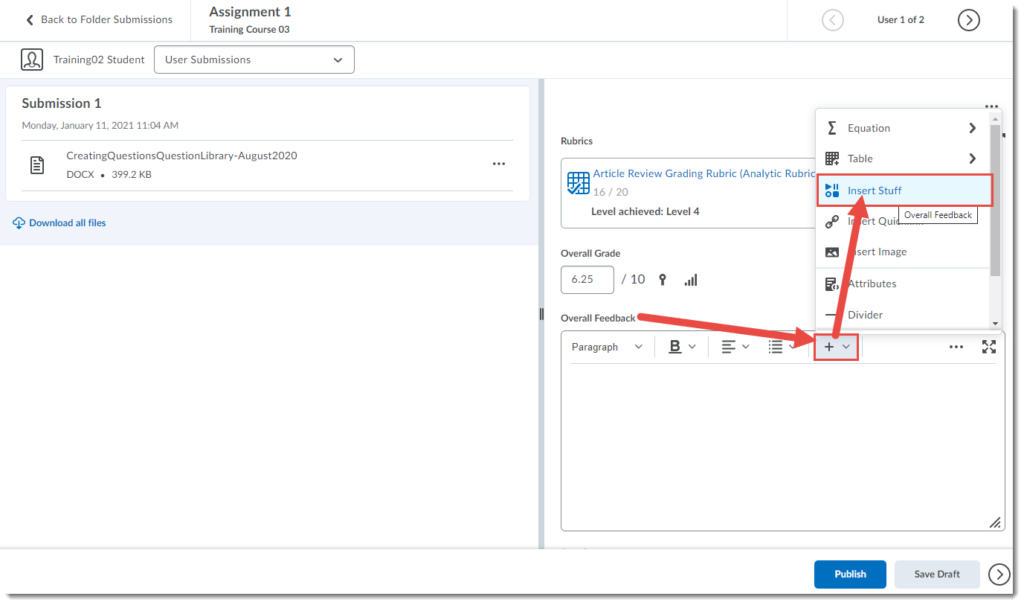
  3. In the Overall Feedback box, click the Plus drop-down menu and select Insert Stuff.

    Click Insert Stuff

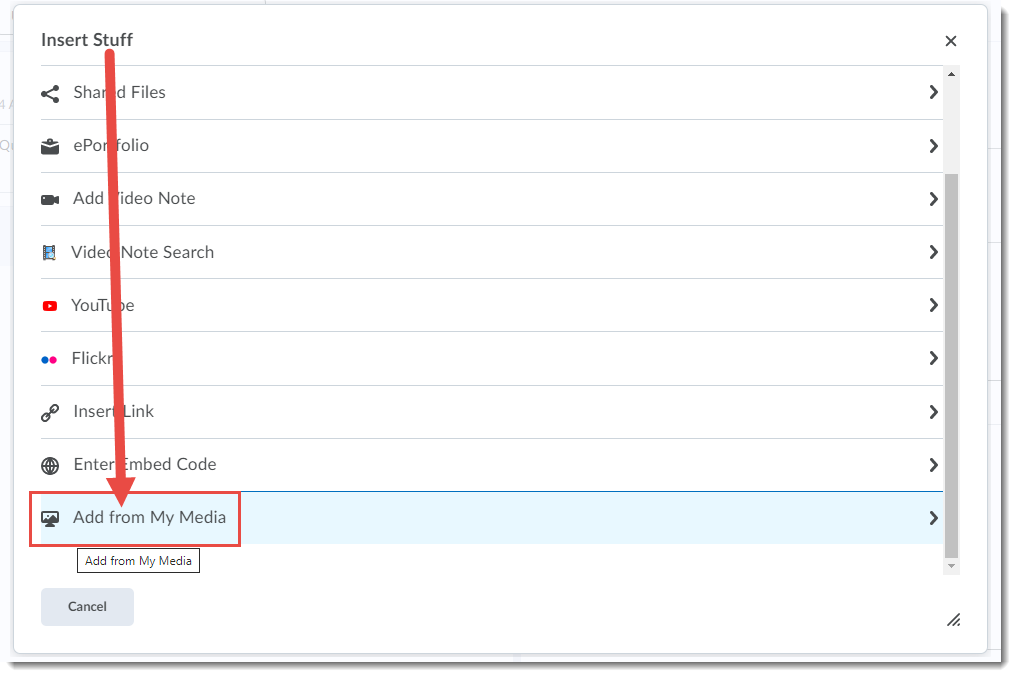
  4. In the Insert Stuff pop-up box, click Add from My Media.

    Click Add from My Media

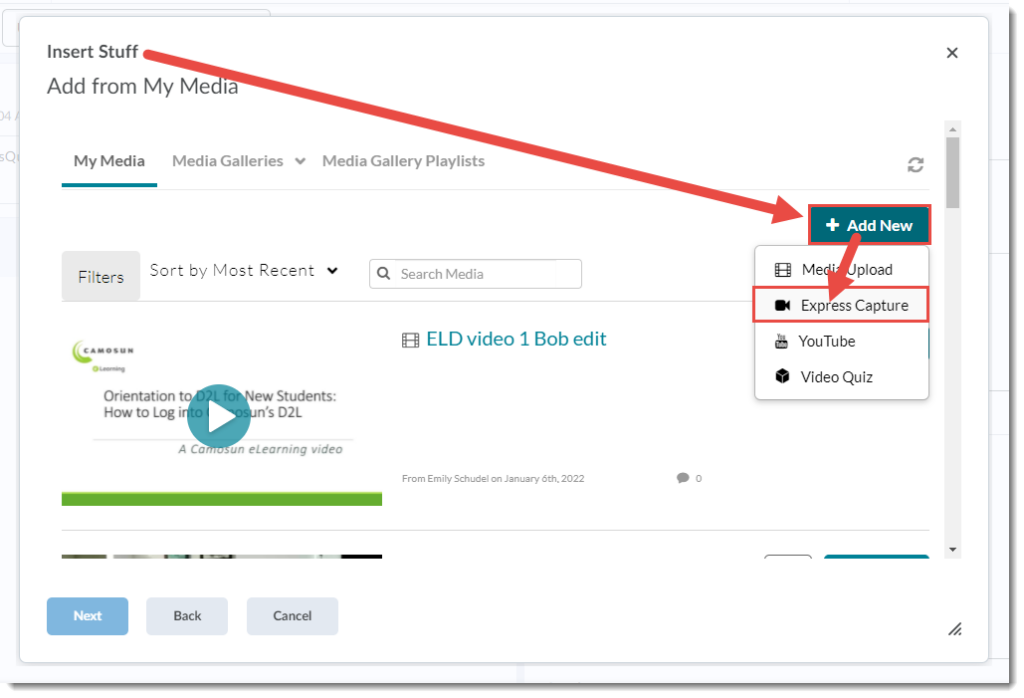
  5. Click Add New and select Express Capture.

    Click Add New and select Express Capture

  6. As per step 4 in the previous scenario, you will see your webcam video appear with a record button at the bottom centre. Click the Settings icon at the top right of the video to change your camera and/or microphone settings.  Click the Record button.
  7. As per step 5 in the previous scenario, after the countdown (from 3) ends, start talking (note that it’s good to have a script or very clear idea of what you want to say to avoid having to re-take or edit your video(s) later.  Click the Stop button to end the recording. 
  8. Click the Start Over icon in the centre of the video to play the video.  Click Record Again to re-record your video.  Click Download a Copy to download the video to your device.  Click Use This to save the video to My Media. 
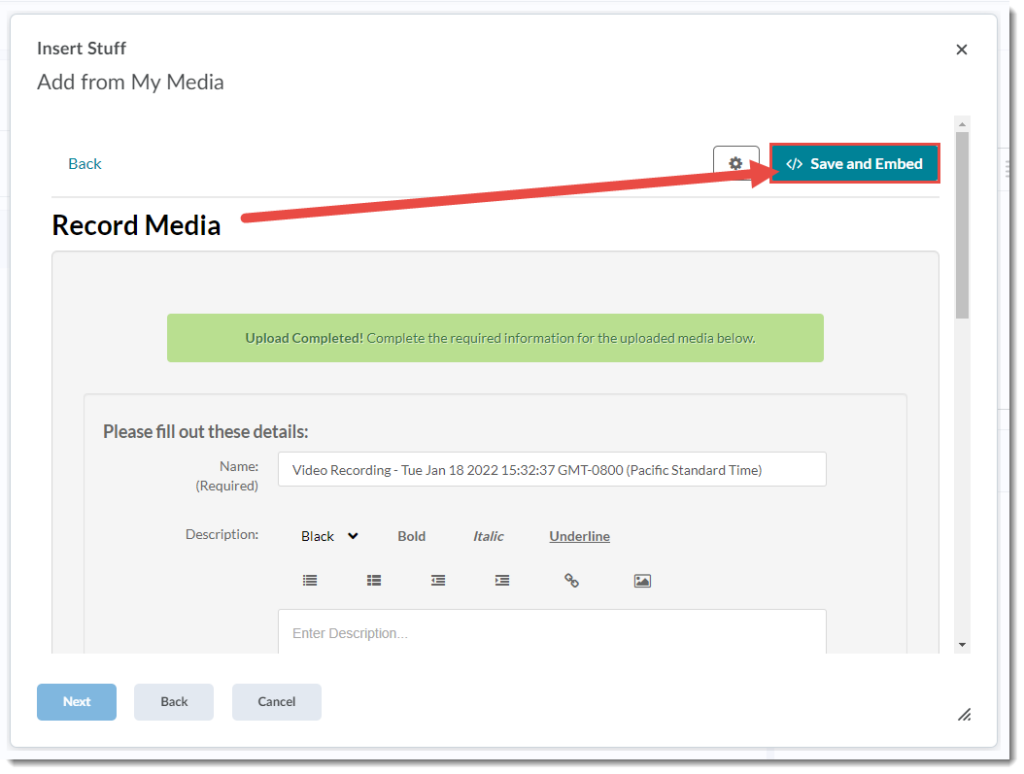
  9. Click Save and Embed.

    Click Save and Embed

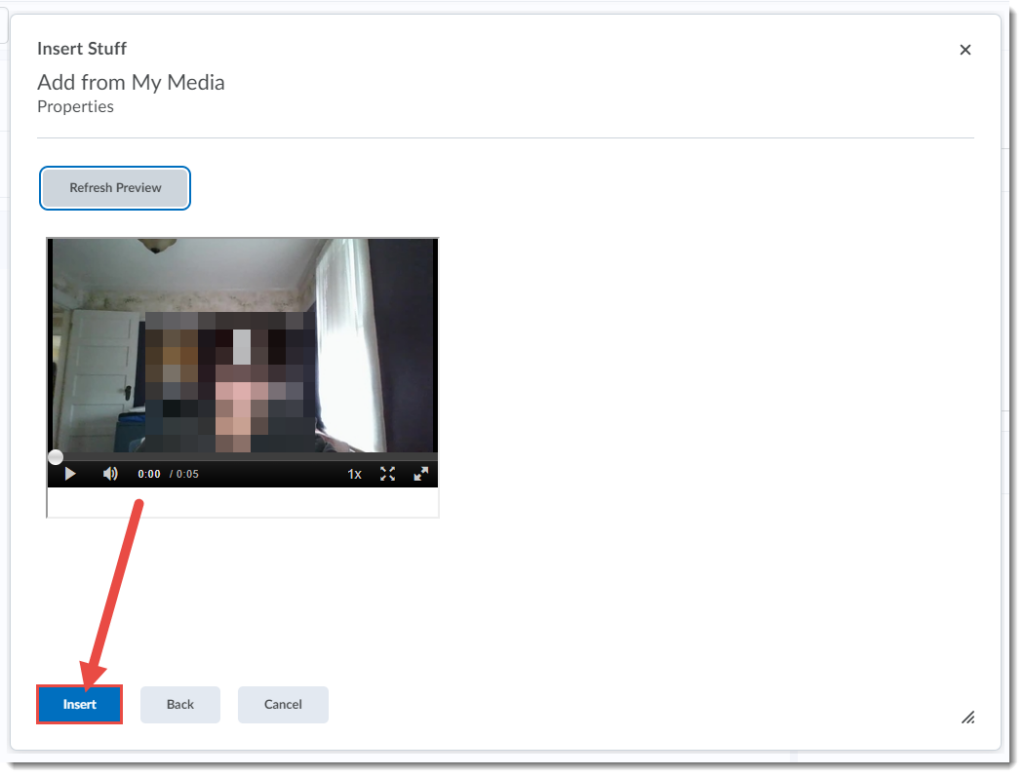
  10. Click Insert.

    Click Insert

  11. Publish or save your feedback as Draft and continue to the next submission. 

Things to Remember 

You can add a Kaltura Express Capture video into the HTML editor wherever it appears in D2L.  For example, you could add a quick video into a News post or a Discussion post.  But we recommend if you are creating videos you want to use for more than one iteration of a course (a video for more than just in the moment feedback), use the regular Kaltura Capture on your device.  See the tutorial Introduction to Kaltura Capture for more information. 

All videos you create using Kaltura Express Capture will be saved in your My Media area no matter where you create them, so you should delete them from the My Media area periodically (e.g., a year after a course has ended) so you don’t end up with hundreds of feedback videos in your My Media space.   

eLearning Where to get Help Reminders for Winter 2022

As the Winter 2022 term begins, I wanted to remind you of some important information related to D2L, both for faculty and students.   

First, how you contact us for support has changed! If you need help with D2L, Collaborate, or Kaltura, you can now submit a ticket on our eLearning Support Portal. Click Faculty or Student, then select your issue, or click “My Issue is Not Listed.” 

In addition, you can find out more about D2L by opening the following documents: 

Final Grades in D2L

Well, it’s hard to believe, but here we are at the end of another term.  I know you are all probably exhausted from the past couple of years of uncertainty, but here’s hoping everyone gets a well-deserved break over the holidays.

In the meantime, if you are wondering how to release your final grades to students in D2L, and to export final grades from D2L into myCamosun, here are some links to tutorials that might help!  Remember, if you have questions or run into any trouble, contact eLearning Support – now through our new Team Dynamix Portal.

Downloading Written Response Answers (D2L Quizzes) for Reviewing Offline

Scenario

This tutorial will cover the steps involved with downloading all answers to a Written Response Question in a quiz so they can be reviewed offline.  Note that in order to view ALL responses to a Written Response Question in one place, you will NOT be able to see which student gave which response.  However, if you export the responses in an Excel document (outlined in this document) you will be able to match student and response.

Steps

  1. Go to the Quizzes tool in your course.
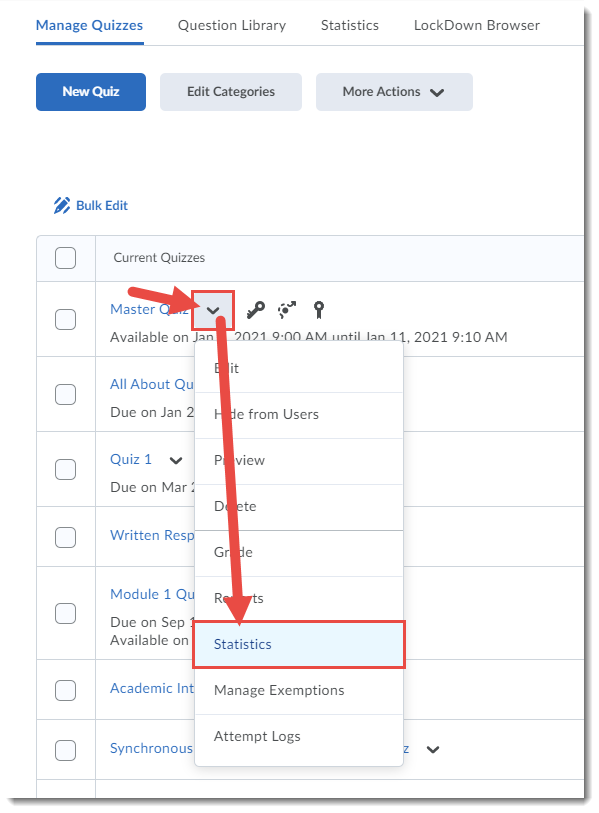
  2. Click the down-arrow next to the title of the completed quiz containing the Written Response Question you wish to download responses for, and select Statistics.

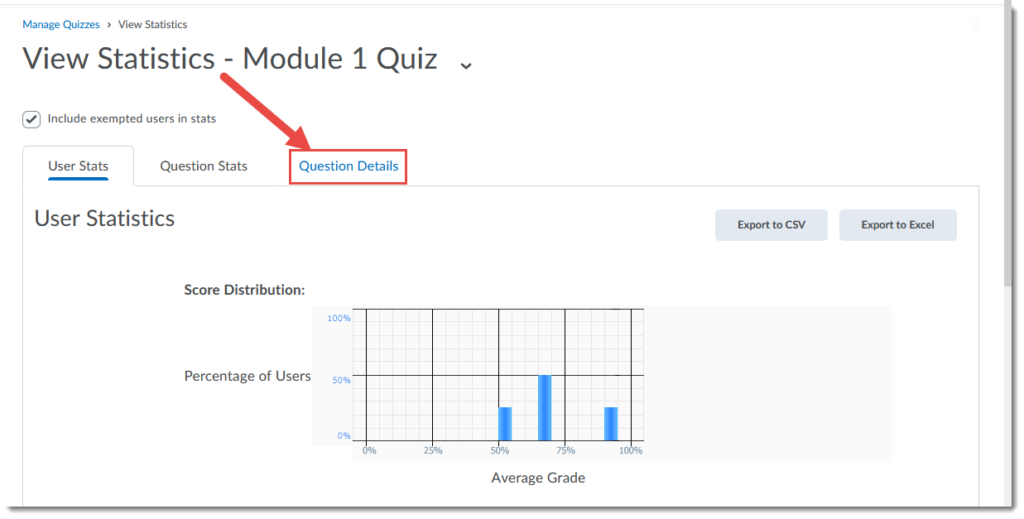
  1. Click the Question Details.

    Click Question Details

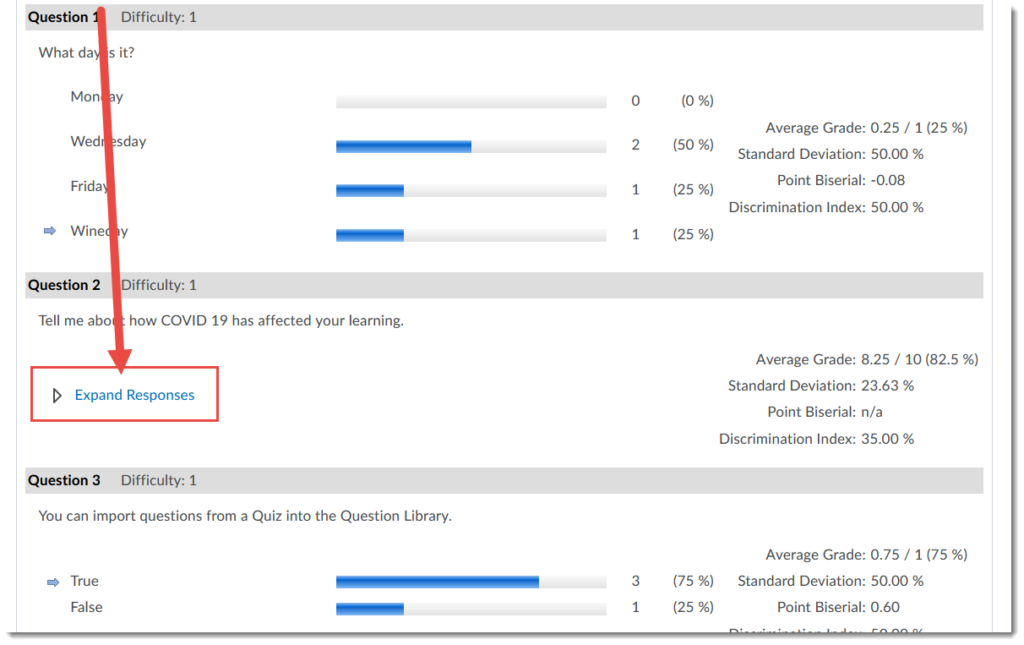
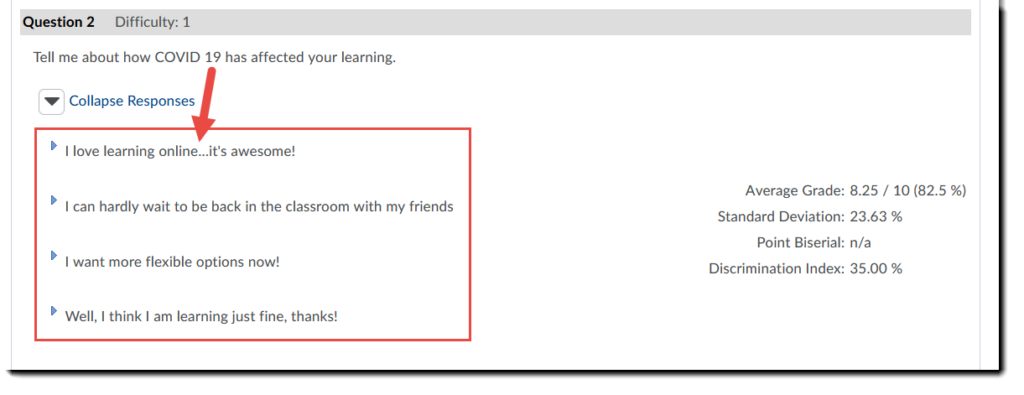
  2. Find the Written Response Question for which you wish to review all the responses, and click Expand Responses.

    Click Expand Responses

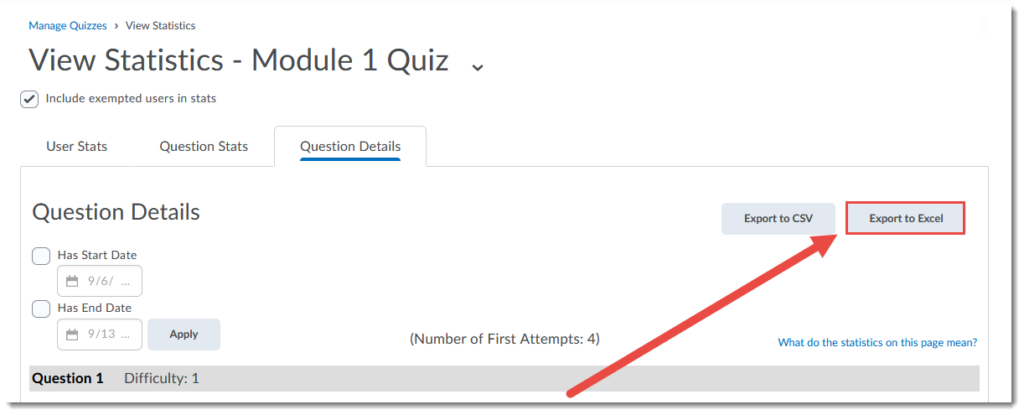
  1. Either copy all the responses and paste them in a WORD file, or scroll to the top and click Export to Excel to download ALL the Quiz responses to your device. Once you have saved the Excel file to your device, you can work with all the questions in the quiz, or delete the ones you don’t need to review, and review the Written Response answers alone.

    Copy and paste responses
    Click Export to Excel

Things to Remember

You can also use the Grade function for a quiz, and grade by Question to assess individual student responses to a Written Response Question.  See the tutorial Grading or Re-grading a Quiz for more information.

Changing your Time Zone in D2L

Teaching or learning using Camosun’s D2L from somewhere other than Victoria, BC, Canada?   You can change your time zone in D2L!  Here’s how.

This tutorial will cover the steps involved when you want to change the default time zone for your course deadlines.  This will automatically adjust due dates, start dates, and end dates in your courses to match with your own location. Your students will need to set this for themselves if they do not live locally, so please point them to this tutorial so they won’t have to worry about missing deadlines.

Steps

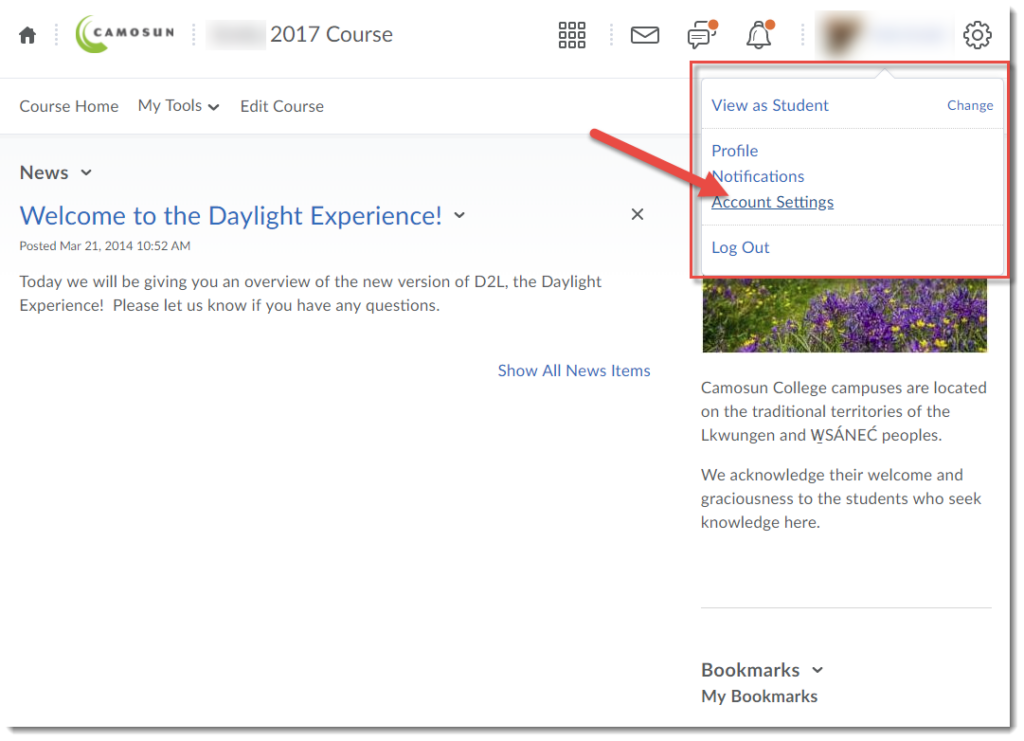
  1. After you log on to D2L, click on your name at the top right, and select Account Settings.

    Click on your name and select Account Settings

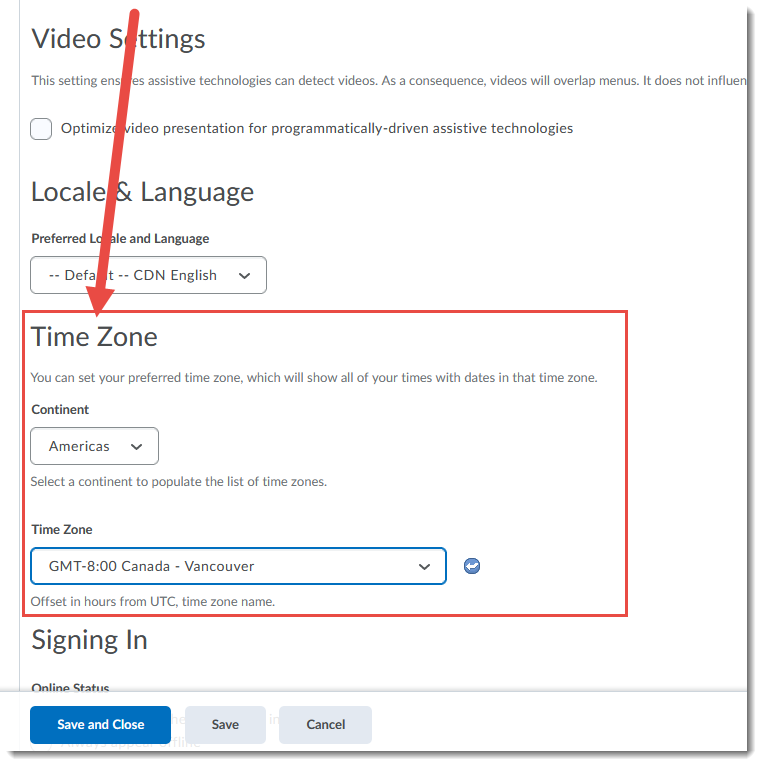
  2. In the Account Settings area, scroll down to the Time Zone.

    Scroll down to Time Zones

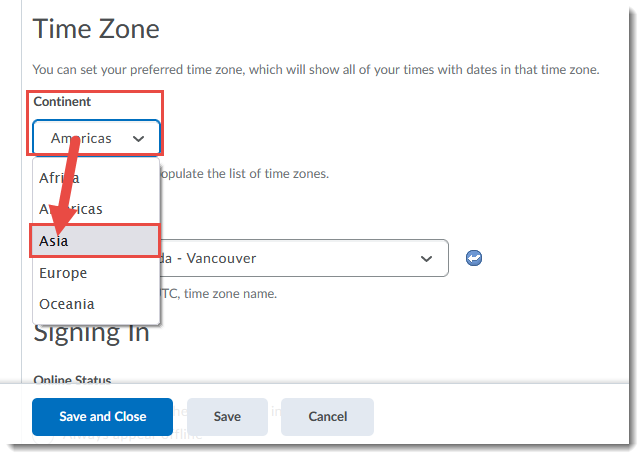
  3. From the Continent drop-down, select your continent.

    Select your continent

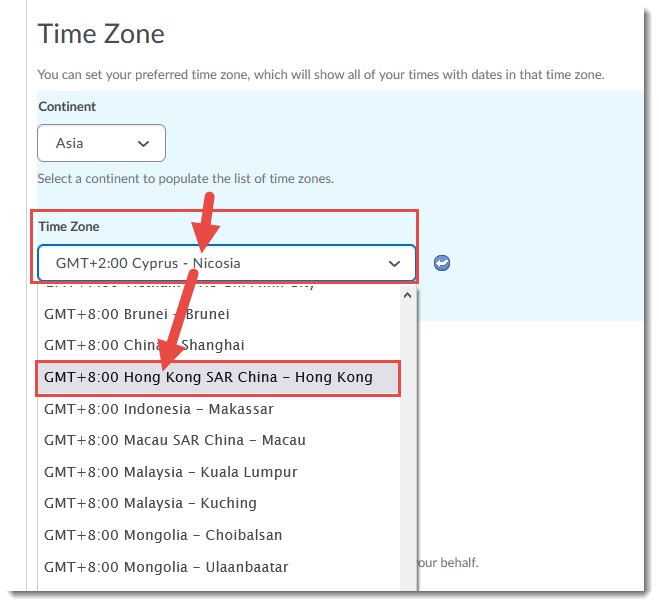
  4. From the Time Zone drop-down, select your specific time zone.

    Select your Time Zone

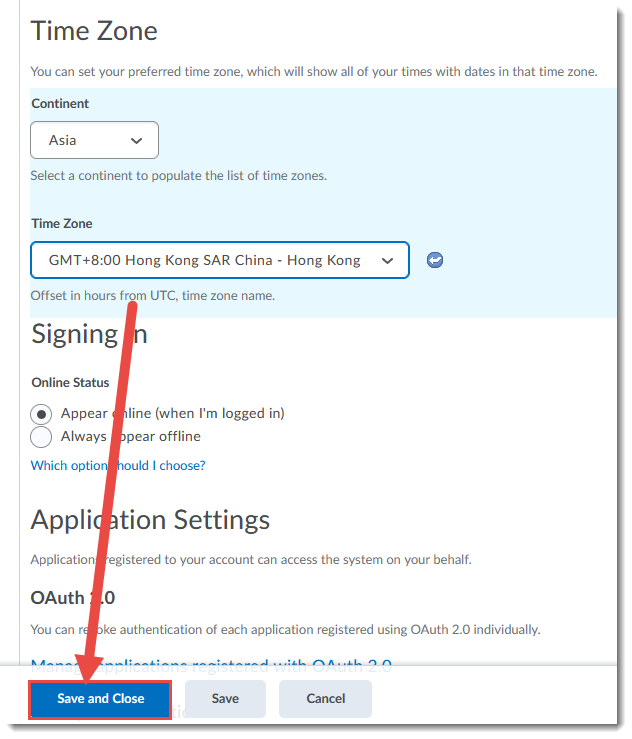
  5. Click Save and Close.

    Click Save and Close

Things to Remember

Each individual in a course, instructor or student, needs to adjust time zones for themselves.

Updated Whiteboard in Collaborate!

Over the summer, the Whiteboard in Collaborate was updated.  Here is our new tutorial on how to use the Whiteboard in Collaborate (also available on our Tutorials site).

This tutorial is designed for faculty who have previous experience using Blackboard Collaborate Ultra.  For further information, please contact elearning@camosun.ca for assistance.

Scenario

This tutorial will cover how to use the Whiteboard in your Collaborate session.

Steps

  1. Click the Collaborate link on your Navbar, and click on a Collaborate session link to enter the session.
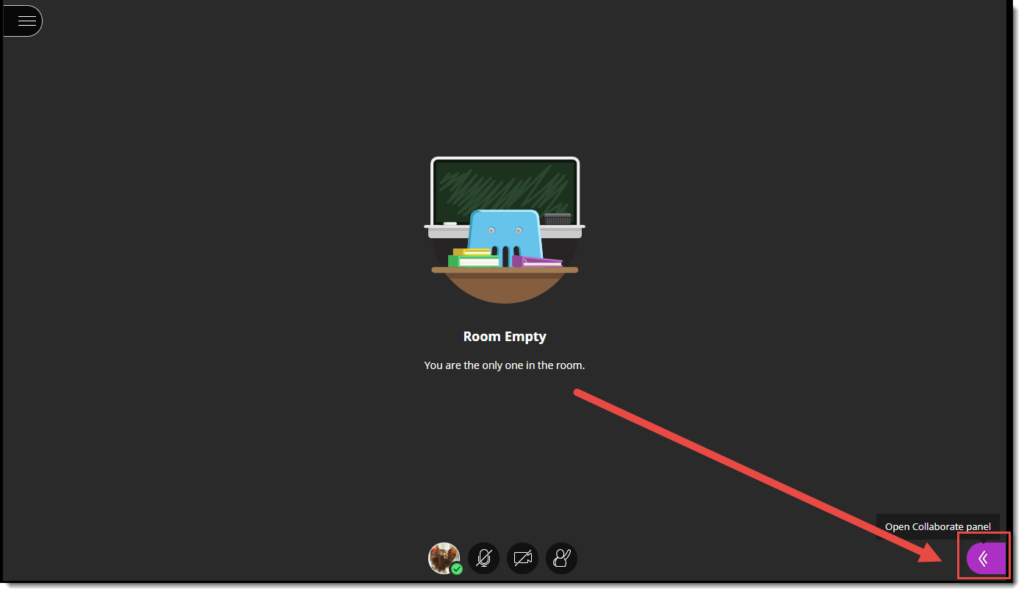
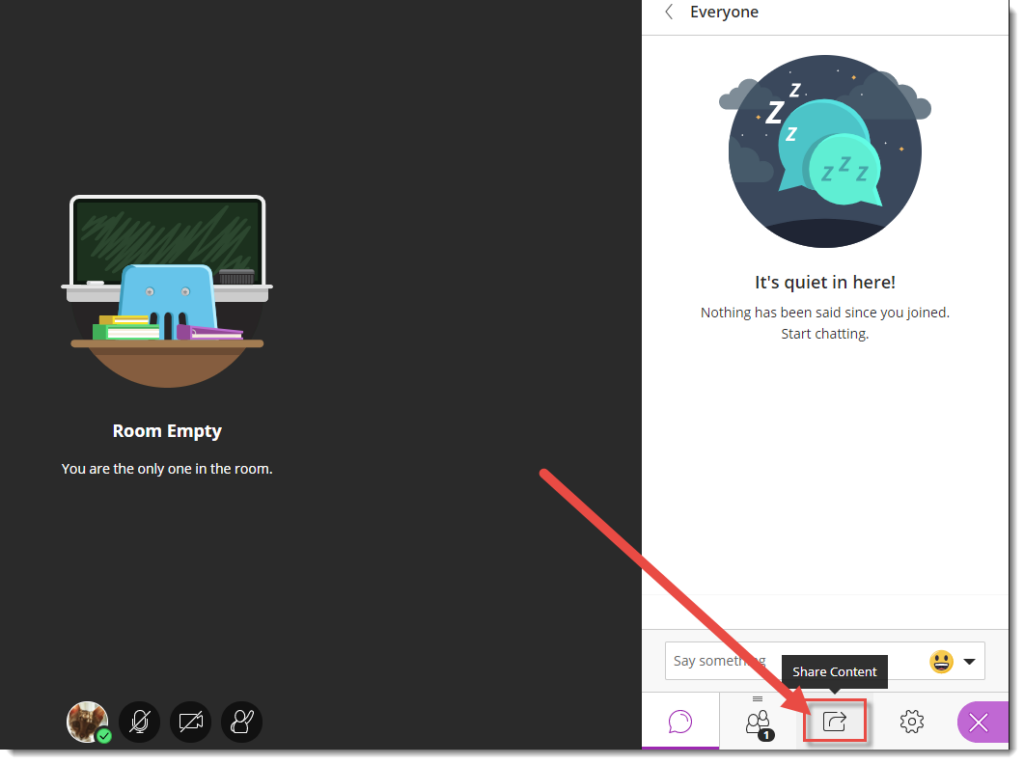
  2. Open the Collaborate panel (the bottom right icon).

    Open the Collaborate panel

  3. Click the Share Content icon.

    Click Share Content

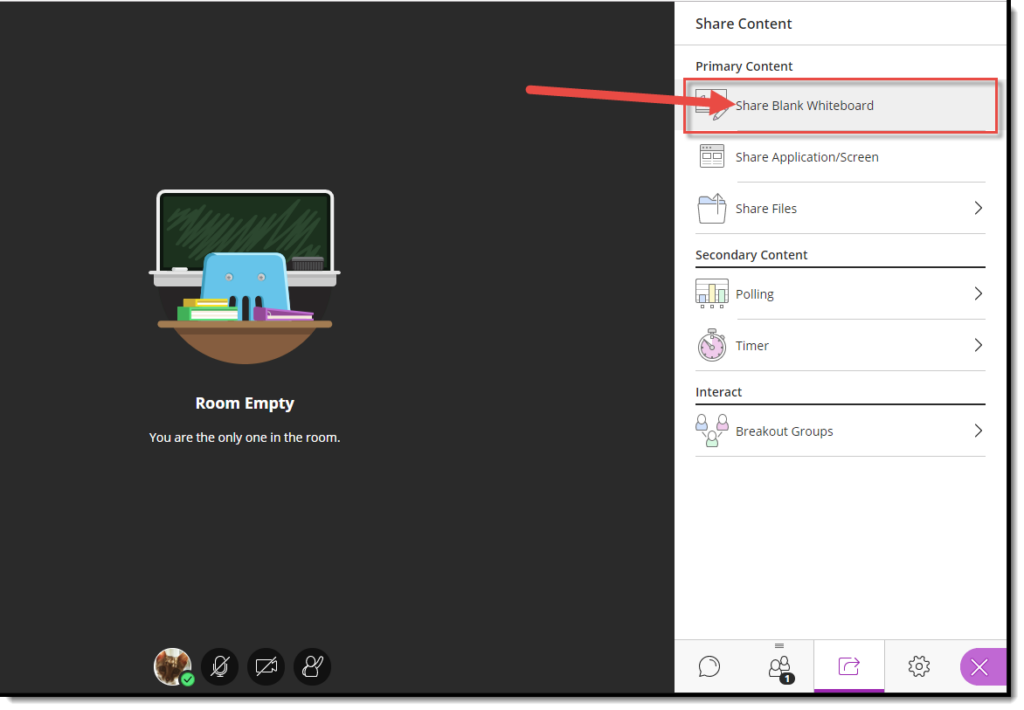
  4. Click Share Blank Whiteboard. The Whiteboard will open in the main session area.

    Click Share Blank Whiteboard

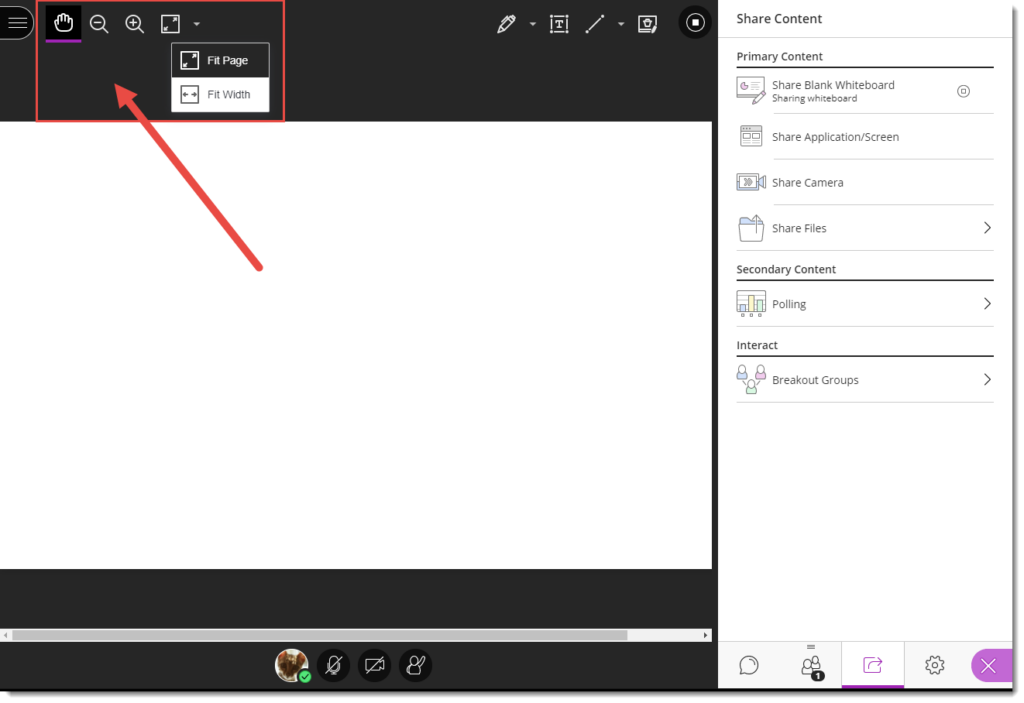
  5. There are two panels above the whiteboard. The one on left contains:Pan Mode (the hand).  Pan Mode allows you to select an object.  Once it’s selected, you can then move it around, add a note to it, delete it (by clicking the Delete key), or duplicate it.

    Zoom Out (a magnifying glass with a minus sign) and Zoom In (a magnifying glasses with a plus sign).

    Fit Page (click the down arrow to select Fit Page or Fit Width).

    Note that the Zoom and Fit functions are user-dependent, meaning that participants will need to Zoom in on a Whiteboard (or PPT) for themselves – you can’t do that for them.

    Top left whiteboard panel

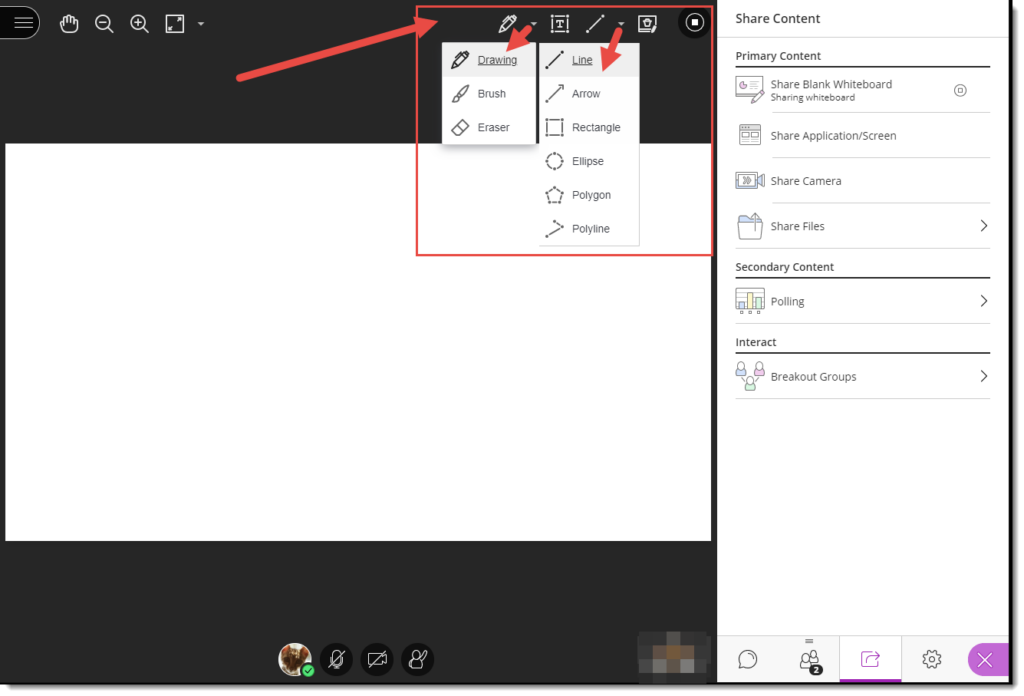
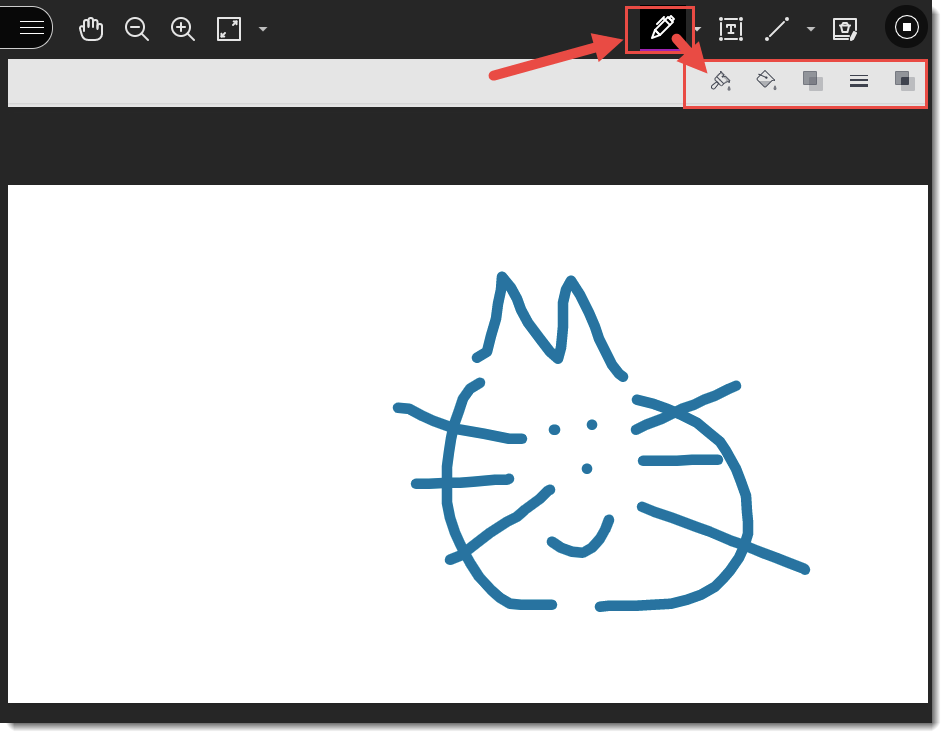
  1. The panel on the right side contains the drawing functions. These are:Drawing (pen icon) allows you to draw, or select Brush or Eraser (acts like a pencil eraser).  We will look at these functions more in Step 7.

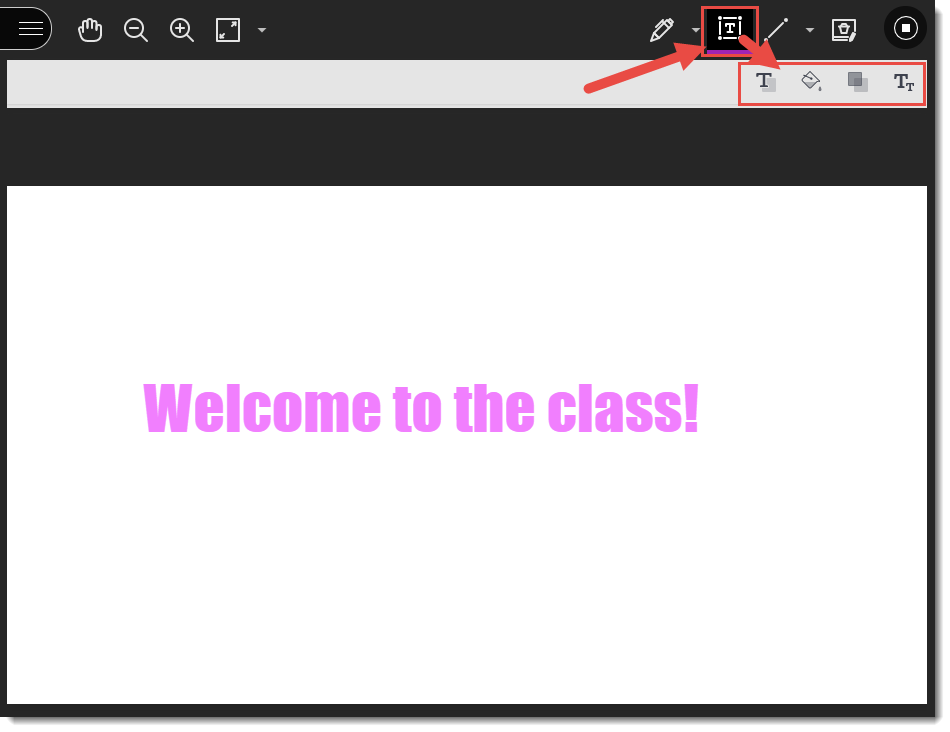
    Text (the T icon) allows you to add text.  We will look more at this function in Step 8.

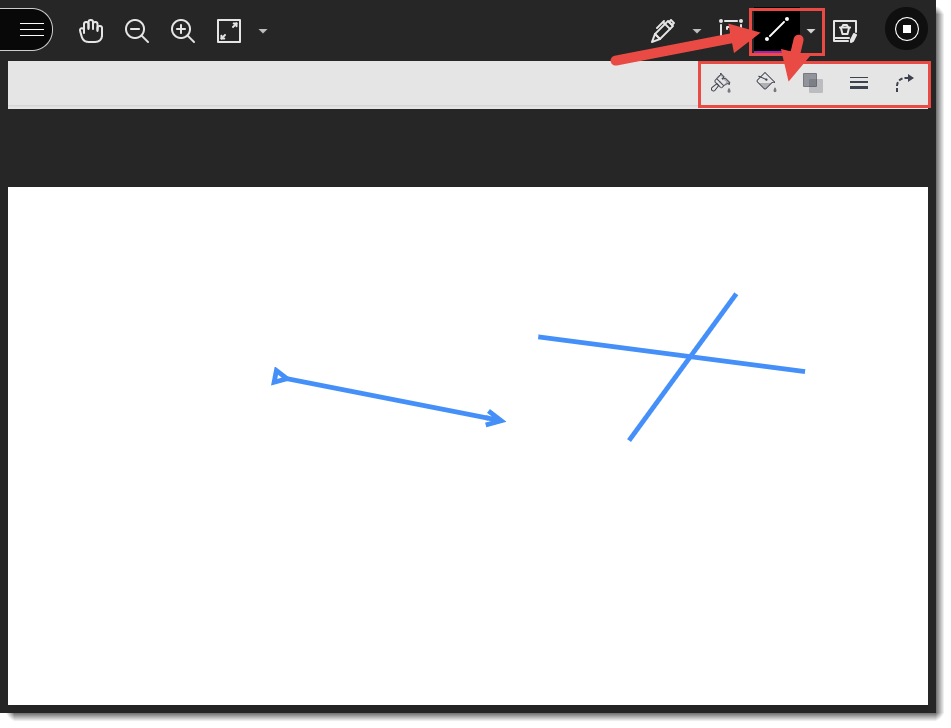
    Line (the diagonal line) allows you to draw Lines, Arrows, Rectangles, Ellipses, Polygons, and Polylines.  We will look more at this function in Step 9.

    Clear Annotations (the trash can) clears everything.  You will be given a warning that this will delete everything on the whiteboard, and it cannot be undone.  Only Moderators and Presenters have this ability.

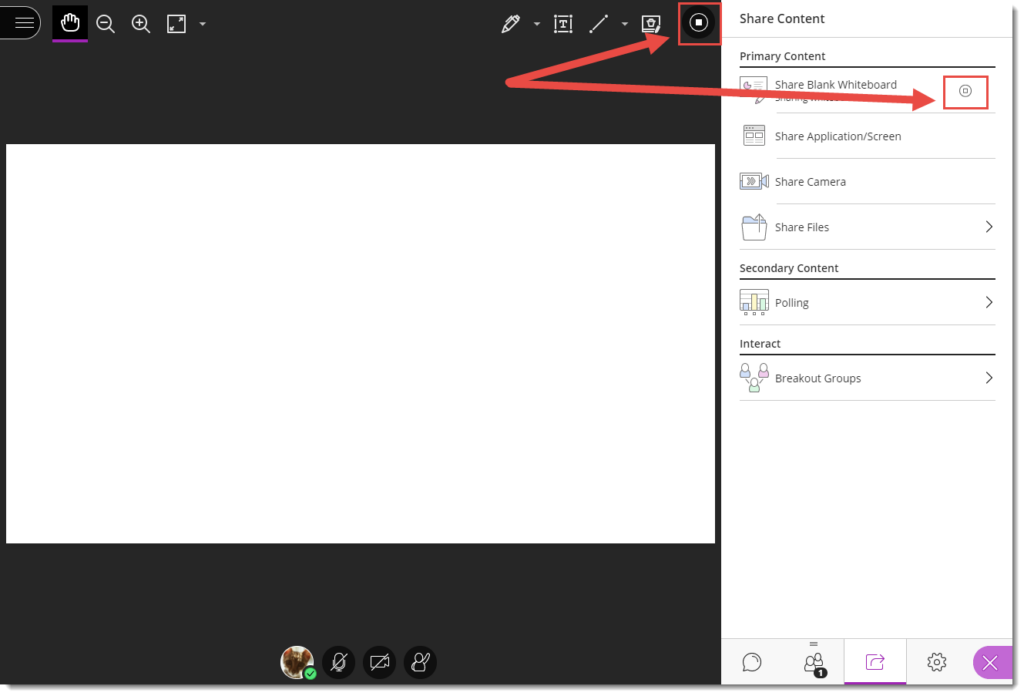
    Stop Sharing (the square) stops the Whiteboard.

    Top right whiteboard panel

  2. Drawing Both the Drawing and Brush functions allow for:Changing the Colour (the paintbrush)

    Adding a Fill Colour around the drawing (the bucket)

    Changing the Opacity (the two overlapping squares), which makes the object lighter or darker

    Changing the Thickness (the set of three lines)

    Adding Blend Mode (the two overlapping squares at the far right) which allows you to manipulate the colour and saturation of an object by drawing over it.

    Drawing functions

  1. Text The Text function allows for:Changing the Colour (the T with the square behind it)

    Adding a Fill Colour around the drawing (the bucket)

    Changing the Opacity (the two overlapping squares), which makes the object lighter or darker

    Changing the Font (the set of three lines) which give you the option to change the font type, the font size, the alignment (left, centre, right), and the placement (top, middle, bottom of the text box)

    Text functions

  1. Line The Line function allows for:Changing the Colour (the paintbrush)

    Adding a Fill Colour around the drawing (the bucket)

    Changing the Opacity (the two overlapping squares), which makes the object lighter or darker

    Changing the Thickness (the set of three lines)

    Changing the Line Style (the dotted curved arrow).  This give many options to change a plain line to various kinds of arrows (you could use this as a pointer for a presentation by moving it around on the whiteboard) pointing in both directions from the line, and various kinds of dotted lines.

    Line functions

  1. Click the Stop icon (top right of the slide in the main window) to stop sharing the Whiteboard. The Whiteboard will be saved in the session, meaning that when you launch it again in the session, the annotations will persist.

    Click Stop

Things to Remember

While the Whiteboard annotations persist during a session (unless you delete them), you can’t save a Whiteboard from a session to your device.  If you want to keep a copy of a Whiteboard, you can either use the screen printing option on your computer, or right-mouse click on the whiteboard, to save an image of the Whiteboard to your computer.

You can’t add an image (picture, graphic, etc.) to the Whiteboard.  To present and work with an image in the main session area, you need to use Share Files.

How to Release an Individual Submission Assignment to a Specific Group of Students in D2L

If you are an instructor in a D2L course site containing multiple instructors where each instructor is responsible for a specific group of students in the course, or if you are working in a D2L site with merged sections where you want to create separate assignments for each group/section’s students, this post is for you!

In this tutorial post, we will cover the steps involved with setting up Release Conditions in an assignment when you want an Individual Assignment Type assignment folder available only for a specific group of students (you will need to create Groups in your D2L course first to use this feature – see the various Groups tutorials for more information.)  For more general information about Conditional Release see the Conditional Release – Setting up Release Conditions tutorial under Course Admin.

Note that this tutorial will show how this process works in the new Assignment Creation Experience interface. If you are using the old interface, the steps will be similar, but you will find all of the Release Conditions functions under the Restrictions tab. For information on how to turn on the new Assignment Creation Experience, see the tutorial Creating an Assignment in D2L in the New Assignment Creation Experience.

For further information, please contact elearning@camosun.ca for assistance.

Steps

  1. Go to the Assignments tool in your course.
  2. Open an existing assignment folder, or click on the New Assignment button to create a new assignment folder.
  3. After adding an assignment Name, and any other settings in the main assignment creation area, click Availability Dates & Conditions to open that part of the right side panel.
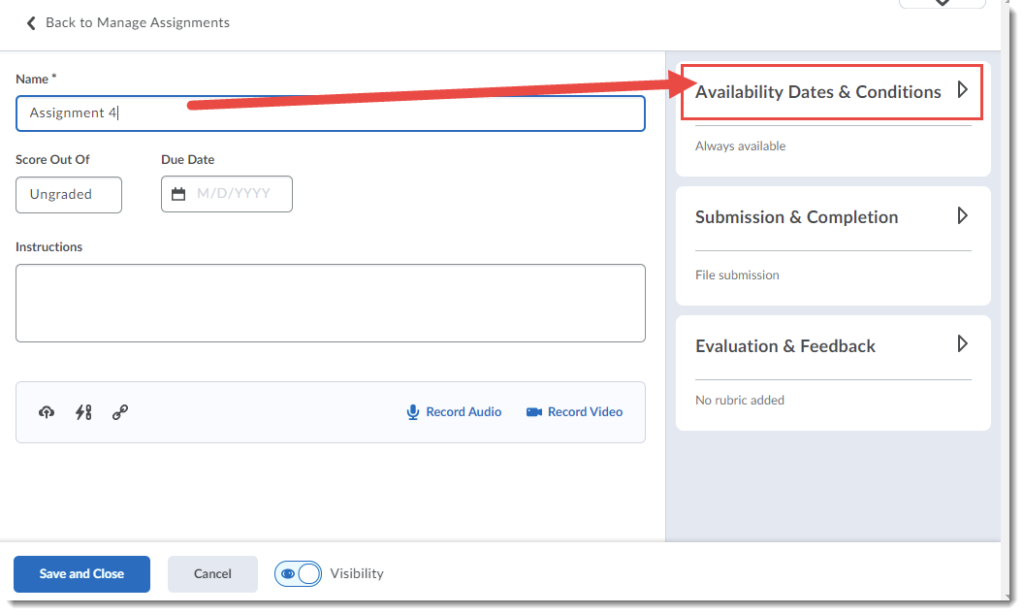
    Click Availability Dates & Conditions

  4. Click Add Release Condition. Select Create New. NOTE: Once you have created a release condition, you can click Add Existing to use it again.
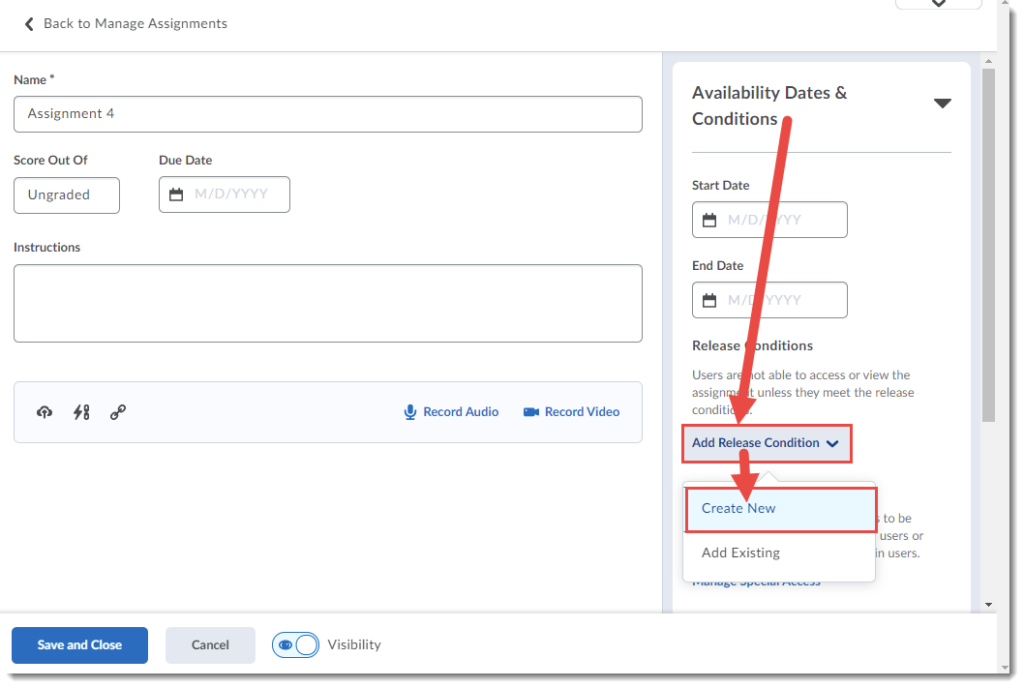
    Click Add Release Condition and select Create New

  5. From the Create a Release Condition pop-up, click the Select Condition Type drop-down, and for this tutorial, we will choose Group Enrolment. (For information on all the various Release Conditions, see the tutorial What Release Conditions are Available in D2L under Course Admin for more information.)
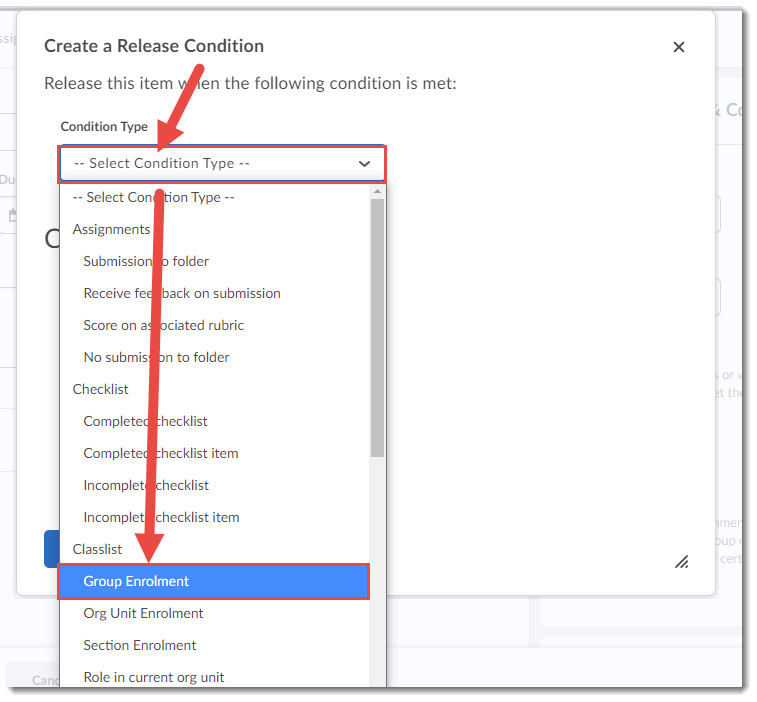
    Click Select Conditional Release and select Group Enrolment

  6. Click the Condition Details drop-down, here, a Select Group drop-down, and select the Group you wish to attach this assignment folder to. Then click Create.
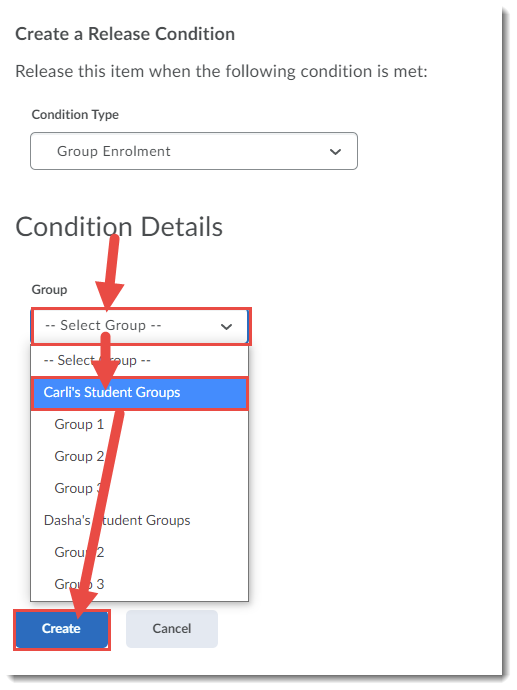
    Select group and click Create

  7. Finish setting up your Assignment, and click Save and Close.
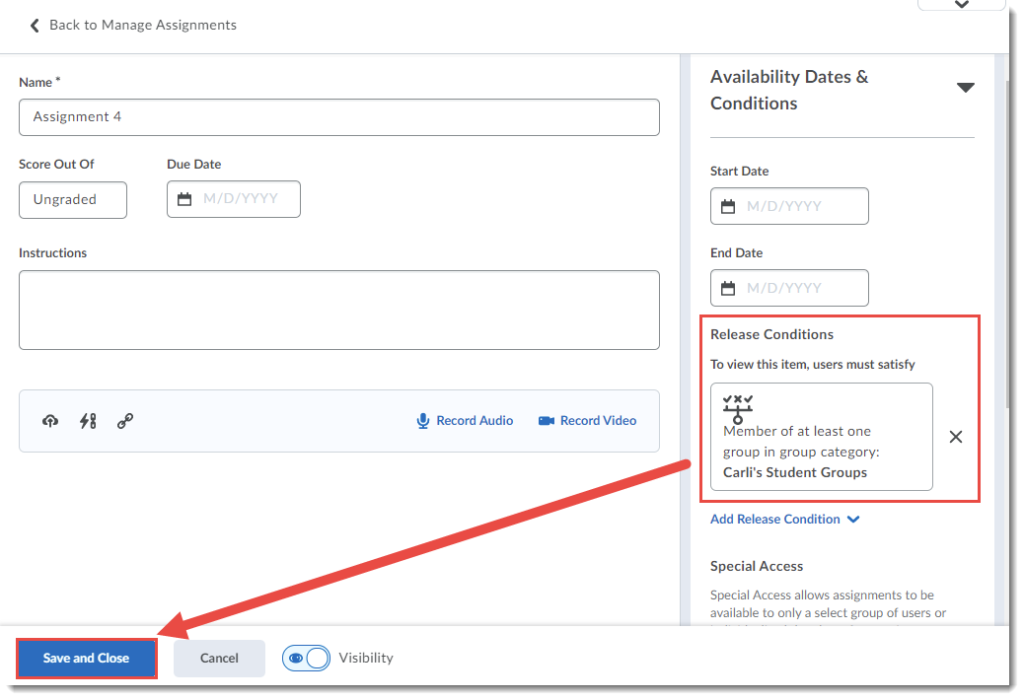
    Click Save and Close

Things to Remember

Note that connecting an Individual Assignment folder to a group is NOT the same as creating a Group Assignment folder. For a Group Assignment folder, every student in a group can see everything submitted into their group folder – it is set up for group submissions. Conditionally releasing an Individual Assignment folder to a Group means each student in that Group only sees their own individual submissions.
Once you create a Group Assignment folder you can NOT change it back to Individual. You have to delete it and start over.